Mantua, New Jersey
Original Site:
September 2004
E-mail: usav8or@yahoo.com
The Radical Radial Firewall.
November 24, 2015 Focus on...
un-focusing once in awhile.
Crap, I just deleted my entire blog entry.
Focus, we're, or should I say, I'm so focused on one particular part of the project that I fail to think "ahead". Focus: It's great, AND needed, when you're into that particular part of the project but when you fail to think ahead every once in awhile the project can get stalled.
There are part and pieces that need to be thought out ahead of time; things to be purchased. And let me tell you, Aircraft Spruce doesn't keep a pile of cut cap strips or triangle gussets sitting around just waiting to be bought. I think they wait until they get a large number of these ordered then do them in a batch. I've waited weeks for some triangle gussets to be shipped to me... stalling my build. Not because I waited for the gussets, but because I now had to think of something else to do and plan that out. Not that there isn't a lot to do on a project this size but I just can't pick up a piece and start hacking away at it.
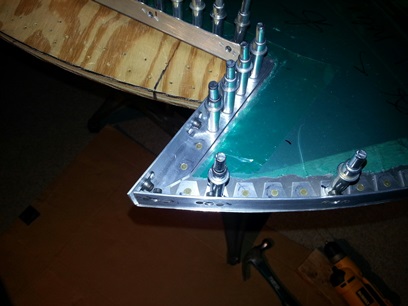
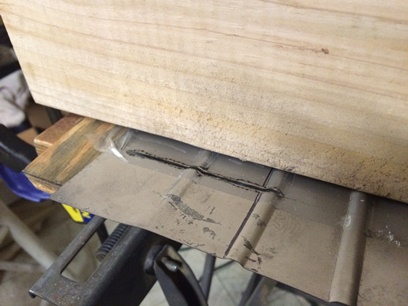
Tonight I riveted on the second 1/2 flange to the firewall blank. Start to finish with it, other than the round head rivets that need to be squeezed on both halves. I was going to reset the squeezer to squeeze the round head rivets but while typing this out I thought ahead and figured I'd squeeze the rivets on the three pieces of flange that I have for the exhaust port aread THEN I'll reset and squeeze all the round head rivets for the firewall. yeah... yeah...
The exhaust port area and a few round head rivets left to do.
November 25, 2015 Push it...
and you'll most likely screw things up !
"The Ox is slow but the Earth is patient."
Great quote from a Tom Selleck movie; "High Road to China".
Worked out of the house today so I had time during lunch to work on the biplane. The last part of the firewall project was to attach the three flange pieces around the exhaust port area. Needed to deburr whatever holes needed deburring then rivet them on and then go back and rivet on the round headed rivets.
Deburred the holes then saw, and remembered, that I needed to file down a few of the overhanging areas of the stainless steel. and... I'm thinking that this is going to be one BIG pain in the arse. I thought; it's hard to drill so why wouldn't that carry over to doing anything on it.
Turns out... that wasn't the case at all. As I'm slowly filing away the overhang (and there was quite a bit of overhang in this area) I kept thinking that all I need to do is take it out into the garage workshop and grind this right down; do it real quick like. And then I kept thinking... whenever I've done something like that, something always, or at least most of the time, happens. Might not be a major boo boo, but a boo boo just the same. So, I kept filing at it. After a long time I'd stop, look at it and say "That looks good enough.", and then continue on filing 'cause we know "good enough isn't good enough."
Between the little bit of deburring I had to do and about 20" of overhang, it took me close to three hours to finish. The deburring took no time at all...
With the stainless steel prepped all I needed to do was rivet on the three pieces. Again, these rivets went on like there was nothing to it. AGAIN, I've got to attribute that to the rivets being BOUGHT at the right length. Cutting them off is for the birds. The only thing I can think of, to get a squared off edge, is to make a little metal jig that you actually push the rivet up into a hole/slot and then file/sand it down to length. None of that shearing off. With the absense of round head rivets out there, I just may need to resort to that if I run out of the shorter, correct length round heads.
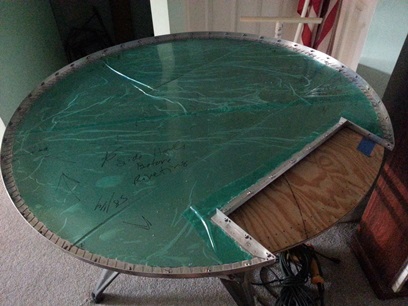
After finishing the riveting... I still have one last thing to do on it. I need to file the overhang around the perimiter of the firewall. And there is quite a bit of it to do: maybe a day or two worth of work.
November 27, 2015 Firewall...
where it's suppose to be.
Busy with Turkey Day so didn't work on the biplane yesterday. Today I was off... got kind of a slow start. Ran the pup. Went and got an oil change. Came home got a bite to eat then started working on the biplane project.
Time to finally finish up the firewall. Yeah... I think I'll actually be able to say I've completed the fireall... I think.
The only thing left to do on it was to file the overhanging stainless steel; the stuff going out past the edges of the perimiter. Did some filing on it two days ago and it went along pretty easily. Today, I'm thinking the same...
Put some music on the radio and had at it. Took my time as I didn't want to mess it up after putting all this time into it. About an hour and a half later I had all that overhanging material filed off and sanded smooth.
Next on the list is to see what I needed to do to hang the engine on the fuselage. I'm knowing, but I wasn't thinking... that the engine mount for the Bamboo Bomber wasn't the traditional engine mount-to-fuselage connection. The engine mount actually has four large circular attach points that are at an angle. The rubber shock mount gets inserted into these circular mounts (I'm thinking) which then slide into some sort of "C" bracket to capture the circle with the rubber shock mount. So..... it's not the simple bolt-onto-the-fuselage that I was thinking it would be, but actually knew it wasn't (if that makes any sense).
I sat back in my chair thinking of what I could do to move this process forward. I want to start working on the sheet metal. I must have dozed off for about a half hour. Wasn't too comfortable in a hard wood chair but I managed to do it. Anyways... I decided I wasn't going to figure this out right now, and actually I think I started down this path before I kind of let it just drop off, which I can't be doing anymore 'cause I'm getting to the point that things need to be done before I can do something else and there isn't alot of something else to be done.
End it with; I need to see if I can find detail drawings of it somewhere. I'll contact the UC-78 guys. and/or... maybe the Smithsonian has the plans archived ??? maybe ? That'd be pretty kickass.
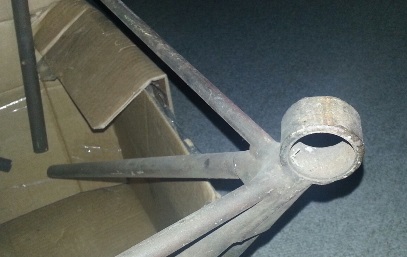
Rubber mount holder (or whatever you call it).
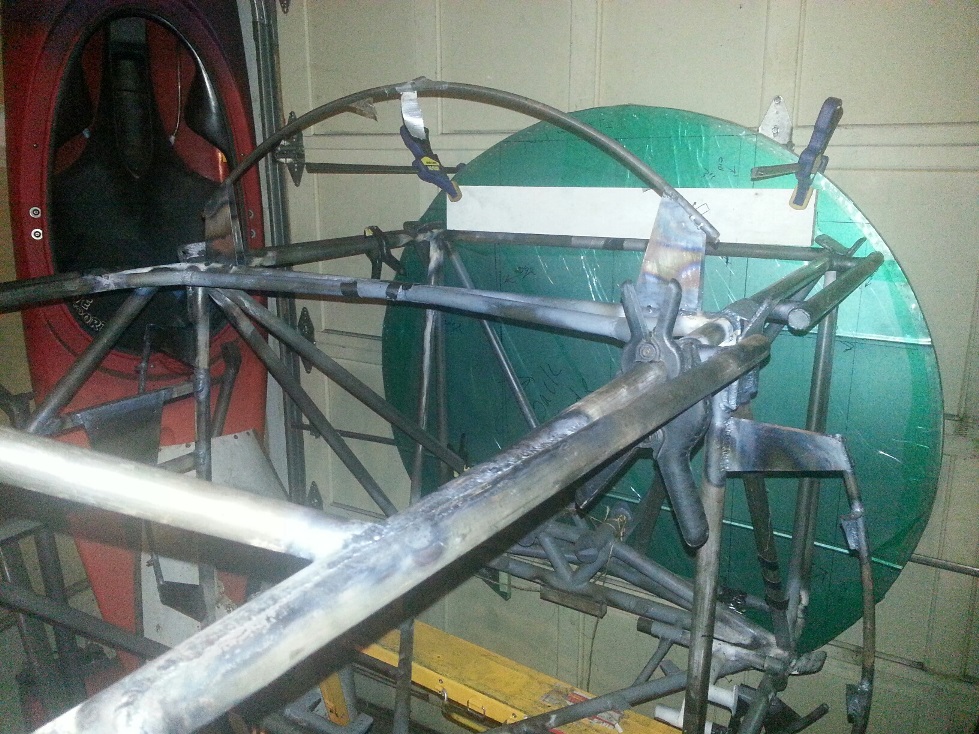
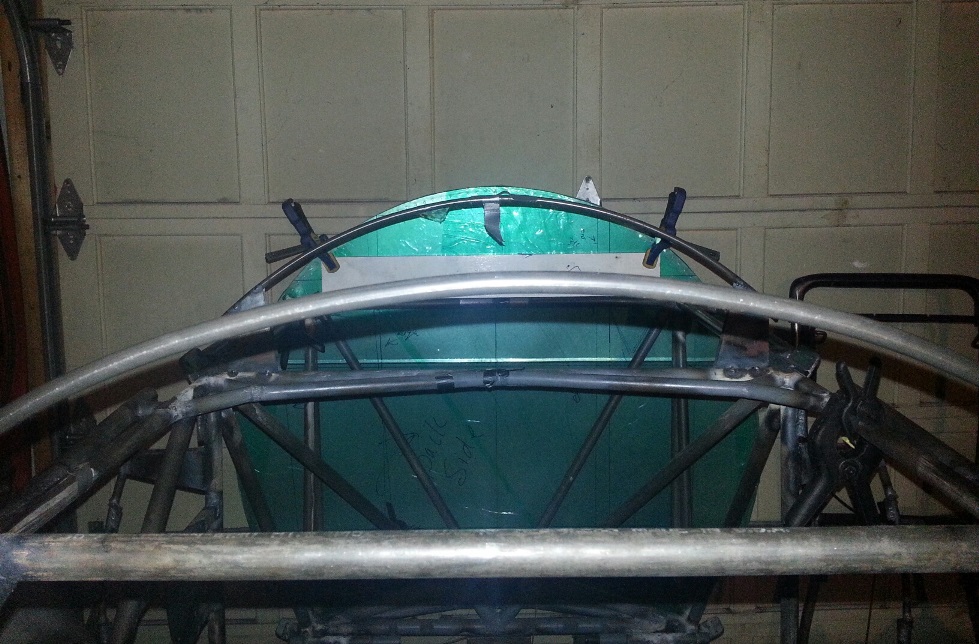
okay... so before I wrap it up for the day I took a few photos of the firewall kinda in place. I clamped a piece of wood in position to hold it at approx. the right height.
Gotta tell ya, it looked pretty good sitting up front there...
"Just hung" firewall. Click on image for larger...
View from the pilot's seat. Click on image for larger...
November 28, 2015 Reaching out...
a few questions.
Back at it a few different times today.
Went to the UC-78/T-50 Bamboo Bomber web site and sent out a few emails asking about the fitting on the forward wing truss (where the engine mates up to the fuselage). Heard back from both of them pretty quickly and... Michael gave me a few leads as to whom to contact for more information (one actually is up at the Reading Air Museum - they're restoring one up there). Terry, who Michael also suggested I contact is out of town right now but gave me instructions on finding the part number and then when he comes back he could look it up on the CD (microfilm). So I have a little work to do but a lot of good information from a few emails.
Actual work on the project came to close to three hours. Getting ready to rivet the frame pieces (aluminum "L" flanges) to the seat backs. Still need to cut the 45's so that the four pieces will actually fit together to form a frame. Cut the 45 in the first piece then clamped that and another one up to the seat back frame and discovered two things; 1. all that trimming to get the right angle the first time was for naught... the 45 degree angles will be cutting those all away 2. I cut the wrong leg on the first "L" flange, DAMN ! Not a problem for either one: Sure a little bit of wasted time cutting those angles but that happens and... I hadn't spent much time on that one I screwed up so it was an easy fix to just cut another one.
Using quite a few pinch clamps... and after clearing a nice work area on my work bench, I was able to get a close fitting frame for the seat back. I'm a little concerned about the corners and them not clamping tight with the sheet metal of the seat back. So... I'm thinking I'll use a little T-88 in the corners. Clamp them over night. and... I'll be good to go, or at least that's what I'm thinking right now.
Seat back frame ready for drilling and riveting.
Broke for awhile then came back and prepped the aluminum flanges for the rivets; measured, marked and glued the hole spacing patterns on the flanges then using a centering drill bit drilled the starting hole for each of the holes. Done for the night.
thinking: With all the crap happening out in the world today it's great to find that a common ground/interest brings people together. Complete strangers answering calls for help. Maybe if more of us asked for and answered questions we wouldn't be in all of this conflict we are now in; within and out.
July 19, 2016 Looking to make...
a few holes.
I watch the Phils lose in a 10 inning game to the Marlins as I work on the firewall... a close one 2 - 1; at least they were fighten it out.
Now it's back to working on the firewall, or at least the installation of the firewall, so that I can start on the sheet metal work.
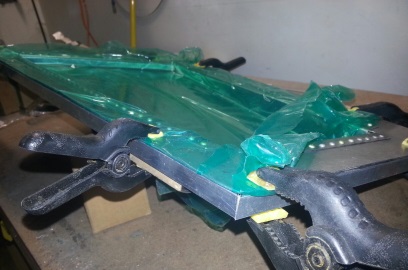
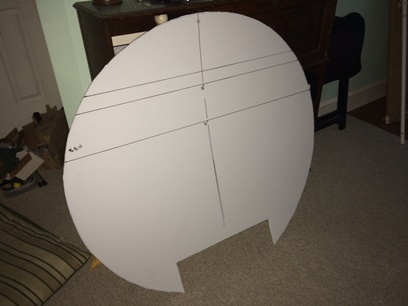
The firewall has been sittin gin my dining room since I made it last November. Needed to make a pattern for it so that I can figure out the placement of the holes for the motor mount fittings to poke through. I needed something stiffer than the display board that you can buy nowadays. Remembered that I had some corrugated plastic that I was going to use to sandwhich between aluminum for the flooring (decided against it due to fumes if the plane every decides to catch fire). That stuff has been sitting in my living room forever.
Grabbed it from its hiding location... perfect !; a 48inch x 48inch piece. Just right for a 44inch diameter firewall. Laid the firewall on the corrugated plastic. Traced it. Cut it out... Went out to the garage workshop... took a few measurements. Came back and watched the ending of the game.
Still need to transfer those measurements to the pattern and try it out. I also need to figure out where to put a few tabs for holding the firewall in place because the openings around the motor mount fittings don't have a means of securing the firewall to them. Gots to attach it somewhere... somehow.
Existing firewall.
Traced pattern...
Now cut out.
July 20, 2016 Circles, squares...
or triangles.
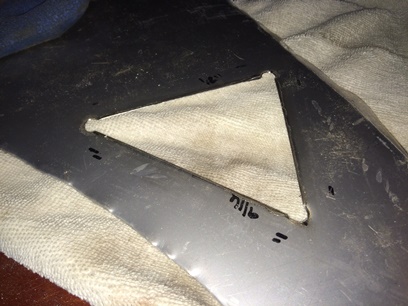
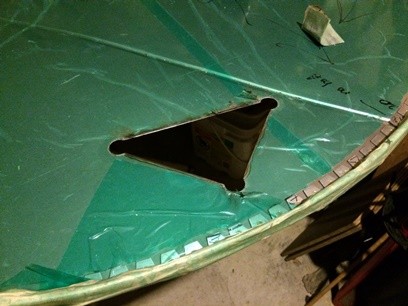
I went with the triangles; less of an opening and probably a lot easier to cut than the circles.
Tonight I spent time on the overall shape while trying to figure out how I was going to make a covering over the motor mount fittings to "enclose" it; ya know... keep the heat from getting past the sides of the opening.
I'll need to take a closer look at the UC-78's firewall design to see how they did it. The only thing I can recall right now is that it was a circle. Hmmmm ?
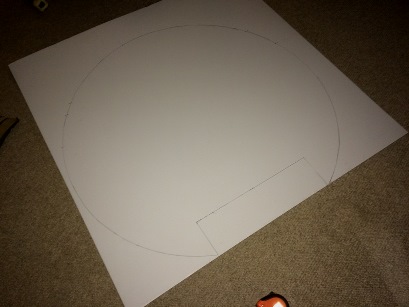
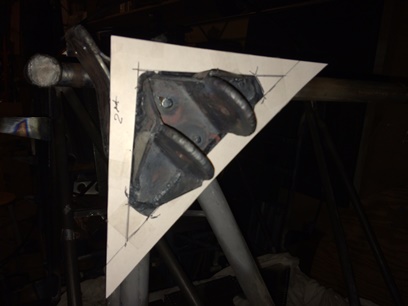
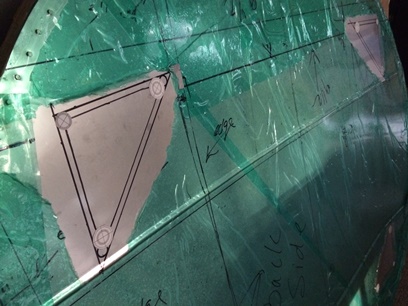
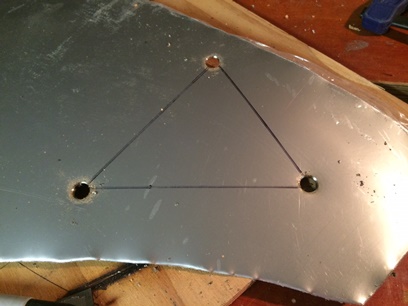
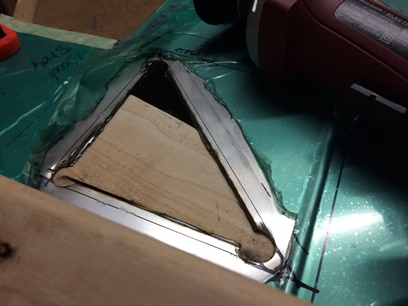
Here are a few iterations of the pattern. Actually started out with a more triangular inside... then rounded the edges like the first photo below. The second photo shows a similar inside opening, although the three corners are more rounded to prevent stress cracks. The outside of the pattern is a lot larger. Reason being... I can cut a large hole in the firewall pattern and position in place without having to get the exact placement of the openings... I'll then overlay the four patterns (as shown here) and tape into position. This should be the exact placement of the cutouts that I need.
First pattern...
Second one... and the one I'm going with.
July 21, 2016 Taking my time making patterns...
'cause it's still important.
I tend to want to rush through things like making patterns and aligning pieces and need to step back and say... it's just as important, if not more important...
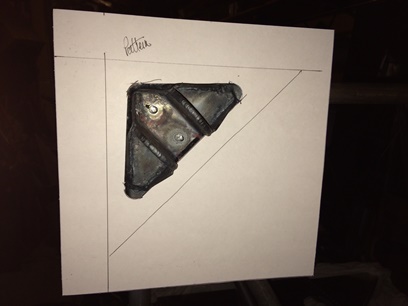
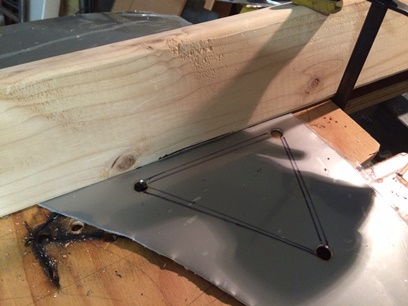
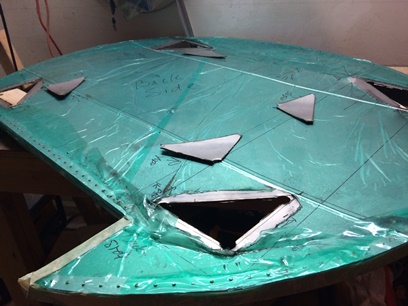
Another step forward in making the holes in the firewall. Took the measurements again off the fuselage. Transferred these to the corrugated plastic and cut out the over-sized openings. Aligned, then checked the aligned to make sure that the corrugated firewall pattern was sitting on the fuselage correctly, then put the four motor mount cutouts over the corrugated firewall blank and taped them into position.
I liked what I did... I'm real happy with it. Now all I need to do is transfer this onto the firewall a make the cuts.
Note: Triangles on first image; smaller ones are the size of the fittings, the larger ones are the size openings I cut. This allow me to have some wiggle room for aligning. I will actually be cutting the openings larger than the motor mount fittings and then cap them with a stainless steel covering (still to be worked out).
Artistic shot...
July 22, 25 and 26, 2016 Taking time...
testing...
I've been busy for a few days... so the biplane project had been ignored... sorry buddy. Messed around with the firewall on Friday... drew out the triangular patterns for cutting out but wasn't happy with the corners; I needed a circular pattern with a center to make sure that all round corners are in the right location and that all four are as close to each other (look-wise) as possible. That ain't gonna happen unless I print these out and that ain't gonna happen until I draw up the CAD and print them out at work.
Drew them up on the CAD and that was that for Friday night... ain't really logging that down; guess I could put 1/2 hour down for the work I've done.
Fast forward to Monday (busy over the weekend with going to the races and working on my Mother's porch)... patterns are printed out and I glue them into place (that's it for Monday). Tuesday I begin practicing on drilling dots and grinding lines to connect the dots. (oh yeah... bought a cut-off grinder with a few 1/16inch cut-off wheels for this firewall project on Sunday).
Using a Unibit... I was able to drill holes with relative ease. Grinding through the stainless wasn't too much of a problem with the cut-off grinder. But, I think I'm going to try clamping a 2x4 in place as a guide to see if I can a better straight line between the dots. I'll try that out on Wednesday. If all goes well I'll be drilling the dots and connecting the lines.
I think the key to my success is having a wood backing board behind the stainless steel...
Test drilling...
Test cut...
July 27, 2016 I don't want to do it...
freehand.
More test cutting. I don't want to have to make this firewall again... and I want to do a nice job of cutting out these openings. So... more testing.
Freehand cutting is "okay". It'll get me by. I'll need to do a lot of clean up work to make them look nice. But, I don't want to need to do that so, I measured out the space between the cover (protecting me from the spinning disc) and the disc. Clamped a 2x4 that far from the line and it made a beautiful, straight line. NICE ! So... I figured I'd test it a few more times and... When I tried cutting a line that was further in on the metal (aka to handle of the cut-off wheel was over the metal) I wasn't able to get a vertical cut with the disc; the handle held the tool at about a 10degree angle. DAMN !
Freehand here I come ??? Not if I can help it. I was only 45minutes in to my "work session" and called it quits until I figure this out... if I can figure it out. About an hour later I think I have the solution. Cut the bottom of the 2x4 at the angle I need and clamp that to the firewall and use as a guide. Brilliant ! or at least I think it is...
Tomorrow I'll angle that 2x4 and give it another test run.
Test without the metal in the way of the tool handle.
Nice, straight cut.
July 28, 2016 I don't want to do it freehand...
so I made a jig.
Based on yesterday's findings I need to do a little bit more testing before the actual cuts...
Found out yesterday that the handle of the cut-off tool was hitting the work piece when used at a 90degree angle. So... angle the tool and I'll alleviate the problem. Tooks a nice straight piece of 2x4, figured out the cut needed to be at a 20degree angle and went about cutting it on my small table saw. I'm all about making a simple jig.
Thought I would have a problem with clamping it to the work piece with the angle on it but... no problemo. Tried a test cut on a scrap piece to find this out. Found that the cut is 1/2inch from the base of the straight-edge.
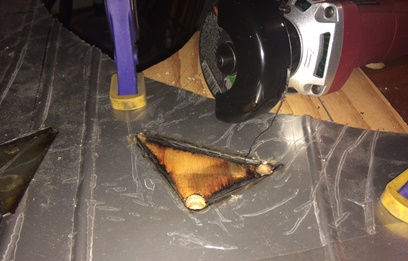
Used a piece of plywood as a backing board. Used the Unibit to drill the three test holes (drilling tends to push/stretch some of the metal downward... not a problem, just clean it up with a file). Drew my cut lines just inside of the circle's outer edge... made a mark 1/2inch from that line and clamped my straight-edge to it. Put some pressure on the shield of the cut-off toot to keep it flat against the angled straight-edge and started to make a few easy cuts along the line. I continued doing this until the cut was through the stainless. NOTE: Watch cutting at the ends of each side so that you don't cut the far-side of the circle. You'll understand what I'm saying if you use this method and try a test piece or two.
Finished all three sides in not time. Cutting will leave quite a bit of excess thin, material on the cut line. Just a matter of filing this off. I used a straight file and filed going along the straight line of the cut... finished with a sanding. The distortion of the circles was taken care by tapping them flat (by sandwiching the piece with wood) and tapping back until they are flat; not much effort is needed. I then cleaned up the rough edges with a small radiused file (from a package of seven or eight small diamond-bit files from Harbor Freight).
Test to figure out distance of cut from base of straight-edge.
Unibit holes drileed in test piece.
Lines marked and first cut ready to be made.
Making last cut.
Test piece... just a little bit more cleaning up.
July 29, 2016 Stepping...
gingerly.
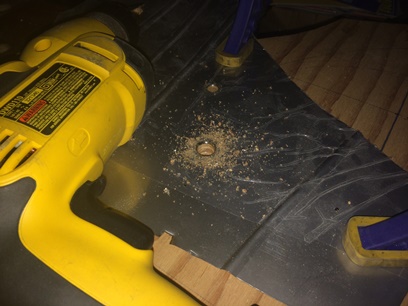
I eventually had to do it... just like everything else... so I drilled the first hole in the firewall. Not as easy as drilling the test piece...
Just a matter of putting a backer block behind the area I was drilling and supporting the rest of the firewall with the same thickness of block... banging a starting dent into the piece to keep the bit from wandering... and then drill.
I had meant to pick up a new unibit but forgot about it when buying the rest of the stuff from Harbor Freight. Used what I had... it worked. I think it dulled the one out so had to switch over to the second one I had. Not a problem... 'cause I had the second bit.
Now just a matter of grinding the lines to connect the dots and then a little bit of cleaning up and it's ready to be hung on the fuselage. Ain't it great.
July 31, 2016 Cutting...
gingerly.
Another test of the cutting distance before I started my first cut... I used 7/16inch as the distance between the bottom of the angled straight-edge and the outside of the cut.
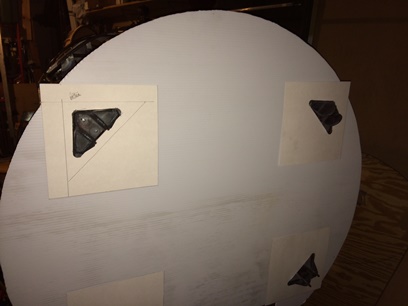
The 44inch diameter firewall was a little unwieldly to work with but I managed. I slowly rotated the firewall as the time passed making sure that it was both secured to the table and had sufficient backing behind the cut. I made sure to take as much care cutting that last line as I did the first line. All that prior work put into the firewall and I wasn't about to be careless (not that I ever am) with my technique.
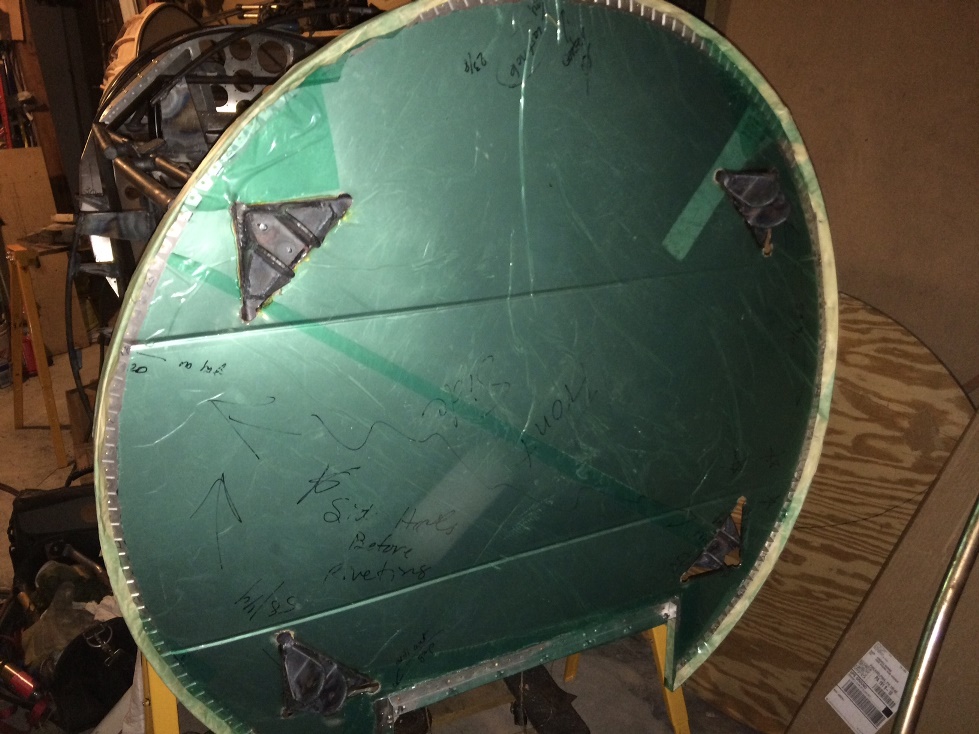
I'm real happy with the way it turned out. Still need to clean up the openings and smooth out the intersections between the straight cuts and the drilled holes. Close to putting it on the fuselage...
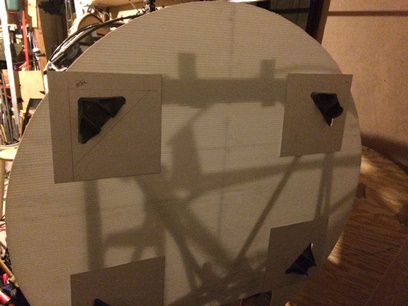
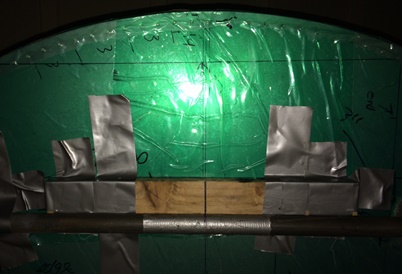
All four openings in firewall. Yeah man !
August 1, 2016 The practice of Excellence...
creates near perfection.
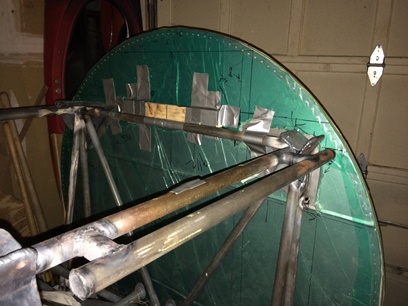
I could have tried fitting the firewall on the fuselage last night... but I wanted at least one day of me thinking that it was a perfect fit. Got home from work tonight and before doing anything else I went down into the basement workshop, grabbed the firewall and then headed out to the garage...
This is what happened when I tried the firewall on for size...
Near perfection ! The openings still need cleaning up, but I couldn't have asked for a more perfect fit.
It wasn't until after nine tonight when I was able to get back to working on the firewall. Spent close to an hour cleaning up just the one opening... three more to go.
August 2, 2016 It's on...
It's in place...
Need to clean up the openings on the firewall... Didn't spend three hours on the three remaining ones but I did put in some time tonight.
Another test fit after the cleaning and it looks like it was made for it. Need to make the tabs for keeping it in place. Most builders, with inline engines bolt their engine mount onto the fuselage by running the bolts from the fuselage, through the firewall, into the engine mount. My engine mount isn't set up that way.
Nice fit !
August 3, 2016 Pieces of...
six.
Another check of the firewall today... yep, still as I had left it; centered on the fuselage. Made a check on either side to make sure that the "overhang" was the same. Yep, pretty much the same.
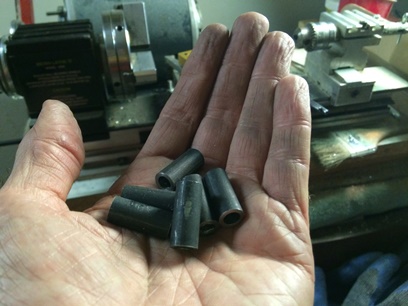
Need to figure out the mounting brackets for the firewall, as mentioned in yesterday's post. Found an 8' length of .375 x .o65 tubing (you'd think an 8' piece of tubing would have been easy to find, it wasn't). Reamed a 1/4inch hole in an 8inch piece... Rough cut six 1inch pieces then locked all six in the micro-lathe and took them down to 7/8inch.
Thought of using a bracket similar to what I've used for the flooring, with the bushing welded to the under-side, but after looking though one of Tony B's books decided I'll make them look very similar to what a motor mount fitting would look like; a bushing with a circular washer welded to the one end.