Mantua, New Jersey
Original Site:
September 2004
E-mail: usav8or@yahoo.com
The Radical Radial Turtledeck.
March 26, 2013 Taking a closer look...
behind the pilot's seat
I've been thinking about the turtledeck for a while now; wondering how I was going to do it and with what material.
I think, er, I've decided upon a plan: Plywood turtledeck with false wood stringers.
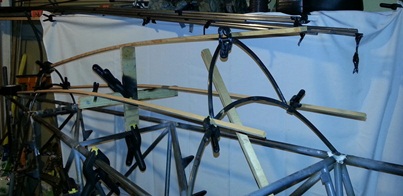
Since the turtle deck is part of the shaping of the fuselage... tonight, while waiting on the items I ordered last night, I decided to start looking at the turtledeck with a closer eye. I have the temporary turtledeck formers in place and from the looks of it, they need to be modified slightly. (two of the formers are hanging a little over or way over the sides of the fuselage - one was designed to do that... but I have since changed my plan with it)
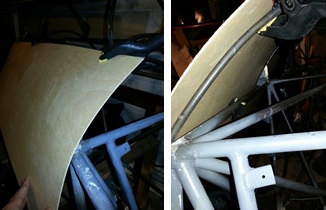
To make sure my plan was going to work, I tested a piece of 1/16 inch ply on the formers that I had in place. It formed real nice to the shape... I'll be making it in two pieces; the lower section which will also be the storage area and the upper/smaller section which is an extention of the pilot's headrest.
I looked over the plans again to make sure I was putting things where they need to be. and... After looking at the plans I've decided that I need to get things together for the tail area before moving much more forward with this so that I can make a smooth transition into the tail. One of the guys on the biplane forum (Chris - aka smizo) made a carbon fiber (kick-ass looking) turtledeck which fits into the vertical tail similar to what I had designed mine to do. He has some great photos of it on all sides, which helps me to visualize what I need to do with mine. Nice piece of craftmanship, Chris !
I've got all these thoughts and ideas tossing around in my head. I've started to jot down what I want to do (before they're gone)... how I'll make the turtle deck, but I want to print out the vertical tail chapter and the turtledeck chapter from the Skybolt manual and give them another good read before firming up sizes.
I guess I'm getting what I wanted:
I said I wanted to go with a composite turtledeck earlier... and... plywood is the first composite that I know of. It ain't carbon fiber but...
plywood test
March 28, 2013 Taking another look...
behind the pilot's seat
Spent about 3 hours... or more, working out... thinking about... how I'm going to do the turtledeck; plywood with false stringers ?, wood stringers and a ply storage box ? How to make the front access area; aluminum ? Wood ? How is this going to connect into the tail area ? I'll need to piece the back area together to see what I have before i figure out the back-end.
A lot of good feedback from the guys on the biplane forum.
I've got a base plan... I'll start working towards it. I may need to make a few turns here and there to change it up to make it work though.
March 29, 2013 More than just a look...
behind the pilot's seat
I'm wondering just how many hours do we put in on the "building" of our projects.
I mean... think of yourself and the amount of hours you spend looking for/reading about how to do something. I don't know about you, but I'm not logging those hours. Although, I did read a guy's build log saying that he put in the hours that he spent going places picking things up. I can only imagine the amount of time he'll have on his project.
Took Good Friday off... just because. Ran around all morning doing things. Finally settled down to work on the project a little after 2PM. Spent two point seven hours on the project so far today.
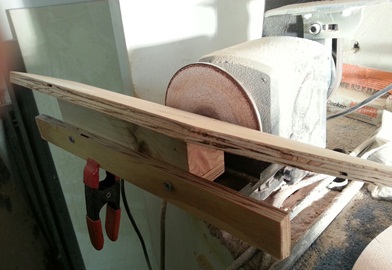
Went out to the garage workshop to take a look at the fuselage/turtledeck area again. I've got a plan so I need to move forward on it... instead of standing around thinking about it. First thing I decided to do was re-make the rear turtledeck former. It needs to move forward and it's a little larger than the one tacked on the biplane right now. (even if I was going to keep the one on there... I'd be re-making it becuase the top is kinda flattened out because of no sand in the tube when making that extreme bend)
On the new 2-piece former I took the time to fill the upper piece with sand (weld the one end close - fill with sand - plug the other end with a piece of wood). Formed the bottom piece of the former first then formed the upper piece. Looks one helluva lot better when you bend it with the sand-filled tube.
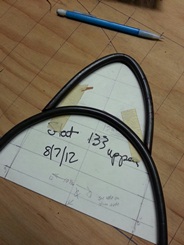
by the way... it's not station 133.o. I modified station 133.o pattern to work (I never made one for that station) at station 167.5
That's pretty much it for the close to three hours I worked on it.
I need to tack this onto the fuselage then modify the headrest former at station 87.o because when I made it, the sides of it actually are inline with the outside edge of the 3/4 inch tube. Need to scooch it in about 3/8 inch on each side so that the longeron is further out than the former. (following this ???)
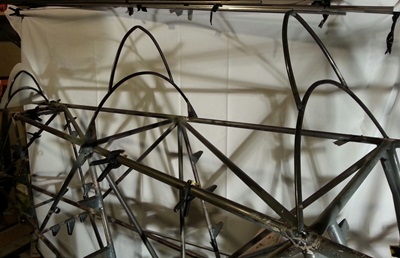
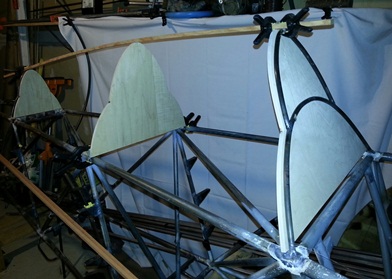
I'll be eliminating the center former you see in the photo below 'cause the plan, at the moment, is to make it out of plywood and put false stringers on it.
turtledeck before today's work
.
March 30, 2013 Shaping the shell
DAMN ! just lost about 20 minutes of blog updating... clicked on the button to add a photo and POOF ! the program closes. DAMN !!
let's see...
oh yeah... most of today was re-doing rather than moving forward. Although, I did make a little forward progress.
Tacked the 2-piece rear turtledeck former together and then tacked it in the right location on the fuselage; station 137.5. Needed to modify the forward turtledeck former, which is at the headrest/seat back of the pilot; station 87.something. Cut the tacks on that. Re-formed it. Tacked it back on.
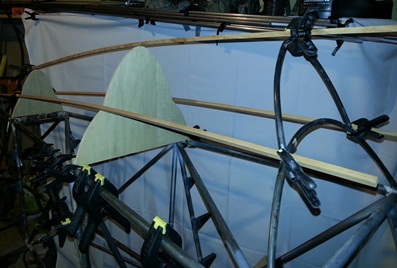
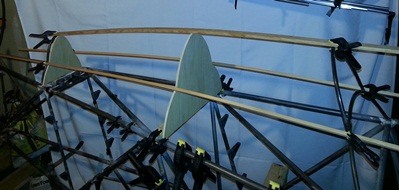
After thinking long and hard... and taking the comments from the biplane forum in to consideration, I'm moving forward with making the turtledeck out of plywood. The main/lower area will be covered with 3/32nd ply and the upper section will be covered with 1/16th inch ply. I'll glue false stringers to the ply to give it that old look.
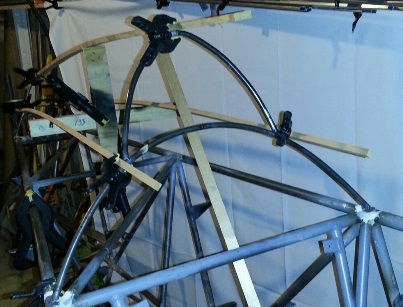
I cut the center metal former off of the fuselage and clamped a few pieces of wood to hold the pesudo-stringers in place so that I can tweek the look of it. Below are a few shots of what I have so far. I'll need to re-check to make sure that this is how I want it then I'll make the pattern for the center wood former for the shell. Then... I'll be cutting a few pieces of builder's grade plywood to further tweek the design then I'll be cutting the real stuff, which I need to order.
Here are a few shots of the idea.
.
March 31, 2013 re-Shaping the shell
It's Easter Sunday... started out with nice sunny skies... ended with rain and drizzle andwith overcast skies. Nice day... to work inside. Did get a walk in with the pup before the rain started coming down.
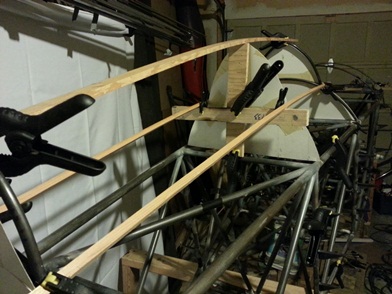
More work on the turtledeck today. Spent A LOT of time re-working the former at station 105.o. I must have put in AT LEAST six hours on it (only gonna log in three)... just re-working it, drawing it out and the cutting and fitting and adjusting and re-drawing and cutting and fitting and re-drawing and cutting and fitting. and... finally got what I think is the look I want.
Here are a few shots from different angles that I took. Tomorrow I'll be cutting out the cheap wood formers as tests before ordering up the expensive stuff.
.
April 3, 2013 Measure four times, cut twice...
The other day, Monday the 1st, I started working on the wood formers for the turtledeck. Started off using a piece of builder's grade (for the housing industry) plywood to make a test piece. It was 1/2" instead of 1/4" but it would allow me to wrap my head around what cuts I needed to make and how to make them.
Well... I measured twice and cut once. But... ya need to measure the correct measurement... Wasn't a waste of time. I know what the bottom angle needs to be cut at. I know how much extra material I need to add to the sides so that I can put the correct angle on it as it angles back towards the tail.
Tonight I wanted to start cutting aircraft quality wood... make the actual pieces. Looked around the shop to see what I had: Had a few smaller pieces of aircraft quality ply. It wasn't large enough to make the forward former for the turtledeck, but it was enough to make both the center and the rear wood formers. A little over and hour tonight... and this time measuring correctly twice, twice, and cutting once, twice and I have two nice formers.
I've got to order the rest of the ply for the turtledeck. When I'm waiting on that I'll start back up on the fuel tanks... maybe ?
.
April 8, 2013 Money going out... material coming in...
Ordered the material for the turtledeck today. Kinda... re-thinking the look of it after perusing Tony B's books again. Details to come.
.
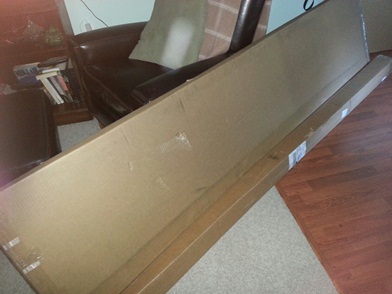
May 3, 2013 The package arrives...
albiet, a month later.
and...
So I begin making the next piece of this extremely LARGE puzzle.
The turtledeck in it's present form, plywood and false stringers (in boxes of course):
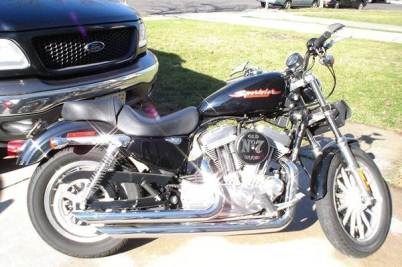
May 4, 2013 It's no mo...
the bike... that is.
The bike has been in the way... much too long. And it wasn't where it was suppose to be... on the road eating up pavement.
Put it on Craig's List. Got a lot of ass-clowns offering nothing for it. Then got an email from a guy not that far down the road from me in Mullica Hill, NJ. A younger guy not long out of high school. He came and took a look at it last week and came back and bought it today.
I didn't get as much as I was asking for it, but we're both were happy with the final deal. With the bike gone... I have more room in the garage work area and the bike is back being used like it should be.
Spent a few hours today cleaning up the garage work area... getting ready to start on this turtledeck.
Good luck with the bike, Jordan.
May 4, 2013 continued... It's Mo on the...
turtledeck.
Started back up on the turtledeck again tonight.
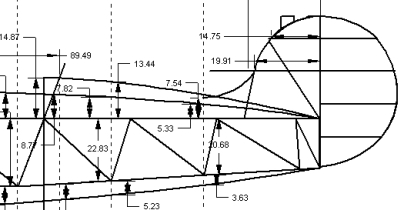
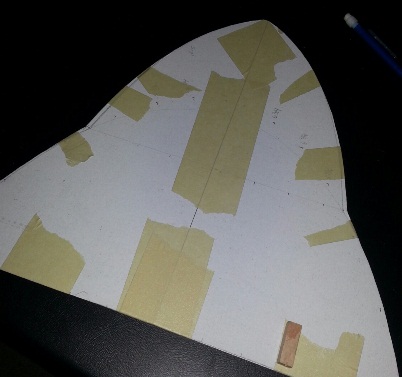
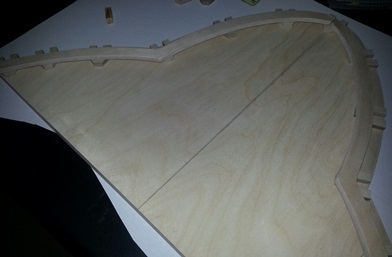
Took my paper pattern and compared that to the actual "former" I have at the front location on the turtledeck; station 89.49. Saw that it was a little off so I took a sheet of display board I had and traced the actual former onto it. THEN I gridded up the traced former to make sure that each half of it was the same shape. THEN I cut the pattern out and traced IT onto the aircraft grade 1/4inch birch ply that finally arrived the other day.
After tracing the pattern I measure out an additional 1/4inch for the angle that I will be putting on it to form the turtledeck (the back-dend of the ply at that station is angled out from the front. I didn't realize this on the test ply I made. THAT is one reason you make test pieces. Of which... I'll be making another test piece before cutting this one out.
Now that I'm thinking about all this... I should have put the slanted cut that is on the bottom of the wood former... BEFORE I did all this tracing. DAMN ! (maybe I'll just angle the shelf on the sander and take it off carefully that way)
May 5, 2013 continued... Mo work on the...
Wait ! A little work on the turtledeck.
A lot of work on the jig for the former.
Two hours... Really... ??? Two hours (we'll that included rough cutting of the front former) to figure out and then make a jig for cutting the ANGLE on the front former. And another point two hours to sand the angle on the wood former.
The small table in front of my small sander does angle BUT not in the right direction. Ya see... I needed to sand off of a curved, fixed line and have the board feather out from that line about 1/8inch. I knew what the fixed line, outline was, but the feathering out line was a question mark.
I've said it before... and today I lived it again... "You spend as much time making jigs as you do building the biplane." Case in point... TODAY !!! Actually I spent one heck of a lot more time on the jig than what it was used for. The finished product looks great ! thankyouverymuch
Jig to sand angle on former.
Newly angled, cut former in position.
May 6, 2013 A lot of time...
But, A little "forward" work on the turtledeck.
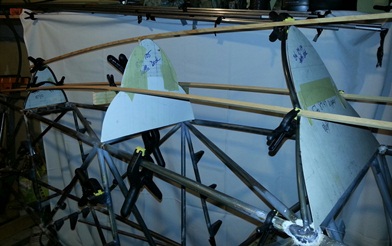
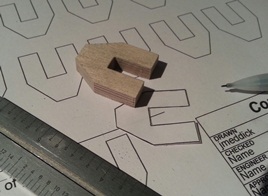
Making the saddle gussets tonight.
Drew up the patterns last night. Printed them out at work today. And now... I'm cutting them out of 1/4inch birch ply. Traced one pattern on a piece of 1/4inch ply. Cut it out and used it as a pattern for the rest of them. Doing that for an hour... in the back of my mind I'm thinking... these don't look as good as I would like them, BUT, they're not going to be seen so... no biggie, right ?
Ahhh... no.
Nobody will know but me, and ya know what ???... that's a pretty important person that knows. Pushed them aside, took that paper pattern and traced it out on some of the display board I bought the other day. Used THAT pattern to trace all the saddle gussets on the 1/4inch birch ply. Went back down to the basement work area and did it all over again. Only this time... they're up to my level of excellence.
The notches in them still need to be test fitted with the 5/16inch stringers and filed to fit... I'll leave that for tomorrow. NOTE: The following image doesn't reflect the final layout of the gussets. And that top saddle gusset... that ain't even gonna be there. I'll have a full length spine at that location.
May 7, 2013 Moving forward ???...
But, my thinking has stalled...
I'm not sure if I want to "box" the entire turtledeck out with plywood. Still thinking it through...
funny... Tonight I thought I made the decision that I wasn't going to make the turtledeck with plywood covering... writing this, I'm not so sure that I don't want to do it with the ply. I guess I'm going through the various senarios; thinking it through. Decided no matter what, I needed to make an additional wood former for station 130.o.
Three hours... of thinking about it and making the pattern for station 130.o and I'm not sure if I really made any forward progress tonight.
Oh yeah... I finished up those saddle gussets tonight before starting any of this...
May 8, 2013 Stopped thinking !!!...
Moving forward !!!
There's only so long that you can spend thinking things through... arrive at a decision, then re-think, and re-think, and...
I've had a plan... several plans actually. I need to push forward with the best one... and make it work. I'm not getting nowhere (yes, used on purpose) just thinking about it.
Started moving forward with that plan tonight. First thing I needed to do was make a support that would glue to the back-side of the front (headrest) former so that I could attach the ply to allow the height of the stringer plus the thickness of the ply. This is so I can start the stingers even with the top of the front former (my headrest). I'll be capping the forward portion of the stringers with a thin sheet of plywood... give it a little added detail to finish it off nicely.
All of this explaining is harder than just showing photos as I go along.
Anyways... I cut the pattern to make the support. I also cut down the former at station 105.o 5/8inch (the height of a stringer) so that I'll be keeping the shape I originally designed (not raise it up an additional 5/8inch.) I also modified that pattern I made yesterday for station 130.o for the same reason. oh yeah... cut out the former for station 130.o.
tomorrow... I'll cut out the supports and whatever else follows.
May 9, 2013 Started thinking !!!...
and still moving forward !!!
More thinking things out than actual work on the project... again... tonight.
Traced and cut out both halves of the false former that will be just behind the front bulkhead on the turtledeck. It took me about an hour to trace, cut and file to size both pieces. Looking at it, I'm hung up on how I will attach the fabric to the joint between the upper section of the turtledeck and the lower section. I've been thinking about this for weeks... and now... another three hours.
Here's a few photos of what I've done so far on the front bulkhead. Nothing has been glued up yet, and I've just placed the saddle brackets on the bulkhead to hold the false former in place so that I can do some of that thinking...


 On the new 2-piece former I took the time to fill the upper piece with sand (weld the one end close - fill with sand - plug the other end with a piece of wood). Formed the bottom piece of the former first then formed the upper piece. Looks one helluva lot better when you bend it with the sand-filled tube.

 Nobody will know but me, and ya know what ???... that's a pretty important person that knows. Pushed them aside, took that paper pattern and traced it out on some of the display board I bought the other day. Used THAT pattern to trace all the saddle gussets on the 1/4inch birch ply. Went back down to the basement work area and did it all over again. Only this time... they're up to my level of excellence.
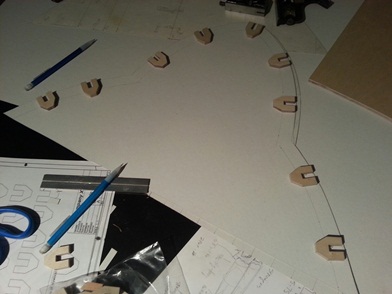
 >
>