Mantua, New Jersey
Original Site:
September 2004
E-mail: usav8or@yahoo.com
Making.... The Radical Radial Fuselage Fuel Tank.
May 11, 2008 The Belly.... of
the beast.
When will the maddness end ????
Of all things... I'm making the fuel tank.
Why ???? you may ask. Well, if not you... I'm asking that
question.
I
started out to make a mock-up of the fuel tank, to make
sure it will fit in between the diagonal tubes that I'm
welding into the forward section of the fuselage. Confidence
builds as you build and you/I begin to take on, and tackle,
more challenges. The fuel tank being one of them. Figured
I'm welding now... never thought that I would so... why
not build the fuel tank, like I just built the throttle
quadrants.... and pedals.... and...
Grant it, I'm just in the beginning stages of shaping the
tank right now; making the "ribs" of it so that I can wrap
the .050 aluminum around it. The Skybolt Builder's manual
is coming in real handy for this too.
As with almost any plans built airplanes out there, the
designer shows you the structure of the plane, what tubing
you need to build it, but then leaves the building of accessories
to you. I first heard the guys on the Tailwind Yahoo group
talking about how the Tailwind plans don't show you how
to build the tank. Same thing with the Skybolt. Well....
that's not the responsibility of the designer, or at least
I don't think that it is. He/She is giving you the dream
of the airplane, how you go about creating it is up to you.
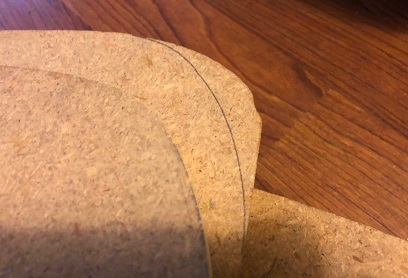
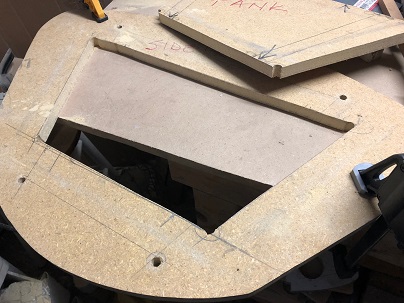
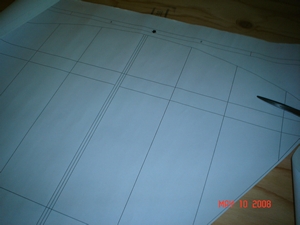
As
you can see from the cut out pattern, I've decided to go
with the traditional tank, with the rounded bottom. Several
of the guys on the biplane forum are squaring off the bottom
so that they can easily attach a smoke tank under the main
tank. I saw where someone made a small smoke tank and placed
it under the floor board. I think that will be my plan of
action. Six, one half a dozen....
I'll be routing the additional fuel tank "ribs" tomorrow.
Need to get some threaded rod, nuts and washers too. Taking
the lead from Manuel, from the biplane forum, I'll show
you how he made his mock-up... soon to be my mock-up too.
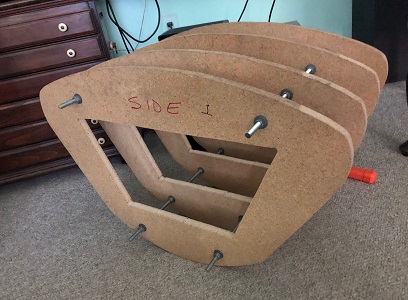
May 12, 2008 Makin' me another
jig.... didn't
think I was going to build a tank. (gulp!)
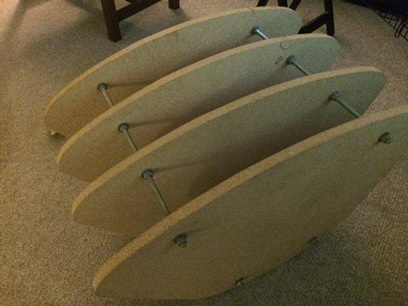
Took the fuel tank pattern I cut the other night, screwed
it to a few pieces of 3/4" MDF and made me some ribs. Twernt
hard at all. Turned it over and routed it using a bearing
router bit. Took my time and they turned out beautiful.
Actually a minor flaw in one spot that I'll fill in with
some wood putty before making the actual tank. Seems the
plywood decided it was going to crush a little, thus giving
me a slight flat spot on the one corner.
Here's a shot of the pattern after I've
screwed it to the piece of 3/4" MDF. Had thoughts of using
1/2" plywood but thought that it warp a little bit more
than I would want it to. Maybe 1/2" MDF would have been
a better choice. This 3/4" stuff weighs a ton. It's a
lot stiffer though. Yeah... made a good decision.
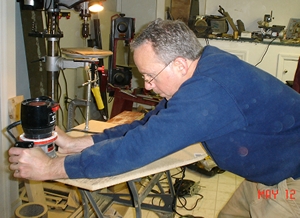
I took
my jig-saw to the piece of MDF to cut off a lot of the excess
wood, clamped it to my Black and Decker Workmate workbench
and routed all four pieces in short order. Make sure to
keep the piece you're routing overhanging the table. If
the bit extends past the depth of your work you'll be putting
marks in your table. What the hell... it's just a workbench,
right ? By the way... don't forget to wear your safety glasses
Here's a shot of the tools that I used
to make the "jig" for the fuel tank. Doesn't take much to
make an airplane. Just a lot of your time. I remember Randy,
from the biplane forum, telling us that he made his first
Skybolt in 4 years/4000 hours and that's with no power tools.
That's hand cutting 4130 flatstock. Gotta give the man props.
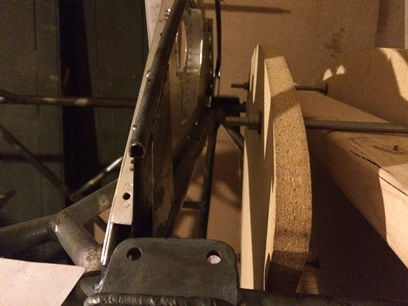
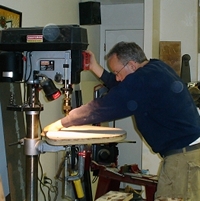
Me drilling
a few holes in the ribs. Hint: Have the holes drilled
for the threaded rod in your pattern before you start routing
your ribs so that you can go over to the drill press after
you've routed the piece of wood and knock out the holes
without having to re-attach the pattern to the rib. A waste
of time otherwise. Don't ask me how I know. (I seem to
be full of those "Don't ask me how I know" stories.)
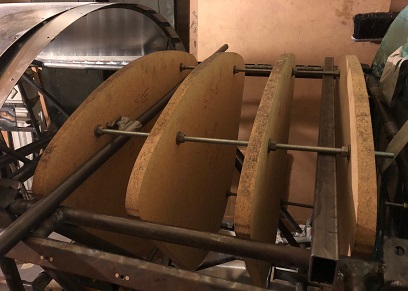
Here it
is... after one and a half hours of hitting it with a rubber
mallet and threading on the screws. (I was up stairs
in the living room watching the Speed Channel so your mileage
may vary.) In addition to the threaded rod (I used
3/8" rod which is a little stouter than 5/16") you'll
want to pick up 36 nuts and 36 washers. These will sandwich
each of the ribs on each of the rods.
Very simple to do. At least the mock-up was. Wait 'til I
get around to welding up the aluminum... I think I'll get
someone who knows that type of welding to do it. Although....
things have been known to change on this project.
August
21, 2012 Make that...
Two
Tanks !!!
If you've been following along with my blog you know I've
been working on the upper wing center section. And... there
is a fuel tank that needs to be made for that as well. Were
as you can buy the main fuel tank... you must make the fuel
tank for the upper wing center section. I guess you have
the option of having someone make it for you.
I didn't realize that it's been such a long time since I
visited this page. Anywho... doing my research on how to
make a fuel tank for the upper wing center section I thought
I might as well make the main fuel tank at the same time.
After some research I've decided to make it out of 3003
H14; the upper tank out of .o40 and the main tank in .o50.
It was suggested that you use 5052 (I guess based on what
Aircraft Spruce wrote for a description in their store).
By reading a few threads on the Biplane Forum I've decided
against it because it sounds like it may tend to crack more
easily. The Skybolt Builder's manual suggests 5052H32, 6061-0
or 5052-0... all .o50 thick.
UPDATE: March 23, 2019 - I'm making the upper tank out of 3003 H14 and the main tank out of 5052 H32
Today I went online to Air Parts Inc. and ordered me up
some .o40 and .o50 3003 H14 for the tanks (make that 3003 H14, and 5052 H32). Hopefully it
won't be another four years before I make another entry
on this page.
March
2, 2015 Inside and
out...
systems
and all.
It hasn't been four years... but it has been quite a while
since making an entry on this page. I've actually been working
on the upper wing fuel tank for some time now.
Working with aluminum (banging out baffles and ribs, and
bending skins and drilling holes)... it's a learning curve
that I've picked up on fairly easy. Oh, sure, there are
a few little mistakes with drill holes but they won't be
seen unless you tear apar the upper wing fuel tank. AND
those "mis-drilled holes" were because I flipped the end
ribs on the tank. I JUST looked at the photos tht JimW had
of his tank and he made it just like I originally had it
made... but now I've flipped those ribs around and have
a few extra cleco holes that will be visible to the gas
inside the tank.
Looking at the upper wing center section plans and the fuel
tank plans and the stuff Tony B wrote about fuel tanks...
My original thought was to have the vent line coming out
the back of the tank. Glad I compared what I wanted to do
(following what Tony B. wrote) and the construction of the
upper wing center section! The rear spar is where I wanted
to have the vent exit. NOT GOOD ! And having it exist out
the sides, on either side, will have it going through one
of the inboard rib assemblies which I don't want to go through
either.
This
leaves either the top or the bottom of the wing in which
to exit the vent line. And I'm thinking the bottom-rear
of the tank... close to the right-side where the one drain
and fuel line sits. I'm thinking... BUT, even though I can't
place it where Tony did in one of his tanks, I'm taking
his idea and having it run from the back top to the forward
top; when you're in a climb the fuel won't come spilling
out if the vent opening was a short tube in the back and
it won't come spilling out in a dive if the vent tube was
a short piece in the front. Doing it the way Tony explains
you may get a few drops of fuel coming out of the vent but
nothing to talk about.
Tony Bingelis' books are a must if you are scratch building
from an older design. Heck... these guys were building (bi)planes
for themselves. I don't think they intended others to build
(I could be wrong). But when people see a sexy little sport
plane they say.... "I've got to have one of those." After
bugging the designer for years they release the drawings
for the (bi)plane that they used and it pretty much leaves
everything for you to design except for the basic structure
of fuselage and wings. And THAT's where Tony's books come
in... he details just about everything you would ask someone.
Right now I'm figuring out flairing of 1/4inch and 3/8inch
tubing for use with AN867-1's 2's and 3's. What bushings
and nipples to use with each. Finger strains and fuel valves...
A whole lot of stuff I didn't think I'd need to know to
build a biplane. The nice thing is that I will know this
biplane inside and out... systems and all.
September
22 and 23, 2016 Inside and
out...
systems
and all.
It has been a while since I last visited the main fuel tank.
Looks like I'm back at it again...
First things first; since it's been a while I need to make
sure that the jig for making it is squared up. It wasn't...
so I took the time to adjust the ribs on it, making sure
that each of them are spaced evenly from the edge of the
threaded rod to the last rib. DONE !
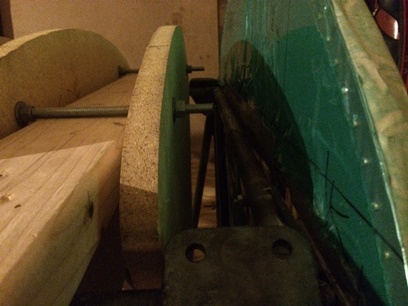
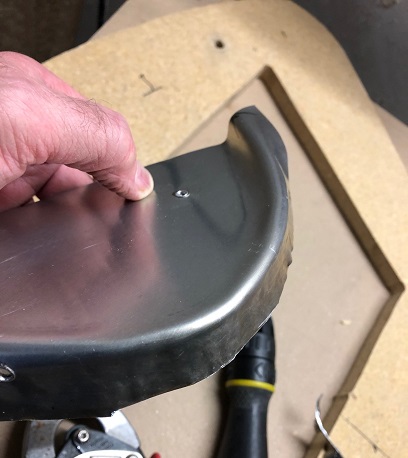
It's usally a tight fit on the Standard Skybolt... not so
much with the Radial version. PLENTY of wiggle room to fit
the tank in nicely without having to worry about needing
to wedge it into place. A test fit confimed my theory...
PLENTY of room.
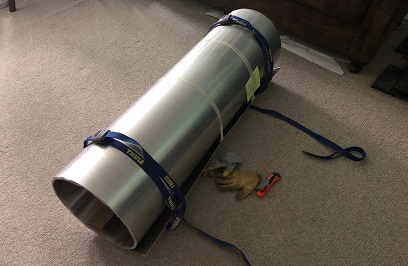
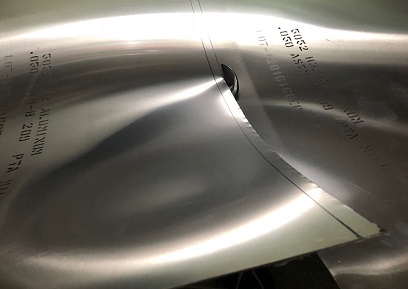
The sheet of .o50 aluminum has been sitting around since
my post in August 2012. It should be good and rolled by
now (no BOIIIIING when undoing the tape that holds it in
a coil). Should be a pain in the ass to cut too.
November
10, 2018 Go ahead...
do
it.
It has been a while since I last visited the main fuel tank.
Looks like I'm back at it again... (he writes again...)
I've been looking at the plans for the main fuel tank forever
it seems... flop tube? capacitance fuel probe? Do I even
want to make the damn thing? The quesetion... because I
don't TIG weld, and you need to TIG weld aluminum. Make
all the pieces and have someone else TIG it for me? Buy
a cheaper TIG and learn to TIG and TIG it myself?
So... that's what I've been thinking about for the past
month. Nothing else getting done. Looking through the plans...
Looking through the "Skybolt Manual"... Looking at the plans
in the "Skybolt Newsletter" to see what goodies I could
add to it if I did make it.
I'e decided to make it. Bought the "T" bolts from Steen
Aero along with the stainless steel tank straps. Got the
straps and they aren't welded ready for the "T" bolts. Thought...
DAMN! I can't weld stainless steel... the fumes are toxic!
Emailed Steen and they said to send them back... no problem.
Need to now order some 4130 from Aircraft Spruce, along
with a list of other things I can purchase to help defray
the cost of shipping.
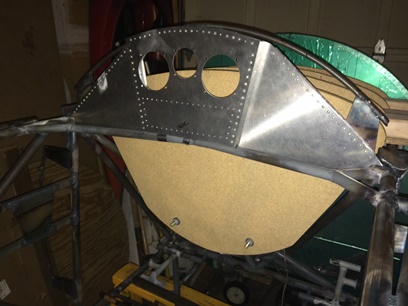
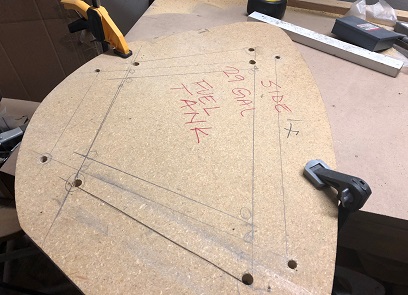
Today I unscrewed all those screws holding the skin over
the area that the tank will go; between station 0.o and
24.o. That took a little bit of time. I then fitted, and
squared up the fuel tank pattern/jig in position. That took
some time. Discovered that the pattern is a little too wide
so I marked one of the four patterns with the amount I wanted
to take off from the top corners... cut and sand to the
marks. Did the same for the other side. Now I need to route
the other three using this first "pattern".
A month of figuring it out... and debating on the damn tank!
Was going to throw down $550.00 and just buy one... because
I didn't know how to build it. BUT... THAT'S WHAT THIS IS
ALL ABOUT! The learning! I just might be learning to TIG
TOO!
Below: Photo of fuel tank jig when I initially put it into
position. Needed to still be squared up and jigged up higher.
Second photo is the amount that I trimmed off the top corners
for a better fit... to allow the tank to fit into position
without interference with the bushings.
by
the way... I think I'm going to drill, route, or cut some
lightening holes in the fuel tank jig. That thing is pretty
heavy and akward handling in and out of the fuselage.
November
22, 2018 I'm... doing
it.
Working towards, and puzzling about, the main fuel tank.
I can practically buy one for the price I'll pay for all
the parts and pieces, not to mention someone having to TIG
it together. But... where would ALL that learning be? NONE!
Maybe I'll be inspired to find a used TIG machine and weld
it up myself.
Ordered up... and have received the new straps (need to
send the other ones back to Steen Aero still). Will make
paper patterns of the straps for locating where I need to
make the slots in the straps (two holes connected with cutting
the opening between.) Purchased the rubber padding for the
tank straps too, along with a mess of anchor nuts and machine
screws for all the tabs on the fuselage.
Anyways... I need to start cutting some .050 aluminum for
the tank and stealing bungs from the upper wing center tank
(of which I'll replace) and figure out locations on this
main one.
December
22, 2018 I'm...
thinking about
it... still.
Still.. working towards, and puzzling about, the main fuel
tank.
I've been thinking it through, and thinking it through...
and thinking it through. Still thinking it through.
It's been a month. A MONTH! I needed to just get started
on it. Make the shell. Take a few photos of it. Post them
on the biplane forum. Ask a few more questions. Yeah...
that's what I'm going to do.
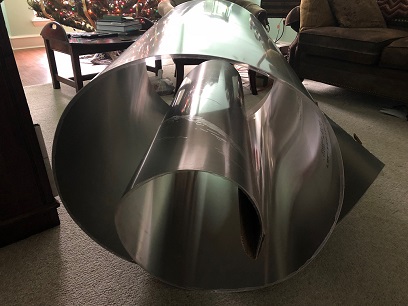
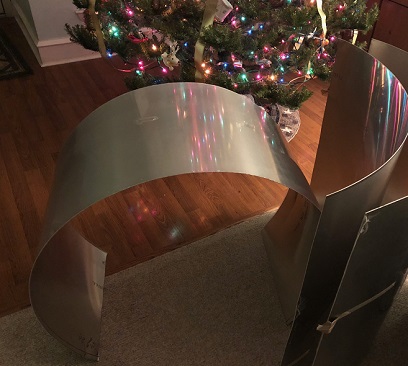
Unrolled the 4ft x 12ft sheet of .050 5052 H32. Bought this
back in 2006... it's been rolled since that time. The .050
looked pretty thick for cutting by hand... and it was. Measured
and cut blanks for the main wrap, the ends, and the two
baffles; the easy stuff.
I have the Skybolt manual, and the Skybolt Newsletter that
I can somewhat follow to build the main tank. There's also
a few threads on the biplane forum I've been referencing
all this time.
I've just jumped over the inital hesitation hurtle... I've
been here many times before and it hasn't changed.
Layout
The beginning of the main tank.
Twelve years of being rolled.
The blanks...
December 29, 2018 I'm...
doing more than thinking about
it.
Still.. working towards, and puzzling about, the main fuel
tank.
Still... thinking it through, and thinking it through...
and thinking it through. Still thinking it through.
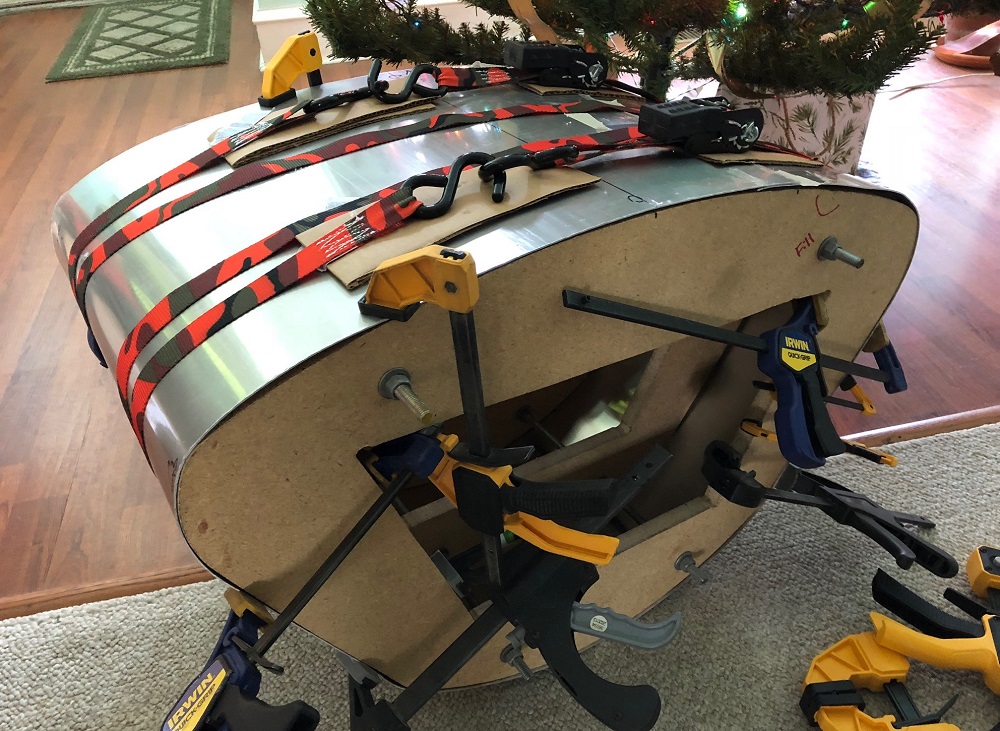
I've got some forward progress going on... After a false start (wrapped the main wrap before trimming to the 16.5inch wide that I needed. Also... didn't put the beading in it before wrapping. BUT... with it wrapped I got my measurements of where I want to start and end the beads, a good indication of where things need to go.
One thing... the flange I had bought (and thought I would use for the bottom connectors) won't work. There's a pretty good curve to the bottom of the tank and the flanges that I have are about 2.25inches in diameter. Ain't gonna work on the bottom... I'll need to look for some other alternative. Maybe (I will) ask the biplane forum.
The whole process of making this tank is one thought after the next. A thing I would change if I were to make another tank would be to make the side of it curved instead of flat. The natural tendency of the aluminum wants to curve. I need to clamp the aluminum to the flat sides to hold them against the frame/jig. It won't be a problem once I get them tacked/welded to the end-caps... Just a thought...
With all the thinking again, re-thinking process, I've needed to re-CAD after re-CAD of where things will be positioned... making sure I print the newest out to follow.
January 20, 2019 The most thought about fuel tank...
in the world.
Turns out I can place those flanges/bungs at the bottom of the tank. The curve ain't as bad as I thought it was.
I've been working on it/thinking about it all these weeks; Spent a number of hours CADing, re-CADing, and re-re-CADing... where to put things, where not to put things, what things I need to buy (spent about three hours one day just making sure that I'm ordering the correct flanges, fittings, probe, and probe mounting kit), what things not to buy.
by the way... when talking about fuel lines, lines for venting, etc, they describe the outside diameter of the tube; a 3/8inch tube is 3//8inch O.D. That had me scratching my head until I asked the biplane forum.
Ordered and received everything with the UPS delivery except the fuel probe. Need that before I can drill the holes for that mounting flange for the probe. And... since I'm unable to drill those holes I won't be putting the beading on the tank wrap. Sunday, today, I decided to start wacking out one of the end-caps. To keep the aluminum blank tight against the original end-cap form, I cut the top form (approx. 1/2inch in from all sides of the end-cap to keep it from the sides to allow easier forming). Once I had the pieces cut it took me a while to start forming the end-cap. I didn't want the aluminum blank to move on me... the only way to do that is to drill holes in the blank. I've tried "just" clamping things before and more times than not... the piece moves on me. After thatI then proceeded to start banging down the sides; banging wacking trimming... repeat. I only have the top side of it banged down. There are a few waves in the piece. DAMN !
Work on the piece today about 2 1/2hours. I'll come back to this to bang the rest of the edges over, then... I'll finesse the waves out of it.
January 21 - February 10, 2019 Tuck shrinking...
and a tangent.
Working the bumps out of the basically straight areas is one thing... but to bend the edges around those corners... WOW! is another thing. And... back to learning.
I'm not sure what I did to try and form that first tight radius. A "practice" attempt on my actual piece. Always a bad decision to learn something on your actual piece.
I did my homework and got some advice and I made that first try on the actual piece and I failed. Not a problem. That's all a part of the learning. But as I had mentioned earlier... don't do it on the piece you want to keep.
You can't want to learn something new and feaer failure; you'll never pick up the tools to begin.
Do your research. Get the correct tools... and start learning. I almost ALWAYS spend days, weeks, hesitating only to start and begin the learning process. It never fails... you need to start at some point. So "DO IT NOW!".
I look at this fuel tank... and when I sit back thinking about it, I could have bought it for less money than the sum of its parts. But... where would the learning be? EVERY-SINGLE-PART on this biplane can probably be bought for a cheaper price, but where would the learning be? You want it quick? Buy a plane. You want it a little less quick. Buy a kit. You want to learn determination; blood, sweat and (well, not the tears)? Scratch-build an airplane.
I orginally started building this biplane to have a biplane. After 125 hours I failed at that... and bought a T-craft to fly instead. I came back to this project to build a biplane. And after 4600 hours I'm still learning, and I'm still building this biplane. There's no quick way of doing it unless you've done it before, and even then, when scrach-building it still ain't quick it's just quicker. Even seeing someone else do a task doesn't mean you're going to pick it up right away and be able to do that same task at that same level. Not. At. All. Scratch-build and you're in it for the long haul.
Okay... back to talking about the main fuel tank. What you see in the photos below is a few hours of work. It wasn't my first attempt at the annealing and tuck shrinking method. I learned a lot from Bill's thread on the biplane forum once I fully read and "not just look at the pictures" understood. It's a slow process. The smaller the lip the easier it is... and I of course I made the lip on mine larger than normal. I just may cut it back to 1/2inch instead of the 3/4inch I have now.
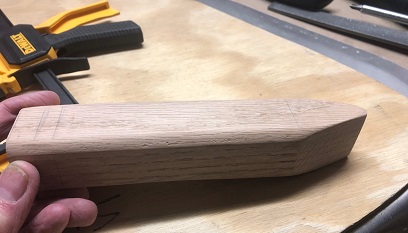
Tools that I used; a deadblow hammer, and an oak forming tool.
Once you have the blank... secure that to the wood form with a few srews so that you have it located in the exact same spot each time. The upper wood restraint, to hold the aluminum against the bottom form should not be off-set any more than 3/8 to 1/2inch otherwise you'll get lifting of the aluminum.
I took a deadblow hammer and started to tap down the edges slightly so that I could see where I had to anneal. Take a black marker, or lightly coat the edges with soot, and anneal the areas needing bending. Let cool and re-attach to the form and clamp into place with the top wood restraint. begin to form the V's (the more the better) with the oak tool and deadblow. If you end up with one or two large V's you'll most likely have one or both of those collapse and fold over on themselves. THIS you don't want.
Once you've formed the many V's, you'll want to start to hammer them down from the top so that they begin to form the bend. Do a little each time on each of the V's. Once the aluminum starts to harden... go back and anneal again. Repeat the process until you've made the complete bend.
It's a slow process. It really is... a... slow... process. Don't try and rush it.
First attempt
Working it. Clamps have been taken off at this point for another round of annealing.
Finished test piece.
You can see the lifting of the aluminum because the restraint on top was off-set too much... A few more test pieces and I can start on the actual end-caps.


 I
started out to make a mock-up of the fuel tank, to make
sure it will fit in between the diagonal tubes that I'm
welding into the forward section of the fuselage. Confidence
builds as you build and you/I begin to take on, and tackle,
more challenges. The fuel tank being one of them. Figured
I'm welding now... never thought that I would so... why
not build the fuel tank, like I just built the throttle
quadrants.... and pedals.... and...
I
started out to make a mock-up of the fuel tank, to make
sure it will fit in between the diagonal tubes that I'm
welding into the forward section of the fuselage. Confidence
builds as you build and you/I begin to take on, and tackle,
more challenges. The fuel tank being one of them. Figured
I'm welding now... never thought that I would so... why
not build the fuel tank, like I just built the throttle
quadrants.... and pedals.... and... 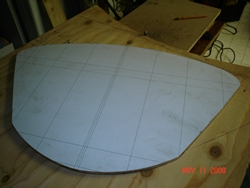 As
you can see from the cut out pattern, I've decided to go
with the traditional tank, with the rounded bottom. Several
of the guys on the biplane forum are squaring off the bottom
so that they can easily attach a smoke tank under the main
tank. I saw where someone made a small smoke tank and placed
it under the floor board. I think that will be my plan of
action. Six, one half a dozen....
As
you can see from the cut out pattern, I've decided to go
with the traditional tank, with the rounded bottom. Several
of the guys on the biplane forum are squaring off the bottom
so that they can easily attach a smoke tank under the main
tank. I saw where someone made a small smoke tank and placed
it under the floor board. I think that will be my plan of
action. Six, one half a dozen....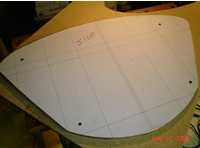
 I took
my jig-saw to the piece of MDF to cut off a lot of the excess
wood, clamped it to my Black and Decker Workmate workbench
and routed all four pieces in short order. Make sure to
keep the piece you're routing overhanging the table. If
the bit extends past the depth of your work you'll be putting
marks in your table. What the hell... it's just a workbench,
right ? By the way... don't forget to wear your safety glasses
I took
my jig-saw to the piece of MDF to cut off a lot of the excess
wood, clamped it to my Black and Decker Workmate workbench
and routed all four pieces in short order. Make sure to
keep the piece you're routing overhanging the table. If
the bit extends past the depth of your work you'll be putting
marks in your table. What the hell... it's just a workbench,
right ? By the way... don't forget to wear your safety glasses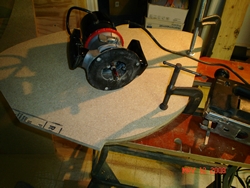
 Me drilling
a few holes in the ribs. Hint: Have the holes drilled
for the threaded rod in your pattern before you start routing
your ribs so that you can go over to the drill press after
you've routed the piece of wood and knock out the holes
without having to re-attach the pattern to the rib. A waste
of time otherwise. Don't ask me how I know. (I seem to
be full of those "Don't ask me how I know" stories.)
Me drilling
a few holes in the ribs. Hint: Have the holes drilled
for the threaded rod in your pattern before you start routing
your ribs so that you can go over to the drill press after
you've routed the piece of wood and knock out the holes
without having to re-attach the pattern to the rib. A waste
of time otherwise. Don't ask me how I know. (I seem to
be full of those "Don't ask me how I know" stories.)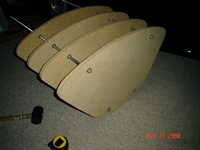 Here it
is... after one and a half hours of hitting it with a rubber
mallet and threading on the screws. (I was up stairs
in the living room watching the Speed Channel so your mileage
may vary.) In addition to the threaded rod (I used
3/8" rod which is a little stouter than 5/16") you'll
want to pick up 36 nuts and 36 washers. These will sandwich
each of the ribs on each of the rods.
Here it
is... after one and a half hours of hitting it with a rubber
mallet and threading on the screws. (I was up stairs
in the living room watching the Speed Channel so your mileage
may vary.) In addition to the threaded rod (I used
3/8" rod which is a little stouter than 5/16") you'll
want to pick up 36 nuts and 36 washers. These will sandwich
each of the ribs on each of the rods.