Mantua, New Jersey
Original Site:
September 2004
E-mail: usav8or@yahoo.com
Building the Skybolt, Model M14
aka Radial Engined Skybolt..
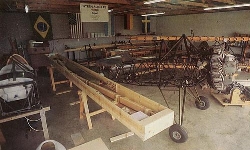
A project such as the Skybolt (Hal's radial prototype to the left,) any plane
for that matter, can appear to be daunting. When you look
at the final product, (the biplane) and how many years it will take to get you
there, it may look intimadating. Never fear... you won't be
the first one looking at it from this perspective. There are
many flying airplanes out there that were crafted by an at-the-time
inexperienced builder.
You're not alone in your journey. I'm always here to throw questions
at. Beej, Randy, Al and the others at the biplaneforum.com
are there to help you with your questions. And there is always
the group at your local EAA chapter that will help you climb
any walls your will encounter.
If you have the time, find the plane you want to build and
start today. If you don't, years from now you'll wished you had.
Notes: (link coming soon)
It's been so long, I forget what this means.
The Plane as of Sept. 6, 2004
IMPORTANT ! Ask questions before doing ANYTHING. You will be saving yourself both time AND money. For instance, I was going to buy the Joint Jigger to cut the 4130
tubing for the fuselage, but in speaking with somone in EAA that has built several planes they said to just use a pair of metal snips and use a file to trim to size. SAVINGS: $150.00 !
Update: Tried the snips... that didn't cut it for me. Too damn hard to cut
.049 or thicker tubing with snips. Invested in the Joint Jigger... money well spent.
What to build or what NOT to build.
1. Built up ribs from sitka spruce and mahagony plywood.
2. Purchase a welded up fuselage (out now since I'll be building the R version - it hasn't been around long enough for anyone
to build the fuselage and then leave it unfinished. Guess I'll have to beef up on my metal working skills.)
3. Very light weight seats since I will be wearing a parachute
most of the time (canvass or wicker.) After speaking to a
few of the other builders it looks like canvass or wicker
won't do. It needs to be able to withstand a certain amout
of G's. Looks like it will be either a pan with minimal cushioning
or metal webbing.
4. Newer landing gear?
5. Use the Haigh locking tailwheel and save 3-4 lbs. Gives better prop clearence too !
6. Ailerons - finish the wing up through the first coat of
silver while working at getting all of the aileron gaps down
to less than a 1/4 inch - then close up as much of that gap
as possible with balsa filler strips and put the finish tapes
over the balsa
Tools to get - making the build go a lot easier.
It's always been my belief that having the right tool makes the going go a lot faster.
Sooo... with that idea in mind I asked the Biplane Forum what tools have the builders used,
beyond the usual shop tools, that have helped them in their build.
Here is the list so far:
Drill Press
Metal Cutting Bandsaw
6" Benchtop Lathe
30" 3-in-1 Sheetmetal Machine (breaks, shears and rolls)
10" Pedestal Grinder
Two Large Bench Vises
A Bench Planer
Bench Disc Sander (great for shaping)
Digital Level
Dremel Tool
Air Drill (needed for those tight areas)
Copper Tube (pipe) (used to make a drag/anti drag drill jig)
Router (great for cutting all those nose rib pieces) DON'T buy cheap drill bits.
Click here for pictures of these tools with brief discriptions.
Wish
list for the Skybolt
1. 360 + hp engine - 2/8/05 just purchased the plans to build
the radial engine version. YES !
2. Inverted gas and oil (Christian system)
3. Smoke system
4. I just pray that I make it VERY light weight.
5. Glass cockpit (if it reduces weight) novel idea in a biplane
6. Newer style LoPresti cowling if an inline (out now - see
above)
7. Convertible, open cockpit with also a full enclosure for
both pits ( I live in the northeast and it gets mighty cold
in the winter) BUT a biplane MUST be an open cockpit.
8. Radial engine? 1/30/05 NOW YES ! A new airframe with the
nostalgic look of an older radial engine plane.
9. Turned metal, sheet metal, just behind the engine (nostalgic
look)
10. All glass instrument panel. WOW ! maybe ?
11. Clipped-wings ?
October 22, 2008 (entry should have been August 21, 2008) Tech Inspection...
by Whitey Lance
I'm not sure what took me so long to have the first inspection... maybe it was the fact that it took me so long to complete those wing ribs.
Since I'm starting to move along at a pretty good pace, and I'm venturing into "unknown" territory I was figuring that I should get someone from my chapter to take a look at what I have done. Just around that time I get an email from Ed (my next door neighbor on the airfield who had the Tri-Pacer.) He's asking me if anyone has taken a look at my project
yet and if not, I should give Whitey a call. (There aren't that many guys in our chapter building planes and Tech Inspectors need so many inspections to keep their status.)
I haven't attended Chapter 216 meetings, on a regular basis, for a long time. And when I do, I usually talk to the guys that I've known for the past 20 years. Whitey came down to the South Jersey area about 10 years ago and I'm not sure when he joined the chapter. Anywho... I've heard of him but didn't know him. But, with the suggestion from Ed I looked up his number and decided to give him a call.
It was around one in the afternoon. I was lucky that he was at the airport that day 'cause he usually isn't. He's usually up flying around. Anyways... we have a nice conversation about my project and we set something up for that Thursday. It's Monday and I just can't wait for the three days to pass so that I could get a professional set of eyes to look over everything that I've done so far.
Whitey arrives bright and early on Thursday. I had just brewed a pot of coffee and ask if he'd care for some. Two hours later we're getting up from the kitchen table to go have a look at my project. (Whitey's one of those good ol' boys. A life time of adventures to talk about. Will do anything he can for you.)
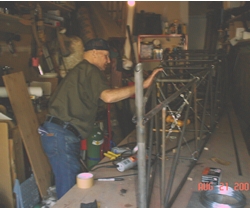
We walk outside and into the garage workshop so that he could take a look at the tacked up fuselage before we venture down stairs to my other workshop to take a look at the brake/rudder pedals, a zillion ribs, a stack of cut and drilled fittings and the beginings of my tailfeathers.
I'm happy to say that Whitey was pleased with my work and gave me an Excellent on my welds and other projects. Since his visit I've finished welding quite a bit of the frame. I need to get him over here again, before too long, to have him check on the welds.


 A project such as the Skybolt (Hal's radial prototype to the left,) any plane
for that matter, can appear to be daunting. When you look
at the final product, (the biplane) and how many years it will take to get you
there, it may look intimadating. Never fear... you won't be
the first one looking at it from this perspective. There are
many flying airplanes out there that were crafted by an at-the-time
inexperienced builder.
A project such as the Skybolt (Hal's radial prototype to the left,) any plane
for that matter, can appear to be daunting. When you look
at the final product, (the biplane) and how many years it will take to get you
there, it may look intimadating. Never fear... you won't be
the first one looking at it from this perspective. There are
many flying airplanes out there that were crafted by an at-the-time
inexperienced builder.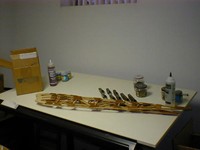
 It was around one in the afternoon. I was lucky that he was at the airport that day 'cause he usually isn't. He's usually up flying around. Anyways... we have a nice conversation about my project and we set something up for that Thursday. It's Monday and I just can't wait for the three days to pass so that I could get a professional set of eyes to look over everything that I've done so far.
 We walk outside and into the garage workshop so that he could take a look at the tacked up fuselage before we venture down stairs to my other workshop to take a look at the brake/rudder pedals, a zillion ribs, a stack of cut and drilled fittings and the beginings of my tailfeathers.