Mantua, New Jersey
Original Site:
September 2004
E-mail: usav8or@yahoo.com
The Radical Radial Fuselage.
November 23, 2008
This day came a lot quicker than I thought it would. Always another mountain of learning to climb.
I thought that this day was way far down the road of building. But then again... I've been at it for awhile now.
Following the same path as I did for the bungee truss, there are a few modifications to the plans that I need to make. Nothing daunting, but changes just the same.
The task at hand:
The gear is approximately 10" longer than the Standard's gear (I'm comparing the length of the Radial's hydraulic gear to the Standards.) and the tubing diameter and thickness is slightly different.
I'm thinking that I'll go with the heavier of either plan. For instance... the front tube on the R version is 1.5" x .o83; on the S version it's 1.25 x .o95. The back tube for the R is 1.25" x .o83; the
S is 1.25" x .o63. So.... again, my thought, fall to the heavier gauge and diameter of the two designs. I'm not one to add unnessary weight to the biplane, but I figure the landing gear takes a lot of
"beating up" on each flight. Better to add a half pound here than to have it go to hell after a few landings and me needing to rebuild with that heavier tubing I should have used in the first place.
The Skybolt Builder's Manual (the one on biplaneforum.com) has a chapter on building the landing gear. It give measurements of how to do it. I'll need to adapt the manual to the measurements for my new, longer gear. Shouldn't be a
problem, but it's just another step that I can mess up with numbers. Hope to only build one set... and not two or three of these.
If all goes as planned with the seats, I should be starting on the gear sometime during the first week of December. (fingers crossed)
January 20, 2009
The Day that came up so quickly... quickly got pushed back for a few more days.
I was so hot to trot to get going on the landing gear but then had the opportunity to bend up the metal ribs (which were god-awful hard to bend on the little bending brake Whitey loaned to me) on a 'UGE bending brake. And since I had them bent, it was time to put the tail feathers together so that I could take the
'UGE jig off my basement workshop bench.
Anywho... I digress. I should be done with the tail feathers in about two weeks, cleaning the table off so that I can work on making the jig for the gear and jigging up the torque tube.
As always, you need to have several balls up in the air when building the biplane; working on one thing, getting another started, always keeping an eye open for the opportunity when a part of the plane is available at a great price. And so it was just recently with a piece of the landing gear.
I have a search set up on ebay that will notify me of when certain items are listed, under certain categories. One of them was tailwheel. I've had the search for several months... an email coming to my mail box every day. Most of the tailwheels were either rust buckets or those Scott 3200s made of gold, or at least the price of them you would think they were made of gold.
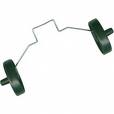
The other day I saw a dual forked tailwheel that wasn't exactly what I was looking for (I was looking for the Bob Wheel, made by Iron Design) but the conversation on the biplane forum convinced me that this would be a good choice at less than half the price. Well, I picked this beauty up for about 1/5th the price. The other $500.oo can go toward my instruments or overhauling the engine. I can always decide to change the tailwheel at a later date if I'm not that happy with it and
and pretty much get my money back when I sell it.
With the tailwheel purchased, all I need to do is get a few leafsprings and make the front landing gear and she'll be sitting up high and pretty.
Seems like that day is coming back into view.
February 2, 2009
Changing the old plans... means making new plans.
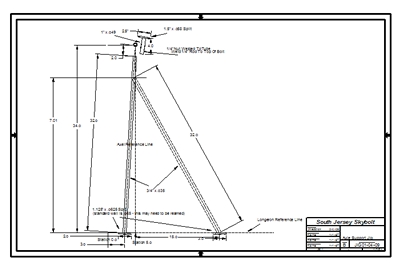
A few weeks ago I re-drew the Radial Skybolt landing gear from the hydraulic to the bungee truss. Figured I'd post it since it hasn't been done before and that it might help speed up someone else's build. Note: These are for reference only. If you decided to use these in your own build, do so at your own risk.
I have the drawing in both DeltaCAD and DWG formats. If you'd like me to send you a copy, just send me an email with the request and I'd be happy to. As of today (Feb. 2, '09) I have them drawn up in half scale with the lengths reflecting that. They would need to be increased by two.
February 5, 2009
The only thing in front of the main gear... is the making of the jigs. Getting my ducks in a row...
Tonight I got a pretty good start on working on the biplane. Pulled out a half a sheet of plywood to start drawing up the jig. Figured I had plenty of time to get on this... I just might be able to get one of these notched and tack welded up.
Figured out all the lengths and where everything needed to be... or so I thought. Looking at the drawings, actually trying to build from the drawings and you notice things that you didn't notice while you're nice and comfortable in your chair working on the computer with DeltaCAD.
Nothing major, but I had to go up and make the corrections on the drawings so that I could scale it out to make sure what I thought I needed to do was what I actually had to do. I did, so I printed the revision out and with print in hand set about finishing up the jig layout.
Once the plans were corrected, it was easy to layout the lines and screw in the blocks. With that finished, I gazed up at the clock and it was a little after ten. Looked at the outside temps and it was hovering just around 15 degrees. Hmmmm... it's going to be in the forties on Saturday and it's a little late to be getting all set up to cut and weld out there in the garage workshop. Hmmmm...
I think I'll push this off until then. (I hoped this wasn't the beginning of the end. Me not going out there in the 15 degree weather to work some more on the Skybolt.)
It felt good, that I was feeling bad, about not going out there in these temperatures. I put close to two hours on the plane, albiet some of it was doing revisions, but that's what this learning is all about. Felt good that I wasn't happy with just putting in close to two hours. That's what I'm saying here. Some guys are forcing themselves to put in an hour and here I am.... well, I've already explained it.
I ordered the only piece of tubing that I didn't have in stock here (along with the tools I need for finsihing the trim servo tabs); the 1.5" x .o58 for the axle holds. I hope they're in tomorrow. Aircraft Spruce is pretty good about getting things here quickly. Come to think of it, tomorrow would be an overnight shipment. Ahhh... I think I better have a plan B for Sunday. Plenty to do... if it isn't working on something, it's getting something ready that's waiting in the wings. (get it ? wings... ducks... quack quack... ahhhh never mind)
Here's a shot of the Axle Support Jig that I drew up.


 I thought that this day was way far down the road of building. But then again... I've been at it for awhile now.
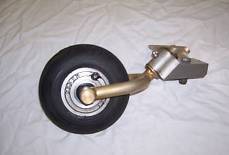 The other day I saw a dual forked tailwheel that wasn't exactly what I was looking for (I was looking for the Bob Wheel, made by Iron Design) but the conversation on the biplane forum convinced me that this would be a good choice at less than half the price. Well, I picked this beauty up for about 1/5th the price. The other $500.oo can go toward my instruments or overhauling the engine. I can always decide to change the tailwheel at a later date if I'm not that happy with it and
and pretty much get my money back when I sell it.
The other day I saw a dual forked tailwheel that wasn't exactly what I was looking for (I was looking for the Bob Wheel, made by Iron Design) but the conversation on the biplane forum convinced me that this would be a good choice at less than half the price. Well, I picked this beauty up for about 1/5th the price. The other $500.oo can go toward my instruments or overhauling the engine. I can always decide to change the tailwheel at a later date if I'm not that happy with it and
and pretty much get my money back when I sell it.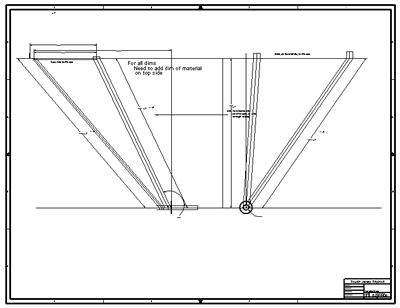
 Figured out all the lengths and where everything needed to be... or so I thought. Looking at the drawings, actually trying to build from the drawings and you notice things that you didn't notice while you're nice and comfortable in your chair working on the computer with DeltaCAD.
 I ordered the only piece of tubing that I didn't have in stock here (along with the tools I need for finsihing the trim servo tabs); the 1.5" x .o58 for the axle holds. I hope they're in tomorrow. Aircraft Spruce is pretty good about getting things here quickly. Come to think of it, tomorrow would be an overnight shipment. Ahhh... I think I better have a plan B for Sunday. Plenty to do... if it isn't working on something, it's getting something ready that's waiting in the wings. (get it ? wings... ducks... quack quack... ahhhh never mind)