Mantua, New Jersey
Original Site:
September 2004
E-mail: usav8or@yahoo.com
The Radical Radial Driver's seat.
October 12, 2014 Working on...
the seating arrangements, right now.
Decided to make a new page on fitting out the cockpits. For the most part I'll just be adding all the separate items I'll be checking off my checklist onto the general "Fitting it Out" page. If I see the need to have another sub-page, I'll create it at the time of that need.
I've been working on the pan seats for a few days now. I've made a note of it in my jornal but nothing really on paper about it. Most of the information I gather has been from the Biplane Forum; a thread created by Beej and he then references a thread by Skybolt540.
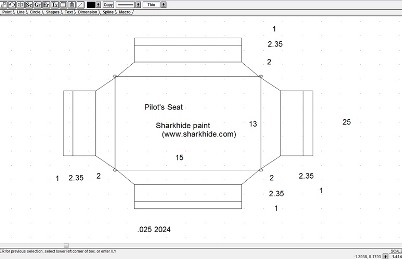
I'll be making them out of .o25 2024 T-6 aluminum. Which I'm told is "plenty thick for the task."
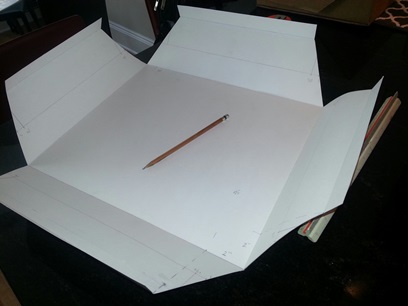
The series of screen shots and photos you'll see is the progression of part from conception to finished product. As of today, I have the first test pattern cut. I think I'll need to make a slight modification of the length of the sides. The depth of the seat pan is 2inches. Using Pi, I figured the wrap of the tube to be clost to 2 3/8inches. I've added 1inch for riveting the wrap to the main pan.
I worked on the initial test pattern today; drew it up and cut it out. Already see where I'll be making a change to it (a cut-out needs to go in the back where the lower portion of the "V" in the back connects to the seat frame.)
Right now I'm not sure where the wrap of the tube will begin. I'll see where the 1inch tab sits flat on the main pan (with a tight wrap on the tubing) and adjust the depth of the 2 3/8inch side accordingly. Right now I'm thinking that the wrap should be about 1/4 of its length. We'll see.
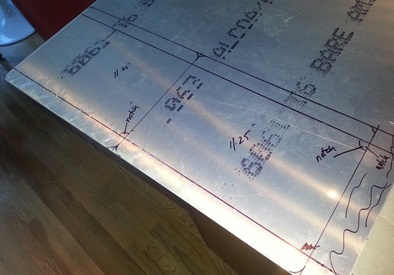
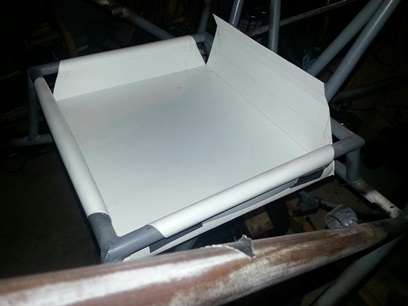
Had some additional time to layout the heel trays today. (Took/checked my measurements yesterday.) Laid them out on a piece of .o63 6061 T-6 I had laying around. Spoke to Beej about this the other day and he got that material from somewhere (I'm not sure where... but I trust that he did his research).
All I need to do is cut them out, bend them up... a few screw holes and they're ready for mounting. oh yeah... I'll be putting the same stuff they use on truck bed liners for the finish; tough as nails !
October 14, 2014 Still working on...
the paper seat pans.
I wanted to accomplish a few things today; drill a few holes and see if my test piece worked.
My work on the brackets is noted elsewhere... no room for it here.
I took my paper handy-work from the other day and tested it out on both seats. From what I could see, with a paper version of the seat pan, it fit real nice in each seat opening.
The measurement I used, caculating it with Pi, worked to my surprise. The surprise wasn't in the calculation, but in the depth of the pan... it was at the depth that I wanted it to be. The wrap was full on the tube. I was thinking that it may not wrap completely and the depth of the pan would be deeper than I had wanted it to be. I was ready to make a few marks and re-cut the paper test piece. But... no need to.
I thought of this prior to fitting it up... that I would need to notch the wraps around the angled seat-back tubes. I can cut the one set of notches on the test piece I have. The other seat... I'll make a new back wrap and make the notches on that for the second trial fit. Hell, maybe I'll buy a few new pieces of display board and make two entirely new ones... but, that would be a waste of time, no?
Here's a few shots of the test-fit of the test pan.
Back of pilot's seat.
October 16, 2014 small update:
I knew I had a sheet of aluminum down in the basement from years.... ago. I'm talking WAY back. I knew it was thin and was about 2feet by 4feet. Hoping that it was a piece I could use for one of the seat pans.
Headed down to the basement before starting on the project and lifted the piece out of the cardboard sleeve and read "2024 T-3 .o25" YES ! JUST what I needed. I'll make two more displayboard cut-outs; one for the pilot and one for the co-pilot's seat pans. Make the cut-outs in the back to fit around the vertical, angled tubes and then start making cuts on the real thing; pilot seat first, then co-pilot.
November 2, 2014
Here or there ?:
Accommodations or fitting out the fuselage ??? I've been posting the "back wall" of the pilot's area on the fuselage page... here's a link to it. It's kinda the fit and finish, ain't it?
Click here and see what I did to enclose the sides and the bottom area around the pilot's seat to seal off the back of the biplane.
More about the cockpits to come...
February 11, 2015
Hundreds of choices to be made...
and here's one.
Found the perfect stick grips... from an outfit called "Fatboy Flightworks". A while back I sent them a few emails and called once. Turns out, they're no longer in business.
They have what us homebuilders need (speaking for all homebuilders ???); a nice stick grip kinda like the ones that they had in the old miltary birds. Nuthin' out there in the market place. Now what? EBAY BABY !
Found one that looked sorta like the ones Fatboy made. Going for X amount of dollars with a four-way switch on the top. Suppose to be NOS (new old stock) military. And... it didn't look used at all. Was listed on ebay for X amount of dollars. Made an offer for 1/2 of X amount of dollars and turned down. Re-listed again for the same price. Made an offer for 3/4 of X amount of dollars and it was turned down. Re-listed for X amount of dollars. Made an offer for X amount of dollars and they took it. Surprise surprise surprise...
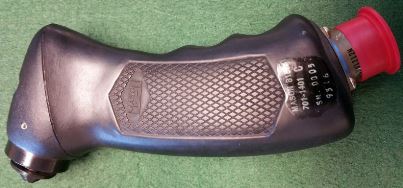
There's nothing really out there like this. It's a solid rubber grip. Everything out there is either foam rubber, thin rubber or a hard, hollow plastic (something you'd see used with a computer flight simulator). This is solid rubber. I'm thinking of replacing the top four-way with a mike button which I can purchase online.
The search is on for another one like this...
February 13, 2015
A photo of my Mason stick grip
The new stick grip arrived on Friday, the 13th ! It's everything I wanted in a stick grip ! haha
February 19, 2015
Work on my Mason stick grip
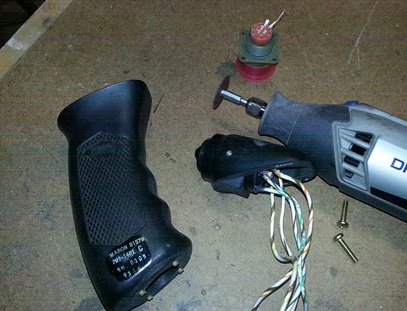
Threw the question out to the forum, a few days ago, to see how I could tap out a tube to fit the threaded attachment on the bottom of the grip. I didn't get an answer to that question... what I did get was a few guys telling me that I shouldn't use that electrical quick-attach as my attachment to the control stick.
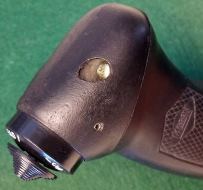
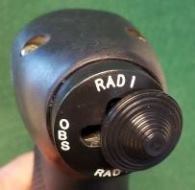
So... I had to take it apart to see what I had to work with; to see if this was still useable or just a bad purchase. I had time to do that tonight. The top comes off and exposes the hat switch and its wires. Looks like I'll be able to use that hat switch after all. Dremeled the four pin heads that held the lower, threaded attachment to the grip. (was able to pull two of those cut-off pins out... had to dremel down the others) A wired, plug-like insert easily pulled out and left a 2inch deep hole larger than 7/8inch but not quite 1inch in diameter.
My thoughts... I'll need to purchase a length of tube that will slip into the 1inch x .o49 tube that is being used for the control stick. It'll need to have a thick wall so that I can put it on the micro-lathe and turn it down to allow it to slip on the grip.
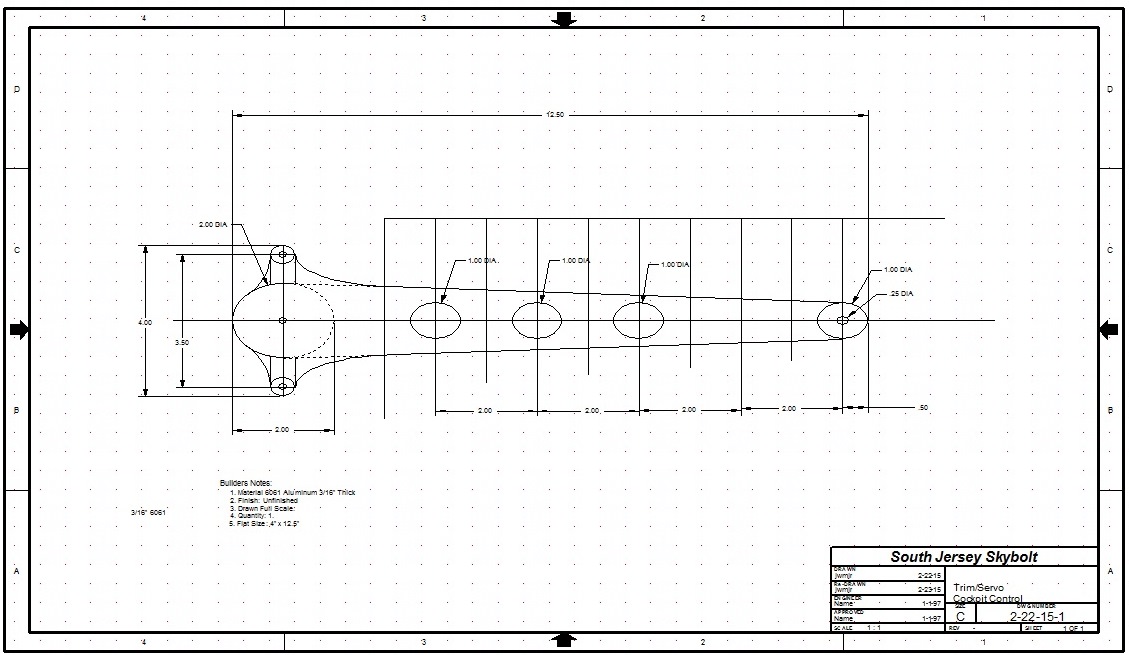
February 22, 2015
Designing the Trim/Servo...
control stick !
Looking to work on something today since we're pretty much staying inside today (the roads are like crap!). Looked over the sheets of aluminum that I have at Lombard. Thought about re-drawing the instrument panels but decided against it until I have the sheet metal on the biplane so that I can make it to the curve in the sheet metal. That's not going to happen until I get the firewall completed. (the old... The hand bone connected to the wrist bone. The wrist bone connected to the arm bone. It's easy to connect those dry bones...)
So where does that leave me? STILL looking to work on something today... Ya know, there's a lot still left to do on the biplane and I pulled this one out of the air (wasn't hard to find); design the Trim/Servo control stick. Looked on the Steen site a while ago and saw they go for $95.00. YIKES !