Mantua, New Jersey
Original Site:
September 2004
E-mail: usav8or@yahoo.com
more work on the...Radial Fuselage.
May 5, 2012 If it ain't square...
do something about it !!!
More work on the front spar of the upper wing center section. The simple task of attaching the nose ribs to the spar took two point one hours. A lot more than just a simple task.
Started off the night having to square up the 45 degree blocks. Apparently Spruce Specialty doesn't cut 90 degree corners... more like 85 degree corners. When you go to sandwich the nose rib between the two blocks you get a nice gap at the top on either side. Not a problem, other than having to take the time to do something that should have been done when they cut them. (just adding a little bit more time onto the build) The odd cut on the blocks would also allow the nose rib to fall off to either side... not keeping it vertical.
I took the time to mark the areas where I'd be nailing in the brads so on the blocks that it'd look nice and pretty, even though you won't see it... 'cause that's how I do it. Pre-nailed the brads to give them a start... just soes they're poking through the bottom. It's a lot easier to nail a piece of wood onto another, when there is glue sliding it around, when on the first tap it's already attached to the other piece. Make any sense ???
Before I started glueing and nailing everything together I ripped a few pieces of 1/16 inch ply and tacked them on the top and bottom of the spar for a reference when attaching the nose ribs (there needs to be 1/16 inch overhang both top and bottom of the nose rib). The ply allowed me to place the rib in the correct location... not too far down and not too far up on the spar.
With everything glued up I used some of those heavy, round weights, I've used in making spars, to keep the nose ribs vertical (sandwiching them between a few of the weights stacked up).
Tomorrow I'll take a photo or two...
May 6, 2012 Head scratching...
and rib sanding.
Looked at the work that I did yesterday. One rib moved slightly up (I most likely put it there to begin with). Spent some time thinking what I'll do to rectify my situation...
Tomorrow I'll sand down the one side of it and then I'll build up the other side slightly and then sand. Shouldn't be a major production. Still need to attach the two outer ribs (which are solid). I'll have to play with the fittings to see how/when they will attach. Trying to look ahead here...
May
7, 2012 Exit... stage
left !!!
I had it all planned out... use the outer two nose ribs as
a guide and sand the high spot on the one nose rib... build
up the other side.
Started sanding... wondering... sanding more... wondering
more... sanding a little bit more... just not feelin' the
love. Are the outer two nose ribs centered? They're close,
but is a hair off either way going to matter? Not sure...
Spent a lot of time just pondering... actually not pondering...
spent time knowing what I needed to do. Maybe some of that
time was spent thinking I didn't really have to do what I
knew I had to do.
I've been down this road before. Not only knowing... but understanding
what needed to be done. Spent tonight thinking about it instead
of doing it.
I need to route two more ribs to use as my pattern on the
sides. Set/lock those into position and start sanding. (just
need to keep the speed up...)
Sometimes a good night is just knowing when to walk away.
May 8, 2012 my plan...
"no matter what"
I was going to route these two nose rib blanks (for the sanding jig pattern) no matter what tonight. And a lot of no matter what it was...
Started off with cutting the blanks from some construction grade 1/4 inch plywood. Not a problem... went to grab the home-made router table I made soooo many years ago and couldn't find it right away. Twenty minutes later I located it, BUT... ahhhhhhhhh I'll spare you the long story. I finally ended up attaching the nose rib jig to a square of plywood, locked it onto a table and then routed the blank to shape. Repeat for the second one.
Marked the center lines on the blanks and center line on the spar. I'm ready to attach the nose rib sanding jigs to the spar to finish the job.
A little over two hours spent on the build tonight... an hour's worth of work completed. Got past all the "no matter what's" and got it done.
still... more to come
May 9 - 10, 2012 Don't rush things...
just to get something done
May 9th
Tried using the two nose rib blanks I cut the other night for alignment to see what is high and what is low. "Messed" around with them for awhile. Wasn't working for me... so I didn't press on regardless. Decided to route ten additional nose rib blanks and sandwich the the existing ones.
May 10th
Routed ten additional nose ribs for the front spar on the upper wing center section. Like I said before, I'll sandwich the existing spars with these. Need to come up with a way to make sure that these are aligned correctly.
The issue the other night was me clamping the nose rib blank "jigs" onto the spar. They would raise up or twist a little, thus they would put a skew in the alignment.
I'm thinking that if I just tack them down with brads to hold them into position (since I won't need to push on them for sanding this time) I can put them in the right position and not have them move. I'll strike lines at certain heights and have the new nose rib blanks touch the line for alignment. Make any sense?... we'll see if it does.
If it doesn't... onto working it out some other way.
May 13, 2012 Plenty of time to work on the biplane this weekend...
right ???
I had a plan... or so I thought.
Plan: finish up the bathroom early Saturday and then have the rest of the weekend to work on the biplane.
What happened: It all started off on the right foot. Early Saturday morning I got the tools together and went to work on finishing the bath; install the sink, hook up the water lines, install the new towel rack and TP holder and a small spackling job.
I'd be done before noon... right ?
Pulled the sink out of the box (nice new porcelain one insteal of the old metal one). Took the old one out of the hole placed the new one in and it's about 3" shorter (front-to-back) than the other one. Great... what the hell am i going to do now ? I remembered I kept the extra laminate from the last time I laminated the counter (oh so many years ago). Okay... no thinking about what I need to do with this job... needed to laminate two edges and the top, build up the back portion of the hole (so that it wouldn't just be a thin sheet of laminate) and then laminate the top.
Out to the garage to get the laminate, confimed that I had a can of spray glue in the basement work area. Cut the strips for the side, laminated then routed flush... cut the lamiante for the top, laminated, inserted the filler piece and glued to lamiante, routed the edges and the center out (for the sink)... Okay, ready to drop the sink in, attach the water lines and move on to the rack and holder. (not so fast)
Needed to drill the holes in the plywood that I pieced onto the back end of the hole. Found the hole saws, picked one the size in the sink and made my three holes. Attached the faucet to the sink, dropped th bowl in and... the damn plastic nuts on the underside holding the faucet are quite a bit larger than the holes. Okay... get the saber saw, mark the area that needs to be cut away and have at it. Okay.. with that finished, I'm ready to drop the sink in for a final test fit before applying the silicon on the underside of the sink (the thing that holds the bowl in place... not clamps or screws) Fit great... but let me try out the stopper mechanism (it sticks up behind the faucet).
Guess what ??? The center hole in the new sink isn't large enough for the metal rod to go through (meaning that when I move the faucet as far forward in the other two holes it still isn't far enough to allow the rod to go through). Lucky I have a Dremel Tool. Spent the next hour... or so, grinding a notch in the back of the center hole to allow the rod to thread through it.
I finally finished up around 6:30PM... and not much feeling like working on the biplane after all the obstacles I hit with the "simple" task of finishing up the bathroom. I still needed to hang the rack and holder, the spackle job and whatever other misc. things that are going to pop up.
Sunday morning comes around... needed to do some other stuff around the house, it's also Mother's Day so I went over to my mother's place for a few hours. At 4:30PM I get a chance to work on the biplane.
Went down to the basement work area and measured the 45 degree support blocks that area glued to the nose ribs on the upper wing center section front spar. Made my measurements on one of the new nose ribs, took it over to my big ol' band saw and cut out the excess then file to the line and sand smooth. I used it as a pattern to mark the remaining nine and set out to cut ,file and sand smooth the cut outs on these.
It's not as much as I thought I would get accomplished this weekend... but I'm happy to have been able to do this much.
May 15, 2012 A week's worth...
of sandwiches ???
Needed to set about filing down the high spots on the existing nose ribs on the upper wing center section. Need to do this before attaching the outer two and striking lines at various heights and then aligning the other ribs to lines.
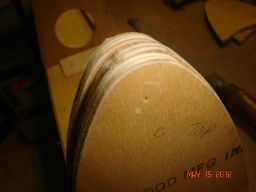
Decided to align each of the nose ribs with the upper side of the section with the 1/16th inch ply in place. With the existing nose ribs sandwiched between the new nose ribs I marked the high spots and started to file the excess away. With all the aligning and marking, I only had time to file down one nose rib. Another hour next session and I sould be ready to move on to the next step.
Center of "sandwich" still high.
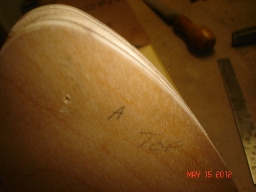
Center of three ribs sanded down.
May 16, 2012 The Question of...
"What is the World Made Up Of ?" aside....
will my posit on String Theory...
hold up to the test of nose rib alignment ???
Filed down the four additional nose ribs... the ones that were a little high on the upper wing center section front spar. Not much more to say about that...
Wanted to make sure that they (the new nose ribs) were level with each other across the spar.
Thought of putting a brad on the two extreme nose ribs, stretch a length of string between the two and then butt each nose rib to it and tack into position. GREAT idea, right ? Upon testing out my String Theory... I ran into several issues: 1. if the nose rib was pushed a little too far, thus pushing out the string, when pulled back the fibers of the wood would catch the string and pull it back with it. and 2. I could never really be sure that the nose rib was flat against the string because of the previous statement. Messed around with it for about 15 minutes and decided that I needed to line a straight edge along the two outer ribs and butt the new ribs against it.
I'll tackle this tomorrow and then mix a pot of glue and lock them into place.
So much for my theoretical physics' String Theory model for nose ribs and upper wing center section spars...
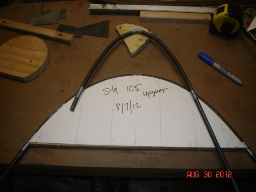
May 17, 2012 Other than any reference...
to Quantum Phisics....
ditto to last night.
Filed down bottom side of the nose ribs... ditto to last night. ('cause that's how I roll...)
May
19, 2012 duuuuuuhhhhh...
I just realized I've been posting the upper wing center section
in the fuselage section.
I've taken all the posts for the center section and posted
them under the correct heading. I'll be keeping the originals
here as they have links on other sites to them.
August
1, 2012 thinking of how to make the shape...
Since welding up the fuselage I've told everyone that I have a rail dragster in the garage... or at least something that looks damn close (sans the slicks). I'm finally going to give this jungle gym it's shape...
Spent yesterday looking over the layouts that I had done up in DeltaCAD awhile ago. Needed to see where I had left off with my "plan of action."
Pretty much spent all night looking things over and arriving at the new plan of action. Figured where the formers need to go and what additional formers I need to make.
Plan of action... make a few jigs to hold the formers in place so that I can weld brackets (of which I'll need to make) onto them. While thinking of all this, I thought about the firewall again, and what type of material to make it out of. I'll probably go with stainless steel. Galanized steel I was told emits a poisionous gas when a hot flame hits it (and it pretty much looks like shit I'm told). Titanium would be nice. One of the guys on the biplane forum said he picked up a sheet of it for not much more than stainless steel; a 36 x 36 inch piece delivered for $99.00. I'm looking for a piece that is 48 x 48 inches. The firewall needs to be 44 inches in diameter.
Over the next few days I'll need to make a decision and order the material for it.
Tonight... out to the garage to look over the fuselage. Back down to the basement to make those formers. Tomorrow I'll lock these jigs into place and start laying out the formers and stringers.
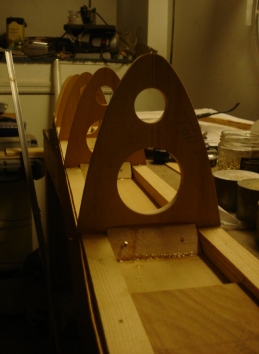
August 3, 2012 they ain't never gonna fly...
pigs, that is.
You can kick things around your head from here until, well, until pigs fly... but you just need to get out there and start working on it. Get started on that small project... if it's not working for you, you're working through it and you'll eventually end up with the right solution.
and so it was... with the alignment of the formers
I've been thinking of how I was going to align these so that they'd produce the right lines. Finishing off the shape of the plane is critical in the final look of it when it's all said and done. Made a few jigs and "played" with them tonight thinking that they would work. Walk away from it after one and a half hours and wasn't feelin' the lovin'. Got some "Friday night" pizza and it came to me as to what I need to do.
I have a sheet of ply simulating the Jacobs hanging on the firewall end of the fuselage. What I need to do is make a few plywood "formers" that will sit on the top of the upper longerons and space them throughout the fuselage, span straight edges from ply form to ply form and raise the formers up to meet them. YES !!!
Ain't it great when things fall into place... so quickly!!!
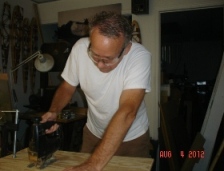
August 4, 2012 things are shaping...
up!!!
It's feeling good... the whole experience. Well, let me rephrase that. It has always felt good; the learning, the experience... the mindfulness of the build. But now... after all these years of work and now it's starting to look like an airplane.
In my mind it has always looked like a Skybolt, but now dream turning into reality... a fuselage with shape to it.
As mentioned in my last post, I came up with a good solution for keeping the formers in line. Today I spent time cutting out the shape of the former jig/support and positioning it on the fuselage. Tomorrow I'll work on tack welding them onto the fuselage.
As a side note, I took a ride over to the airport today to speak to Whitey. Asked him about firewall stuff. He uses galvanized... he says it's cheaper. I think I'll stick to stainless steel.
I took a look at the firewall he made for the Aeronca Sedan... he basically made the shape of the firewall with plywood, sandwiched the galvanized steel between that and another sheet of ply and bent over sections of the steel to the form. He followed this up with a shrinking tool. He has the lip of the firewall facing forward. I'm not sure if I'll do it like that or face it back and hide underneath the sheet metal.
I'll give a call to Fazzio's on Monday to see if they have a sheet of stainless large enough for the firewall... If so, I'll go over and pick it up.
August 6, 2012 going to Kmart..
to buy something for the biplane ???
The plywood former thing-a-ma-jig I made is working out great... just like I thought it would. I've decided that I'd make templates for each of the stations where I'll be placing the formers. Figured that it'd be easier to make display board thing-a-ma-jig patterns (to make sure the lines flow) than to have to modify plywood patterns.
Kmart got my business... that's where I purchased the display board from to make the patterns. Spent three hours tonight laying them out and then cutting them out. Still a lot more to do on them.
It was one of those nights where it's not feeling like you're doing anything... but the results from the night will pay off handly in the near future.
August
7-8, 2012 making paper
airplanes...
Taking that material I bought from Kmart and started making,
well... making what looks like, an airplane. Let's say...
they look like parts that will make the shape of the biplane.
I'm spending quite a bit of time drawing and cutting out these
patterns. It's well worth it though. After I get all of these
cut out I'll fit them up to the fuselage to make sure this
looks like I want it to look. When it does... I'll trace the
patterns on some plywood, fit them up to the fuselage and
weld on the formers and stringers.
Although I'm spending all this time on it... it beats doing
a "hit or miss" by cutting them out of plywood. And if I miss,
having to spend all THAT time all over again... and maybe
again.
Making paper airplanes... shouldn't
be a problem, I've been doing it since I was a kid.
August 9, 2012 repeating myself...
I think I mentioned this earlier... as I'm working on the fuselage, at this "advanced stage" I'm beginning to see the shape of the biplane in my mind as I'm working on different projects. I'm not sure if that is a good or bad thing... probably neither. It's just my dreams taking shape.
Still working on cutting out the patterns for the formers and stringer stand-offs. I'd just be repeating myself if I wrote about it...
August 13, 2012 still repeating myself...
I'm close... but not quite there yet. One more night of cutting out the white board patterns and I'll be ready to test fit these to the fuselage. 'nuff said...
August 18, 2012 I've stopped repeating myself...
for the most part
Yep, still working on the shapes... haven't given up. I've been doing the "repeating myself" and I just wasn't into writing that again.
The shapes have all been cut out (well, actually, from doing what I have done over the past few days I discovered I need to cut out one or two more). I have them taped up on the fuselage in some form or fashion and it looks like the biplane in the CAD I drew up some months ago... amazing ain't it ?
I was thinking that I would try and skin it somehow but that would be futile given that the forms are only made out of thin display board. I think I've just about proven the design and can move forward to cutting these pieces out of plywood. When I have the ply cut THEN I can tweak it for that finished look.
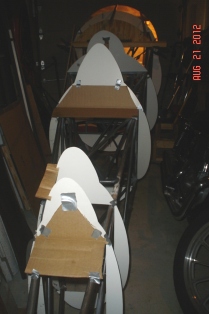
August 19 and 21, 2012 From paper pattern to finish former...
well, almost... nothing in between
Over the past few days I taped the patterns to the fuselage and it's just what I was looking for... the Skybolt Mystery Ship.
Sa... weeeeet !!!
I originally thought that I would cut plywood patterns and then fit those up to the fuselage. Now thinking about it, and after seeing the display board patterns up on the fuselage already... it'd be a waste of my time. I've decided that I'll work off of these display board patterns and make a few tweaks along the way. It's more of an art form at this stage than a science. (note: I am making plywood patterns for each of the formers I am making but will save on wood by using the same wood for each station by cutting down from larger to smaller... make sense? And now that I'm thinking about I I may cut a few of the shapes where the stand-offs are so that I can lay the string up on the pattern and cut my stand-off to length.)
I had a few formers already bent to shape to match the soon-to-be-made firewall, but that ain't gonna work. The only thing that mirrors the firewall is the 9" height at the center, both top and bottom, back to Station 49.o6. Everything else starts to curve in. So... while the time spent on the original formers was a little off speed, I can still use them with a slight adjustment.
I re-formed one of those today... that slight re-adjustment took close to one and a half hours. And believe me... I was working toward excellence, not perfection on it.
August 22, 2012 10PM...
and all hell is breaking loose
Tonight when eating dinner I was flipping between the Phils/Red game and the local Public Broadcasting Station's series on the history of WWII (it's a new one I haven't seen before... and I'm enjoying it).
One inning ran into the next and there weren't any commercials on PBS... the Phils lost to the Red 3-2 and the WWII program was finished at 9:45PM... and I'm stil sitting on my arse amd thought "What the hell ???... this can't be... I need to do something on my project."
Decided that I'd re-bend one of the existing formers to the new-correct shape... no matter how long it took me. If it takes me 2 1/2 hours like yesterday I'd be looking at 12:30AM. And so... I marched on down to the basement work area.
Took my plywood pattern from yesterday and laid the new former shape up on it, traced it's shape and cut it down to size then sanded to the line. Started working on re-shapping the tubing and must have re-learned something yesterday that I forgot since the last time I formed these formers. Tonight (drumroll please) I was finished re-shapping it in 1/2 hour. nice....
August 24, 2012 First, second and third...
and we ain't talkin' bases.
Another late nighter. Watched the Phillies kick the Nationals arse (well it wasn't kicking their arse with a win of 4 -2, but the Nationals have been in first place all season and the Phillies are just coming up out of the basement... so, yeah, they kicked their arses). Okay...
It's 10:48PM and I'm just heading down to the basement to form another former. What I thought I learned from the first and applied to the second left on the third. I spent an hour working the bend back-and-forth on this re-bend. Well... maybe 45 minutes considering that I cut down the plywood pattern of the last former to use for the bend-shape on this former.
(which got me to thinking...)
Is "Art" ever learned ??? or is it a continuous practice ??? ahhhhh... enough of the heavy stuff... back to baseball tomorrow (baseball, which if you think of all the stats is kind of a "heavy" sport too... more stuff to ponder ?).
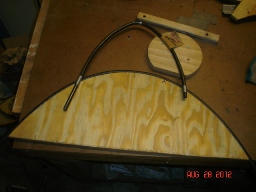
August 30, 2012 Horses, turtles and Skybolts...
oh my...
Blinders... for horses... not builders.
Have a plan... but unlike flying... you don't need to "Plan your flight... fly your plan". Sure... you need to have a plan of action to get you started, but don't have blinders on when you come to a "wall" to getting to where you need to get. For instance...
I created a simple jig for bending up the formers; a circular "block" with a backer block for holding the tube in place. This works great for the larger, less radiused bends but when it comes to bending tight radius-us-is (wurd) it's not cutting, or should I say, bending it. Being the "type A" I want to push through it. But... step back, see what you need to do and make the change.
For this it was a simple matter of making a smaller bending block to make the tighter radius, but this applies to the more complex too. If something doesn't work there is a way to do it... you just may need to work around it. More times than not it's going to take a little bit of time but that time will save you a lot of wasted time attempting to make a piece that you're going to screw up making in the first place (yeah... run on sentence).
I know this but I need to keep reminding myself about it. And when I actually follow through on what I know I'm surprised at how well it works.
Here are a few shots of the formers for the turtle deck. This isn't the usual look for a Skybolt. Still quite a few more to make.
August 31, 2012 Geting lulled into complacancy ?
Naaaaa... just one of the steps to getting it done
With some of the longer, drawn out projects... you get lulled into a "thousand yard stare" when making the same parts and pieces over and over again. You're working towards an end goal, but it takes some time getting there. But, there comes a point in that small, assembly line of parts that you need to stop the conveyor and get "it" done.
I've been working towards shaping the biplane for awhile now; quite awhile actually. First it was the shape itself (no shape was given with the "R" plans so I had to come up with something myself). Once I decided upon the kick-ass shape I needed to figure out where the formers and stringer stand-offs were going to be placed. THEN I needed to actually figure out the shape of the formers I THEN had to make. I'm at the point of making those formers now... and close to completing them.
This brings me to my point of today's post... which is: I'm just about at the point of needing to get "it" done. This is where I usually stumble and over think things... putting off what eventually will be done anyways... and that my friend is taking that first step.


 Looked at the work that I did yesterday. One rib moved slightly up (I most likely put it there to begin with). Spent some time thinking what I'll do to rectify my situation...
 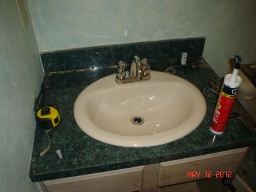 Out to the garage to get the laminate, confimed that I had a can of spray glue in the basement work area. Cut the strips for the side, laminated then routed flush... cut the lamiante for the top, laminated, inserted the filler piece and glued to lamiante, routed the edges and the center out (for the sink)... Okay, ready to drop the sink in, attach the water lines and move on to the rack and holder. (not so fast)
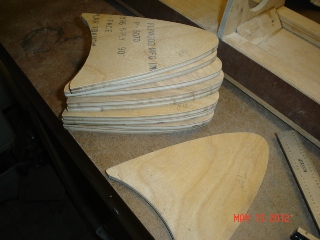
 It's feeling good... the whole experience. Well, let me rephrase that. It has always felt good; the learning, the experience... the mindfulness of the build. But now... after all these years of work and now it's starting to look like an airplane.
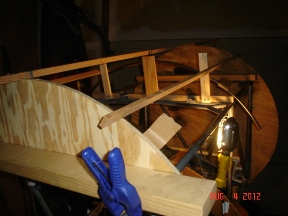
 I originally thought that I would cut plywood patterns and then fit those up to the fuselage. Now thinking about it, and after seeing the display board patterns up on the fuselage already... it'd be a waste of my time. I've decided that I'll work off of these display board patterns and make a few tweaks along the way. It's more of an art form at this stage than a science. (note: I am making plywood patterns for each of the formers I am making but will save on wood by using the same wood for each station by cutting down from larger to smaller... make sense? And now that I'm thinking about I I may cut a few of the shapes where the stand-offs are so that I can lay the string up on the pattern and cut my stand-off to length.)