Mantua, New Jersey
Original Site:
September 2004
E-mail: usav8or@yahoo.com
Three-piece upper wing... stronger than Babe the OX.
May 5, 2012 If it ain't square...
do something about it !!!
More work on the front spar of the upper wing center section. The simple task of attaching the nose ribs to the spar took two point one hours. A lot more than just a simple task.
Started off the night having to square up the 45 degree blocks. Apparently Spruce Specialty doesn't cut 90 degree corners... more like 85 degree corners. When you go to sandwich the nose rib between the two blocks you get a nice gap at the top on either side. Not a problem, other than having to take the time to do something that should have been done when they cut them. (just adding a little bit more time onto the build) The odd cut on the blocks would also allow the nose rib to fall off to either side... not keeping it vertical.
I took the time to mark the areas where I'd be nailing in the brads so on the blocks that it'd look nice and pretty, even though you won't see it... 'cause that's how I do it. Pre-nailed the brads to give them a start... just soes they're poking through the bottom. It's a lot easier to nail a piece of wood onto another, when there is glue sliding it around, when on the first tap it's already attached to the other piece. Make any sense ???
Before I started glueing and nailing everything together I ripped a few pieces of 1/16 inch ply and tacked them on the top and bottom of the spar for a reference when attaching the nose ribs (there needs to be 1/16 inch overhang both top and bottom of the nose rib). The ply allowed me to place the rib in the correct location... not too far down and not too far up on the spar.
With everything glued up I used some of those heavy, round weights, I've used in making spars, to keep the nose ribs vertical (sandwiching them between a few of the weights stacked up).
Tomorrow I'll take a photo or two...
May 6, 2012 Head scratching...
and rib sanding.
Looked at the work that I did yesterday. One rib moved slightly up (I most likely put it there to begin with). Spent some time thinking what I'll do to rectify my situation...
Tomorrow I'll sand down the one side of it and then I'll build up the other side slightly and then sand. Shouldn't be a major production. Still need to attach the two outer ribs (which are solid). I'll have to play with the fittings to see how/when they will attach. Trying to look ahead here...
May
7, 2012 Exit... stage
left !!!
I had it all planned out... use the outer two nose ribs as
a guide and sand the high spot on the one nose rib... build
up the other side.
Started sanding... wondering... sanding more... wondering
more... sanding a little bit more... just not feelin' the
love. Are the outer two nose ribs centered? They're close,
but is a hair off either way going to matter? Not sure...
Spent a lot of time just pondering... actually not pondering...
spent time knowing what I needed to do. Maybe some of that
time was spent thinking I didn't really have to do what I
knew I had to do.
I've been down this road before. Not only knowing... but understanding
what needed to be done. Spent tonight thinking about it instead
of doing it.
I need to route two more ribs to use as my pattern on the
sides. Set/lock those into position and start sanding. (just
need to keep the speed up...)
Sometimes a good night is just knowing when to walk away.
May 8, 2012 my plan...
"no matter what"
I was going to route these two nose rib blanks (for the sanding jig pattern) no matter what tonight. And a lot of no matter what it was...
Started off with cutting the blanks from some construction grade 1/4 inch plywood. Not a problem... went to grab the home-made router table I made soooo many years ago and couldn't find it right away. Twenty minutes later I located it, BUT... ahhhhhhhhh I'll spare you the long story. I finally ended up attaching the nose rib jig to a square of plywood, locked it onto a table and then routed the blank to shape. Repeat for the second one.
Marked the center lines on the blanks and center line on the spar. I'm ready to attach the nose rib sanding jigs to the spar to finish the job.
A little over two hours spent on the build tonight... an hour's worth of work completed. Got past all the "no matter what's" and got it done.
still... more to come
May 9 - 10, 2012 Don't rush things...
just to get something done
May 9th
Tried using the two nose rib blanks I cut the other night for alignment to see what is high and what is low. "Messed" around with them for awhile. Wasn't working for me... so I didn't press on regardless. Decided to route ten additional nose rib blanks and sandwich the the existing ones.
May 10th
Routed ten additional nose ribs for the front spar on the upper wing center section. Like I said before, I'll sandwich the existing spars with these. Need to come up with a way to make sure that these are aligned correctly.
The issue the other night was me clamping the nose rib blank "jigs" onto the spar. They would raise up or twist a little, thus they would put a skew in the alignment.
I'm thinking that if I just tack them down with brads to hold them into position (since I won't need to push on them for sanding this time) I can put them in the right position and not have them move. I'll strike lines at certain heights and have the new nose rib blanks touch the line for alignment. Make any sense?... we'll see if it does.
If it doesn't... onto working it out some other way.
May 13, 2012 Plenty of time to work on the biplane this weekend...
right ???
I had a plan... or so I thought.
Plan: finish up the bathroom early Saturday and then have the rest of the weekend to work on the biplane.
What happened: It all started off on the right foot. Early Saturday morning I got the tools together and went to work on finishing the bath; install the sink, hook up the water lines, install the new towel rack and TP holder and a small spackling job.
I'd be done before noon... right ?
Pulled the sink out of the box (nice new porcelain one insteal of the old metal one). Took the old one out of the hole placed the new one in and it's about 3" shorter (front-to-back) than the other one. Great... what the hell am i going to do now ? I remembered I kept the extra laminate from the last time I laminated the counter (oh so many years ago). Okay... no thinking about what I need to do with this job... needed to laminate two edges and the top, build up the back portion of the hole (so that it wouldn't just be a thin sheet of laminate) and then laminate the top.
Out to the garage to get the laminate, confimed that I had a can of spray glue in the basement work area. Cut the strips for the side, laminated then routed flush... cut the lamiante for the top, laminated, inserted the filler piece and glued to lamiante, routed the edges and the center out (for the sink)... Okay, ready to drop the sink in, attach the water lines and move on to the rack and holder. (not so fast)
Needed to drill the holes in the plywood that I pieced onto the back end of the hole. Found the hole saws, picked one the size in the sink and made my three holes. Attached the faucet to the sink, dropped th bowl in and... the damn plastic nuts on the underside holding the faucet are quite a bit larger than the holes. Okay... get the saber saw, mark the area that needs to be cut away and have at it. Okay.. with that finished, I'm ready to drop the sink in for a final test fit before applying the silicon on the underside of the sink (the thing that holds the bowl in place... not clamps or screws) Fit great... but let me try out the stopper mechanism (it sticks up behind the faucet).
Guess what ??? The center hole in the new sink isn't large enough for the metal rod to go through (meaning that when I move the faucet as far forward in the other two holes it still isn't far enough to allow the rod to go through). Lucky I have a Dremel Tool. Spent the next hour... or so, grinding a notch in the back of the center hole to allow the rod to thread through it.
I finally finished up around 6:30PM... and not much feeling like working on the biplane after all the obstacles I hit with the "simple" task of finishing up the bathroom. I still needed to hang the rack and holder, the spackle job and whatever other misc. things that are going to pop up.
Sunday morning comes around... needed to do some other stuff around the house, it's also Mother's Day so I went over to my mother's place for a few hours. At 4:30PM I get a chance to work on the biplane.
Went down to the basement work area and measured the 45 degree support blocks that area glued to the nose ribs on the upper wing center section front spar. Made my measurements on one of the new nose ribs, took it over to my big ol' band saw and cut out the excess then file to the line and sand smooth. I used it as a pattern to mark the remaining nine and set out to cut ,file and sand smooth the cut outs on these.
It's not as much as I thought I would get accomplished this weekend... but I'm happy to have been able to do this much.
May 15, 2012 A week's worth...
of sandwiches ???
Needed to set about filing down the high spots on the existing nose ribs on the upper wing center section. Need to do this before attaching the outer two and striking lines at various heights and then aligning the other ribs to lines.
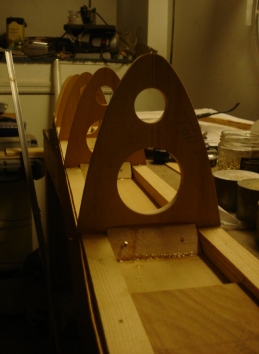
Decided to align each of the nose ribs with the upper side of the section with the 1/16th inch ply in place. With the existing nose ribs sandwiched between the new nose ribs I marked the high spots and started to file the excess away. With all the aligning and marking, I only had time to file down one nose rib. Another hour next session and I sould be ready to move on to the next step.
Center of "sandwich" still high.
Center of three ribs sanded down.
May 16, 2012 The Question of...
"What is the World Made Up Of ?" aside....
will my posit on String Theory...
hold up to the test of nose rib alignment ???
Filed down the four additional nose ribs... the ones that were a little high on the upper wing center section front spar. Not much more to say about that...
Wanted to make sure that they (the new nose ribs) were level with each other across the spar.
Thought of putting a brad on the two extreme nose ribs, stretch a length of string between the two and then butt each nose rib to it and tack into position. GREAT idea, right ? Upon testing out my String Theory... I ran into several issues: 1. if the nose rib was pushed a little too far, thus pushing out the string, when pulled back the fibers of the wood would catch the string and pull it back with it. and 2. I could never really be sure that the nose rib was flat against the string because of the previous statement. Messed around with it for about 15 minutes and decided that I needed to line a straight edge along the two outer ribs and butt the new ribs against it.
I'll tackle this tomorrow and then mix a pot of glue and lock them into place.
So much for my theoretical physics' String Theory model for nose ribs and upper wing center section spars...
May 17, 2012 Other than any reference...
to Quantum Physics....
ditto to last night.
Filed down bottom side of the nose ribs... ditto to last night. ('cause that's how I roll...)
May 19, 2012 Stepping back...
for a new run at it.
At what point do you realize that things need to change... go back a few steps so that you can begin the run again ???
I always realize it at some point, sometimes sooner than later, sometimes later than sooner. Today... it was later than sooner, although my gut was telling me sooner. I guess I'm just one of those that get the learning from going down that road that shouldn't be gone down.
Went down to the basement work area and started final alignment of the nose ribs so that I could glue and tack them in place today. I took my time aligning them, maybe a little bit more than I really had to (I was splitting hairs that didn't really need to be split). With nose ribs where they were suppose to be I mixed up a pot of that glue and glued and tacked them into place. It was three hours, but I was finally finished with the nose ribs.
I was upstairs for 15 - 20 minutes and got to thinking about the finished product I had. Wasn't feelin' good about it... it wasn't how I thought it should be done. Sure, you won't see it when it's all covered with ply... it won't be seen again. I'll know it though.
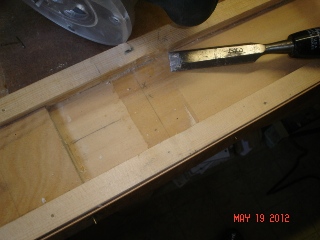
Went back down and pulled the glued up pieces off the spar and then cut the original nose ribs off the spar, or as much as I could. Had to take a chisle to get the wood level to the spar build up so that I could then route the 45 degree corner blocks out of the space between the two build ups.
I've cut all the nose ribs off and have routed the corner blocks out of one of five areas. I did one helluva job with the cutting away and routing out. Four more to go and I'll be routing new nose ribs so that I can use what I've learned about aligning nose ribs in front spars for upper wing center sections.
Here are a few photos of today session:
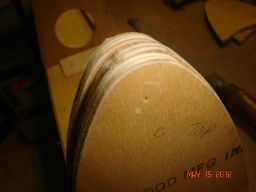
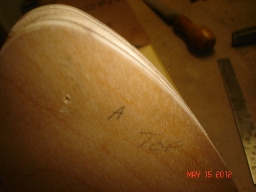
Ribs have been cut off
45 degree corner block have been routed out. You can see the marks (through the glue) I originally marked on the spar.
May 20, 2012 Restoration.... ???
naaaaa... just plain ol' fixin' a screw up !
Feels like I'm restoring an old biplane... before it's ever taken flight. Yeah, that's what it "felt like"... but isn't the case.
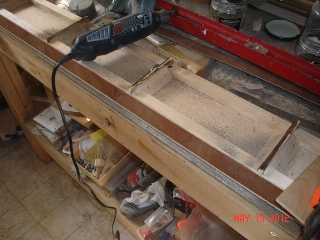
Down to the basement for more "demolition" of the upper wing center section front spar. Ever get that feeling when you know you're doing something right... no matter what ? Just feels good knowing you are doing it the right way, even when you've gone down a road that was a little rocky... a road albiet... but a rocky one.
Spent a little over an hour chisling, sanding and routing out what was left of the original nose ribs. The plan that I had yesterday work so it was just a matter of following through on that same plan four more times.
And to the left are the results... with the various tools I used while working on it.
May 21, 2012 It was a dark and stormy night...
the Philles lost...
but I still managed to put in some time.
Watched the Philles/Nationals game tonight... sooooo, got a late start. Wanted to put some time on it even though I'd be getting started after 10PM.
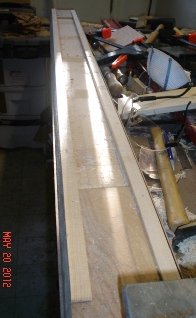
With the nose ribs routed out of the spar, lookin' like I need to make a few new ones to put in their place. Took some of that extra Birch ply I had laying around and cut the blanks and then routed them using the jig pattern I made for the first ones (see it does pay to keep things around).
All I need to do now is drill the ligthening holes in them, cut and square up the 45 degree corner blocks and then glue and tack them in... this time making sure that they are all in line with each other.
oh... by the way, the final on the Phils/Nats game... 2 - 1 Nats...
May 22, 2012 Thoughts...
coming at you...
at light speed.
A little bit more work to do on the nose ribs before they can be installed. Used both a hole saw and a forstner bit (love that forstner bit). Here is a shot of the new nose ribs. I didn't remember how long it took to just drill the holes in them...
Other than taking my time to do it... nothing much more needs to be said about it. I do have a story though.
About a month back I work long and hard on figuring out how to make the curve of the fuselage look kinda-sorta-like the TravelAir Mystery Ship. I like the look of what I finally came up with. Fast forward to this week... I was on the biplane forum and saw an ad at the top for (drum roll please) for a set of plans for the Monocoupe 90A/110 Clipwing Special. I mention this beautiful monowing plane back on a page I wrote in 2007. At that time I mentioned that I don't have to worry about choosing, or not choosing, this plane to build because no plans existed. Yeah, now they exist, it's been coming at me at light speed since 2007 so... I can't let it pass.
Emailed Andrew (does stuff for the Flybaby guys too) and asked him a few questions about the plans. Asked him for a sample shot of one of the pages, etc etc. Turns out they're beautiful and they are in a pdf format. I can print these puppies out and start looking over them... maybe starting on them the day after I finish the Radial Skybolt. Hell, maybe I'll pick at it a little before then.
Anyways... Andrew said that the TravelAir Mystery Ship plans are on there too... un-bee-lee-va-ble... What are the odds ???
No limits, Mr. Bach... no limits...
May 23, 2012 Just a few more things...
before I attempt glueing up again...
Needed to do a few more things to the nose ribs before leveling and glueing up. Notched the bottoms of the nose ribs so that they will nest between the two spar build ups. Marked the center on the spar next to each of the areas that the nose ribs get attached to.
Still need to cut the 45 degree corner blocks and square them up (remembering from last time... they were out of square). Then it's back to making sure these nose ribs are squared up with each other.. then glue them in place.
recently... I'm getting use to doing things over... not sure if that's a good or bad thing ??? Guess if I look at it as learning... it's always good.


 Looked at the work that I did yesterday. One rib moved slightly up (I most likely put it there to begin with). Spent some time thinking what I'll do to rectify my situation...
 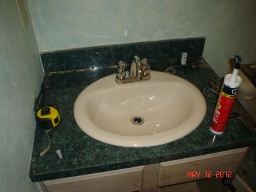 Out to the garage to get the laminate, confimed that I had a can of spray glue in the basement work area. Cut the strips for the side, laminated then routed flush... cut the lamiante for the top, laminated, inserted the filler piece and glued to lamiante, routed the edges and the center out (for the sink)... Okay, ready to drop the sink in, attach the water lines and move on to the rack and holder. (not so fast)
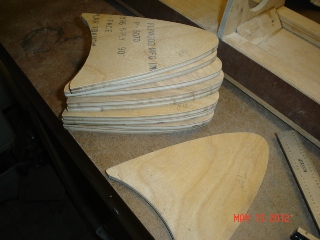
 Down to the basement for more "demolition" of the upper wing center section front spar. Ever get that feeling when you know you're doing something right... no matter what ? Just feels good knowing you are doing it the right way, even when you've gone down a road that was a little rocky... a road albiet... but a rocky one.
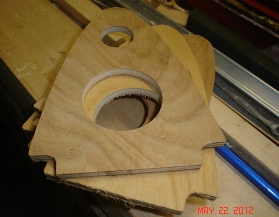
 About a month back I work long and hard on figuring out how to make the curve of the fuselage look kinda-sorta-like the TravelAir Mystery Ship. I like the look of what I finally came up with. Fast forward to this week... I was on the biplane forum and saw an ad at the top for (drum roll please) for a set of plans for the Monocoupe 90A/110 Clipwing Special. I mention this beautiful monowing plane back on a