Mantua, New Jersey
Original Site:
September 2004
E-mail: usav8or@yahoo.com
more work on the...Radial Fuselage.
September 1, 2012 a roll of duct tape and...
I knew what was going to happen
Well... most of the parts and pieces are completed to give this puppy it's shape. Now, how am I gonna a do it ?
Nothing like going out to the piece you're working on and trying things out... even it they aren't what's gonna' work. So I took all those formers I've been bending up over the past few days and a roll of duct tape to see what was going to happen. Out in the garage work shop I saw what was going to happen before it even happened, but I made what was going to happen anyways...
Started lining up and taping things... tried to give it it's shape. After the third two-piece turtle-deck try I saw (again) what was happening. What needs to happen: buy lengths of stringer material (they come in both the aluminum and wood variety) so that I could jig these in place and have the formers rise up to the opportuinty, er, stringers, and kinda self align. Well, self align if you want to call all the weeks I've been working on this (measuring and planning and pattering ((wurd?)) "self align"ing.
Oh.. but I didn't want to stop at that point today. Two more things that I wanted to do; read up on the turtle making (in the Skybolt Builder's Manual) and figure out and make the patteren for Station 10.5, the Station just behind the front landing gear attach point. and... so I did.
Not much to write about reading and making that pattern, so I won't.
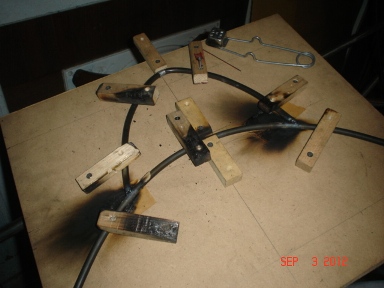
September 3, 2012 First former tacked...
not quite sure how that happened !!!
Keeping focused... knowing what needs to be done (attach the formers to the fuselage), just not sure how I want to go about doing it. I do have several ideas, though.
I got quite a bit done today... worked on the biplane five point five hours. Started it all off by forming the bottom and side formers for Station 10.5. This is the station behind the main gear front attach point.
Still plenty of daylight left on Labor Day so I decided to take a few measurements on the fuselage for the formers. I wanted to do this so that I can make a few holding jigs for the stringers. These would hold the stringers at the correct height which would allow me to then tack the formers at the right height and location. The headrest/front turtle deck former lays back at an angle to match the pilot's seat back. I took the measurement for the headrest/turtle deck former and somehow... got sided tracked into making the jig and tacking together the former for this area. Not quite sure how that happened...
After tacking the former together I called it a day... a good day at that.
September
9, 2012 A hardwood is
a hardwood...
isn't
always a hardwood.
Over the past few days I've been working on getting things
lined up for making the parts and peices for the upper wing
center section fuel tank.
Figure out the amount of aluminum material needed: check
Order material: check
Buy material to make forming blanks: check, check
Oh... by the way, if you think that Poplar is a hardwood,
it is. It just isn't the hardwood that you need for making
a form blank for bending several baffles, or ribs, etc. I
discovered this after buying a length of Poplar from the Home
Depot.
Apparently the difference between hardwood and softwood is
the cellular structure. Hardwoods grow slower, and branch
out rather than shooting straight up. Hardwoods also lose
their leaves in the fall. A Poplar tree does all this... BUT
produces a soft wood. What's this all mean ??? I paid about
$8.00 for a piece of "hardwood" that I can't use for making
a forming blank. And that meant I needed to spend the time
going back to that same Home Depot and spend $20.00 on a piece
of hardwood (oak).
Got the hardwood now, drew the form pattern on it and ready
to cut it out.
September 13, 2012 slowing down...
to move forward faster ???
Took the 2nd step in getting the form blank for the upper wing center section fuel tank baffle ready for service... a lot of words for not a whole lot.
Anywho... I took that piece of Oak hardwood hard wood and cut out the blank pattern I had drawn up the other night. And, in my reading the other night about making metal ribs, in one of Tony B's books... he said to cut the edge of the blank form with a little under cut so that you bend the edge a little past flat. Why ??? because of the spring back of the aluminum.
Need to go over to the airport to ask Whitey and Tony about how to make the flanging holes/wood plugs for the lightening holes in the baffels. Toney had shown me the one that Whitey helped him make awhile ago. Mentioned that it was eeeeeeasy to make. Hope to make it over there this Sunday...
It's these moments of walking softly in unknown territory that's slowing me down in the build. Need to figure out how to push through a little quicker... or maybe... slowing down and doing it right on the first attempt is actually doing it quicker ???
September 18, 2012 Buy it instead of make it... count me in !!!
(we are talking about tools here)
I've been workin'... yeah, no doubt about that. Just nothing to show for it right now.
The rolls of aluminum arrived in the UPS truck last week... and there they sit. Doing research on how to make flanges in the ligthening holes. Looked online... remembered that Tony (from the airport) said Whitey showed him how to make them real easy. Went to the airport on Sunday and asked Whitey and he couldn't remember what he told Tony... and Tony wasn't there. So... went back online and asked the guys on the biplane forum. Got quite a few responses and an offer from Chris (he's building an Acro Sport II... and it's lookin' mighty fine in those photos he's uploaded) to either bring them up or ship them up to him in Clarke Summit. He'll flange the hole for me. I just might take him up on his offer.
I hit Google to see if I could find anything... saw a blog of a guy building a Zodiac from scratch... He showed a flanging tool that a buddy of his showed him how to make. A pretty simple looking tool with a few bearings on it with a broom stick handle. I took a quick look in Aircraft Spruce and they sell them for $19.00. Hell... I'd rather spend my time building the biplane then tools to make flanges. Aircraft Spruce... count me in !!! I'll probably buy one of their variable circle cutters too.
Tonight I headed out to the garage work area to see about starting on the tacking on of the formers. Measured where I wanted the last former to go and had the location for the former just at the pilot's headrest. All I had to do was trim the formers I had made and tack them onto the fuselage. Turned into an hour and a half session. This should have taken less than an hour to do.
Unlike some... I at least have some place to build, albiet... tight quarters, but still a place.
With those two tacked into place I'll now run a few long pieces of 1/4" tube (to represent stringers... which reminds me... I need to buy stringers) to finalize the shape of this area so that I can start tacking the rest of the formers and stringers in place. As soon as I decide on where I can lay out these 4' x 12' sheets of aluminum, I'll start cutting out the baffle blanks I need.
Gots lots of stuff to do... just no room to do it.
September 19, 2012 Forming the plans...
for attaching the formers.
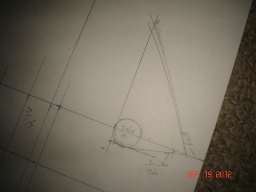
More work on the formers. Spanned the former at station 89 point somethingorother to station 136 point somethingorother with a small piece of wood trim. With the trim set in place I figured out how the turtle deck was going to look and how high to place the former between the other two formers.
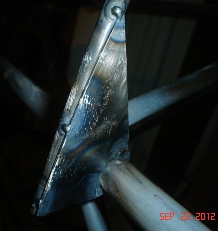
Trimmed the former for station 105.o (which extends past the longerons.) Needed to decide on what/how I was going to support the overhangs like the one at station 105.o. Here is what I came up with. It's similar to the main wheel rear attach brackets. I'll fashion these out of .o32 4130. With a slight modification I can use this attachment for ALL the extra long, overhanging formers.
Got that behind me now... time to start attaching them.
September 22, 2012 Making sandwiches...
before lunch and after dinner.
Three sessions today... total of 3.3 hours of work. and... it's lookin' good.
In order to make the former brackets I first needed to drill the 3/4 inch holes, then draw the pattern, rough cut on metal bandsaw, then grind to size, file and sand.
Made the first set and tacked into place to make sure it worked. It did... so I made a second set which will be tacked on after I get all the formers in place. (I want to make sure this looks like I want it to look before commiting complete welds and making it hard to make any adjustments.) The second set will go on the reverse side to sandwich the former for additional support.
Pictures... pictures...
October 1, 2012 Leaving something for another day...
isn't always procrastination.
I've been juggling both the formers/stringers and the fuel tanks over the past few days.
Needed to buy a few tools and fitting for the fuel tanks; flanging and fluting tools. These arrived the other day. Next step... unrolling these large sheets of aluminum so that I can start cutting it apart to make the baffles and end caps for the upper wing fuel tank. Looks like the living room will be a sheet metal shop for a few hours one night... make that, a couple of nights.
Next step for the formers... well, I've been working on the next steps. Still cutting out former brackets and fitting them up to the fuselage. Working on the upper formers from the firewall back to Station 49.06. Double, triple, quadruple checking... and then leaving it for over night to repeat the checks again.
Right now... I'm at the "over night" thing.
October 4, 2012 going... going... going
as planned
I'm really enjoying shaping the look of the biplane. It's sooooo much more than making parts and pieces.
Don't get me wrong... I like making parts and pieces and everything that goes along with it; the learning and relearning... and relearning, and the times that the light bulb lights up when you understand what you need to do... not just know. (that's gold Jerry... that's gold)
Tonight... cut the former for Station 27.o to size, measured and re-measured location and height, then tack welded it into place. The formers for the upper side of the biplane are just about all tacked in. The only one remaining is for Staion 49.06. Next... the sides and then the bottom formers followed by the multitude of stringer stand-offs.
If all goes as planned, it'll look pretty kick-ass. and... it will go as planned...
October
7, 2012 Still
going...
Moving
right along with the shape of this biplane. Tack welded on
the first side former; the one at Station 24.o.
Alignment was pretty easy... taped the display board pattern,
I originally made to shape the formers, onto the vertical
tube at station 24.o then laid a sheet of plywood up against
the fuselage (at a 90 degree angle). Locked the ply into place
with clamps, drew the pattern and location of the former onto
it, then placed the brackets in place and tack welded. Did
the same with the former... and tacked into place.
The other side tomorrow and if I have time... I'll cut the
former brackets for Station 49.06's sides.


 Trimmed the former for station 105.o (which extends past the longerons.) Needed to decide on what/how I was going to support the overhangs like the one at station 105.o. Here is what I came up with. It's similar to the main wheel rear attach brackets. I'll fashion these out of .o32 4130. With a slight modification I can use this attachment for ALL the extra long, overhanging formers.
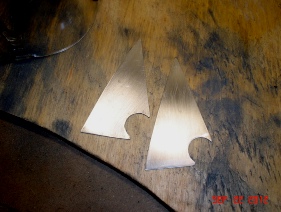

 Moving
right along with the shape of this biplane. Tack welded on
the first side former; the one at Station 24.o.
Moving
right along with the shape of this biplane. Tack welded on
the first side former; the one at Station 24.o.