Mantua, New Jersey
Original Site:
September 2004
E-mail: usav8or@yahoo.com
working on the...Radial Fuselage.
December 1, 2008 The South Jersey... Experiment
While waiting on my tubing order, I've gotta fill this void with something productive; looking down the road of the build.
For the past week, or so, I've been fixated on the stringer stand-offs. I have other types of "tabs" that need to be made and attached before the stand-offs but for some reason I've been wanting to figure these out.
There has been a thread or two about these on the biplane forum. One... go with the "plans" design, which is .25 x .032 tubing with an "L" or a "U" shaped 3/4" x 3/4" inch piece of .o32 4130 welded to the end of it. OR... the Mac MacKensie design of an "L" shaped piece of .o32 4130.
My dilemma. I want to keep the biplane as light as possible. I like the look of the "newer" stand-off but there has been a debate on whether it's heavier than the "plans" stand-off. With dilemma in hand I set about getting the answer.
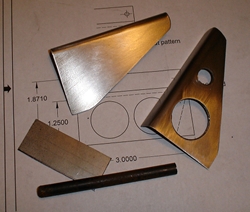
I'm pretty convinced that the two arn't that much different in weight. So much so that I've cut 30 blanks out for the Mac designed stand-off; the "L" shaped piece of .o32 4130. In the picture, to your right, you can see the two basic designs. The "plans" stand-off consists of the 3" piece of tubing and the rectangular piece
of .o32 4130. (Note: the piece of 4130 is the plan's 3/4" square leg with room for a 1/2" thick stringer. The plans shape is an "L", most builders are now making this into a "U"... I've cut the blank out as if I was going to make the "U.")
You'll see two of the Mac design in the photo. The solid "L" stand-off is the Mac design. The "L" stand-off with the lightening holes is my modification of the Mac design. I wanted to see how much these holes would cut off the weight of the stand-off. (thought it looked kinda neat too)
I'm thinking that the three are so close in weight that it doesn't really matter which one I go with. Although, the Mac design, without my modification, will not only look good, it will be quick to make and attach. Tomorrow, the test. We have a postal scale at work and I'll be weighing each one of these. Tomorrow night... the results of the experiment will be revealed. mwahahahaha!
December 2, 2008 Survey Says... there's not much difference
Weighed all three of the above stand-off samples on the postal scale; the plans design, the Mac design and the modified-Mac design.
Weights:
- plans design :: .6 oz
- Mac design :: .7 oz
- modified-Mac design :: .6 oz
I'll be going with the modified-Mac design. The plan will be to bend and weld all the pieces, full size, onto the fusleage, then mark and cut to size. I'll then clamp a metal template/jig for drilling the holes into each one. I'll just need to make up a few different template/jigs. Sweet !
December 3, 2008 Decesions... everyone is important
Am I being overly anal when I think hard about what type of stand-off I want to use ? What type of "flooring" I'll be putting in my creation ? A rhetorical question, by the way. Ahhhh... it's all a matter of opinion I suppose. To me... every single piece that is attached to my Skybolt is an important decision.
Just threw up the question, to the biplane forum, about whether to install flooring or heel trays in my plane. You know... get the opinions of others... see what they are doing and what others have experienced. Got some really good answers.
Randy suggested a full floor for the front pit and heel trays for where the pilot sits. Makes sense, and I was kinda thinking that way to begin with. Jim threw out the idea that heel trays would be sufficient for standing on and that they would be good, but he and Macarena are making a set of awesome carbon composite floorboards. Light-weight ! But Jim has some skills
with making plugs and working with fiberglas that I don't, so I won't be going that route.
I'm thinking I'll go with the heel trays from the front pit to the back pit, BUT put a complete aluminum (two thin sheets of aluminum glued to a corrugated plastic panel to make it strong - an aluminum sandwhich) flooring in the front so that passengers will have a little bit better chance of not going through the skin on the belly underneath where their feet are.
Best of both worlds ? I think so. And having the channel run from the front pit to the back pit will give it a consistant look and won't add any additional weight to the front since it would have been covered in the first place.
More about flooring...
Spent most of tonight looking at the front of the fuselage and determining how many and where to... put all the tabs for the flooring.
From what I see. in photos, it looks like a lot of builders go overboard with putting in tabs. I'll have to cut the tabs out and tack them into place to see how they feel with a load on them. Heck, most of the time there won't be a load on them.
You can either go with three or five stringers on each side of the fuselage. I'm looking... and I only see photos of Skybolts with three on each side. And they're beautiful looking biplanes. Why go with five ??... it only adds weight and time to the build.
December 7, 2008 More on the tabs... in the fitting's chapter.
I had to restrain myself from just walking out into the work shop with no real plan and figuring it out once I got out there. Always need a plan, even if it means not making "saw dust" for a little while, until deciding on what to do or what needs to be done.
The bulk of the fuselage is completed. I pulled out the plans, and a few drawing I had of the fuselage, to see where the rudder pedals are to be mounted in the Standard Skybolt frame and how that would work in the Radial Skybolt frame. Looks like I need to add a few tubes to mount them. I'll let you know where, when I do it.
So the plan for tonight is to locate the postion of the rudder pedals and locate the placement for all of the floor/heel tray mounting tabs. I'll see tonight if my ideas of what to do for this will work or if I need to make a few adjustments.
Open the door to the shop... turn on the lights... and hmmmmm... looks like I finally need to take the frame out of the spit so that I can sit in it and size up the rudder pedals. Com'on... there is plenty of time to do that. I need to sit in this thing and make some noise !
After making a few noises... I "dry" fitted the tabs for the flooring and heel trays and also located the places where the rudder/brake pedals will be mounted. Spoke to Jim on the biplane forum and he suggested reaming out the "hinge" tube, at the bottom of the
pedals with a 3/4" then an adjustable 3/4" reamer. I think I'll ask some of the guys at the airport if they have a 3/4" before going out spending the money.
There is a multitude of widgets and tabs to make and attach to it. A totally different mind set when it comes to doing the little things. It was almost mindless... not mindless... but it was easy going out to the shop each night knowing what had to be done. Another notch here, measure there, tack here, another notch there. Now there is a lot of trial fittings before you even start the project, just to make sure that it will work the way you visualized it. Sometimes that visual doesn't
work in the real world.
Alot of cross-referencing also; pictures and words. A lot of builders out there building and documenting their builds... letting you know what works and what doesn't.
December 11, 2008 Fitting... the fittings... making sure they fit
Glad I dry fitted the fittings and located the spot where the rudder pedals are going. If I hadn't I'd be cutting off the forward most fittings for the front and back pits 'cause they would have been directly underneath the spot where the rudder pedals
are to be located.
Yeah... I'm starting to learn this building-an-airplane-thought-process. I would have normally gone on dumb and happy... just tack welding these mounting tabs in place... only to be kicking myself further down the road asking myself how I could have been so stupid. Not this time.
Spent tonight fine tuning my mounting tab mounting locations. (This is where I discovered that the forward tabs would have been in the way of the pedals.) I also discovered that it will be much more simple to place a full floor in the front pit with heel tray overlays. It was just getting too complicated with the mounting tabs
to have the heel trays with the floor inbetween them. It added a lot more tabs and for what ? Decision has been made.
Now if I can just lift this fuselage back into the rotisserie I can start to tack weld these tabs onto it.
December 22, 2008 Back in the saddle.. both me and ... the biplane
With the fuselage sitting up on a few five gallon buckets I was able to tack all the mounting tabs onto the frame. Although it didn't sit high off the floor, I was able to keep the flame pointed away from the carpet that is on the floor, for the most part that is.
Came time to get serious about welding these tabs on to the frame so I clamped the rotisserie ends on the frame and hoisted it up into the cradle with only minor difficulty; just had to take my time, that's all. Once I had it in it's spit I was able to get at most tabs with no problems. And those that created problems...
were few and far between.
As of today... I only need to finish weld the "legs" for each of the tabs and tack and finish weld the four most forward tabs; the ones that are welded to the 1.125 x .065 truss tubing.
I have a lot more mounting tabs, for various other components, that I'll to think about. Once I've decided, I'll need to create then attach to the frame.
Oh... by the way... Watch your welding as you go to weld on these tabs. Most of that tubing is pretty thin. You'll blow a hole right through it if you're not watching it (don't ask me how I know.)
What next ??
Just a short time back I had thought about creating the main fuel tank for my next project, but recently switched gears. I'd like to keep moving along with pieces for the fuselage and have decided to tackle the main landing gear. Not an easy task, but I'd like to get it out of the way and possibly have this up on the wheels by Spring. After that... more mounting tabs, the controls thrown in there somewhere for good measure, the stringer stand-offs as soon as I get the chance... oh yeah... the main fuel tank.
December 26, 2008 Cleaning by Reaming
After heating the bottom tubes on the rudder pedals, to get them back close to straight, I needed to clean out that scaling that I made from welding. I also wanted to make sure that the inside tubes were not only clean, but straight, so that I could insert the .250 tube inside for mounting.
Spoke to Jim on the biplane forum. He suggested an adjustable reamer. Pretty expensive piece of tooling for using it only once or twice. I figured either Whitey, or one of the other guys at the airport would have one that I could use. Stopped by there today... and I was right.
With a little cutting fluid and a little elbo grease, I cut through that scale like it was nothing. Reamed all four tubes in less that 15 minutes. Was at the airport for close to four hours though. Just seems to take longer when you're at the airport than when you home alone working in the work shop. :)


 My dilemma. I want to keep the biplane as light as possible. I like the look of the "newer" stand-off but there has been a debate on whether it's heavier than the "plans" stand-off. With dilemma in hand I set about getting the answer.
  I'm thinking that the three are so close in weight that it doesn't really matter which one I go with. Although, the Mac design, without my modification, will not only look good, it will be quick to make and attach. Tomorrow, the test. We have a postal scale at work and I'll be weighing each one of these. Tomorrow night... the results of the experiment will be revealed. mwahahahaha!
 I'll be going with the modified-Mac design. The plan will be to bend and weld all the pieces, full size, onto the fusleage, then mark and cut to size. I'll then clamp a metal template/jig for drilling the holes into each one. I'll just need to make up a few different template/jigs. Sweet !
 Am I being overly anal when I think hard about what type of stand-off I want to use ? What type of "flooring" I'll be putting in my creation ? A rhetorical question, by the way. Ahhhh... it's all a matter of opinion I suppose. To me... every single piece that is attached to my Skybolt is an important decision.
  Just a short time back I had thought about creating the main fuel tank for my next project, but recently switched gears. I'd like to keep moving along with pieces for the fuselage and have decided to tackle the main landing gear. Not an easy task, but I'd like to get it out of the way and possibly have this up on the wheels by Spring. After that... more mounting tabs, the controls thrown in there somewhere for good measure, the stringer stand-offs as soon as I get the chance... oh yeah... the main fuel tank.