Mantua, New Jersey
Original Site:
September 2004
E-mail: usav8or@yahoo.com
The Radical Radial Fuselage.
February 11, 2009
Investing in something... with a large return !
Another one of those tasks that never seems to end. I thought that I'd have these two axle support jigs finished in about three or four hours, but I was only kidding myself. I was thinking... BUT, It's only a set of jigs !
I know for one thing... the time I invest in these jigs now will pay off in dividens in a few short days. (And God only knows what pathetic dividens our investments are paying off to us at the moment.)
If there is one thing on the biplane that is an absolute must, it's the squareness and trueness of your landing gear. If you don't have it 100 percent right... there's no tellin' how you're going to be tracking down the runway... which ain't too good of a place to be. Take the time to make the
landing gear right. And from what I've read about others not building the main gear in a jig... If destiny can be controlled by me, then I think I'll just avoid such a fate. Now all I needed to do was to build these things.
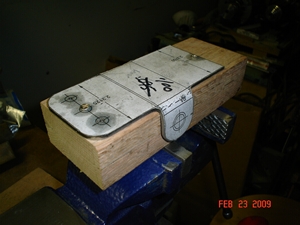
The key component for building a straight tracking Skybolt is the Axle Support Jig. From my previous posts you saw that I needed to modify the typical, if there is a typical, axle support jig that most Skybolt builders build; the gear on the R version is a bit longer and the spacing of the stations on the fuselage is different, which pressed me into changing quite a few of the measurements in order to make it work.
We'll here are the results of the three nights and about seven hours worth of work. I've spent enough time on them so they're not even getting a cleaning and a coat of paint ! Hopefully... yeah I said Hopefully, these past seven hours will save me untold headaches when making the landing gear, not to mention the time I'll save and the
money in tubing I'll save from not screwing the notching up. (fingers crossed)
Now if I can get the fittings made, regretably for the second time,... (don't draw up both the Standard and the R version fittings, stick with just the R version... there is a 50 percent chance that you'll print out and make the wrong ones. Don't ask me how I know.) I can get moving along with getting the gear built.
February 12, 2009
Wasted time... the art of doing what you didn't need to do.
See above... last paragraph. Here it is just in case you can't find it: (don't draw up both the Standard and the R version fittings, stick with just the R version... there is a 50 percent chance that you'll print out and make the wrong ones. Don't ask me how I know.) Let me rephrase this. If you draw up two size fittings for the same purpose you WILL end up making them twice... no matter what.
The mistake I made was to not write my original findings down. The first, the most important of my findings, was that the one streamline tube that they call out on the R drawings should be 2.023 x .857 x .o49 not 2.23 x .857 x .o49. There isn't even a streamline tube that you can get that is 2.23 x .857 x .o49. It's gotta be a typo. The next size up is a tube that is 2.36 x 1.0 x .o49. So... the fitting that is drawn up on the R version drawings are not right. I drew up both the fitting, per specs, for the R version... and then seeing the mistake with the tubing size, drew up the fitting per the S version, the one that would fit with the 2.023 streamline tubing.
Let me state that in the back of my mind I was thinking that I would go the larger and heavier of either version. Better to go a little heavier in this area, as mentioned elsewhere on my blog. So... (and this gets back to where I should have documented all of this in writing) after I make the first set of fittings, and I see that it's for the size tubing listed on the S drawings, I think it's the wrong size since it's the fitting for the S version, not realizing that I already discovered that the called out tubing on the R drawings was incorrect...
Yeah I know... blah blah blah blah... just get to the point, right ? The point is: If you're listening to me... don't make the front landing gear fitting that is on the R version drawings. Make the fitting that is on the S version. 'nuff said.
I hope I made it clear... I could have gone down a long and winding road (as if I haven't already) to tell in more detail why I made two sets of the same fittings, different sizes, when I knew better all along.
Chalk it up to experience ? Chalk it up to something.
February 13, 2009 (Friday)
Thinking out loud here... the leg bone is connected to the knee bone and the...
I'm at work and I'm looking at Brad Roberson's site... looking at his landing gear construction page. Then... I'm looking at my CAD drawing of the landing gear... It's looking to me like the size of the fitting may be determined by the size of the forward down-tube on the leg. I need to look at this closer before doing anything else.
Like they say in the business... Change one thing and it changes something else, and something else, and something else...
February 16, 2009
And I'm Still... thinking out loud...
Again, looking at the Radial supplemental drawings, I'm seeing that Curtis is making the front landing gear/flying wire fittings out of .125 4130. The Delta version is showing it made with .100 4130, same as the Standard. He shows 3/8" ears welded to the .125 flatstock. Seeing that it would be pretty hard to bend these ears... I understand why Curtis is suggesting that you weld on the two pieces of 3/8" 4130.
Speaking to Jim, on the forum, and I am in agreeance with him, he saying that the .100 would be good enough for the flying wires and that Curtis is saying to weld on 3/8" tabs apparantly addressing the breakage of these ears with previous hard landings on Standard 'bolts. It's suggested in the biplane forum's Skybolt Manual to weld on additional .100 ears to beef this area up, which is what I'll be doing.
My decision on all this... make the main fittings out of .100 material (Jim also thought that it would be pretty hard to bend that .125 4130 around the longerons... he said that the .100 was hard enough to do) with the "ears" an integral part of the fitting. I'll add on the two additional "ear" tabs for extra support. The top plate on the fitting, the one that spreads the load on several diagonals, will be made as spec'd; .71 4130.
With that being said, it looks like my first fitttings will be the ones to use. I'll clean them up some, buy some hardwood for a bending block and get about bending and drilling them. Brad Roberson has a good idea about how to get perfectly aligned holes with this fitting. You can either go to his site, or, in a few weeks I'll post something similar here.
Still thinking about the cross-tube on the main gear. I'm thinking that the 1.5" x .o83 is good for that...
February 16, 2009
Spinning my wheels... with the landing gear (get it ?)
Doing a lot of leg work figuring this landing gear set-up out. Whenever I do leg work, I feel like I'm not getting anything accomplished... just nothing physical to show for it. A necessary part of the learning; I don't want to call it evil. I'm learning to think things through throughly.
It's easy by now just to look at the plans, read the Skybolt Builder's Manual, cross reference Mac's newsletters and the 15 page manual that came along with the prints. And, up until now I was basically building the fuselage per plans, and prior to that I was building the ribs, pedals and tail feathers per plans. Then I come up on the landing gear. The change I made to the bungee truss has thrown in an entire new set of questions. What size tubing to make the gear out of ? Should it be the same as the tube spec'd for the hydraulic gear ? What ? no cross-tube mentioned for the hydraulic gear ? Now what size tube should I use for the cross-tube ? And on and on and on and on and on...
Questions that need answers...sure. It's just not the kinda progress that I like seeing. I like to see a few tubes cut and notched, or a set of tabs made, the pedals welded up... something other than a few question answered on a sheet of paper.
Today... into tonight. Got answers to the cross-tube question by talking to Jim on the biplane forum (thanks Jim !) and I got answers to the front landing gear/flying wire questions I had (thanks again Jim !) Vital information for me but all I have to show for it are a few sentences on a piece of paper. I sound like I'm complaining but I'm not... I'm thankful for Jim, and a few guys like him, that have helped me through some of my periods of questioning, and the questions to come.
Another... I needed to make bending blocks out of hardwood. Didn't have any here so I needed to take the time to go out and buy some. Again... nothing to show for it but a length of board. Needed to be done, just not a whole lot of forward movement with the biplane.
Just venting out loud. Something new in front of me that I need to get educated about, get things ready for, and I get all worked up about not putting any real time in on the building. I kinda feel like I'm slipping away from my daily routine of moving forward on it. I don't want to get into a period of time like I had in the beginning stages of the project where the hiatus was more the norm than building. (I just read what I wrote... a few days of preparing before I get to making saw dust and I see that as shunning the project... guess that's a good thing.)
It's getting late...
I've probably spent close to five hours on the plane today and get to show 2.5hrs... and that might be a little generous actually. Hell, if I took the time that I've spent on this site and put it towards making that biplane I'd almost be finished by now... but part of this learning is reenforced by these writings.
... I'm tired.
February 18, 2009
Time to stop looking... 'cause it ain't gettin' me any closer to being done.
After looking over the plans and supplemental plans, and looking over and looking over and looking over... I think I have the list of everything that I need to purchase to get the landing gear finished and the
torque tube ready to mount into the biplane. I think...
February 23, 2009
I finally bent part of the biplane... er, the biplane's fittings that is.
Ahhh... I've been working towards this night for quite awhile now. All these fittings just sitting in the box where I placed them after cutting them out... straight as can be. Not much use like that, but I've been putting this off as long as I can. Not sure that I wanted to face the
reality of whether all that CAD work, after figuring up bend allowance and set-backs, was going to actually work.
It's impossible to start building the landing gear without attaching the fittings onto the fuselage first. These fittings haven't been sitting around for a year, but I used the same logic in drawing these out on the CAD; same bend allowance and set-back way of thinking. The moment of truth was at hand.
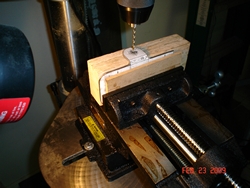
Bought a length of oak (hardwood) from the Home Depot the other day, cut it up, glued it up, radiused (werd?) it up (that's put the 1/8" radius on the block for bending the ears of the fitting.) It was all up to me now; me and my mathematics.
My plan of action was to under-size drill the three forward holes and then drill another hold on the trailing edge, a section that I would be cutting off to fit it up the the cross-tubes to weld. The holes were used to attach the blank to the oak bending block. Sized it up, fitted it up, held it up... hell. I better drill it up.
OK... everything is in "position," at least the position that I thought it was to be positioned at. Positioned it in the jaws of the vice, with a thin piece of MDF protecting the side that was bare metal, and started hammering away at it. "DAMN, looks mighty fine, Jer." Looked at the ear, and the placement of the cross-hairs of where the hole is supposed to be, in relation to the line I drew on the side of the bending block, where the hole had to be. "Suppose to be," and "had to be" were dead on ! Dead on ! Wadda know... all those numbers about bend allowance and set-backs worked for me too, not just for the privileged.
Wait a minute... that was only one fitting.
I've got another one sitting on the bench in the same state
as all those other fittings... flat. Could I expect that same
results for the next ? It better... it's cut from the same
pattern as the other, will be bent on the same bending block
as the other...
Got the
next one ready... secured it in the Jaws of life and started
wacking it, as I did the other. LIAR ! It was a smigen off
this time. Grant it... I probably couldn't get a thin pencil
mark between the line where it should be and where it ended
up to be. All in all... I couldn't have done much better in
a machine shop. I was happy, no make that VERY HAPPY with
the results.
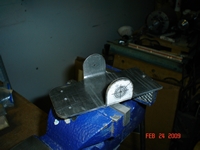
Still had to drill the holes in the ears. Just so happens
that I picked up a cross-sliding vice from Harbor Freight
two weeks ago. If you don't have one... put it on your short
list of things to buy. Once I got the fitting leveled in the
vice I could position it in any location I wanted with a few
twists of the levers on the sides. I can probably say that
with this piece of equipment, drilling accurate holes in fittings
are painless.


 We'll here are the results of the three nights and about seven hours worth of work. I've spent enough time on them so they're not even getting a cleaning and a coat of paint ! Hopefully... yeah I said Hopefully, these past seven hours will save me untold headaches when making the landing gear, not to mention the time I'll save and the
money in tubing I'll save from not screwing the notching up. (fingers crossed)
We'll here are the results of the three nights and about seven hours worth of work. I've spent enough time on them so they're not even getting a cleaning and a coat of paint ! Hopefully... yeah I said Hopefully, these past seven hours will save me untold headaches when making the landing gear, not to mention the time I'll save and the
money in tubing I'll save from not screwing the notching up. (fingers crossed)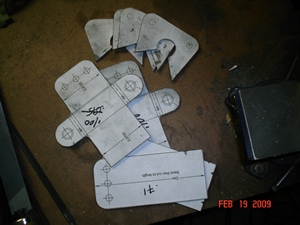 My decision on all this... make the main fittings out of .100 material (Jim also thought that it would be pretty hard to bend that .125 4130 around the longerons... he said that the .100 was hard enough to do) with the "ears" an integral part of the fitting. I'll add on the two additional "ear" tabs for extra support. The top plate on the fitting, the one that spreads the load on several diagonals, will be made as spec'd; .71 4130.
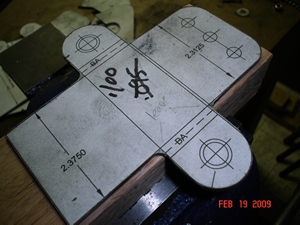 Ahhh... I've been working towards this night for quite awhile now. All these fittings just sitting in the box where I placed them after cutting them out... straight as can be. Not much use like that, but I've been putting this off as long as I can. Not sure that I wanted to face the
reality of whether all that CAD work, after figuring up bend allowance and set-backs, was going to actually work.
Ahhh... I've been working towards this night for quite awhile now. All these fittings just sitting in the box where I placed them after cutting them out... straight as can be. Not much use like that, but I've been putting this off as long as I can. Not sure that I wanted to face the
reality of whether all that CAD work, after figuring up bend allowance and set-backs, was going to actually work.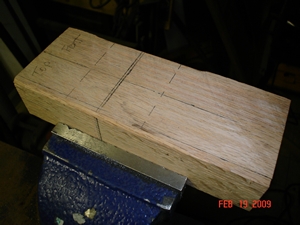 Bought a length of oak (hardwood) from the Home Depot the other day, cut it up, glued it up, radiused (werd?) it up (that's put the 1/8" radius on the block for bending the ears of the fitting.) It was all up to me now; me and my mathematics.
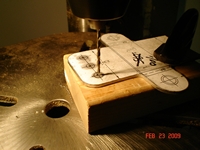 My plan of action was to under-size drill the three forward holes and then drill another hold on the trailing edge, a section that I would be cutting off to fit it up the the cross-tubes to weld. The holes were used to attach the blank to the oak bending block. Sized it up, fitted it up, held it up... hell. I better drill it up.
 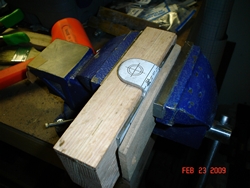 OK... everything is in "position," at least the position that I thought it was to be positioned at. Positioned it in the jaws of the vice, with a thin piece of MDF protecting the side that was bare metal, and started hammering away at it. "DAMN, looks mighty fine, Jer." Looked at the ear, and the placement of the cross-hairs of where the hole is supposed to be, in relation to the line I drew on the side of the bending block, where the hole had to be. "Suppose to be," and "had to be" were dead on ! Dead on ! Wadda know... all those numbers about bend allowance and set-backs worked for me too, not just for the privileged.