Mantua, New Jersey
Original Site:
September 2004
E-mail: usav8or@yahoo.com
Three-piece upper wing... strong as an OX.
May 27, 2010
New pieces....
Old skill sets
Back at work on the spar/spar doubler test pieces. Another one of those... "The Oxen are slow, but the earth is patient" dealio's.
The angles on the final cuts don't allow cutting on the circular saw. Instead of trying to rig up something to use the "new" band saw with a resulting ruined test piece, I decided to do it "old school" and file down the 1/8" notches by hand. Took a little bit of time, 'cause I didn't want to start shredding splinters of wood from the edges of the ply. End result... what I think the plans are telling me to do.
What I did was mark the angle of the cut. Strike the parallel lines on the doublers. C-clamp metal straight edges to the doublers and use a file to cut away at the wood. The two metal straight edges kept the cut level (I filed until I started hitting both of the metal straight edges... follow ?)
All I need to do now is test fit the metal plates up to the spars to see if the sizes are correct. If all goes well, it's time to do the real things.
May 31, 2010
Checks....
and re-checks
Wasn't any big deal... cutting the front and back spars for
the Upper Wing Center Section. Had I not done a test run first,
it might have been another story. Probably not, but could
have been. The test spar/spar doublers gave me peace of mind.
Did more measuring on these two spars than I've measured on anything else I've ever made/cut. Checked, re-checked, checked again... both the plans and the marks I made on the spars. Checked, re-check, then checked again... the angle on the table saw, for both the 8 degree and the 10 degree cuts.
Spent close to two hours doing the above... that included changing out the blade on my miter saw twice. The first 80 point blade I put into it, I thought was pretty new, burned through everything I cut. Changed that out with one I had re-pointed (I guess you'd call it that) a while ago... cut like a hot knife going through butter. Saaaaa-weet !
Below... the result of today's labor. Next I'll be cutting and glueing on the spar doublers.
June 2, 2010
Caveat emptor ??
naaaa....
Caveat Architectu !
Back to a routine. Routine feels good. Routine means no unknowns... when it comes to building my biplane. No unknowns mean I get on with my work.
I'm feeling comfortable with cutting the wood for the spars and spar doublers... and I guess pretty much the rest of the Upper Wing Center Section. Made some really nice cuts on the 1/4" Pine ply tonight. Wait... what was that you just wrote ??? Uh, yeah, Pine ply.
Guess this story starts the day I wanted to make "test" pieces of the spars and spar doublers for this center section. Made nice examples to prove the plans were right... made those last week. Eight twenty-nine tonight I went down to the basement workshop to cut the actual pieces for the spar doublers, out of the aircraft quality wood. Eight twenty-nine tonight I went down to the basement workshop and cut the actual pieces for the spar doublers, out of construction quality wood. One key word in the last sentence turned these pieces into additional tests; construction instead of aircraft.
Sure, I thought that there was some extra "bow" to the plywood. Nothing that the 1" thick spar wasn't going to straighten out; not a problem. Thought it looked a little rough too. It wasn't until I picked up the 1/4" piece of ply again, to cut out the forward spar doublers, that I noticed the barcode on the surface of it.
Wait... There ain't no stinkin' barcodes on the aircraft ply that I buy ! It was then that I realized that this wasn't the birch ply that I should have been using. It was the A/B pine ply that I bought to make the test pieces.
Caveat Architectu ! (Master Builder Beware !)
(Hint:) Mark in BIG letters the/any/all material that you have in your aircraft workshop that isn't aircraft quality; PINE, POS Metal, POS Aluminum, etc etc etc. AVOID my mistake ! It only cost me an hour of time... luckily. (by the way... POS stands for "piece of shit" - anything in the workshop that's not aircraft quality is a POS)
Instead of making all the doublers tonight... I made an additional test set for the rear doublers out of A/B pine ply... and an actual set of rear doublers out of birch.
June 3, 2010
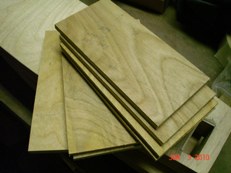
Still...
a box
of parts....
just
a lot more of them.
Moving along with the Upper Wing Center Section spar doublers.
Cut the doublers for the forward spar tonight. Was gonna glue
them on tonight but thought otherwise. I'll give them a second
look tomorrow, with a fresh eye, before sealing their fate...
Looking at the hours I've put on the biplane so far... close
to 1800 hours. I can remember close to four years ago... damn
!... when I was just starting back on the build. Wanted to
build a biplane back then to have a biplane. Now... I want
to build and a I'll have a biplane when I'm finished.
Anyways... getting off track here. Three more hours to put
on her and I'll be at 1800. Was thinking, if I was always
that close to the next "goal"... ahhhh, never mind. (stupid
thought) My goal is to enjoy the building of this biplane.
And when all those little projects I've been working on for
all this time are finally finished, and I put them together,
I'll have a biplane.
My quote... "A few ribs and a box of parts."... still holds true. Just a lot more boxes and a helluva lot more parts.
June 7, 2010
Way too much...
is just the right amount.
Glue... I'm getting tired of thinking of that worn out phrase my grade school art teacher said each time I'm working with glue. She said it over and over again... "A little dab will do you." And I have to keep tellin' myself... "You didn't know what you were talkin' 'bout. A little squeeze out will do ya !"
In most cases, I have a helluva lot more than a little squeeze out. Not starving the joint of glue, I just spread plenty of it on there. Think of a peanut butter and jelly sandwich and the amount of peanut butter you glob on it... THAT's what I'm talking about ! And I love peanut butter so I put plenty of it on there. But it's generally the jelly that's squeezin' out, ain't it. Regardless...
My point, as always, a little exaggerated, to make the point. When glueing up any of your pieces on your biplane, make sure you put plenty of glue on it. Make sure you've got squeeze out. Make sure you don't starve the joint of glue by having too much squeeze out. Make it like you would a good ol' peanut butter and jelly sandwich.
Oh yeah... the point of all this excessive amount of glue. I glued on the last four spar doublers for the Upper Wing Center Section. I put plenty of "peanut butter" on it. Plenty. Even though I was wiping off the excess glue while I was clamping it down, I'll still have some sanding to do "tomorrow" after everything has dried.
I'm running out of wood pieces to make for this project. Soon I'll have to start to put a few pieces of 4130 tubes on a lathe and cut them down to size.
June 7, 2010
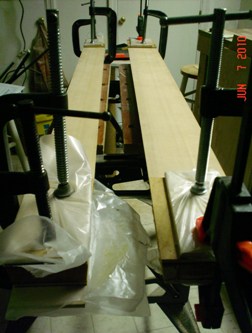
Follow-up...
Here's a photo of the glued up spars for the Upper Wing Center Section. Wax paper helps keep the clamping ply from being permanently attached to the spar doublers.
June 8, 2010
A little less...
is just the right amount.
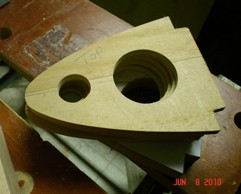
Deciding on how I was going to cut the triangular lightening holes in five of the Upper Wing Center Section's nose ribs.
Doing it as it's shown on the drawings I would need to drill a starting hole and then mount them to a jig and route out the remaining wood. I didn't feel that it needed to be that complicated, and I'm not one for just doing things just any way... but I've seen where Tony Bingelis (Mr. Homebuilt Guru) just drilled large holes for this same purpose. It'd be REAL close to the same amount of material I'd be taking out but a whole lot quicker.
Sounds like a plan to me.
Using a 2" hole saw, I cut the first hole in the nose rib blank that I had made up for routing the nose ribs. Used that as my template for marking all five of the ribs. Finishing up with the first set of holes, I marked a center line on all five nose ribs. Using a 1" forstner bit (love this bit) I drilled a hole in one rib. After marking the center line on the remaining four ribs I used the first rib as a pattern and traced the 1" hole on each. (the center line helped with aligning the forstner bit)
Other than taking close to two hours to do... 'nuff said.
June 13, 2010
I'm not a small tool repairman...
but being the guy that I am...
Kinda funny... my router took a turn south today. The funny thing is, my drill, from the same time period, went south about a month ago. Both are Craftsman. Both over 30 years old. The drill... not a problem, I have my floor drill press for all the tedious stuff, a few cordless and a large DeWalt hammer drill. The router... a problem, need that for making jigs and routing good ol' aluminum.
Spent the day working on the jig to make the trailing edge bow for the Upper Wing Center Section; 3.8hrs. Of that 3.8hrs, I spent probably 1.1hrs of it being productive. I'm writing off the additional time. Ain't gonna add that to the build log.
Actually, thinking back on the day, I rough cut the radius with a jigsaw and then went to work filing and sanding it. Kinda knew it was a bad idea to begin with; I knew I probably wouldn't end up with a clean vertical cut the entire length, but being the guy I am... tried anyhow. After that unsucessful endeavor, I decided that I would try the router.
I tried a few different bits but the router would "jump" on the wood like they were dull. Thought it was strange but kept changing the bit out. Came down to my last usable bit and it did the same as all the others. Looked at the clock and saw it was still before five on a Sunday so I had time to take that 1 mile ride to the Home Depot to get a new bit. Got back home and the "lock" on the router wouldn't go into the locking position (which allows you to change out the bits.) Turned the shaft to see if it would lock and discovered that there was a slight "clunking" to it when I spun it. Can't be good.
I'm not a small tool repair guy and I took it apart like I was. It's about as useless apart as it was together... so it looks like I'll be sending this, and the drill, off for repairs. Being the guy that I am, I won't be waiting for the router to get repaired... I'll be picking up one in the next day or two to get this jig made soes I can move on with the Upper Wing Center Section.
So, am I disappointed witn today... naaaaaaaaaaaa, I enjoyed my time working on the biplane. If I didn't do "this" today, I would have done it tomorrow or the next. Best to get it out of the way and move on with other things more productive.
June 14, 2010
New Router...
making jig.
'nuff said
June 20, 2010
Most of the time I'm building...
I'm not building.
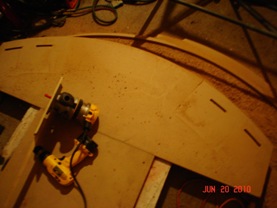
For the past week I've been throwing around ideas of how I was going to make the jig to make the jig for making the Upper Wing Center Section trailing edge. Saw what JimW had done... great idea! Now how was I going to accomplish the same thing with the same accurate results ?
Finally thought of a solution... but, for lack of a better term, I'm space challenged. I find that once I've made space where there wasn't any I'm half way to completing that task at hand. And... so it was with the making of the jig for the jig. Out to the garage work shop, where I have the 168" long fuselage. The fuselage barely fits in there, let alone trying to make room for something that needs to be 60" wide x 90" long.
I'm in luck with a ceiling that is close to 168" high. If you peered in the garage right now you'd see it standing on-end. With room for one of those beautiful tables, I got from Gus, I'm able to make the jig for making the jig. Got it? Good.
Made a "holding plate" for the brand-spankin' new router earlier in the week. It's a beaut ! 2 1/4 hp DeWalt... saweeet ! I digress... Glued a 1x2 to the holding plate so that I could make the 51 1/4" radius cut with the router. Screwed the 3/4" MDF to Gus' table. Screwed another piece of 3/4" MDF to the table so that I would have an even surface at the pivot point for the arm of the 1x2. Locked the arm into place 51 1/4" inches from the carbide bit of my brand-spakin' new DeWalt 2 1/4 hp router, flipped the switch on and 30 seconds later had a beautiful 51 1/4" radius jig.
Took me 1.6 hours to get it to the point of being able to use the jig... 30 seconds to accomplish what I had been working towards all that time. Saw where JimW routed part of the way into the wood for securing clamps. I routed a few additional holes 3" in. Made them clear through the 3/4" MDF. Hope it has the same effect as Jim's did for him.
Here's a shot of the final piece... with a few of the clamping holes routed into it. Did I tell ya... my brand-spankin' new DeWalt 2 1/4 hp router is a beaut !
June 22, 2010
Just a few things...
yeah, just a few things...
Just a few things to do to get this jig ready to bend the Upper Wing Center Section trailing edge... just a few things that took nearly one and a half hours. Yeah, just a few things.
A few additional holes to route so that I could use additional C-clamps to hold the Sitka Spruce to the 51 1/4" radius with enough pressure to allow the T-88 to do it's work. Once those slots were routed I made sure to do a test run of the clamping. One never knows what one will run into until ones been there before. Good thing that I did 'cause I needed to notch a few of the slots to allow for the thickness of the C-clamp head. Yeah... just a few more things.
No earth-shattering, news-worthy information to pass on to you tonight. Well, if I had to think of something, it'd be to get off yer arse and stop thinking about the project... and just get on with it. Well, at least stop over-thinking it. I've had my share of screw-ups, er learning. Just make sure you're keeping the "strive for excellence" mind-set in the frontal lobe. It'll keep you on the straight and narrow.
Getting back to the work at hand... had the glue mixed... spread it on like I was makin' a PB and J... and clamped her up for the night. I'll be ready to clamp the remaining three pieces of spruce tomorrow night. I better start thinking, now, of how I'm going to make that radius profile the length of the entire trailing-edge. Actually, I've been thinking... and haven't come up wtih a good solution yet. I have some ideas...
Not a bad clamp job if I do say so myself. Not too many... not too few... it's just right.
June 23, 2010
Wax paper...
Murphy's
Law... and Drama Queens.
If you've kept up with recent events, you know that I glued
up the first three of six lengths of Sitka Spruce for the Upper
Wing Center Section trailing edge. Seems like I used half the
roll of wax paper on the jig to keep the trailing edge from
sticking to the jig and the clamps. All clamped up... looked
good so I turned out the lights and headed up the steps to give
it a rest... I'll come back tomorrow to see how my project had
come along.
Tonight...
Got home from work and walked down to the work shop. A few twists
and a few trigger pulls and I was ready to pull it from the
jig to see how it turned out. Thing is... I couldn't pull it
from the jig. Funny... I thought, I gave the good ol' Renyolds
company my hard earned cash to keep it from doing just this...
keeping me from pulling it from the jig.
I started working it from the one side. I pulled it away eeeeeeeeeasy
until I got to the far end of the jig. Somehow... I don't know
how... but on the far end some of the excess squeeze out worked
it's way under ALL that wax paper. Actually, a tear in the paper.
Drama... no matter how much I try and avoid it.
Okay, just another little bump in the road. The beauty of MDF...
not only is it good at staying straight for long periods of
time, it also chips/breaks/tears away easily. A quick pull up
on the end of the trailing edge and a nice chunk of MDF came
came along for the ride. Easy enough to sand/file away. Not
much of a bother.
Apparently Murphy is a drama queen too.
The rest of tonight's session... ditto of yesterday with layers
four, five and six.
June 24, 2010
Boring...
just some filing and sanding.
Building... it's not that "holier than thou" attitude of crafting all of the time. There's just some things that you gotta do that doesn't scratch that builder's itch inside of you; mundane stuff. And here we have just one of those "things."
In order to make the part correctly ya need to get the squeeze out (glue)... in order for it to fit properly, and to look good, ya need to get rid of that squeeze out. Sorta like lawns; you water it to grow and ya hate mowing it. (not sure if that is a good analogy or not)
Great squeeze out over the past two days = an hour or two of mundane work, aka filing and sanding. Get use to it... it happens a lot.
I was about to write that you could spend this time planning other projects... but, come to think of it, I had my mind in what I was doing; making sure I wasn't going to screw up a few nights worth of work and all that wood. With the excess glue gone now, I need to shape it per the plans... more filing and sanding, or maybe, hmmmmmm ?
Mundane is good... gives the mind a chance to rest. Hmmmm... not sure if it ever rests.
June 30, 2010
A half inch piece of spruce...
ain't a half inch piece of spruce.
Hold on before you begin writing me nasty letters, or I lead some of you astray...
I'm talking about the nail strip, for the front spar, for the Upper Wing Center Section (as if you didn't know what part I was working on...).
Take a look at drawing number SB3PW-041. It shows you a side view of the nail strip; total thickness is 1/2". Okay... I'd say it was a 1/2" if there weren't a few "steps" involved with the piece. The steps being that it gets progressively thicker as you move in from the ends.
Total width of the nail strip is 56 7/8". Now... move in 4 3/16" on both sides... it steps up 1/8". Go a little bit further in on each side; for shits and giggles lets say that it's 2" further in on either side, 'cause that's what it is. This section is another 1/8" thicker than the previous step.
So... total thickness of that center section, which is 44 1/2" by the way, is 1/2". The next step down is 3/8" thick. And the final little pieces sticking out 4 3/16" on the ends are 1/4" thick. Referring back to my orginally statement that a 1/2" thick piece of spruce isn't 1/2" is correct, in this instance. A 1/2" thick piece of spruce is made up of one part 1/4" and two parts 1/8". Do it in layers of glued sitka spruce and you'll save yourself a lot of trouble trying to layer it from a single piece of spruce. I was smart enough this time to not even try.
July 2, 2010
Ripping quarter to eighth..
not this boy.
I think I was only figuring on producing one nail strip for the Upper Wing Center Section. Musta been a brain fart back whenever. Can be the only reason I didn't buy the two pieces of 1/8" thick x 3/4" pieces of spruce. What to do...
Had several pieces of 1/4" x 3/4" so I thought I could rip two of them down to 1/8". Set the table saw up for the rip, and rip I did. Didn't rip it to shreds, but I might as well have. The table saw I have isn't set-up for the task at hand. I'd have to make all kinds of ripping fences... blah blah blah. Instead of doing all that blah blah blah, I tried to do it using the one fence and ended up with a piece that went from 1/8-to-1/16-to-1/8-to-. Not pretty. Wasted my time and a good piece of 1/4" x 3/4" wood.
I'll be ordering the two pieces of 1/8" another piece of 1/4" and whatever tubing and angled aluminum I need to complete the Upper Wing Center Section. I'll order it sometime this weekend. Won't be shipped until Tues/Wed of next week.
Time to cut those angles on the spars for this section. Maybe I'll mock-up the engine diameter and start looking at where I'll be putting the stringer stand-offs. There's the two metal ribs I need to bend and weld onto the landing gear to finish them off. Oh yeah, I need to...


 Moving along with the Upper Wing Center Section spar doublers.
Cut the doublers for the forward spar tonight. Was gonna glue
them on tonight but thought otherwise. I'll give them a second
look tomorrow, with a fresh eye, before sealing their fate...
Moving along with the Upper Wing Center Section spar doublers.
Cut the doublers for the forward spar tonight. Was gonna glue
them on tonight but thought otherwise. I'll give them a second
look tomorrow, with a fresh eye, before sealing their fate...
 Sounds like a plan to me.