Mantua, New Jersey
Original Site:
September 2004
E-mail: usav8or@yahoo.com
No work has been completed on the upper wings. It may not
be until the fall/winter of '07 before I get around to starting
them.
October 12, 2012
I thought it would...
Nope... it didn't happen.
No... Booooioooioooooooinnnnnnnng !!!
I planned for it. I expected it... but it didn't.
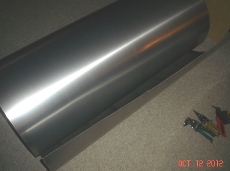
I needed to unroll one of the LARGE rolls of aluminum, in my living room, so I could start working on the upper wing fuel tank. I tied heavy twine around it (like they instructed on the outside of the roll from Airparts) and carefully cut the tape to let it SNAP!!! open. I did it in steps to keep it from exploding and going straight on me, and in the process, possibly hitting me and everything else in the living room.
It didn't happen. Sure... there was some strain on the twine the first few releases but it got to a point where it didn't unroll any more. Looked more like a loose spiral than a 9foot x 4foot sheet of aluminum. Works for me !
Well... it worked for me in unrolling the sheet, but not for laying out the baffles which I'm cutting out of 7inch x 24inch blanks. Took a 3foot x 2foot sheet of 1/2inch thick MDF and laid it on one side of the coil to flatten it out then made my marks for cutting the first blank and started working the tin snips on it. The first few cuts, er nips, were a little akward (the aluminum seemed to stay in the way of the tool) but once I nipped into it a few inches it began to curl up and out of the way making it it much easier to cut the blank out.
Once the blank was cut out (and by the way... wear some type of glove to keep the metal from chewing up your knuckles) I traced out the pattern and nipped it to shape. After admiring my work for what must have been five minutes I cut the blank for another one and then nipped that to shape.
First baffle took about an hour (due to me unrolling the sheet of aluminum)... the second one took 40 minutes. It's a pretty good workout for the grip of your hand. I'm thinking now... once I get the blank cut out I can take it to the metal bandsaw in the basement work area and cut these to shape easily. Sounds like a no-brainer to me.
October 13, 2012
Cutting with only 3/4...
More of last night... cut three blanks. Of those three, I cut the shape of two more baffles.
Not much more to say tonight other than I learned one very importanted thing when cutting with tin snips on aluminum... DON'T make a full cut with the snips. Cut with 3/4 of the blade and then begin your next cut. REASON: when you cut all the way through the blade you get a jagged cut each time you end the last and begin the next. When you use only 3/4 of the blade you're not completing a cut. The next cut is a continuation of the last (if that makes any sense). If it doesn't just try what I say and you'll be happier with the finished look of the piece.
Not that it's a big deal if you have a jagged cut. It's just a lot more work cleaning up the edge before bending it into the baffle or end caps.
October 17, 2012
It's all good.
the past few days...
Finished up the baffles and the end caps... next up is to debur and clean up the edges before putting the finishing touches on them.
Confession time. The second baffle blank I cut out was a wee-bit too short (don't ask me why 'cause I measured it twice). An unuseable piece ???? naaaaa... I decided to cut that to shape and use it for a test piece for cutting the lightening holes, flanging and fluting. BRILLIANT !!!
Tomorrow I need to start cleaning these up.
October 20, 2012
Cleaning up...
It's not one of the work areas this time. Naaaa... leaving the saw dust and metal shavings for another day. Needed to keep moving forward on the upper wing fuel tank.
The other day I finished cutting out the blanks and trimming them to the shape of the baffles and end caps. I wasn't finished with them yet... still needed to file and sand smooth the edges of those pieces before bending them to shape. That's what I accomplished tonight; cleaned up all those edges.
Next up... drill the corner relief holes on the test piece... then I need to mount it to the bending form and bend to shape. I'll then drill the lightening holes... flanging the holes will finish up my tests. The test piece to be followed up with finishing the six actual pieces.
If everything I have read is true, the bending and finished will be the easy part of it. Here's what they look like so far.
October 22, 2012 Just a weeeeee bit...
Just for shits and giggles.... not really... I discovered this when I went to drill the positioning holes in the forming block for the baffles and end caps on the upper wing tank... I made the pattern before I made the forming block. And, I made the forming block after I corrected the size of the baffles/end caps to take into account the thickness of the aluminum.
What the hell does this all mean ??? The baffle and end cap blanks are a weeeee bit too big. And what the hell does it all really mean ??? I needed to re-size all the pieces I thought were already ready.
Last night I re-sized and trimmed them down. Tonight I began deburring and filing/sanding the edges. Another four to go and I'll be ready to drill the positioning holes.
measure three times and it's still not right... I'm just not getting it
October 24, 2012 The last "I think"...
I think I'm finally ready to form the baffles and end caps for the upper wing fuel tank. So much of building the biplane is each step involved in making each piece; whether it's making a wood form to make the bend for a former or the multitude of steps before the final bends in making these baffles.
The more complicated the part, the more I say "I think I'm finally ready...". No matter how much I plan I almost always leave out a step only to be discovered along the way.
I think I've pushed through those unexpected steps and have arrived at the threshold of bending these pieces.
next... the test piece
test piece
October
27 and 30, 2012 Another unexpected
step...
The other day I trimmed back the edges of the baffles and end
caps so that they wouldn't touch when bent over. Thought I was
done with it.
(fast
forward to today...)
Went to draw on the relief holes and discovered that it just
wasn't looking right. Referred to one of Tony B's books (The
Sportplane Builder)... I had remembered that there were
a few drawings in there of how to fabricate aluminum ribs. Basically,
the same thing that I was now building.
I quick look at the drawings and I saw what I needed to do.
Spent about two and a half hours cutting back the sides (again)
and rough cutting the relief holes. Tomorrow I'll file back
the holes and begin bending these up.
Oh yeah, also marked where the rivets will be attached so that
I don't use the fluting tool in those areas.
October
31 and November 1, 2012 Avoid streching
while hammering the edge...
We're not talking exercise here...
Working on the aluminum fuel tank ribs (baffles and end caps)...
I was listening to Koob on WMGK. They're playing the first 25
years of Rock; A thru Z. A nice selection of songs... a couple
of days worth of great music.
I started, and finished, banging out the edges on the ribs.
Had it all planned out... I've had plenty of time to plan it...
my usual hesitation at doing something new.
The bending,
it's all done now. Just some tweaking with the fluting pliers.
THEN, cutting out of the lightening holes. THEN, flanging of
the holes. THEN, they're ready for whatever needs to be done
to them to rivet them into a fuel tank.
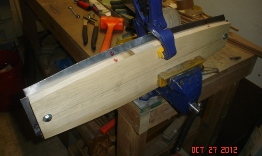
One IMPORTANT thing I want to say about banging these ribs,
or any aluminum shapes. Take your time as you hammer (with a
soft hammer... I used a 2 lb. dead blow soft plastic hammer)
the edges over. I hammered a slight bend over the entire length,
then repeat, then repeat, repeat... repeat, until it is completely
bent over.
If you hammer the edges over completely in small sections at
a time you will be stretching the aluminum, which, will make
your edge look like a storm at sea. (aka waves/ripples). oh...
that reminds me... Keep your work on aluminum to a minimum.
The more your work the piece the more "streches" you'll be doing
to it, aka... streching.
again... I've showed myself that hesitation is a waste of time... will I remember this "truth" the next time ?
November 5th and 6th, 2012 Remembering the Truth...
No hesitation... pushing forward with the aluminum tank ribs.
Tonight I wanted to do a test making a 3 1/2 inch hole using the new adjustable circle hole cutter. Took that test rib I made and clamped it to the drill press. (max speed with the hole cutter is 500rpms... so I started with a speed of about 250... and it was doing nothing... then 350... nothin'... then just below 500... and it worked great). I'm not sayin', but I'd just start with the speed closest to 500rpms or less.
Cutting with the circular hole cutter isn't fast, but you can't push it... ya just need to let it work itself... in its good ol' time. It took me about 10 minutes to work the cutter through the aluminum. Used some cutting fluid... not sure that I actually had to, but what the hell.
Duburred and cleaned the hole then took the flanging tool to it. Worked it around the hole a few times to put the 30 degree bend in it. Looks... nice.
Test completed... I worked on cutting a few more holes in the first of six tank ribs.
November 7th, 10th and 11th, 2012 The Art of working aluminum...
Over the past few days I've been working on the fuel tank "ribs."
Since I said I was going to make this a scratch built airplane I'm doing everything either by hand or using basic tools. These ribs have been nothing but...
Other than the slowness of drilling the holes, nothing new to learn there. Flanging the holes... another story.
wait... let me back up, There was a learning with drilling the holes; a finesse to working the drill on the aluminum for maximum cutting.
back to the flanging... there is an art about flanging the ligthening holes with the tool I used; working the aluminum to a close-to-perfect angle; seeing the flange before it has been made. The art... working it by hand, becoming the piece, as opposed to the industrial feel of putting them in a vise and closing the die.
What's this all mean ? I've enjoyed learning the new skills of working with aluminum. Hell, yeah, I've made mistakes... that was all a part of the learning. It's one of the things that keep me coming back to the build... time and time again.
November 12th through the 15th, 2012 More than a lot going on...
the ball is just starting to roll
The upper wing tank "ribs"... put the finishing touches on the two end caps for the upper wing fuel tank tonight. Over the past few days I remade both of these starting from cutting the blanks from the sheet of .o40 aluminum I have still sitting in my living room.
looking back..
One helluva lot of steps to go through when making them by hand. I'm more than happy with their outcome.
All this time I've been thinking about more than cutting and bending aluminum... There's a lot more that goes into building a fuel tank than forming the sides of it. There's... where does the fuel cap go and what kind?... fuel lines... vent over-flow line... how to run vent line internally... etc etc etc.
and... not to forget about the fuselage... I've been figuring out how to do, and what I need, to shape it.... with how many stringers. a Watch Out !!! If you need to ship your stingers, and they need to be over 8' long (mine needed to be 12' long), you're going to be paying more for freight than the cost of the stringers. With that in mind, I added on to the order fuel lines, trailing edges for the wings, and tank straps..
Next up for the upper wing fuel tank... cut the outside shell and start figuring out the exact placement of all those parts on it. Thinking of taking it over to Whitey to see if what I'm thinking is what I should be doing.
at the same time...
I'll be fitting up the stringers to the fuselage which will allow me to start welding on the stringer stand-offs and the additional formers. After that I'll... one second thought... I won't get too far ahead of myself.
Plenty of things lined up to do...
April 4, 2013 More wrapping...
and it ain't gifts
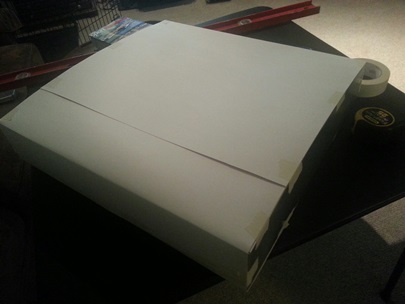
Started wrapping my head around the upper wing fuel tank again.
Decided to take a box in the shape of the tank and started sketching what goes where on it. I'll be taking it to the airport, along with the drawings, so that I can confirm my thoughts with Whitey and the rest of the gang there.
Trying to figure out how/where I'll put the vent line on it. The plans show it coming out the front/top... I guess that will be the best place for it. Tony B. was showing it coming out of the top/back-side. hmmm... ?
Spent 3.2 hours on the thinking and sketching tonight. Won't be logging more than an hour on it in the log, though.
April 6, 2013 The relief hole...
conspiracy
I swear it's a conspiracy... things appearing on the plans AFTER I make the part. Well... let's say I wished it were a conspiracy. It'd save me the embarressment of being quilty of missing something.
Guilty as charged ?!?!?! The end ribs on the upper wing fuel tank should not have the corner releif holes like the four baffle ribs. (for welding purposes) Did I miss this the first time ? Depends on if you believe the conspiracy theroy or not.
Thought about maybe just branishing in the corners of the tank shell where the corner reliefs are. Did a test... couldn't figure out an easy way of branishing those corners. It would take more time and effort to do it that way than to just re-make two metal ribs. The one million dollar question is: Do I have enough aluminum ?
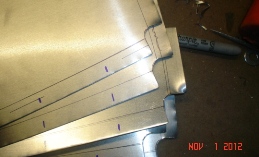
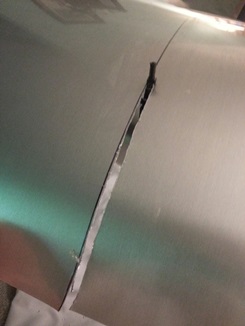
Measured then re-measured the roll of aluminum that I had left... and it turns out I had plenty to make the two additional ribs. If I didn't... I'd be ordering just enough to make both ribs.
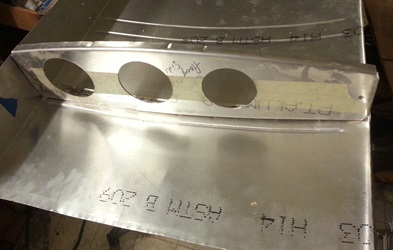
Spent close to three hours on the project today. Ended up with one complete rib ready to be straightened out and one blank ready for smoothing the edges then bending to shape. I'll have both of these puppies finished by tomrrow. Maybe I'll even cut the shell of the tank tomorrow.
Left is the new rib - Right rib has the relief holes on corners.
April 7, 2013 Making the first two...
"extra" ribs, now !
Finished up the re-makes of the two outer ribs for the upper wing fuel tank. Not much to say other than... they're finished.
The first two I made... hell, maybe I'll make wall hangings out of them...
September 11, 2013 A fuel tank is a fuel tank...
is a fuel tank !
(No down time. No down time... no down time.)
I'll be ordering the extra cap strips for the turtledeck (I'm re-making a few of the stringers... I was unhappy with the way a few turned out) but I can't stop the forward motion on the project. What to do ???
Well... I was working on the fuel tanks before starting on the turtledeck... so... looks like I'll be working on the fuel tanks again, or at least the upper wing fuel tank, so that I can finish the upper wing center section.
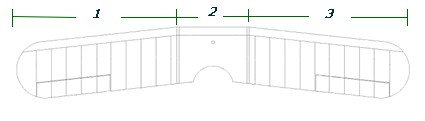
First thing I need to do is cut the aluminum sheet for the skin of it. But first I need to make the pattern for it so I'll know where to make the bends in it.
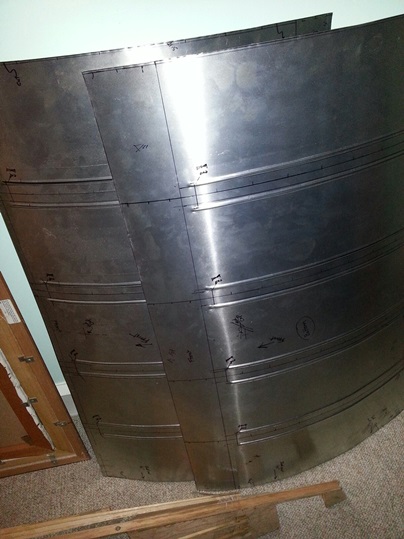
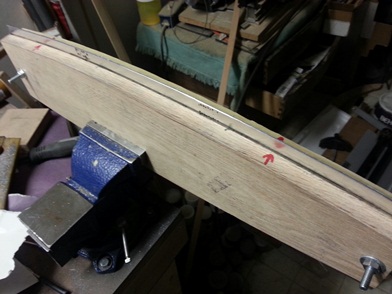
Spent close to an hour making what you see here. Which... will save me a lot of time an material not having to make "test" pieces out of the expensive stuff. Threw the question out to the guys on the biplane forum on how many pieces to make the skin in. Got quick responses from both James (aka littletootpilot) and Wes (aka PittsDriver68). Thanks, guys !
James shared a link that pointed me to a BearHawk site that shows a lot of detail in building one of these fuel tanks (the cross-over between fuel tanks on various aircraft is basically seamless - a fuel tank is a fuel tank is a fuel tank). I'll be making it in two pieces. And I will most likely have these TIG welded up... by someone who knows how to TIG weld.
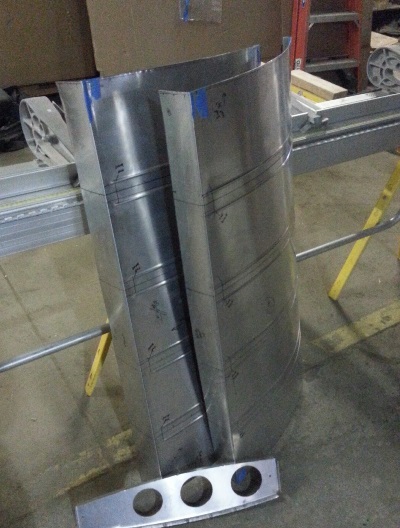
Aluminum ribs with paper skin (disclaimer: this is a test and not the finished tank)
September 12, 2013 A fuel tank ain't a fuel tank...
until you make the fuel tank !
Not a lot of time to put on the build tonight, but I did do something... 'cause it ain't a fuel tank until you've made it.
Un-rolled the HUGE-ass roll of 3003 aluminum and marked the 41.5inch line on it for cutting.
Th-Th-Th-That's all, folks.
September 13, 2013 Doin' it...
old school.
When you don't have the right tools (or should I say, least phyisically demanding)... 'cause they would cost thousands of dollars, or you don't know someone who has the tools... ya do it old school.
Started to cut the sheet of 3003 aluminum with a pair of tin snips. That ain't gonna work with the piece I need to cut soes I go and get a tool I bought some time ago just for something like this. It's called a hand nibbling tool and it's made by Adel. Worked like a champ.
Took about 1point7 hours to nibble that aluminum away, but I got it done. Now all I need to do is make two more cuts, er nibbles, to have the pieces sized right for the upper wing fuel tank.
Getting there... it's just taking a little longer than I thought it would
September 16 and 17, 2013 Slow...
AND painful.
Cutting down the aluminum for the upper fuel tank skings...
I should have taken it to some place and had these pieces sheared. Spend the money to save A LOT of time.
It was painfully sloooooow. And I mean several huge blisters painful. I wore gloves and taped my figers underneath the gloves but I still got some huge blisters. (actually... they don't hurt that much) I had to cut through roughly 12feet of aluminum, at 1/16inch nibble at a time... you do the math.
They're cut now... I just need to trim and file for a nice, straight, smooth line then bending and drilling and clecoing and riveting and...
More to come...
September 18, 2013 Slow...
but not painful.
Ya won't see the edges on these skins 'cause they'll be TIG welded but I'm re-marking them and cleaning them up... 'cause that's how I do it.
Re-marked the first edge and was able to use the tin snips on it this time. Slow, but not real slow... and not painful
September 19 and 20, 2013 Measuring and...
marking.
Yesterday I trimmed the second and last edge that I wanted to "clean up." Tonight I began marking up the skins for the upper wing fuel tank.
Spent close to three hours of time on it tonight and I'm still not finished. Figured out and made the marks for the rivets, bead lines, and bend lines. Needed to confirm that the even spacing for the rivets wouldn't overlay any of the flute marks that I made in the the metal baffles/ribs to straighten them out. Two were close... but not close enought to be a problem (he says now). I still need to mark the locations for the fuel lines, vent lines, drains and fuel cap.
September 24, 2013 MORE Measuring and...
marking.
Went back and reviewed the fuel tank plans; the ones that Curtis drew up for the "D" Skbolt (which is also the one for the "R" model).
Looking over the plans once again I see that the weld on the end ribs need to be an overlap weld. Which... means that I need to have those end ribs sticking out past the end of the skins by about 1/4inch. Remarked the cuts for the ends... also marked where the fuel drains, fuel outlets, vent, and fuel caps holes are to be drilled out.
Need to trim the ends, figure out how I'll be connecting the vent line inside of the tank to keep it from moving, and drill all the holes before making the bends in the skins.
September 25, 2013 MORE hesitating and...
a little work.
I feel myself hesitating and I don't like it. I'm keeping busy with little crap... and that ain't the way to do it. I need to take the break I need and read up, ask questions, about riveting metal; holes to make, what rivets, etc. There will probably be the "I should've dones" and the "Why did I do it that ways?", but hell, I've been there before.
Tonight... I took inventory of what needs to be done. I actually think I wanted to go out and look at the plane for a while and since I was there I figured I'd do something.
My list:
- Finish turtledeck
new 1/2 stringers
drill and attach
flooring
front mount
holes for seatbelt cables
- Drill and bolt fuselage stringers
- Instrument panels
- Fuel tanks
make and mount
- Run lines; fuel, vent, etc
- Upper Wing Center Section
Quite a bit to do
- Seat pans and backs
- Floor boards
- Attachment for horzontal tail
- Tailwheel
- Brakes; mount and run lines
- Finish throttles; mount and connect
- Firewall
- Sheet metal for fuselage
- Wheels and brakes
- Confirm gear is straight
- Mount torque tube controls
buy stick grips
- Weld on upper wing hardware to fuselage
- Buy engine ring/mount
- Make windshields
- Attachment of seatbelts
creat hooks for hanging belts?
- Battery box and run cable
- Put wings together
cut spars
re-check ribs for finish
sand ribs
- Mount/weld on rudder
- Overhaul engine
- Have prop made
It's in no particular order and by no means compete.
oh yeah... I actually did some work on it... I marked the end ribs on the fuel tank for the weld overlap and I cut the excess metal off the sides of the skins to allow for this overlap.
September 26, 2013 The best you can be...
whether you can see it or not.
Prepping these aluminum panels...
This is another one of those answers to a question... The question being "Are you going to fly that after you're finished?"
I've been working on the fuel tank panels for a little while now (no where near the amount of time I've put on the turtledeck). I just put another 1.6hours on them, cleaning the edges by filing and sanding them to the line. They're going to be welded. Did I need to spend that much time on it? Probably not. Well... I do.
I guess it's the philosophy behind the build, for me at least. Work towards excellence on all the parts, no matter what it is; drilling a hole, making the turtledeck, building the main gear, making a rib, brushing on sealer.
Tonight another 1.6hours on prepping the aluminum skins for the fuel tank; filing and sanding them. They're ready for drilling and bending now.
June 10, 2014 Rolling... rolling...
rolling.
Started back on the upper wing fuel tank tonight. It's been a while... the turtledeck has kinda kept me busy over the past six months to a year ??? seriously !
I have all the parts and pieces (although, now that I think of it, I need to purchase rivets to hold it together as the TIG welder welds it up... either that or screws ?).
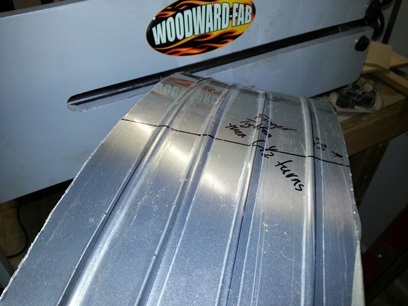
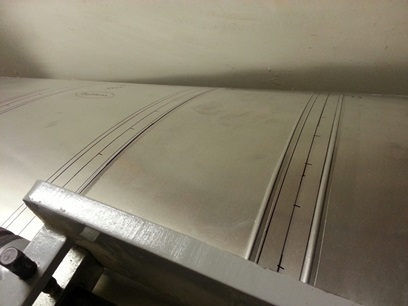
The top and bottom panels of the fuel tank are all marked up. next... I need to run the beads on both, bend front and back of both to match the ribs and drill the holes for the fill/drains/fuel lines. I've got a beader... lemme try a few practice beads.
Grabbed a piece of aluminum. Made a few marks and then set it up on the bead roller. First attempt the bead line started before the line that I had set up. The second attempt I marked the edge of the roller... started rolling it and figured out how far out I needed to mark the panel to get the correct start (on the line) of the bead. Looked at the lines I had drawn and looked at the plans again. Decided that I'd be happier with the bead lines a 1/4inch further out on both sides of the dead-center line. Re-marked the panels, then took my time rolling the beads. Half-way through doing the top panel I'm thinking "I'm getting the hang of th...). I look down and I'm rolling the bead on one of the original lines (1/4inch closer to the center line). DAMN !!! Not a reason to start over (that would be excruciating !!!) I'll know it's 1/4inch off. You'll know it's 1/4inch off. Nobody else will know it's 1/4inch off.
Continued rolling the beads. They're not dead straight and ya know what... I wasn't looking for dead straight. It's a hand-made tank and I like the non-cookie-cutter look.
Here are a few photos; the test piece... rolling it... and the completed pieces. Enjoy !
September 20, 2014 With a little help...
from my friends.
Back on the upper wing today
These sheets of aluminum have been sitting around for a while now... took a trip to Richard S. Burns Company, aka Andrea's family business. Went there looking to guillotine a few pieces and bend a few more.
Drove over with Andrea... got there and the guy that could help with the chopping wasn't there so we went over to the bending brake to bend the upper wing fuel tank into shape. Al and I... lined up the aluminum, clamped it into place... then started to bend it, or should I say, try to bend it. The brake is for bending aluminum for gutters and siding not .o63 thick metal. When we lifted the bar to bend the piece the aluminum sheet actually raised the clamp holding it. So we called over the man that knew what he was doing. Lined it up again and he really clamped that sucker in. Pulled up on the brake and it made a nice, straight bend.
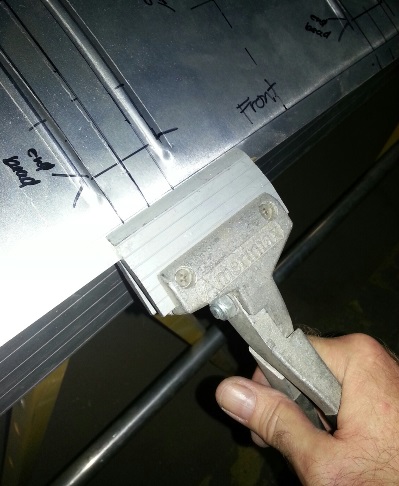
Second bend... only about an 1inch length... he was thinking it'd pull out when making the bend, and he was right. It started to make the bend then pulled away from the brake kinda making a curved bend. Tried it again with the same result. Eddie walked out of the room and came back in a few minutes with a hand held clamping tool. Grabbed the piece and started working the edge with the clamper. Worked like a charm. Who would have thought ???
Eddie helped me with the longer piece on the second half of the tank, then I finished up with the hand bending of the two pieces. What I thought could have been a disaster turned out to work out pretty nice.
I have a little tweaking to do, but they're ready for me to drill holes and attach the baffles.
The hand clamper.
September 21, 2014 I saw a little creep...
today.
Thought I was going to have more time to do more on the project today but stopped by my Mother's before the work session then headed over to hang with fiends for the afternoon football games. Good times... both places.
Managed to drill the holes in both the upper and lower halves of the upper wing fuel tank. Not much to write home about. Drilling, you know what I'm saying. oh... just a heads up... clean the end of the drill bit off each time, or at least look to make sure that it's clean... The aluminum tends to wrap itself around the tip and through the fluting. You'll see the bit start to wander if it does. If you're rushing things... it'll dance across the sheet of aluminum. and no... I'm not talking from experience. I took my time... this time. All I saw was a little creeping going on.
Need to look at what I planned on doing for the internal workings of the tank and get it done before closing her up.
Rib fits... just need to push the bottom up.
September 23, 2014 Cleaning things up...
a bit.
Get it ???
Cleaning things up... a bit (with a bit). Ahhh... never mind.
Started off checking to make sure that the one half of the upper wing fuel tank was up to my standards. Saw that it had a little bow in it so I decided that I would take a length of 2x4, place it in said bowed part and tap it a few times... going the length of the bow. Did that a few times and it took care of most of that bowing. A few tweaks in a few other places and it's ready to be a fuel tank.
Last session I had drilled all those under-sized rivet holes. I need to fit the ribs up to them and match drill holes into them but first I need to debur the back-side of where I just drilled. Spent the rest of the night pretty much doing that. Had some extra time at the end to mark the center line on the ribs. Still had time so I held one up against one of the halves and... couldn't see the line. DAMN ! guess the holes are too small to see through them or it's probably because of not enough light and I had my contacts in (which means I need a pair of cheater glasses to see up close... which I don't need when I don't have my contacts in).
I'll try this again next time, when I have my contacts out.


 I needed to unroll one of the LARGE rolls of aluminum, in my living room, so I could start working on the upper wing fuel tank. I tied heavy twine around it (like they instructed on the outside of the roll from Airparts) and carefully cut the tape to let it SNAP!!! open. I did it in steps to keep it from exploding and going straight on me, and in the process, possibly hitting me and everything else in the living room.
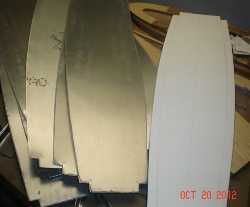
 (fast
forward to today...)
(fast
forward to today...)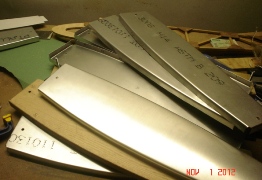 The bending,
it's all done now. Just some tweaking with the fluting pliers.
THEN, cutting out of the lightening holes. THEN, flanging of
the holes. THEN, they're ready for whatever needs to be done
to them to rivet them into a fuel tank.
The bending,
it's all done now. Just some tweaking with the fluting pliers.
THEN, cutting out of the lightening holes. THEN, flanging of
the holes. THEN, they're ready for whatever needs to be done
to them to rivet them into a fuel tank.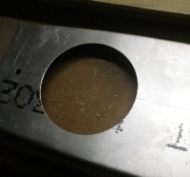 Tonight I wanted to do a test making a 3 1/2 inch hole using the new adjustable circle hole cutter. Took that test rib I made and clamped it to the drill press. (max speed with the hole cutter is 500rpms... so I started with a speed of about 250... and it was doing nothing... then 350... nothin'... then just below 500... and it worked great). I'm not sayin', but I'd just start with the speed closest to 500rpms or less.
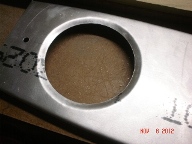 Duburred and cleaned the hole then took the flanging tool to it. Worked it around the hole a few times to put the 30 degree bend in it. Looks... nice.
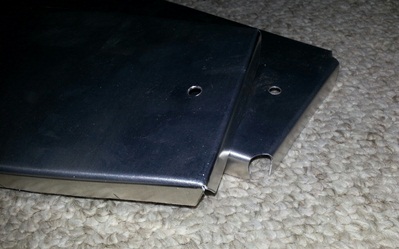

 When you don't have the right tools (or should I say, least phyisically demanding)... 'cause they would cost thousands of dollars, or you don't know someone who has the tools... ya do it old school.
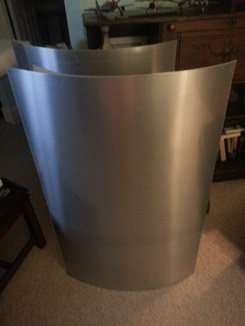 Cutting down the aluminum for the upper fuel tank skings...
I should have taken it to some place and had these pieces sheared. Spend the money to save A LOT of time.
Cutting down the aluminum for the upper fuel tank skings...
I should have taken it to some place and had these pieces sheared. Spend the money to save A LOT of time.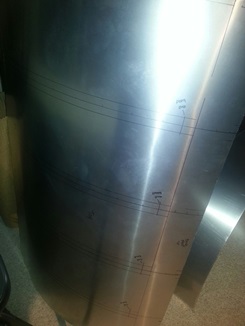 Yesterday I trimmed the second and last edge that I wanted to "clean up." Tonight I began marking up the skins for the upper wing fuel tank.