Mantua, New Jersey
Original Site:
September 2004
E-mail: usav8or@yahoo.com
Zero construction on the ailerons. Wait... make a change to that. On December 16th 2006, I started working on the ribs.
Well, in a sorta-kinda way that is. I traced and began cutting out the nose blocks for the Lower Wing Ribs for the ailerons.
Just starting the ailerons, as you've just read. Will be adding more to this page in the next few weeks.
March 18, 2007
Update:
Not happy with all the nose blocks that I previously cut.
Traced out and cut pattern for new Lower Wing Aileron nose
block. Traced and routed all ten nose blocks. Traced and cut
all gussets for the Lower Wing Ailerons. The photo to the
left shows three nose block patterns for the Lower Ailerons.
Confused ? Well, I was at a few points. As you can see from
this photo for some reason I thought that the nose block for
the ailerons were a different shape than what they actually
are. hehe Each time getting a little bit closer to what they
actually were suppose to look like. Made the far left nose
blocks twice. Wasn't happy with the first batch. I didn't
realize that these were the wrong shape and I made them again.
Center nose block shows one that I just made the other day.
STILL not the right shape. I didn't realize this until I thought
back to when I made all those standard ribs. The nose block
actually came back and would glue/attach to the spar just
behind it. With this in mind I made a new pattern and re-routed
the nose blocks a fourth time. (what's that they say about
three being a charm... ain't so, I'm tellin' ya it ain't so)
Just to let you know... it's not that clear on the drawing
on what the nose block is suppose to look like. Maybe its
me, but I didn't see it as you can tell.
Note: I could have probably asked the guys in the biplane
group to see if I could use the center nose block and then
sandwich the center spar using 1/2" x 1/4 spruce capstrips.
But you go to all this trouble and time to make things as
good as you can, per the plans, so why start "cutting corners"
now. Keep the same standards as when you first started the
project.
Followed the same steps for making the jigs for the nose blocks
and the ribs as I did for Upper and Lower Wings. Click
here to read about these steps if you haven't already
read about it. No sense in repeating myself here. I'm starting
to confuse myself. : )
On this page I will point out a few of the differences between
the making of the wing ribs and the aileron ribs.
Right out of the gate you'll want to make the aileron ribs contextual to your wing ribs... aka, take the pattern that you
made your ribs from, the one that is on the jig and make the TE (trailing edge) and top and bottom capstrips match that. blah blah blah
The spar connected to the front of the aileron ribs NEED to be cut with the angles on them before they are glued to the front of the ribs.
Don't ask me how I know this.... I was told this. I'll let you know why in the coming weeks.
To clear up a little confusion I had. The angled cut piece of wood that you see on the drawings that is on the front of the rib nose blocks is the front spar for the aileron and connect all of the ribs together. They aren't 1/4" thick
1/2" x 1/4" spruce pieces. It's pretty obvious, but it wasn't to me at first, for some reason.
The Trick to Making Ribs using brass brads:
I'm telling you what works for me at the time I'm writing this. In the past I've been told to use staples or brads and that it's a lot quicker to do
BUT at that time I wasn't really given clear directions on how it was easier and faster. Just a matter of time for me to discover for myself and for you now to read; learn
from the mistakes of me, aka others.
I'm not a master builder. This is my first time at something like this. And with this little experience I may read the blue prints wrong at first and then learn, from asking,
what is the right way to do it. And then ask more probing questions on exactly how to do it. I asked questions at first, just didn't probe deep enough for me to fully understand
how to go about doing it. It's all good. And it was all a part of the learning for me. And if you haven't started your plane building yet, a lesson learned for you too. (glad I could
help)
From me re-working a few of the standard ribs into ribs that
will go in front of the ailerons, I've figured out how to
build the ribs using the brass brads that I originally started
making the ribs with but.... without much success. Well, success
at a cost. It took forever and I always made a huge
mess.
Start off with everyrthing in place as I've described before on my The Ribs Too Page. Before placing the gussets onto the glued up capstrips
as mentioned in stage ten on my list, take a pair of tweezers that you need to squeeze to open, not squeeze to close. This may seem like a small detail but I've found it to be most important.
On each of your gussets tack the brads, I found that 3/8" brads worked, into place THEN lay the gusset
onto the glued up capstrips that are in the jig and lightly tap the brads so that they secure the gusset to the rib. A little longer to do than just simply placing the weights onto the gussets
but you'll be able to knock out a few ribs each night because you'll be able to pull the rib out of the jig and do the same to the other side.
When building ribs this way it is very important to set the drying rib on a perfectly flat surface to cure. I'm going to add those weights to the second side after tapping in the brads just so I know
the rib is as flat as possible while drying.


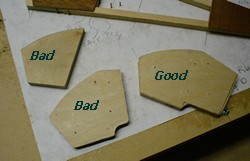 Update:
Not happy with all the nose blocks that I previously cut.
Traced out and cut pattern for new Lower Wing Aileron nose
block. Traced and routed all ten nose blocks. Traced and cut
all gussets for the Lower Wing Ailerons. The photo to the
left shows three nose block patterns for the Lower Ailerons.
Confused ? Well, I was at a few points. As you can see from
this photo for some reason I thought that the nose block for
the ailerons were a different shape than what they actually
are. hehe Each time getting a little bit closer to what they
actually were suppose to look like. Made the far left nose
blocks twice. Wasn't happy with the first batch. I didn't
realize that these were the wrong shape and I made them again.
Center nose block shows one that I just made the other day.
STILL not the right shape. I didn't realize this until I thought
back to when I made all those standard ribs. The nose block
actually came back and would glue/attach to the spar just
behind it. With this in mind I made a new pattern and re-routed
the nose blocks a fourth time. (what's that they say about
three being a charm... ain't so, I'm tellin' ya it ain't so)
Update:
Not happy with all the nose blocks that I previously cut.
Traced out and cut pattern for new Lower Wing Aileron nose
block. Traced and routed all ten nose blocks. Traced and cut
all gussets for the Lower Wing Ailerons. The photo to the
left shows three nose block patterns for the Lower Ailerons.
Confused ? Well, I was at a few points. As you can see from
this photo for some reason I thought that the nose block for
the ailerons were a different shape than what they actually
are. hehe Each time getting a little bit closer to what they
actually were suppose to look like. Made the far left nose
blocks twice. Wasn't happy with the first batch. I didn't
realize that these were the wrong shape and I made them again.
Center nose block shows one that I just made the other day.
STILL not the right shape. I didn't realize this until I thought
back to when I made all those standard ribs. The nose block
actually came back and would glue/attach to the spar just
behind it. With this in mind I made a new pattern and re-routed
the nose blocks a fourth time. (what's that they say about
three being a charm... ain't so, I'm tellin' ya it ain't so) Followed the same steps for making the jigs for the nose blocks
and the ribs as I did for Upper and Lower Wings.
Followed the same steps for making the jigs for the nose blocks
and the ribs as I did for Upper and Lower Wings. 