Mantua, New Jersey
Original Site:
September 2004
E-mail: usav8or@yahoo.com
Three-piece upper wing... stronger than Babe the OX.
July 3, 2010
Spar/spar doublers....
beyond the test pieces.
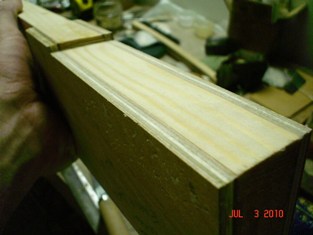
Work on the Upper Wing Center Section spar tonight; the rear spar. (lack of material put the additional nail strip on hold)
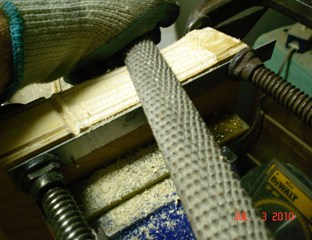
On the spar/spar doubler test pieces, that I did about a month ago, I cut the 1/8" notch by first running it on the table saw. I then took two pieces of straight 4130 flat stock and clamped them along the edge of the cut I made so that I could finish off the notch (where the round saw blade couldn't reach.) Instead of the possibility of screwing up the hours of work I've put into these spars I decided to do it all by hand; sorta like I did when finishing up the test pieces.
Made my 1/8" marks on both sides of the spar doubler. Aligned the one side with the straight edge and tapped a few brads below it to hold it where it was suppose to be. Did the same on the other side. Laid the straight edges in place and clamped them to the doublers. Spent the next hour and a half filing down the 1/8" notch. I'm very happy with the end result.
Sorry, no earth-shattering news tonight.
Oh, by the way, remember to score the plywood on the marks so that you're not splintering into the wood you want to keep. Scoring will allow the wood to break at the scored point (in case ya didn't know.)
July 4, 2010
Bike ride....
or biplane ride ?
Looked outside... July 4th and I'm off. The weather is beautiful. I'm not scheduled to fly a 172 until next weekend. Maybe I'll steal away a few hours and cover some ground with the Harley.
I started to get ready for the ride... the thought of working on the biplane working it's way from the back of my mind forward. The more I got ready for the ride, the more that thought move forward and tried pushing out my focus on the bike ride. I tried to reason that I'll have time to work on the biplane later on today. I knew better. I had invited a few people over for a cookout and knew squeezing in the project would be difficult at best. I continued getting ready. It continued pushing forward. As I started to slip my foot in the boot I had to stop. Something clicked inside my head and at that very moment made a gray decision black and white.
I could continue to slip my foot into that boot, warm up the Harley and go ride for a few hours. Or, I could stop where I was at, throw on my work clothes and get a little bit closer to riding that biplane. What's the question again ? Fly that biplane or .... what ?
With the decision made... I was looking forward to getting the second notch made on the first spar. Yesterday's success had me stoked for doing the same today.
A little was learned from my work on the first notch; positioning of the c-clamps, tapping the razor blade in for a full-depth cut at the 5" mark, etc etc. The small amount of learning turn out to be a big time saver. I completed the three additional cuts in two hours; cutting two and a half hours off of that one piece of the puzzle.
Reflecting back on today's events, I can see a pattern. When I take the time to stop and think of the consequences of making one decision over another, I'll always make the correct one... one that gets me closer to flying or keeps me in better shape. I just need to remember to stop and think more often.
July 6, 2010
Specialized....
a few tools to make the job easier.
We're building because we like to build, right ? We're not looking to rush through this process or we'd buy a kit and pull one part out of a box and bolt it to another part from another box.
Since the begining of time, man has sought out ways of making things easier, and, to be more precise... more precise. And so it is with me building this biplane. I can hack my way through it and have something not even "good enough" even after a few tries at it. Or, I could get the right tools for the job and make the job go a little quicker and with a lot better outcome. And so it is with this project.
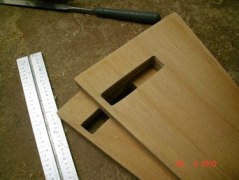
The holes that need to be made in the lower, back end of the outter trailing edge spars need to be "square" from one side to the other. I could drill two holes and start filing away at it. In order for me to keep it square I'd need to clamp a few straight edges on both sides to keep my file from going askew (wurd?).
In walks the Plunge Router adapter I've had for the past few years (forgeting what I even got it for to begin with). Last night I went to the Home Depot to pick up a router bit for the Dremel. Got something... not exactly what I wanted so I held off on tearing it open. Had the day off today and one of the things I had to do was go to Lowes to see if I could find a few of these micro router bits. (Lowes is pretty good at having EVERYTHING that I'm looking for.)
After searching for a few minutes I saw a package of six different bits... $30.00. Grabbed the package, paid and headed home.
The Plunge Router adapter for the Dremel isn't that complicated of a piece to figure out. Not quite the quality of my BRAND SPANKIN' NEW Dewalt, but the DeWalt was a little too much for this job. Made a quick jig to hold the angled trailing edge in place. As you can see from the picture of the Dremel tool, there is an adjustable straight-edge. Made it easy to guide it in a straight line.
Routed the two vertical edges on both holes, kinda-sorta routed out the remaining wood with some filing to do on both the bottom and top edges. Not perfect... but a good exercise in working toward Excellence.
If I didn't have this small router, I'd still be working on this project. As it is... I've spent more than enough time on it; 1.7 hours to make two holes??? yeah.
July 28, 2010
Hurry up....
and wait... a few days
Wood delivered on Saturday... takes until Wednesday for work to begin again. The kicker is... the tubing has been here for quite awhile. I actually had them break the order up so that I could get the tubing asap. Yeah... kinda dumb. I always want it now ! even if I don't need it.
The "Hurry Up and Wait" alludes to when I was in Air Force Basic Training. My TI (training instructor) always had us run our asses off to get somewhere, only to wait a half hour for the place to open. Never figured that one out.
The "laminating up" of another Nail Strip for the front spar on the Upper Wing Center Section. Nothing to write home about... again. 'Nuff said the first time. Just happy to be working towards getting it completed.
Need to start looking for a local source for gas tank material; aka aluminum. Plenty of Speed Shops around. Can probably find tank material there. It'll save on shipping.
May 19, 2012 more like a few
years...
real quick... I originally had April 11, 2012 - May 17, 2012 blogged under "The Fuselage" page. I didn't realize my mistake until last night.
soooooo... they'll be duplicates, but I wanted to get these updates under the right heading.
April
11, 2012 working towards...
some head scratching
The other night I cut the tubes for the fairway lead grommets
(at least that's what I'm calling them.) Twern't a fast process
of cutting those pieces. Took near an hour or more to cut
four 3/4 inch lengths of tube. uh... yeah
Tonight it was a visit to the Vets for the pup. He got A's
on his report card. (good pup!) Got home from there, grabbed
a bite to eat and it was appoaching 9:30PM. Wanted to do something
and have been thinking of converting one of the upstairs bedrooms
into a upper wing center section workshop. Had to do some
rearranging before dragging the jig, I made about a year ago,
up the steps.
I have some head scratching to do on how I'll be jigging the
pieces in positon on the jig, but other than that... I'm all
set for making that center section... wooo hooo !!!
April
12, 2012 Spending quality time...
with the plans
It's not about the amount of time but the quality of time that counts... right ???
Looked over the upper wing center section prints tonight. (it's been awhile) Kind of got a feel for what I need to do, the steps I need to take... in the order I need to take them.
Still need to have those THICK metal parts welded up that I cut out so long ago. Need to cut a few lengths of tube and also lathe out a few caps from solid pieces of 4130. After all that is completed I can take all that wood work I've done and create that center section.
At the same time I'm doing all this I still plan on working on the fuselage; attaching all those parts and pieces and figuring out what else needs to be done with it.
April
19, 2012 Thinking through...
the
upper wing center section
I've been away for work for a few days but that hasn't stopped
me from "working" on the biplane. I've been thinking about
things for a week...
I'm back to working with wood again and I've been thinking
about what I need to do to get things going on this next part;
the upper wing center section, if you haven't already figured
it out.
I need to rig a few lengths of wood for jigging and the other
night (before I left for a few days) I plugged in the DeWalt
portable table saw and it kept tripping the fuse (which is
odd because 1. It never did that before, and 2. I have new
fuse box that can handle all that required power.) Went down
to try it out tonight and... (drum roll please) it works like
nothing was wrong with it. hmmmmm... ???
Okay.. (shrug shoulders) table saw is ready, now I need to
clamp a few pieces of pipe to the bottom side of the jig to
make sure it stays straight the entire time I'm building this
part of the wings; as we all know wings need to be straight
and true.
In thinking this all through, I need to make a few short,
temporary spars for the ribs to make sure that the placement
of the two spars in the center section match up to them. Reason
being... there are wing attachment fittings on the center
section spars. I'll need to rip these tonight on the table
saw that is now working. They don't have to be angled and
pretty looking. I'm just looking to make sure that the spacing
on the ribs line up with the spacing on the center section.
Okay... what do I have so far:
1. Rip temporary spars
2. Rip a few lengths of wood for jigging up the spars
3. Weld up two of the fittings that I have made the pieces
for
4. Need to buy aluminum for wing tank
4. START building it !!!
I'm sure I'll be doing a lot more thinking through before
finishing this piece.
April
22, 2012 Tip toe...
and it ain't through the tulips
I'm at that part of the build again, when I slow things down...
Not that I want to, it's just a part of my process
for some reason.
And it's not for some reason, it's because I'm forging into new territory; the building of the upper wing center section. I'm tip toeing... as I've done many times in the past. Rather tip toe instead of rush into it and then have to re-make whatever piece I'm working on at the time.
I'm thinking ahead here... trying to see 20/20 before instead of after the fact. Spent today taking off the excess epoxy that had squeezed out when making the spars. Cleaning them up so that the box ribs I made awhile ago will sit flush with the spars. Then... spent the rest of the work session making a few short temporary spars for the upper wing ribs; wanted to fit them on the ribs and then mate them up to the upper wing center section jig to make sure that they matched up right. They did !!!
Need to measure and cut quite a few corner blocks for the ribs... work for tomorrow.
April 23, 2012 Spending time...
on the project and other schtuff
More pieces to the puzzle... cutting more pieces.
Measured and cut the 3/4" x 3/4" x 45 degree corner blocks that I needed. These support the ribs on the upper wing center section. Other than messing with the bandsaw (aka "other schtuff") not much thought went into tonight's work. Figured I needed to tilt either the table or the "T" square to cut straight cuts. Turned out to be the table that needed to be realigned.
Spent a little extra time makin' them look purty. Sanded the fray off of the edges and the rough face on each of them. Lookin' might fine now.
April 24, 2012 In the foot steps...
of JimW
Spent tonight looking for "gotchas."
Back in 2009, when JimW was working fast and furious on his Skybolt, he documented a few corrections that needed to be made to the plans and the path that he took in making the upper wing center section. Jim, and his other half, were doing it all the right way; a trophy winner to be sure. If he already had been there... I'm sure as hell gonna see how he did it and plan my route from his experience.
Saw a post on the fourm that JimW made that I hadn't seen before. It was how he jigged up the spars for the center section. Looks kinda like what I'm planning on doing. nice...
One last thing I did before stopping for the night was checking on the wing's spar spacing and the upper wing center section spar spacing; close to dead on !!!
oh... and one other thing... just reached 2000 hours on the build. saaaaa... weet !!!
April 25, 2012 It's now...
Flopped
Worked on the upper wing center section tonight. More scratching the head actually...
There is a build up on the front spar. It pretty much spans the top and bottom of the front of the front spar. Needed to trim up one of the layers so that it would nest nicely between the 1/4" spar blocks.
With both build ups trimmed to fit I started placing all the parts and pieces together for a trial fit of all the pieces to make sure they all fit correctly. The first parts I match up, the span build ups, started the head scratching. like... what the hell is going on here ???
Not that you'll follow me on this, but... there was an 1/8 inch gap from the build up and the spar itself. Wondering what happened. Found the prints for the piece and all the layers were there. Scratched my head a few times and still couldn't figure it out. Flipped and flopped the build up on the spar... then it dawned on me. I had the 1/4 inch piece where the 1/8 inch piece should have been. I made the spans before I made the spars and apparently didn't think it through all the way; I flipped it when it should have been flopped!
I have material slated for another part that I'll borrow so that I can continue working on the center section. I'll get started on that tomorrow.
I reinforced something tonight; need to think things through until you fully understand them and you should build the parts that other parts mate to before making those mating parts. But, that's not the important thing that happened tonight... I actually started to put this center section together; got past just the thinking stage of building. Didn't get far in doing it, but I did cross that span of hesitation...
April
26, 2012 Resistance...
is
futile !!! ???
Got home tonight from work around 6:45pm. Yeah... initially
I didn't really feel like working on the biplane after a long
day... yeah... got over that quick enough.
Continued work on the spar build up on the upper wing center
section. Looked over the plans, made a few measurements, looked
at the marks... and it looks like the top 1/8 inch piece of
spruce, per the plans, will be 1/2 inch too long. On both
ends of the spar is an "L" shapped bracket and then a 1/4
inch thick nose rib. With the spar build up the length per
the plans it won't allow space for both of those ribs. And...
of course this is all speculative. Once I have everything
together I'll confirm either way.
Nice to have resisted the resistance (so does that make
it futile and un-futile at the same time???)... put another
hour behind me on the build... another hour closer to flying
her.
Here's an image of the front spar with the cut pieces for
the build up ready for glueing up.
April 28, 2012 Phils VS the Cubs...
starting in the 4th inning
A busy Saturday for me... on everything BUT the project. 7PM rolls around and I need to make a decision... do I work on the project now and miss the frist part of the Phillies game or watch the entire game and then work on it at like 10 tonight???
My better judgement came in to play and I decided that I'd miss about an hour of the game and get some work done on the project instead of watching the game and possibly falling asleep on the couch and missing the last part of the game and not working on the biplane. yeah... that's what I'll do.
The plan was to mix up a big ol' batch of glue and glue up the spar build up for the upper wing center section.
A few small brass brads, some glue and about an hour's worth of time and they're ready for the weights to be placed on them for setting up. By the way, I used the brads to keep the pieces from moving on me (glue has that tendency to slide when setting up, even when they are on a level surface.)
Tomorrow... I'll do a dry run of all the pieces I have made for the center section, find out what I still need to do and proceed from there.
By the way... the Phillies won tonight 5 - 2 against the Cubs (lost last night to the Cubs). Still two more games in the series. Utley and Howard to be making their comebacks soon.
April 29, 2012 Starting and...
Stopping
Had a little bit of time this afternoon to work on the biplane. Managed to file and sand off the excess glue on the spar build ups that I glue together last night. nuff said about that...
Tonight I started to fit all the pieces together that I had made for the upper wing center section. Started with the front spar and didn't get far.
Laid the front spar so that the forward side of it was laying up on the table. Fit both of the spar build ups in place and then got the five nose ribs I had routed and trimmed, oh so long ago... and that is where it stopped going together so well. It looks like the notches shown on the CAD plans for the nose ribs are a little off... ohhh by about 3/16 inch for each notch. I needed to cut out additional material from the height of the notches too. That used bandsaw that I bought a few years back made quick work of re-adjusting the size of those notches. (note: the 45 degree supports are temporary in the photo... they need to be cut down a bit more and fitted between the spar build ups)
More work on fitting up tomorrow... wondering how far I'll get before hitting another "stop." Embracing those stops for their learning...
April 30, 2012 The game was on...
not much was accomplished
Planned doing a lot more than the little that I did. Guess having the Phillies/Cubs game on the TV didn't help much.
Continued working on dry fitting the pieces together for the upper wing center section. Needed to trim the 45 degree support blocks. Liked doing it so much that I did it twice (not enough taken off the first time). That's it !!! That's all that I accomplished tonight. Not much for close to an hour's worth of work. I'll put down .3 hours... but I'm not marking down a full hour.
Next on the list... cutting the angles on the spar build ups, to match the angles on the front spar, then glue them onto the spar so I can get moving on with the rest of the fitting up
oh yeah... My man Vance pitched tonight... Phillies win 6 - 4 over the Cubs. Nice game...
got to thinking...
This deal about an hours worth of messing around and actually working on it for .3 hours... not quite. There's a kazillion things I'm thinking about the entire time I'm working on the biplane; little adjustments and notes that I'm making. Hell, there are times I'm staring at the TV, watching the game, and I'm thinking through what I'm working on... or the next step from there.
soooooooo..... I'm going to have to retract my statement about not much getting accomplished tonight. A helluva lot got accomplished... as usual.
May 2, 2012 Moving forward...
is the risk of making mistakes
There's one thing that I need to overcome... hesitation. If you're going to move forward you'll need to go through whatever it is that is ahead of you... no matter how long you wait to start.
And so it is with this upper wing center section. My hesitation is due to me not wanting to mess up a good piece of wood, or a good piece of whatever I'm about to work on. Maybe I shouldn't think of overcoming my hesitation by moving on quickly... but overcoming it by moving ahead at a steady pace. Plan it out, think it all the way through and then proceed with the task.
These days/weeks of dragging out getting a start on the upper wing center section. (I've been working on it, but nothing that would be a "keep it" or "throw it away" decision.) All that changed tonight.
The build up for the spars should have been glued on before I made the 10 degree cuts on the front spar. Instead, I made the cuts on the spar and then made the build ups... which necessitated me making the 10 degree cuts on the spar build ups and then glue them on to the front spar.
I used the angle on the spar to set the angle on the table saw's blade. Made a test cut with the scrap piece of wood then set about taking my time cutting both spar build ups. saaaaa-weet ! Spent the rest of my session glueing them on and weighting them down.
moving right ahead...
April 30, 2012 Little time, but no excuses...
turns out I wanted to watch this movie tonight
Got home from work and headed straight down to the workshop. I wanted to see how the glue up went. Looooooks.... purty nice.
Needed to clean the excess squeeze out off the sides of the spar. A little under 1/2 hour and I'm ready to glue on the nose ribs.
Wanted to catch a bite to eat before doing the ribs and got sucked into watch "AVATAR" on TV (it was on one of the channels when I started eating my salad for dinner... always heard about it, but never saw it... great flick !). and... That's all she wrote. It's 11:49pm right now and the nose ribs will have to wait until tomorrow.


 The holes that need to be made in the lower, back end of the outter trailing edge spars need to be "square" from one side to the other. I could drill two holes and start filing away at it. In order for me to keep it square I'd need to clamp a few straight edges on both sides to keep my file from going askew (wurd?).
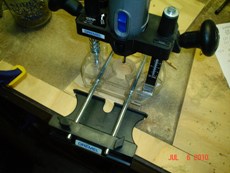 The Plunge Router adapter for the Dremel isn't that complicated of a piece to figure out. Not quite the quality of my BRAND SPANKIN' NEW Dewalt, but the DeWalt was a little too much for this job. Made a quick jig to hold the angled trailing edge in place. As you can see from the picture of the Dremel tool, there is an adjustable straight-edge. Made it easy to guide it in a straight line.
 Wood delivered on Saturday... takes until Wednesday for work to begin again. The kicker is... the tubing has been here for quite awhile. I actually had them break the order up so that I could get the tubing asap. Yeah... kinda dumb. I always want it now ! even if I don't need it.
 I'm at that part of the build again, when I slow things down...
Not that I want to, it's just a part of my process
for some reason.
I'm at that part of the build again, when I slow things down...
Not that I want to, it's just a part of my process
for some reason. 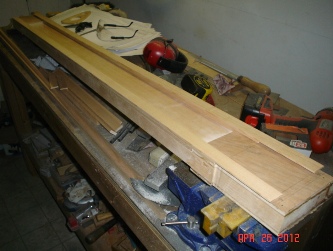
 A busy Saturday for me... on everything BUT the project. 7PM rolls around and I need to make a decision... do I work on the project now and miss the frist part of the Phillies game or watch the entire game and then work on it at like 10 tonight???
 Tonight I started to fit all the pieces together that I had made for the upper wing center section. Started with the front spar and didn't get far.
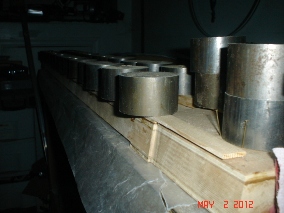 These days/weeks of dragging out getting a start on the upper wing center section. (I've been working on it, but nothing that would be a "keep it" or "throw it away" decision.) All that changed tonight.