Mantua, New Jersey
Original Site:
September 2004
E-mail: usav8or@yahoo.com
Three-piece upper wing... stronger than Babe the OX.
April 23, 2013 Something borrowed...
With all this time invested in the upper wing center section spars I don't want to chance drilling the holes for the wing brackets mis-aligned. So... I threw the question out to the group on the biplane forum to see what they have done, while in the back of my mind I was thinking of something similar to what they use for drilling the corner blocks on the wings.
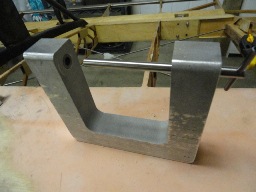
All the suggestions were great. I was going to go with one suggestion that said to start two pilot holes, one from each side of the hole and have them meet in the middle... then begin drilling out to the correct size. It would turn our perfectly aligned then. Then before I was able to act on that thought... Dave Dugan replies to the thread and shows a picture of what I was thinking of. Of course... this was a milled piece of art that I would have no way of making myself. He said all ten holes were aligned perfectly.
He kinda offered it out to the group saying it was sad to see it collect dust. I quick said I'd take him up on the offer and... he'll be sending it my way the end of this week. I'll do a test with it then I'll push forward with making all those 1/4" holes.
April 23, 2013 last night continued...
Another upper wing center section wing bracket sanded... the edges that is.
April 25, 2013 third one done...
and... Another upper wing center section bracket sanded smooth...
April 27, 2013 fourth one done...
and... the remaining upper wing center section bracket sanded smooth...
May 1, 2013 nope, nope... and again NOPE !
NOPE !... haven't stopped "working" on the biplane. I've been thinking quite a bit about the way I'll be approaching the drilling of the upper wing center section spars. While I was thinking about it the other night I decided to ream the 1/4inch holes in all four of the wing brackets.
I got that nice looking drill block from Dave the other day... need to get a few 1/4inch bolts for the job... to keep things aligned as I move from hole to hole. I'll be picking those up this weekend from the local Home Depot. Hope to get these all drilled and finished this weekend. No rush though...
The wood for the turtledeck is finally arriving tomorrow. I'll get moving on that too. That's another thing I keep thinking about as the days pass by... how exactly do I want this to come together ? It's a far cry from when I first started thinking about it way back two months ago. Guess it WAS a good thing that Aircraft Spruce took about a month to fill the order.
May 13, 2013 Keeping things straight...
After picking up the 1/4inch bolts from the Home Depot I got an email from Dave Dugan... basically saying... "you're going to be using AN bolts to keep things aligned as you drill, right ?" Ahhhh... I wasn't but since you mentioned it... I replied... I'll ordered up the right amount of them from Aircraft Spruce and use the AN bolts.
The AN hardware arrived the other day. But... me, being me... hesitated in getting started on the first hole. I didn't want to screw up all that work I had put into those spars. Well, the drill block isn't mine and I can't wait forever to get it back to Dave so tonight I faced that demon... and drilled the first hole. It WAS in a test piece of course.
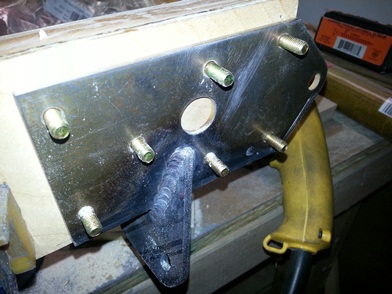
That test pieces was a piece of cake. That drill block Dave made up made match-drilling straight as arrow holes... as I said earlier... a piece of cake. Just under two hours to drill thirty-three holes (and that includes the hole I put in the test piece.)
Nothing like having the right tool to make things easy...
Drill Block
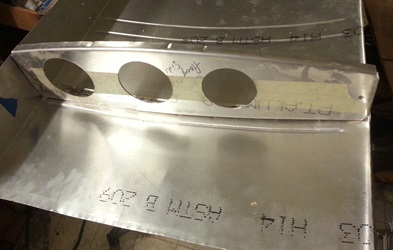
Drilled Bracket
September 11, 2013 A fuel tank is a fuel tank...
is a fuel tank !
(No down time. No down time... no down time.)
I'll be ordering the extra cap strips for the turtledeck (I'm re-making a few of the stringers... I was unhappy with the way a few turned out) but I can't stop the forward motion on the project. What to do ???
Well... I was working on the fuel tanks before starting on the turtledeck... so... looks like I'll be working on the fuel tanks again, or at least the upper wing fuel tank, so that I can finish the upper wing center section.
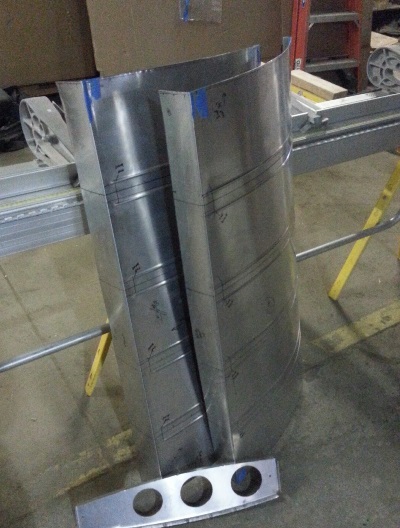
First thing I need to do is cut the aluminum sheet for the skin of it. But first I need to make the pattern for it so I'll know where to make the bends in it.
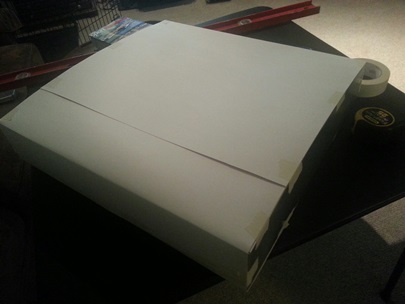
Spent close to an hour making what you see here. Which... will save me a lot of time an material not having to make "test" pieces out of the expensive stuff. Threw the question out to the guys on the biplane forum on how many pieces to make the skin in. Got quick responses from both James (aka littletootpilot) and Wes (aka PittsDriver68). Thanks, guys !
James shared a link that pointed me to a BearHawk site that shows a lot of detail in building one of these fuel tanks (the cross-over between fuel tanks on various aircraft is basically seamless - a fuel tank is a fuel tank is a fuel tank). I'll be making it in two pieces. And I will most likely have these TIG welded up... by someone who knows how to TIG weld.
Aluminum ribs with paper skin (disclaimer: this is a test and not the finished tank)
September 12, 2013 A fuel tank ain't a fuel tank...
until you make the fuel tank !
Not a lot of time to put on the build tonight, but I did do something... 'cause it ain't a fuel tank until you've made it.
Un-rolled the HUGE-ass roll of 3003 aluminum and marked the 41.5inch line on it for cutting.
Th-Th-Th-That's all, folks.
September 13, 2013 Doin' it...
old school.
When you don't have the right tools (or should I say, least phyisically demanding)... 'cause they would cost thousands of dollars, or you don't know someone who has the tools... ya do it old school.
Started to cut the sheet of 3003 aluminum with a pair of tin snips. That ain't gonna work with the piece I need to cut soes I go and get a tool I bought some time ago just for something like this. It's called a hand nibbling tool and it's made by Adel. Worked like a champ.
Took about 1point7 hours to nibble that aluminum away, but I got it done. Now all I need to do is make two more cuts, er nibbles, to have the pieces sized right for the upper wing fuel tank.
Getting there... it's just taking a little longer than I thought it would
September 16 and 17, 2013 Slow...
AND painful.
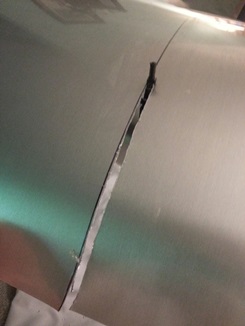
Cutting down the aluminum for the upper fuel tank skings...
I should have taken it to some place and had these pieces sheared. Spend the money to save A LOT of time.
It was painfully sloooooow. And I mean several huge blisters painful. I wore gloves and taped my figers underneath the gloves but I still got some huge blisters. (actually... they don't hurt that much) I had to cut through roughly 12feet of aluminum, at 1/16inch nibble at a time... you do the math.
They're cut now... I just need to trim and file for a nice, straight, smooth line then bending and drilling and clecoing and riveting and...
More to come...
September 18, 2013 Slow...
but not painful.
Ya won't see the edges on these skins 'cause they'll be TIG welded but I'm re-marking them and cleaning them up... 'cause that's how I do it.
Re-marked the first edge and was able to use the tin snips on it this time. Slow, but not real slow... and not painful
September 19 and 20, 2013 Measuring and...
marking.
Yesterday I trimmed the second and last edge that I wanted to "clean up." Tonight I began marking up the skins for the upper wing fuel tank.
Spent close to three hours of time on it tonight and I'm still not finished. Figured out and made the marks for the rivets, bead lines, and bend lines. Needed to confirm that the even spacing for the rivets wouldn't overlay any of the flute marks that I made in the the metal baffles/ribs to straighten them out. Two were close... but not close enought to be a problem (he says now). I still need to mark the locations for the fuel lines, vent lines, drains and fuel cap.
September 24, 2013 MORE Measuring and...
marking.
Went back and reviewed the fuel tank plans; the ones that Curtis drew up for the "D" Skbolt (which is also the one for the "R" model).
Looking over the plans once again I see that the weld on the end ribs need to be an overlap weld. Which... means that I need to have those end ribs sticking out past the end of the skins by about 1/4inch. Remarked the cuts for the ends... also marked where the fuel drains, fuel outlets, vent, and fuel caps holes are to be drilled out.
Need to trim the ends, figure out how I'll be connecting the vent line inside of the tank to keep it from moving, and drill all the holes before making the bends in the skins.
September 25, 2013 MORE hesitating and...
a little work.
I feel myself hesitating and I don't like it. I'm keeping busy with little crap... and that ain't the way to do it. I need to take the break I need and read up, ask questions, about riveting metal; holes to make, what rivets, etc. There will probably be the "I should've dones" and the "Why did I do it that ways?", but hell, I've been there before.
Tonight... I took inventory of what needs to be done. I actually think I wanted to go out and look at the plane for a while and since I was there I figured I'd do something.
My list:
- Finish turtledeck
new 1/2 stringers
drill and attach
flooring
front mount
holes for seatbelt cables
- Drill and bolt fuselage stringers
- Instrument panels
- Fuel tanks
make and mount
- Run lines; fuel, vent, etc
- Upper Wing Center Section
Quite a bit to do
- Seat pans and backs
- Floor boards
- Attachment for horzontal tail
- Tailwheel
- Brakes; mount and run lines
- Finish throttles; mount and connect
- Firewall
- Sheet metal for fuselage
- Wheels and brakes
- Confirm gear is straight
- Mount torque tube controls
buy stick grips
- Weld on upper wing hardware to fuselage
- Buy engine ring/mount
- Make windshields
- Attachment of seatbelts
creat hooks for hanging belts?
- Battery box and run cable
- Put wings together
cut spars
re-check ribs for finish
sand ribs
- Mount/weld on rudder
- Overhaul engine
- Have prop made
It's in no particular order and by no means compete.
oh yeah... I actually did some work on it... I marked the end ribs on the fuel tank for the weld overlap and I cut the excess metal off the sides of the skins to allow for this overlap.
September 26, 2013 The best you can be...
whether you can see it or not.
Prepping these aluminum panels...
This is another one of those answers to a question... The question being "Are you going to fly that after you're finished?"
I've been working on the fuel tank panels for a little while now (no where near the amount of time I've put on the turtledeck). I just put another 1.6hours on them, cleaning the edges by filing and sanding them to the line. They're going to be welded. Did I need to spend that much time on it? Probably not. Well... I do.
I guess it's the philosophy behind the build, for me at least. Work towards excellence on all the parts, no matter what it is; drilling a hole, making the turtledeck, building the main gear, making a rib, brushing on sealer.
Tonight another 1.6hours on prepping the aluminum skins for the fuel tank; filing and sanding them. They're ready for drilling and bending now.
June 10, 2014 Rolling... rolling...
rolling.
Started back on the upper wing fuel tank tonight. It's been a while... the turtledeck has kinda kept me busy over the past six months to a year ??? seriously !
I have all the parts and pieces (although, now that I think of it, I need to purchase rivets to hold it together as the TIG welder welds it up... either that or screws ?).
The top and bottom panels of the fuel tank are all marked up. next... I need to run the beads on both, bend front and back of both to match the ribs and drill the holes for the fill/drains/fuel lines. I've got a beader... lemme try a few practice beads.
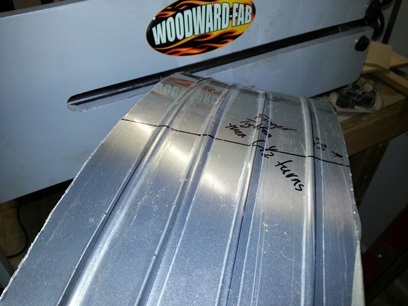
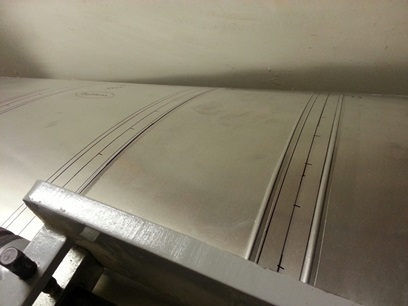
Grabbed a piece of aluminum. Made a few marks and then set it up on the bead roller. First attempt the bead line started before the line that I had set up. The second attempt I marked the edge of the roller... started rolling it and figured out how far out I needed to mark the panel to get the correct start (on the line) of the bead. Looked at the lines I had drawn and looked at the plans again. Decided that I'd be happier with the bead lines a 1/4inch further out on both sides of the dead-center line. Re-marked the panels, then took my time rolling the beads. Half-way through doing the top panel I'm thinking "I'm getting the hang of th...). I look down and I'm rolling the bead on one of the original lines (1/4inch closer to the center line). DAMN !!! Not a reason to start over (that would be excruciating !!!) I'll know it's 1/4inch off. You'll know it's 1/4inch off. Nobody else will know it's 1/4inch off.
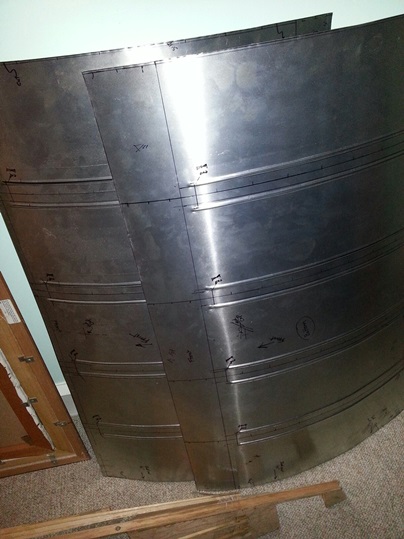
Continued rolling the beads. They're not dead straight and ya know what... I wasn't looking for dead straight. It's a hand-made tank and I like the non-cookie-cutter look.
Here are a few photos; the test piece... rolling it... and the completed pieces. Enjoy !
September 20, 2014 With a little help...
from my friends.
Back on the upper wing today
These sheets of aluminum have been sitting around for a while now... took a trip to Richard S. Burns Company, aka Andrea's family business. Went there looking to guillotine a few pieces and bend a few more.
Drove over with Andrea... got there and the guy that could help with the chopping wasn't there so we went over to the bending brake to bend the upper wing fuel tank into shape. Al and I... lined up the aluminum, clamped it into place... then started to bend it, or should I say, try to bend it. The brake is for bending aluminum for gutters and siding not .o63 thick metal. When we lifted the bar to bend the piece the aluminum sheet actually raised the clamp holding it. So we called over the man that knew what he was doing. Lined it up again and he really clamped that sucker in. Pulled up on the brake and it made a nice, straight bend.
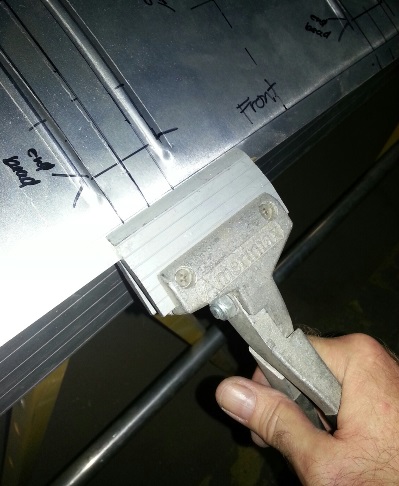
Second bend... only about an 1inch length... he was thinking it'd pull out when making the bend, and he was right. It started to make the bend then pulled away from the brake kinda making a curved bend. Tried it again with the same result. Eddie walked out of the room and came back in a few minutes with a hand held clamping tool. Grabbed the piece and started working the edge with the clamper. Worked like a charm. Who would have thought ???
Eddie helped me with the longer piece on the second half of the tank, then I finished up with the hand bending of the two pieces. What I thought could have been a disaster turned out to work out pretty nice.
I have a little tweaking to do, but they're ready for me to drill holes and attach the baffles.
The hand clamper.
September 21, 2014 I saw a little creep...
today.
Thought I was going to have more time to do more on the project today but stopped by my Mother's before the work session then headed over to hang with fiends for the afternoon football games. Good times... both places.
Managed to drill the holes in both the upper and lower halves of the upper wing fuel tank. Not much to write home about. Drilling, you know what I'm saying. oh... just a heads up... clean the end of the drill bit off each time, or at least look to make sure that it's clean... The aluminum tends to wrap itself around the tip and through the fluting. You'll see the bit start to wander if it does. If you're rushing things... it'll dance across the sheet of aluminum. and no... I'm not talking from experience. I took my time... this time. All I saw was a little creeping going on.
Need to look at what I planned on doing for the internal workings of the tank and get it done before closing her up.
Rib fits... just need to push the bottom up.
September 23, 2014 Cleaning things up...
a bit.
Get it ???
Cleaning things up... a bit (with a bit). Ahhh... never mind.
Started off checking to make sure that the one half of the upper wing fuel tank was up to my standards. Saw that it had a little bow in it so I decided that I would take a length of 2x4, place it in said bowed part and tap it a few times... going the length of the bow. Did that a few times and it took care of most of that bowing. A few tweaks in a few other places and it's ready to be a fuel tank.
Last session I had drilled all those under-sized rivet holes. I need to fit the ribs up to them and match drill holes into them but first I need to debur the back-side of where I just drilled. Spent the rest of the night pretty much doing that. Had some extra time at the end to mark the center line on the ribs. Still had time so I held one up against one of the halves and... couldn't see the line. DAMN ! guess the holes are too small to see through them or it's probably because of not enough light and I had my contacts in (which means I need a pair of cheater glasses to see up close... which I don't need when I don't have my contacts in).
I'll try thing again next time, when I have my contacts out.
Update: September 24, 2014 I've created a separate page for the upper wing fuel tank. I've taken all my back posts and have consolidated them on this page: The Upper Wing Fuel Tank.


 All the suggestions were great. I was going to go with one suggestion that said to start two pilot holes, one from each side of the hole and have them meet in the middle... then begin drilling out to the correct size. It would turn our perfectly aligned then. Then before I was able to act on that thought... Dave Dugan replies to the thread and shows a picture of what I was thinking of. Of course... this was a milled piece of art that I would have no way of making myself. He said all ten holes were aligned perfectly.
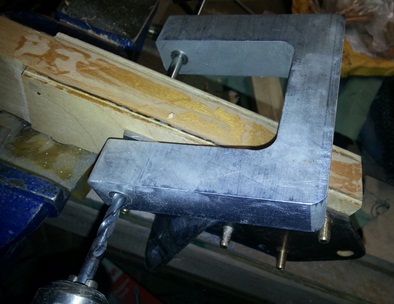
 When you don't have the right tools (or should I say, least phyisically demanding)... 'cause they would cost thousands of dollars, or you don't know someone who has the tools... ya do it old school.
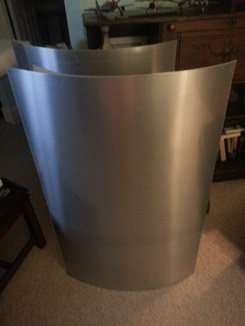 Cutting down the aluminum for the upper fuel tank skings...
I should have taken it to some place and had these pieces sheared. Spend the money to save A LOT of time.
Cutting down the aluminum for the upper fuel tank skings...
I should have taken it to some place and had these pieces sheared. Spend the money to save A LOT of time. Yesterday I trimmed the second and last edge that I wanted to "clean up." Tonight I began marking up the skins for the upper wing fuel tank.