Mantua, New Jersey
Original Site:
September 2004
E-mail: usav8or@yahoo.com
Three-piece upper wing... stronger than Babe the OX.
October 22, 2012 Just a weeeeee bit...
Just for shits and giggles.... not really... I discovered this when I went to drill the positioning holes in the forming block for the baffles and end caps on the upper wing tank... I made the pattern before I made the forming block. And, I made the forming block after I corrected the size of the baffles/end caps to take into account the thickness of the aluminum.
What the hell does this all mean ??? The baffle and end cap blanks are a weeeee bit too big. And what the hell does it all really mean ??? I needed to re-size all the pieces I thought were already ready.
Last night I re-sized and trimmed them down. Tonight I began deburring and filing/sanding the edges. Another four to go and I'll be ready to drill the positioning holes.
measure three times and it's still not right... I'm just not getting it
October 24, 2012 The last "I think"...
I think I'm finally ready to form the baffles and end caps for the upper wing fuel tank. So much of building the biplane is each step involved in making each piece; whether it's making a wood form to make the bend for a former or the multitude of steps before the final bends in making these baffles.
The more complicated the part, the more I say "I think I'm finally ready...". No matter how much I plan I almost always leave out a step only to be discovered along the way.
I think I've pushed through those unexpected steps and have arrived at the threshold of bending these pieces.
next... the test piece
test piece
October
27 and 30, 2012 Another unexpected
step...
The other day I trimmed back the edges of the baffles and end
caps so that they wouldn't touch when bent over. Thought I was
done with it.
(fast
forward to today...)
Went to draw on the relief holes and discovered that it just
wasn't looking right. Referred to one of Tony B's books (The
Sportplane Builder)... I had remembered that there were
a few drawings in there of how to fabricate aluminum ribs. Basically,
the same thing that I was now building.
I quick look at the drawings and I saw what I needed to do.
Spent about two and a half hours cutting back the sides (again)
and rough cutting the relief holes. Tomorrow I'll file back
the holes and begin bending these up.
Oh yeah, also marked where the rivets will be attached so that
I don't use the fluting tool in those areas.
October
31 and November 1, 2012 Avoid streching
while hammering the edge...
We're not talking exercise here...
Working on the aluminum fuel tank ribs (baffles and end caps)...
I was listening to Koob on WMGK. They're playing the first 25
years of Rock; A thru Z. A nice selection of songs... a couple
of days worth of great music.
I started, and finished, banging out the edges on the ribs.
Had it all planned out... I've had plenty of time to plan it...
my usual hesitation at doing something new.
The bending,
it's all done now. Just some tweaking with the fluting pliers.
THEN, cutting out of the lightening holes. THEN, flanging of
the holes. THEN, they're ready for whatever needs to be done
to them to rivet them into a fuel tank.
One IMPORTANT thing I want to say about banging these ribs,
or any aluminum shapes. Take your time as you hammer (with a
soft hammer... I used a 2 lb. dead blow soft plastic hammer)
the edges over. I hammered a slight bend over the entire length,
then repeat, then repeat, repeat... repeat, until it is completely
bent over.
If you hammer the edges over completely in small sections at
a time you will be stretching the aluminum, which, will make
your edge look like a storm at sea. (aka waves/ripples). oh...
that reminds me... Keep your work on aluminum to a minimum.
The more your work the piece the more "streches" you'll be doing
to it, aka... streching.
again... I've showed myself that hesitation is a waste of time... will I remember this "truth" the next time ?
November 5th and 6th, 2012 Remembering the Truth...
No hesitation... pushing forward with the aluminum tank ribs.
Tonight I wanted to do a test making a 3 1/2 inch hole using the new adjustable circle hole cutter. Took that test rib I made and clamped it to the drill press. (max speed with the hole cutter is 500rpms... so I started with a speed of about 250... and it was doing nothing... then 350... nothin'... then just below 500... and it worked great). I'm not sayin', but I'd just start with the speed closest to 500rpms or less.
Cutting with the circular hole cutter isn't fast, but you can't push it... ya just need to let it work itself... in its good ol' time. It took me about 10 minutes to work the cutter through the aluminum. Used some cutting fluid... not sure that I actually had to, but what the hell.
Duburred and cleaned the hole then took the flanging tool to it. Worked it around the hole a few times to put the 30 degree bend in it. Looks... nice.
Test completed... I worked on cutting a few more holes in the first of six tank ribs.
November 7th, 10th and 11th, 2012 The Art of working aluminum...
Over the past few days I've been working on the fuel tank "ribs."
Since I said I was going to make this a scratch built airplane I'm doing everything either by hand or using basic tools. These ribs have been nothing but...
Other than the slowness of drilling the holes, nothing new to learn there. Flanging the holes... another story.
wait... let me back up, There was a learning with drilling the holes; a finesse to working the drill on the aluminum for maximum cutting.
back to the flanging... there is an art about flanging the ligthening holes with the tool I used; working the aluminum to a close-to-perfect angle; seeing the flange before it has been made. The art... working it by hand, becoming the piece, as opposed to the industrial feel of putting them in a vise and closing the die.
What's this all mean ? I've enjoyed learning the new skills of working with aluminum. Hell, yeah, I've made mistakes... that was all a part of the learning. It's one of the things that keep me coming back to the build... time and time again.
November 12th through the 15th, 2012 More than a lot going on...
the ball is just starting to roll
The upper wing tank "ribs"... put the finishing touches on the two end caps for the upper wing fuel tank tonight. Over the past few days I remade both of these starting from cutting the blanks from the sheet of .o40 aluminum I have still sitting in my living room.
looking back..
One helluva lot of steps to go through when making them by hand. I'm more than happy with their outcome.
All this time I've been thinking about more than cutting and bending aluminum... There's a lot more that goes into building a fuel tank than forming the sides of it. There's... where does the fuel cap go and what kind?... fuel lines... vent over-flow line... how to run vent line internally... etc etc etc.
and... not to forget about the fuselage... I've been figuring out how to do, and what I need, to shape it.... with how many stringers. a Watch Out !!! If you need to ship your stingers, and they need to be over 8' long (mine needed to be 12' long), you're going to be paying more for freight than the cost of the stringers. With that in mind, I added on to the order fuel lines, trailing edges for the wings, and tank straps..
Next up for the upper wing fuel tank... cut the outside shell and start figuring out the exact placement of all those parts on it. Thinking of taking it over to Whitey to see if what I'm thinking is what I should be doing.
at the same time...
I'll be fitting up the stringers to the fuselage which will allow me to start welding on the stringer stand-offs and the additional formers. After that I'll... one second thought... I won't get too far ahead of myself.
Plenty of things lined up to do...
April 4, 2013 More wrapping...
and it ain't gifts
Started wrapping my head around the upper wing fuel tank again.
Decided to take a box in the shape of the tank and started sketching what goes where on it. I'll be taking it to the airport, along with the drawings, so that I can confirm my thoughts with Whitey and the rest of the gang there.
Trying to figure out how/where I'll put the vent line on it. The plans show it coming out the front/top... I guess that will be the best place for it. Tony B. was showing it coming out of the top/back-side. hmmm... ?
Spent 3.2 hours on the thinking and sketching tonight. Won't be logging more than an hour on it in the log, though.
April 6, 2013 The relief hole...
conspiracy
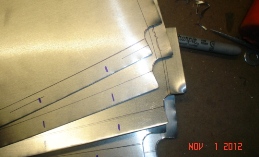
I swear it's a conspiracy... things appearing on the plans AFTER I make the part. Well... let's say I wished it were a conspiracy. It'd save me the embarressment of being quilty of missing something.
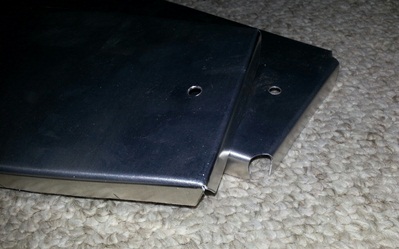
Guilty as charged ?!?!?! The end ribs on the upper wing fuel tank should not have the corner releif holes like the four baffle ribs. (for welding purposes) Did I miss this the first time ? Depends on if you believe the conspiracy theroy or not.
Thought about maybe just branishing in the corners of the tank shell where the corner reliefs are. Did a test... couldn't figure out an easy way of branishing those corners. It would take more time and effort to do it that way than to just re-make two metal ribs. The one million dollar question is: Do I have enough aluminum ?
Measured then re-measured the roll of aluminum that I had left... and it turns out I had plenty to make the two additional ribs. If I didn't... I'd be ordering just enough to make both ribs.
Spent close to three hours on the project today. Ended up with one complete rib ready to be straightened out and one blank ready for smoothing the edges then bending to shape. I'll have both of these puppies finished by tomrrow. Maybe I'll even cut the shell of the tank tomorrow.
Left is the new rib - Right rib has the relief holes on corners.
April 7, 2013 Making the first two...
"extra" ribs, now !
Finished up the re-makes of the two outer ribs for the upper wing fuel tank. Not much to say other than... they're finished.
The first two I made... hell, maybe I'll make wall hangings out of them...
more still to come...
April
9, 2013 Resistance...
is
futile !
Ever wrap your head around something and find out... it's the
wrong something ?!?! Wait ! Let me back up...
It actually wasn't the wrong thing, I just got a little ahead
of myself. I'm sitting here tonight figuring out, and confirming,
the size of the upper wing fuel tank. I'm up and down the stairs
a few times to check the puzzle pieces of the upper wing center
section... which got me to thinking. I need to put these pieces
together to get the EXACT size of the opening. It only makes
sense.
Thus... needing to wrap my head the other something; around
building the upper wing center section; a slight divergence
in the build. I struggled with this thought. Hell, I'm already
working on the fuel tank... and I'm thinking, I'll just continue
working on it. I had to think this through several times before
realizing that I need to get the center section together first.
It seem pretty obvious now. Guess I had my head wrapped around
the idea of getting the fuel tank finish and didn't give a thought
otherwise.
Pretty CRAZY, huh ?!?!
April
12, 2013 The Will...
to resist
I've been antsy to get working on the upper wing center section again; wanting to start cutting and fitting up... before fully understanding what is left to be done. Stupid, yeah...
Fought off the feeling for three days while I wrapped my head around the plans, what's been done and what needs to be done. Most of the parts and pieces have been made... waiting to be worked on again. Still need to cut a few lengths of tubing, etc.
Wrote up my list tonight and I'm ready to get it done...
April 13, 2013 The Will...
not to resist
Started back up on the upper wing center section. (I dislike the moments of starting up, or back up, on a new piece of the project. It always slows me down... the hesitation, the possibility of doing something wrong and having to re-make it. As always... I just need to move on to the next part of the project and learn, if nothing else... eventually getting things right.)
I think this time it wasn't hesitation that took me a few days... it was understanding what I needed to do. Anyways... that is behind me now and I've started making big pieces of tubing into small tubes again.
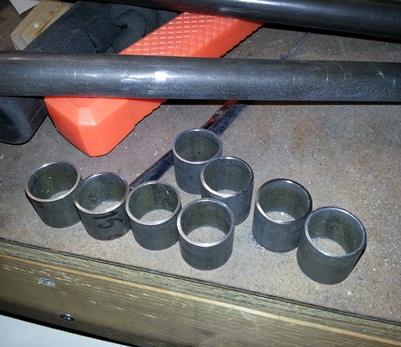
Cut down the 7/8 inch x .o49 and 3/4 inch x .o35 into the pieces that I needed. As always, I try to be spot on with the lengths and that of course takes a lot longer than just getting them close.
I was going to take a photo of them (being the photo journalist that I am - haha - but everyone knows what a fewe lengths of tubing look like, right ?
Awww, hell... here's a photo anyway.
April 14, 2013 It's now...
or much later
HAD to get over to the airport today. HAD TO ! Either that... or push continuing the build of the upper wing center section until another time.
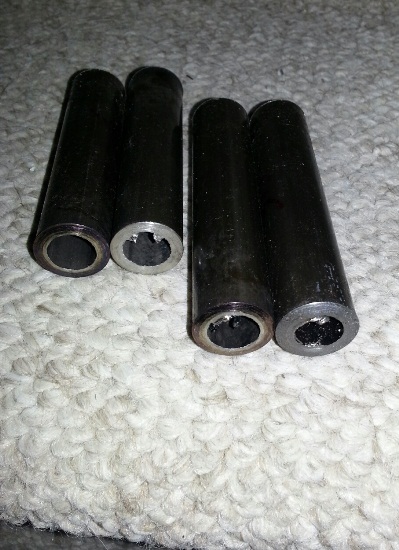
Ya see.. I needed to use an industrial lathe to cut down and square up a few pieces of THICK tubing I needed for this part of the build. And I AM talking thick; say... .12o THICK. My micro-lathe would take forever to cut it down and square it up; the amount of pressure I would need to put on the things would stop it.
Okay... so, I don't want to stop any forward movement. And seeing that they're going to take another week before shipping out my turtledeck wood... I need to do something. AND I don't feel like wrapping my head around anything else right now; tends to slow me down.
need to go to the airport...
Stopped by Alloway Airfield and thought it was deserted... then... I see somoeone walking around Tony's plane. Must be Tony. Walked across the runway and... it was Tony. He had just done some work on the engine in his homebuilt Champ and had just finished running it up to test it out. We talked for about a 1/2 hour and then I headed over to Whitey's house (it's on the field). Whitey answered the door and I said I needed to "borrow" his lathe for about an hour. He said "No problem, Jerry. Thought you had fallen off the bridge." (it'd been so long since last seeing me) Told him "I did but there weren't any gators so I had time to climb back out. And here I am."
We BS'd for about a 1/2 hour then headed over to the main hangar so that I could get working on these four pieces of tubing I had brought over. Spent something like 45 minutes to an hour taking my time in trimming the four pieces to size. Thank you, Whitey ! for letting me use the lathe as always.
Here's another photo of a few pieces of tubing... again... as if you've never seen tubing before. They need a little cleaning up. Other than that...
April
15, 2013 Happy as a snail...
Tonight I started
putting all the upper wing center section pieces together. Thought about how things were
suppose to go... starting last night after I finished updating
the blog. Figured it all out.
First to do... tonight... fit the caps on the two 20 13/16 inch
3/4 x .o35 tubes. Screeeeeeeeeech !!! PUT ON THE BRAKES ! The one
3/4 x .o35 tube seemed to be bugered up. Messed around with
it for a bit and then decided, if I don't find another piece
that I can use I'll just have to order a length of it from Aircraft
Spruce and just SUCK IT UP !!! Amazingly, I found another
length of it when I couldn't find it the other day.
Well, glad I found it. Cut that to length. Cleaned up the ends.
Fit the caps... and then reviewed the plans again.
Still need to cut the "L" aluminum brackets. File down some
of the plywood so that the HUGE tight fitting fittings fit over
the spars. THEN I need to drill the holes and fit it all together
to figure out the lengths of the bolts... just to mention the
start of my list.
Sometimes you just need to push yourself to move at the snail's
pace that things go along, at times. I usually need to hold
myself back... from jumping ahead of the natural order of building
that part. If I don't, I know for sure... I'll be re-making it.
April
16, 2013 More work...
A little bit more work on the upper wing center section. Cut all those aluminum "L" brackets and filed them square. next...
April
16, 2013 a little More work...
Spent a little over an hour marking the hole locations on the above "L" brackets. These marks are for lining up only... seeing as these need to be match drilled. I'm just making sure I've got them in the right local when aligning the brackets with the 3-piece fittings.
April 20, 2013 just right... just right... just right... D'oh!
I've waited two days to have enough time to set things up right so that I could trim down the spars on the upper wing center section. The brackets are dead on 1 1/2" wide and the spar build up is a little thicker... Thus the need to "trim down the spars".
The first one I took the router to it, to take off most of the wood that I needed to remove. Finished it off with A LOT of sanding, checking, sanding, checking... and so on until the bracket slid on there nicely. Did the same for the second. Did the same for the third. On the forth...
I decided to take a measurement from the third trimming so that I could speed things up. Sure as hell sped things up... to the point where I just finished glueing on a thin sheet of birch ply to build it up again 'cause I took off TOO much. D'oh!
It's kinda of funny. I'm pissed at myself... but I'm still making forward progress. Mistakes will be made. It's all a part of the learning. It's the one thing that slows down my forward movement... not wanting to make mistakes.
First Bracket
Upper Wing Center Section Back Spar
April 21, 2013 No D'oh! just right...
Sauntered down to the basement to check on the glued up spar build up I had to do yesterday. nice... A little bit of squeeze out looks good.
Task today is to get this final bracket onto the front spar for the upper wing center section. A lot of what I did yesterday only I didn't over-do like I did yesterday.
As you can see here... the bracket is on and I'm ready for the next step. BUT, before doing that I'm going to sand smooth the ends of these brackets. I'll have that done in a day or two.
April 22, 2013 first one done...
First of four upper wing center section brackets sanded smooth...
April 23, 2013 second one done...
Another upper wing center section bracket sanded smooth...


 (fast
forward to today...)
(fast
forward to today...)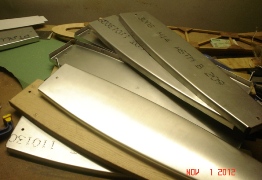 The bending,
it's all done now. Just some tweaking with the fluting pliers.
THEN, cutting out of the lightening holes. THEN, flanging of
the holes. THEN, they're ready for whatever needs to be done
to them to rivet them into a fuel tank.
The bending,
it's all done now. Just some tweaking with the fluting pliers.
THEN, cutting out of the lightening holes. THEN, flanging of
the holes. THEN, they're ready for whatever needs to be done
to them to rivet them into a fuel tank.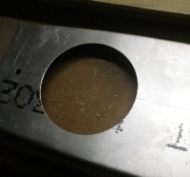 Tonight I wanted to do a test making a 3 1/2 inch hole using the new adjustable circle hole cutter. Took that test rib I made and clamped it to the drill press. (max speed with the hole cutter is 500rpms... so I started with a speed of about 250... and it was doing nothing... then 350... nothin'... then just below 500... and it worked great). I'm not sayin', but I'd just start with the speed closest to 500rpms or less.
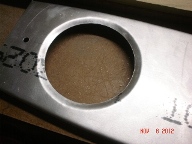 Duburred and cleaned the hole then took the flanging tool to it. Worked it around the hole a few times to put the 30 degree bend in it. Looks... nice.
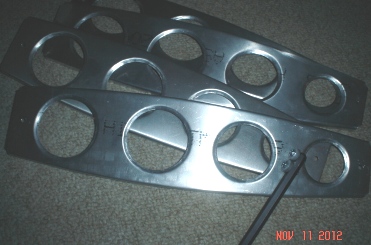

 Tonight I started
putting all the upper wing center section pieces together. Thought about how things were
suppose to go... starting last night after I finished updating
the blog. Figured it all out.
Tonight I started
putting all the upper wing center section pieces together. Thought about how things were
suppose to go... starting last night after I finished updating
the blog. Figured it all out.