Mantua, New Jersey
Original Site:
September 2004
E-mail: usav8or@yahoo.com
Three-piece upper wing... stronger than Babe the OX.
May 25, 2012 Leaving it sit overnight...
it's worked for me so far...
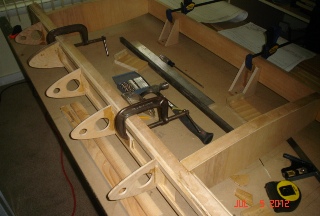
I cautiously descended the stairs to tackle the alignment of the nose ribs on this upper wing center section front spar... Gun shy ??? not really... just want to make sure that I have this thing where it's suppose to be this time. I want to show that I've learned from the past... (actually, let's call a spade a spade) I didn't want to screw it up again.
I first needed to square up these 45 degree corner blocks... since they didn't do it at Aircraft Spruce. After squaring those up, I tacked them into place to hold the nose ribs vertical while I took a read on how the tips of them lined up. Looked like the outer two were a little high due to me not routing the glue out as much on those as the others.
With just an ever-oh-so-slight sanding of the bottoms of those two ribs, all of the tips were in line. Tacked on the 1/16th inch plywood, to the top and bottom of the spar, so that I could easily align the tops of them flush with it and there I'm letting it sit over night.
Reflecting on the past...
If I've made a srew up on the piece once, the next time I'll try and leave the piece over night... so that I can sit and think, make sure that I've covered all my bases... go back the next day to make sure things are good, then lock them into place. It's worked for me so far. Well, it's worked for me so far as in... If screwing something up the first time is a "worked for me so far."
May 28, 2012 Stalling...
without leaving the ground.
Busy holiday weekend... no work on the project until squeezing in a few mintues this morning before heading out again.
Who am I kidding ???
The stall on locking these nose ribs in position... I really didn't want to go down there and find out that they weren't even close to being aligned when flush with the 1/16th inch ply. Yeah, if you really want to know the stall... it just doesn't happen to airplanes in the air.
Just the thought of spending all this time getting it to this point and not having something that I'm happy with kept me from working on it. Well, things eventually need to move forward and I ventured down the steps to the basement work area. I needed to cut the "tabs", that go into the slot between the two build ups, to allow me to adjust them from side-to-side. One of the ribs was just slightly off when aligned with the ply... the rest lookin' fine. Made a slight adjustment to the one, took a few more reads and all line up flush: top of the airfoil, nose of the rib and bottom of the airfoil.
again... I'm ready to lock these puppies in place, but first off to meet up with a friend to have a few beers to celebrate Memorial Day.
My hat is off to those that have served and are serving our country... I've been there.
May 29, 2012 Always...
the push for excellence.
As you know, I've been working on the upper wing center section... for awhile now. It's times like these that I reflect back upon when someone asks me... "Are you really going to fly it when you're finished building it?".
Just like the brake backing plates, just like the landing gear, just like the torque tube... I'm striving for excellence. I'm building this biplane beyond the best of my initial abilities. I've spent many hours on that curve of learning before completing a part. I'm building this biplane with an eye for that excellence. And... I hold myself to a pretty high standard. If the part isn't up to standards I make it again... and again... and again... and... again. I stay with it until it's right.
The nose ribs for the upper wing center section are no different...
Tonight I mixed a pot of glue and locked the nose ribs in place on the spar. Moving right along...
June 1, 2012 The never ending...
"How you gonna do it ?'s".
I'm ready to put the leading edge on the nose ribs. Big question... "How you gonna do it?"
The width of the upper wing center section is basically 58"
wide. Plywood comes in 48" wide pieces (yeah, I know
it comes in 4 x 8 sheets...), so... I'll need to butt the ply together
somewhere on that leading edge. The nice thing is that it's
made up of two 1/32nd thick pieces of ply making a total of
1/16th inch. What I'll do is...
I need more than a 1/4 inch piece of ply (the nose rib) to butt the two pieces of leading edge ply on. Going back to my screw up from a few days ago... I'll use that idea of sandwiching one of the nose ribs with two additional pieces of 1/4 inch ply. I took two of those "throw aways", filed the glue off the backs of them and re-used them for today's work. sweeeeeeeet !!!
All I need to do now is order the 1/32nd inch birch plywood. (I thought I had it... but can't find any evidence of it.) I'll lay these up as follows (from left to right):
First Layer - 47.6875 inch then the 9.1875 inch
Second Layer - 9.1875 inch then the 47.6875 inch piece
I can start laying this out on the table and getting all those other pieces ready for putting them togther. Need to send out the THICK brackets to be TIG welded and attach the spars to the table and then start locking the other pieces on to them.... trailing edges of the ribs, etc.
Glued Up
Ready for Leading Edge
June 5, 2012 Less... is more.
Sometimes I think the limited work space I have keeps me from moving the project along faster...
Case in point... I needed to cut some stiffeners for the bottom of the upper wing center section jig. It's made of 1/2 inch MDF and is so large that it bows on the sawhorses it's sitting on. I need to rip these stiffeners from 8 foot 2x4s and there is just no easy way to handle these things easily in the room that I have. I need to twist and turn these things to get them into the basement... then I need to cut them down by hand (because there isn't enough room to cut them on my table saw... then I need to position the table saw (a portable DeWalt that I have) so that when I push the board through they miss whatever else is down in the basement's work area.
Sometime just knowing I need to go through all those gyrations keeps me from working on it...
I'm not complaining, because I have more work space than some... but it just adds hours to the build. Less space just means more hours on the build...
Enough of this rambling...
Tonight I ripped down several 2x4s and attached them to the upper wing center section. Should have taken about 1/2 hour... took me 1.3+hours. Moving along once again...
June 6-9, 2012 Does it count... ???
Hiatus ???
Stalling ???
Slacker ???
naaaaaaaaaaaaaaaaaa... I've been looking at the jig with the layout on it... looking at the pieces I have made... and have been thinking this entire time. Yeah... thinking. Does it count for anything ??? Probably 50 percent or more of the build is thinking... at least for the first time builder... at least for this first time builder.
I think I have it figured out. I'll rip a few piece of good wood (not the 2x4 pine stuff) to make two L-shaped supports; one for the front spar and one for the back spar. I'll clamp the front spar into position and then place the two thick outboard ribs into place to give me my position for the back spar and then clamp that into place. The rest of the build will take place around those being in the correct postion.
Now that I have it all figured out... it's not the Phillies that will keep me from my work, but a weekend at the races... No, not the Belmont... the Poconos for the Pocono 500, baby !!! My sis is watching the pup for the weekend. I'll be back on Monday to begin putting all these puzzle pieces for the upper wing center section together.
June 14, 2012 Got wood ?
Ripped a few more boards to create the jig to hold the spars in place above the jig base. Went up to attach them and then clamp the spars into place so that I could postion the ribs for glueing up... When doing this I discoverd that the base dips about 1/2 inch in the center. I need to either find a few piece of dead straight wood or a few rectangluar pieces of tubing to attach to the base to level it. (basically bring it up... the 1/2 inch MDF isn't rigid enough on its own)
This didn't happen tonight... I'll do some scrounging tomorrow night to see what I can see... if I don't "see", it's off to the Home Depot for some wood.
July 3, 2012 Got wood ! er. MDF, a wood of sorts...
It's been awhile... combination of me making a strong enough support jig for the spars and my work lap top, which has my DreamWeaver program (web program) has been up in corporate for a major reworking. I'm typing on it now... and it has this LOUD buzzing sound coming from the new fan. Luckly... a local Dell tech is coming on Monday to make that fix.
Anywho... I'll be mounting two sets of ridgid supports on the upper wing center section jig table tonight or tomorrow. I'll clamp the spars to these, mark them and then attach a small 1/4 x 1/4 inch strip to the support to make sure these things don't move while working on them; a ledge of sorts I suppose you could call it.
Gots the lap top back and gots the spar supports made... I'm back at it.
July 5, 2012 Got... something done !
I felt like I got a lot accomplished today. It's the day after the 4th and we have off... took a vacation day off tomorrow too... should get more accomplished.
If you've been coming to my web site recently it doesn't appear as if I've done anything over the past few weeks. Turns out... practically no hands on work was done on the project, but a lot of thinking had been going on. (as a side note: I find myself drifting while working on the biplane... thinking of other parts of the puzzle that relate to what I'm working on now - kind of slows down the project that I'm working on but I'm sure it's avoiding mistakes later on down the road).
I actually just went back and filled in a few days of work... wouldn't call it days of work, but it was days that I worked on the project. Some more than others...
As you know, I'm still working on the upper wing center section. Gots(wurd) all my spar supports made (to my liking). Now all I need to do is lock (clamp) the spars in the right locations on the jig and start adding all the other parts and pieces to it, right ? Right. I took my time in making sure that the spars were level on the jig table and from left to right (over top the layout I had made on the jig table.) Double-triple-quadruple checked that the spars were facing the right way, both right-side up and left-to-right.
Let me back up a few minutes... after making sure that they were level on the jig table, and before making sure that they were positioned correctly left-to-right, I attached thin strips of 1/16th inch ply to the spar supports (just below the spars to act as "shelves") to make sure when I'm working on the other parts and pieces they don't slip down on the support.
Fitted the inside box spars... which were a little too long. Needed to shave these down a 1/16th, and keep them square, so that they would fit nicely. All this takes time, especially if you have a limited amount of space to work in/around.
July 6, 2012 I found them and stopped looking...
It's been awhile since I worked on the brackets for the upper wing center section. I had looked through the box I had placed them in a month ago and discovered some of the smaller "tabs" that I had made for the cabanes had started to rust. I sorted them out and threw away the bad ones I figured I'd make new ones when the time came...
In the same box were the parts to make up the wing attachments for this upper wing center section. When I looked where I thought I had placed these parts I only saw about half of them. I started to look for them in every spot I could think of. I finally decided that when I found the remaining "tabs" for the cabanes I'd either find them or stop looking. I found the "tabs" and stopped looking.
Now... thinking back on it, those existing parts are unfinished (the sides are still rough.) If I had them all completed I would have finished the sides of them too (just something I do after I get all the pieces to one part or area completed.) Finding them unfinished pretty much put the nail in the coffin of them not being made. With that discovery, I know what I'll be doing for the next few days...
July 7, 2012 A little left to do on these fittings...
Back to working on the mult-piece fittings for the upper wing center section spars. Filed and sanded down (3) part SB3PW-012's. Had these already cut and ground to size. Just putting the finishing touches on them.
A little bit more work needs to be done on one of the four (the final SB3PW-012)... then it's on to cutting out the three remaining parts so that I can get them ready for welding up by someone with a TIG outfit.
July 9, 2012 make that... a lot left to do on these fittings...
More work on the upper wing center section fittings. Cut out (and ground down to size) the last three large parts to the fittings... and have decided to go back and cut out the first five... again.
Learned from making a few other parts that when you bend parts that come to a point you need to leave the piece square until after you make the bend. They tend to twist if you don't. Well... I learned that after I cut those original five parts. Instead of going through the motions of bending them and having them twist I'll cut new ones... putting that learning to good use.
Still need to file and sand the edges on these three and... on the five new ones I'll be cutting tomorrow night. More than I thought I had left to do on these.
July 11, 2012 A little more than a little left to do on these fittings......
but not quite as much as before
Back down to the basement work area... more pieces to re-cut on these fittings. As I had mentioned in my last post... The area of bend needs to be square so that the edges toward the area of the bend don't twist. It happened with the thinner material that I had bent awhile ago and I'm not taking any chances with these. I'll go ahead with a little extra effort now.
Another three rough cut to size and then taken to the grinder up to the line. Still need to do this to two more then I'll be filing and sanding. Then these puppies need to be lined up and welded.
July 13, 2012 a little less than a little left to do......
More work on these fittings. Another hour and a half of cutting, grinding and filing.
The final two pieces to the fittings were rough cut and ground down. Spent about a half hour filing the edges of all eight. Need to determine the edges that need to be sanded down to a smooth finish and which edges are going to be welded. No sense in putting in all that time on edges that are going to be melted together with another edge.
oh yeah... Still need to cut the bottom four pieces for the fittings.
July 16, 2012 i hit the wall......
albiet... Roger Water's "The Wall"
I have more reasons why I haven't worked on the project than I care to have... This weekend it was a concert... well, not just a concert... it was Pink Floyd's THE WALL. It was performed by Roger Waters. Great concert !!!
Anyway... that was on Saturday and I had the stuff I normally do on Saturday around the house to do on Sunday, plus whatever needed to be on Sunday. It all boils down to not doing anything on the biplane this weekend. Which... is pretty sad.
I didn't make up for it tonight, but I put in quite a bit of time for it being a week night. More work on these parts for the upper wing center section fittings. Took four of the "plates" I had cut out and took a series of sandpaper to their edges; from 80 to 220. One point seven hours... still need to hit them with 400 grit, but they're nice and smooooooth.
July 17, 2012 ahhhh... Ditto.
Basically what I did yesterday but with the unfinished pieces. Still need to cut the base plates for all four and then sand those. Something for tomorrow...
July 23, 2012 I don't think it ever will...
Still working on the project.. my work computer is down again (it's a lap top and I have my web stuff on it). Got the DreamWeaver program loaded onto my home lap top and I'm able to update the site.
The other night I cut out the remaining pieces of the fittings; the four bottom sections. I ground them to size and then sanded smooth the ends on each of them.
With all the pieces cut and sanded down I need to make a jig for holding them in position while someone TIGed them together. I have a few 2x4's laying around and a partial sheet of plywood. Figured I'd make a sandwhich out of them and then cut them down to size. Should work out great, right? WRONG !!!
Started trimming them down today and they're just not working. Before I got through trying to square up the first one I put a stop to it. Jumped in the car and drover over to the Home Depot and picked up a nice grade of pine lumber. Came home and cut the 1x6x6 in half, glued it up and clamped for sitting over night. Should be good to go tomorrow.
Backing up a few hours... I should have known by just looking at the quality of the wood that it wasn't going to work. Yeah, I guess I was just hoping that it would. Hasn't yet and I don't think it ever will.
July 28, 2012
I think it will...
Got it all figured out. Not a big deal, but I let it ferment for awhile in my head... figuring out how I'll be doing the drilling and jigging of the fittings for the upper wing center section.
I think I mentioned it before... I threw the question out to the biplaneforum group about drilling. Got a few answers and have picked the ones that I think will work best and will shuffle those with my own. I've got a plan and I'm moving, albiet a little slow, forward with it.
Bought a nice piece of finish pine from the Home Depot, cut it in half and glued it together to give me close to the thickness I need. After letting that sit weighted over night I glued on a piece of 1/16 inch mahogany ply to give it the exact thickness I need (without having to plane it down any).
Next up... cut the angle on it and cut it into four pieces (for each of the four fitting.) After that I'll match drill the holes in the metal pieces and then bolt them into position on the faux jigs for TIG welding. I'll need to position the pieces and then tack weld so that they'll stay in position for the TIG welder (not me).
I'm stating to get there...
October 12, 2012
I thought it would...
Update: September 24, 2014 I've created a separate page for the upper wing fuel tank. I've taken all my back posts and have consolidated them on this page: The Upper Wing Fuel Tank.
Nope... it didn't happen.
No... Booooioooioooooooinnnnnnnng !!!
I planned for it. I expected it... but it didn't.
I needed to unroll one of the LARGE rolls of aluminum, in my living room, so I could start working on the upper wing fuel tank. I tied heavy twine around it (like they instructed on the outside of the roll from Airparts) and carefully cut the tape to let it SNAP!!! open. I did it in steps to keep it from exploding and going straight on me, and in the process, possibly hitting me and everything else in the living room.
It didn't happen. Sure... there was some strain on the twine the first few releases but it got to a point where it didn't unroll any more. Looked more like a loose spiral than a 9foot x 4foot sheet of aluminum. Works for me !
Well... it worked for me in unrolling the sheet, but not for laying out the baffles which I'm cutting out of 7inch x 24inch blanks. Took a 3foot x 2foot sheet of 1/2inch thick MDF and laid it on one side of the coil to flatten it out then made my marks for cutting the first blank and started working the tin snips on it. The first few cuts, er nips, were a little akward (the aluminum seemed to stay in the way of the tool) but once I nipped into it a few inches it began to curl up and out of the way making it it much easier to cut the blank out.
Once the blank was cut out (and by the way... wear some type of glove to keep the metal from chewing up your knuckles) I traced out the pattern and nipped it to shape. After admiring my work for what must have been five minutes I cut the blank for another one and then nipped that to shape.
First baffle took about an hour (due to me unrolling the sheet of aluminum)... the second one took 40 minutes. It's a pretty good workout for the grip of your hand. I'm thinking now... once I get the blank cut out I can take it to the metal bandsaw in the basement work area and cut these to shape easily. Sounds like a no-brainer to me.
October 13, 2012
Cutting with only 3/4...
More of last night... cut three blanks. Of those three, I cut the shape of two more baffles.
Not much more to say tonight other than I learned one very importanted thing when cutting with tin snips on aluminum... DON'T make a full cut with the snips. Cut with 3/4 of the blade and then begin your next cut. REASON: when you cut all the way through the blade you get a jagged cut each time you end the last and begin the next. When you use only 3/4 of the blade you're not completing a cut. The next cut is a continuation of the last (if that makes any sense). If it doesn't just try what I say and you'll be happier with the finished look of the piece.
Not that it's a big deal if you have a jagged cut. It's just a lot more work cleaning up the edge before bending it into the baffle or end caps.
October 17, 2012
It's all good.
the past few days...
Finished up the baffles and the end caps... next up is to debur and clean up the edges before putting the finishing touches on them.
Confession time. The second baffle blank I cut out was a wee-bit too short (don't ask me why 'cause I measured it twice). An unuseable piece ???? naaaaa... I decided to cut that to shape and use it for a test piece for cutting the lightening holes, flanging and fluting. BRILLIANT !!!
Tomorrow I need to start cleaning these up.
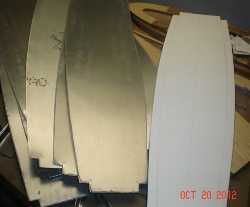
October 20, 2012
Cleaning up...
It's not one of the work areas this time. Naaaa... leaving the saw dust and metal shavings for another day. Needed to keep moving forward on the upper wing fuel tank.
The other day I finished cutting out the blanks and trimming them to the shape of the baffles and end caps. I wasn't finished with them yet... still needed to file and sand smooth the edges of those pieces before bending them to shape. That's what I accomplished tonight; cleaned up all those edges.
Next up... drill the corner relief holes on the test piece... then I need to mount it to the bending form and bend to shape. I'll then drill the lightening holes... flanging the holes will finish up my tests. The test piece to be followed up with finishing the six actual pieces.
If everything I have read is true, the bending and finished will be the easy part of it. Here's what they look like so far.


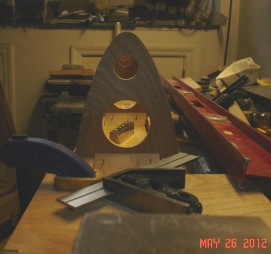 I first needed to square up these 45 degree corner blocks... since they didn't do it at Aircraft Spruce. After squaring those up, I tacked them into place to hold the nose ribs vertical while I took a read on how the tips of them lined up. Looked like the outer two were a little high due to me not routing the glue out as much on those as the others.

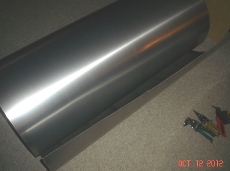 I needed to unroll one of the LARGE rolls of aluminum, in my living room, so I could start working on the upper wing fuel tank. I tied heavy twine around it (like they instructed on the outside of the roll from Airparts) and carefully cut the tape to let it SNAP!!! open. I did it in steps to keep it from exploding and going straight on me, and in the process, possibly hitting me and everything else in the living room.