Mantua, New Jersey
Original Site:
September 2004
E-mail: usav8or@yahoo.com
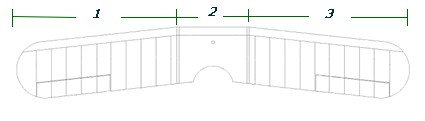
Three-piece upper wing... strong as an OX.
April 23, 2010
The oxen are slow....
but the earth is patient
Working on the plane for the past month and the down stairs workshop is a disaster. No place to put anything... don't really have the room to work when it is cleaned up.
Tonight, took the first rib out of it's mold, flipped then glued on the second side's ply. Repeat of last night for the second rib; sanded the ends, glued then capped by glueing and weighting the birch ply. Wanted to start notching and cutting the cap strips to the first of the second set of ribs but didn't have the room. Didn't feel like cleaning an area that wasn't really there. Would have been fighting against space that wasn't there to work in.
Called it a night. Maybe tomorrow, after I've done what I was going to do tonight, I'll take the hour or two to get things in order, again; tools where they should be, saw dust vacuumed, etc. etc. etc.
The oxen are slow, but the earth is patient. Great line from "High Road to China". Kinda like building a biplane.
April 25, 2010
Weekends....
and time warps.
Another busy weekend... stole some time away this afternoon to work on the biplane. Not sure where the hell the time went; for the entire weekend and the time I worked on the biplane.
Seems like Friday night... and it's Sunday night already.
Anyway... my big issue tonight was the time I spent on notching the cap strips for the first of the second two Upper Wing Center Section ribs. By the time I turned the lights off 2.3 hours had slipped by. Other than ripping down the vertical cap strips... and a little tweaking here and there, I'm not sure why it would have taken that long. Hmmm.... ??? I'm stumped... must have been in some type of time warp.
wait a minute... that's right, I needed to jigout the jig... drill and screw in all the blocks... still need to nail in the bronze brads to hold the verticals in place.
Other than my short term memory going on me... I'm not feeling so bad about the time now.
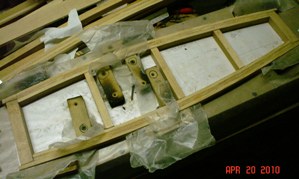
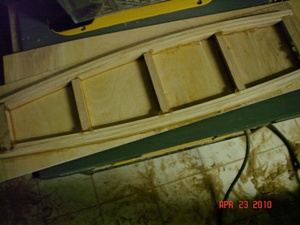
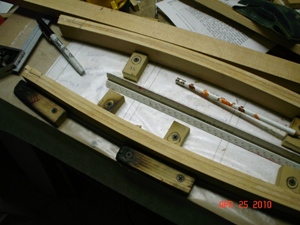
Here are a few shots from the past few nights.
First rib jigged and ready for glueing.
First rib with the first side glued on.
Third rib being marked for notching.
April 28, 2010
Still here....
not much movement forward.
It's the "I've still been working on the Upper Wing Center Section Ribs" routine... nothing new, as far as what I've been doing." So... didn't see the need to write unless something inspiring came along or I had something to say. Something to say as in something that I thought was worth saying, regardless of what others think.
Most of us know, and understand, that necessity is the mother of invention... (not necessarily for me... if it were up to me, we'd still be eating raw meat and dragging things around behind us) But for the sake of this conversation... the afore mentioned statement holds water. Okay... it's the mother of invention... and if it's already invented, all you need to do is buy it.
Case in point:
I'm putting in a helluva lot more hours on cutting these thick cap strips with this pos (piece of crap) Harbor Freight bandsaw than is necessary. It's okay for rough cutting metal. Works Great ! for that actually. But for the finer points, er cuts, on wood product it's VERY lacking. And when something is lacking in one place, it places more of a demand on something else; in this case, my time.
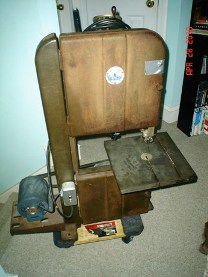
I'm not claiming to be that perfectionist that I use to claim I was... I'm now that "excellence" guy. It takes a helluva lot more time to reach that point of excellence when you have equipment that isn't up to par with your par. Last night was the end of fighting with that metal bandsaw and the end of adding unecessary hours to the build; that feeling of being in one place for way too long. Need to bite that bullet and buy something better... and in this case, older is better. Decided to looked on Craigs List... found an older bandsaw for a good price and emailed the guy asking when I could come up and look at it. Hopefully tonight, at least by the weekend, I'll have that saw.
It's an older Walker-Turner bandsaw; good ol' OLD American made product. (insert Tim the Tool Man's grunts here)
I started with the building of the biplane with quite a few beautiful tools and have since amassed a lot more. The one, and ONLY one, that I bought that was not a top-notch performer (the Harbor Freight metal bandsaw) will now be limited to rough metal work. From this day forward... I'll be purchasing top-notch tools. Mark my word... (yeah right)
Update: April 29, 2010
Picked up the Walker-Turner last night. It's a 1950's model. Sweeeeet ! Heavy ! Runs like a champ !
When I was there, Bud, the guy selling it, asked if I was interested in a jig saw. Took a look at it and said I'd think about (actually wished I had the extra $100 for it in my pocket) and I'd let him know. Thought about it on the drive home and emailed him as soon as I walked in the door. I'll be picking that up in a few days. It's a beaut ! An older, heavy BIG-Ass Craftsman jig-saw. Nice cobalt blue finish to it. Weighs a ton, just like this Walker-Turner I picked up.
I'll be keeping the Harbor Freight POS for cutting metal. I'm looking forward to working with these two new additions to the workshop.
Here's that beaut of a jig saw !
April 29, 2010
Fighting the battle....
PT-109 or the project ??
Good movie was on tonight. Started around the time I had a chance to grab a bite to eat before working on the biplane. Shoulda changed it over to "Family Guy" or one of those mindless 1/2 hour shows... one where I could get up at any point and start working on the ribs. But, I didn't. Got sucked into watching the movie "PT-109" with Cliff Robertson. A Good Ol' War Movie. Love 'em !
Anyways... the battle wasn't only on the screen. I had a rough time turning it off and marching off to work on the biplane. Once I was down there working on it I completely forgot about the movie. Ahh... it's on DVD if I want to see it after I finish the biplane.
Did I learn anything for this ? Hell yeah, I learn something from everything... it's better to watch mindless drivel when building a biplane than something with meat on it. Will I at some point end up watching the battle than marching away ?... good chance that that's going to happen at some point. If I push myself past that initial resistance (resistance is futile)...
April 30, 2010
The written word....
My
written words...
motivate
me
I write all of this stuff on here, for me... for others...
mainly for me. Kinda clarifies things; what I did that night. Yeah, that, and I see it as more...
Ya know... all this thinking, thinking back on
what I've just written the night before, got me to thinking how "we" choose
to put some time on the biplane or choose
to sit on our arses. I'm thinking about that as I'm settling
in after getting a bite to eat for dinner. Another one of
those times I have the tv on while eating dinner, and tonight I'm watching the
Nationwide NASCAR race. My boy, Brad Keselowski, #22, is given
'em hell ! (won the race)
I digress...
Oh yeah... my point. If you can get that "I can either sit here and do nothing or get up off my ars3 and do something on the biplane" idea in your head... you've got some motivation going on. Get it into your head so that every time you sit down wanting to "veg" for awhile... you give yourself the option.
I'm tellin' ya... a large percentage of the time you're going to get off of that easy chair and put some time on the project.
And yeah, I put some time in on the biplane tonight. Took the last Upper Wing Center Section rib out of the jig, flipped it and glued on the second piece of ply. Took the other three ribs and rough filed the over hanging ply. I'll take a fine file to them tomorrow and then hit them with some sandpaper. Then it's on to cutting six degree angles on some of the spar blocks. Then...
The more I think... yeah think, about my project... it's all a reflection upon who I am. What's that saying ?... Strive for excellence, not perfection.
May 2, 2010
The Joy....
of spending money.
You just don't realize what you're missing until you have it.
I'm not one for going out and just spending money on anything. But when I do... I believe that it's money well spent.
You know the biplane is going to cost you a bit of money. I'm telling you now... You might as well start stocking up on the good tools now. I didn't learn the hard way, I learned the aggravating way.
My thoughts were, if you aren't going to need the tool for more than just making a few parts for the biplane, why spend all that money on a good piece of equipment. My thoughts now, if you aren't going to need the tool for more than just making a few parts for the biplane, you still need to spend the money on a good piece of equipment.
It's more than just the useful life that you are paying for when you pay the "high" dollars for your tools... you're paying for quality. For instance, on my bandsaws; the table that you slide your material on... the Habor Freight's table is made out of something like .040 metal and is held into place with three screws. Over time, one side of the table decided it wanted to twist up a little. Now, whatever I cut sits at slightly less than a 90 degree to the blade. Was it worth the $164.00 I spent for it. Yeah... to be used strictly as a saw to rough cut metal. The table on the Walker-Turner is a solid cast piece probably 1/2" thick. The top hasn't moved any since it was made back in the 50's. The only time I'll see that top move is when I set the table on an angle using the turn knob.
Tonight, I trimmed down the over hanging ply on the last remaining Upper Wing Center Section rib. It was actually a joy to cut that ply. I almost cut a few scraps that were laying around just for shits and giggles.
May 3, 2010
Seeing it....
just not seeing it "now."
Okay... you did your homework, and did a good study of the plans; the area that you are ready to work on. Now... you're immersed into the project at hand. You could have sworn that there was an opening here when you studied the prints when you were looking at the whole picture... now that you're working on it there's no hole to be found.
I thought I had it all worked out. I copied the plans so that I could just cut it out and glue it onto the MDF and have the layout exactly as it was on the prints. They were ! Thing is... the hole that is cut into the outboard ribs is shown on the (I'll call it) overlay view, not the "guts of it" view. But, when I was working on it I was thinking to myself "I could have sworn there was an opening on one of these ribs." Looked at the jigs again and didn't see placement of an opening. "Hmmmmm... musta been mistaken. Guess it was just the trailing edge of the rib."
Wrong !
Looking at the plans tonight I saw the opening that was there to begin with, on the "overlay view," but got lost on the "guts" view. Not a problem with this "failure." I'll cut the openings an extra 1/16th of an inch on all sides and box it in with ply. Total disaster averted. Glad I learned on something easily "repairable."
Lesson learned. Transfer all information onto the layout that you will be using for your jig, with call outs. I'm pretty good at that... at least I thought I was. And, if you're working on your project and you could have sworn something was there that you're not seeing now... STOP! and take a close look at the plans again.
As you can gather from the above... I've been studying the
plans tonight; planning my attack on the rest of the Upper
Wing Center Section. In addition, I've read the various post
by JimW on the the center section making notes of the gotchas
that Jim avoided but was kind enough to give those following
behind him, a heads up. (thank you Jim) Looked at all
of the photos I could of the center section too. Took note on how Jim
jigged it too.
The plan; my plan:
I think I'll make a test run on each piece before I cut the actuals. There are quite a few angled cuts on the ply pieces that I wouldn't mind making the screw-ups on cheap ply.
May 5, 2010
More time....
on things that are "ready"
Went down to work on the biplane tonight thinking I'd be cutting, and boxing in those openings in the two outboard ribs on the Upper Wing Center Section. Laid the ribs over the plans ad saw that they didn't jive. Took a few seconds to realize that I still needed to trimmed the front and back over hanging plywood and excess length of cap strips off. I thought that these were ready for the next step.
A little over an hour later and I have two ribs done. That new bandsaw helped cut (what could have been a longer amount of time) the time down. It also made for a cleaner looking piece of work. If I had to file all of that excess off, the wood would have been chipping off and looking terrible. Although I did get a few suggestions from the biplane forum on how to avoid chipping plywood when cutting it on a table saw. I think the suggestion made by Golden Age (David) would work in this case. Back up the piece with another piece of ply, or wood, and allow that to take the hit on the chipping. (Thank you David).
Another hour tomorrow night and then these will be ready for the next step in the project. Two days spent on the project and I feel like I'm three days behind.
May 6, 2010
Ribs are duhhhh....
er, almost done
I came up here ready to write that these ribs were done and ready to be set to the side. BUT, like a lot of things on this biplane... there's just something more to do on it. This time, the something is cutting the openings in the two outboard ribs. They're trimmed and looking good... just that one little glitch from keeping me from saying they're done.
Instead of drawing these openings out four times, I spent a few minutes drawing them up on the DeltaCAD program I have. Tomorrow, I'll print these out and they'll be ready for work. I can't emphasis the amount of time that this DeltaCAD has saved me. Well worth the $39.00, or whatever it costs now.
May 10, 2010
Three days....
two holes
I've spent the past few days working at getting these two ribs done.
Cutting the holes open not a problem... just time consuming. I guess I could have used the Dremel with the circular saw attachment but that generally ends up with a "haste makes waste"d looking holes. So, thinking before rushing into it I decided upon the tried but true "hand cutting" of the holes. Like I said, it's been taking awhile to do it like that. (To the unknowing... this isn't the hole. This is the mystery hole of Mars.)
I'm happy with the way they turned out so it was a success.
With the openings cut out, I needed to box these in. Reason being... I didn't put any balsa filler in before closing up the rib. Should-woulda-coulda-but-didn't. Boxing them in to keep the varmints out and any dirt that may want to accumulate inside of the rib. I'm just about there. Would be there if it wasn't for the one capped side deciding it wanted to dry at a skewed angle. Would it have been okay to leave it like that... ???? Okay... isn't okay... so out it came. Yeah, it added some to the hours, like the rest of this "capping" did, but I'll be happier I took the extra time; now and forever.
Tomorrow... another day; a total of four, on these two holes.
May 11, 2010
So far....
the path seldom taken
The Upper Wing Center Section is so new... not many have trod this path. JimW has and I hate always asking him... it was about two years ago that he walked this road... and the specific questions I have are probably really making him dig deep. My apologies, Jim.
I looked over the plans tonight. Looked at them, yeah, good and long. Maybe I'm looking at them too hard. The one spar block, the front one for the rear spar... it's not looking like it will work with the way the spar is cut. It's too long and the angle on of the cut, while at the same angle, is too low for it to work with the angle of the spar. It looks like a step, which ain't workin' for me. I'm just not seeing how that is suppose to be like that.
I'm drawing this out on DeltaCAD, so that what I think I'm seeing is what should be; at least I think it should be obviously wrong or right when I draw it up on CAD. No ?
Maybe I'm seeing it all wrong. I'm a pretty smart guy... and it's not drawing up right.
To coin a "not too old" term... I'm using my Life Line... asking Jim to think back and see if he remembers an issue with this area of the Center Section. It may come down to me actually making "test" parts out of construction grade lumber to see if all of this jives.
I'll let you know what I find out... whether it's what I hear from Jim or what I see from making the test spar/spar block. Hopefully I'll help smooth this trail a little... although, the hike so far has been a lot of fun.
May 13, 2010
Today's....
Report Card
Put in a 400miler today; 200 out 200 back. Out for a meeting... a little above Harrisburg, PA. Great trip for work, just soooooo long.
On the way home I stopped by the Home Depot to pick up a 2' x 4' sheet of 1/4" plywood so that I could start making these spar block/spar test pieces. Finally made it home by 8PM. Yeah, did the usual then laid back for a "moment" and thought I'd get up in five minutes to head down and start the testing. "Five minutes" later I open my eyes and it's 11:30PM. Ahhhh... so much for starting those test pieces. If I was that quick to sleep, guess I wasn't in any condition to be working around sharp spinning things.
Good thing... At least I have the 1/4" ply (to simulate the spar blocks) and the glued up pine (to simulate the spars.) Now all I need to do tonight is start cutting.
Heard back from Jim. It's been awhile since he worked on the center section but he recalls needing to do some tweaking to the area, to get the hardware all the way in. Reminded me that the blocks were mainly a build-up and that the majority of the work was being carried by the metal hardware.
If I had to rate the day... A+ for work... C- for the biplane.
May 18, 2010
Pine and ply...
my offerings to both Sitka and Birch
Other than picking up a piece of 1/4" plywood... haven't done a lot on the biplane in the past week. Busy with work, but that's no excuse. So... I don't have an excuse for not working on it. Nuff said... lets move past this.
Over the past two nights I've been glueing up and cutting down test spars and spar doublers. As mentioned before, I'd rather mis-cut a cheaper piece of pine or A/B ply than I would a sacred piece of Sitka or Birch ply. Why the tests... cause trying to wrap my head around what I was reading on the plans wasn't producing an understanding of the piece. I thought it would clear any questions I had by making these pieces instead of reading more into it than I should. (make any sense?)
Cut the spars last night and cut down the spar doublers tonight. Other than one mis-cut angle (I'm glad I made this test run.) they look purty close to what the plans were telling me.
Next on the agenda is to cut a few additional angles on the two tests pieces to see if they look like the plans too. Test fit the fittings... see if they look right. If this all fits together... it's on to making the real deals.
Note: Above golden calf photo credited to Indigo_Jones on Flickr.


 I'm not claiming to be that perfectionist that I use to claim I was... I'm now that "excellence" guy. It takes a helluva lot more time to reach that point of excellence when you have equipment that isn't up to par with your par. Last night was the end of fighting with that metal bandsaw and the end of adding unecessary hours to the build; that feeling of being in one place for way too long. Need to bite that bullet and buy something better... and in this case, older is better. Decided to looked on Craigs List... found an older bandsaw for a good price and emailed the guy asking when I could come up and look at it. Hopefully tonight, at least by the weekend, I'll have that saw.
It's an older Walker-Turner bandsaw; good ol' OLD American made product. (insert Tim the Tool Man's grunts here)
I'm not claiming to be that perfectionist that I use to claim I was... I'm now that "excellence" guy. It takes a helluva lot more time to reach that point of excellence when you have equipment that isn't up to par with your par. Last night was the end of fighting with that metal bandsaw and the end of adding unecessary hours to the build; that feeling of being in one place for way too long. Need to bite that bullet and buy something better... and in this case, older is better. Decided to looked on Craigs List... found an older bandsaw for a good price and emailed the guy asking when I could come up and look at it. Hopefully tonight, at least by the weekend, I'll have that saw.
It's an older Walker-Turner bandsaw; good ol' OLD American made product. (insert Tim the Tool Man's grunts here)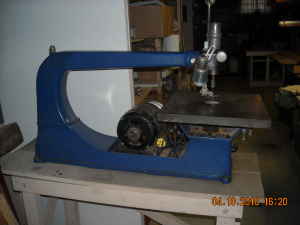
 Instead of drawing these openings out four times, I spent a few minutes drawing them up on the DeltaCAD program I have. Tomorrow, I'll print these out and they'll be ready for work. I can't emphasis the amount of time that this DeltaCAD has saved me. Well worth the $39.00, or whatever it costs now.
 Cutting the holes open not a problem... just time consuming. I guess I could have used the Dremel with the circular saw attachment but that generally ends up with a "haste makes waste"d looking holes. So, thinking before rushing into it I decided upon the tried but true "hand cutting" of the holes. Like I said, it's been taking awhile to do it like that. (To the unknowing... this isn't the hole. This is the mystery hole of Mars.)
 Over the past two nights I've been glueing up and cutting down test spars and spar doublers. As mentioned before, I'd rather mis-cut a cheaper piece of pine or A/B ply than I would a sacred piece of Sitka or Birch ply. Why the tests... cause trying to wrap my head around what I was reading on the plans wasn't producing an understanding of the piece. I thought it would clear any questions I had by making these pieces instead of reading more into it than I should. (make any sense?)