Mantua, New Jersey
Original Site:
September 2004
E-mail: usav8or@yahoo.com
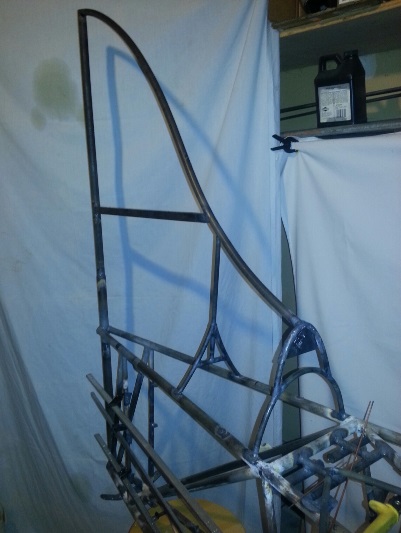
The Radical Radial Turtledeck.
July 13, 2013 Still figuring things out...
well, sorta.
Yesterday... spent more time figuring out how to finish off the back of the turtledeck.
okay... So I've actually had an idea of what I'd be doing for a while now. BUT... there's a maze of parts and pieces in between and they need to be figured out before moving forward. For instance... the horizontail stab... where exactly is that attached (at what height) and how will that affect the look and location of the stringers? Another... the line from the top stringer. At first I completely left that out of the equation... now I'll be putting a splitter there and forming a point at the tail post with the bottom one (which actually ain't gonna be there). That bottom one is ending just before the leading edge on the horizontal stab.
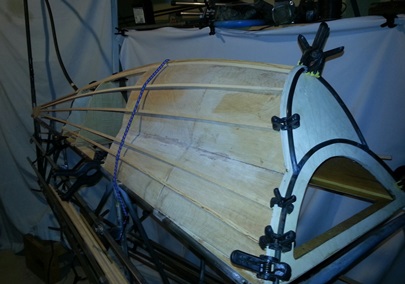
Figuring out the shape and size of the tail cone... I thought it would need a slight curve to it. Turns out that the natural shape of the stringers that far back are all basically flat. The reason for the tail cone is that eight pieces of 5/16" stringer material ending in a point would make for a messy looking "joint". As it is... where they meet (about six inches in front of the tail post) they're about 1/8inch apart.
Once I got to this point I continued to stare and think. I had to snap myself out of it... move on with the plan, I told myself. If I need to modify, or change it, do it... But... get movin' on doing something !!!
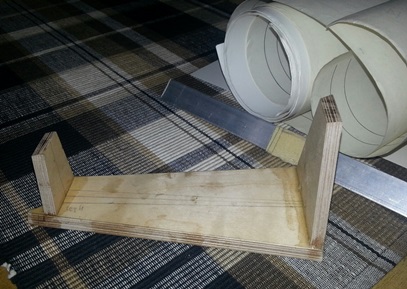
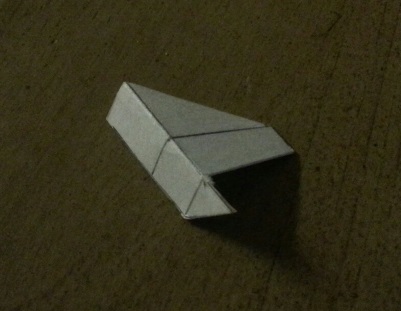
Frame for tail cone.
July 14, 2013 Using a little of this...
and a little of that.
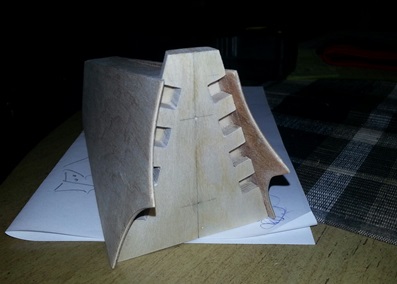
First session today I cut and fit the ply for the tail cone. Instead of just having it squared-off in the front I put a few scallops to the design. (Doing a little forward thinking here and trying to keep with the look of the rest of the finish on the biplane.)
Went over Whitey's to hang with the guys for a while... soaking up some of this sunshine, pool side... the rain has finally stopped, at least for the time being. Got back home around 6PM and decided to lock this tail cone together.
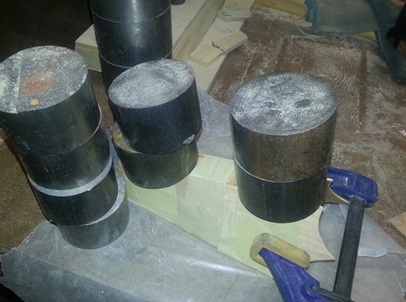
Decided to coat the inside of the tail cone with T-88 instead of mixing up another batch of that red hot L-26 sheathing resin. Worked like a charm. I was able to clamp the pieces together to form the shape of it too. Had to do some creative clamping/taping whatever you want to call it... to keep things together.
This will look like...
This !
July 15, 2013 Nope, not a derby...
it's a cap tonight.
This turtledeck... actually anything new unknown (which is a big part of this Radial Skybolt) is a process in figuring things out... thinking things through.
For instance... how do I finish the back-end of the turtledeck... which lead to me figuring out how to cap it with a tail cone... which lead me to figuring out how I'm going to attach the stringers to the tail cone and be able to take them apart for painting the fuselage.
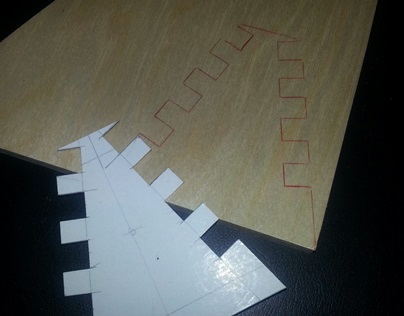
Thought about it yesterday and at work today... what I'll do is create an inner cap that will hold all the stringers in place. I'll put some type of screw system in it (forget what you call them) that will have a metal thread that I will attach to the tail cone that will allow me to attach the inner cap.
Took me two tries (not sure what happened... I think I thought I had a straight edge for the bottom but it turned out it wasn't) to make the pattern. 2point1 hours and I have it traced on the 1/4inch plywood.
July 17, 2013 NAILED...
it !!!
Re-worked the tail cone inner cap tonight. It's the forth one made and it's a keeper.
On this one... I put a nice angled-edge on the vertical sides of the cap for a better (tighter) fit. It took an hour to finish the piece from start to finish. The extra material at the top is for thickness only. If I didn't add that to the top there wouldn't be any wood above the top stringers.
It's not that big of a piece to the puzzle, but it's just as important as the fit and finish of everything you see.
July 18, 2013 NOTCHED...
it !!!
The tail cone for the turtledeck was finished up last night, which means work needs to start on the turtledeck stringers.
There's a strong potential for this being a pain in the arse because the bandsaw and sander are down in my basement workshop and the fuselage, with the turtledeck, is in the garage work area... ahhh, what are you going to do. Other than tacking on a few more minutes from a few more trips up and down the steps, it wasn't THAT bad.
Because of the slight variance in the square, sitka stringers, I had to hand sand slight angles on the back-end of the stringers to get them to fit into the inner cap. I thought of making the openings on the inner cap larger to fit the size of each of the stringers but could only see disaster happening. When all was said and done, after all the notching and fitting, it looks purty DAMN good !!!
I still need to fit the double stringer on the starboard side (which will merge and end just behind the last wood former. AND, I need to put the second layer of 5/16inch stringer material on all of the stringers from the bulkhead back to the last former on the baggage area. Then it's on to the port side to do it again.
Almost there...
July 19, 2013 Workin' it... !
The turtledeck build, at least how to build it... I think, is pretty much figured out. It's just a matter of cutting and fitting the final few pieces.
Another layer of the turtledeck was finished tonight.
Started out doing the same thing I did last night... except it was on the port side; cut and fitted the first layer of stringers.
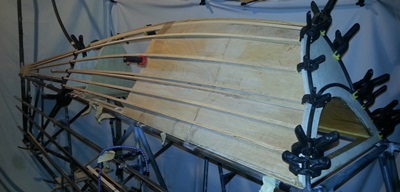
A natural progression was to put the second layer of 5/16inch stringer material on the starboard side. What I did was feather each of the second level stringers from the rear baggage compartment former to the last wood former. This will give it a more pronounced "bump" in the front and come in enough on the sides to give it a smooth transition from the turtledeck to the fuselage sides.
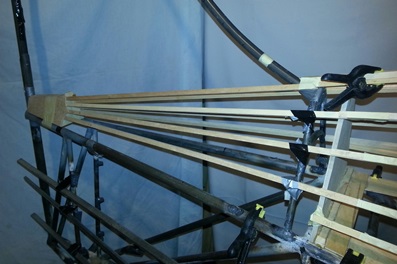
Getting there...
Shot of the rear-end transition.
July 20, 2013 Even ain't workin' !
eeeeeeeeeeeeeeeeesh !!!
Three point three hours today... and the only thing to show for it is the first layer of the first set of double-stringers for the starboard side.
Actually I started off the day by figuring out the even, key word is even, spacing of all the stringers that I had already in place. EVEN spacing didn't look right on the forward part of the turtledeck. What I needed to do was run the stringers parallel until just behind the last wood former THEN they would merge into the tail cone. okay......
With that figured out it was on to working out the double-stringers. I spent one helluva lot of time on the first attempt. When I finally fitted it up to the turtledeck, for the final fit, I discovered that all I needed to do was make the long angled cuts square to the stringer (I was thinking and trying to cut some weird, complicated angle... but they pretty much lay flat after the last wood former as I had discovered earlier when I made the tail cone piece... but apparently forgot).
All this learning will make cutting and fitting of the second set go a helluva lot faster tomorrow.
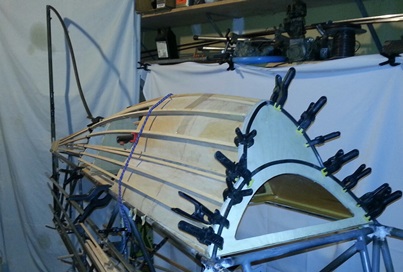
First layer of double-stringer in place.
July 22, 2013 Mirror mirror on the wall...
eeeeeeeeeeeeeeeeesh !!!
Point seven hours today !!! Told you that all that learning paid off. Did the same as I did yesterday... only I shaved off 2.6hours.
For a picture of my work today... hold the screen up to a mirror so that it looks like the port side of the plane !
July 23, 2013 Re-doing a few things...
you guessed it !!!... more work on the turtledeck.
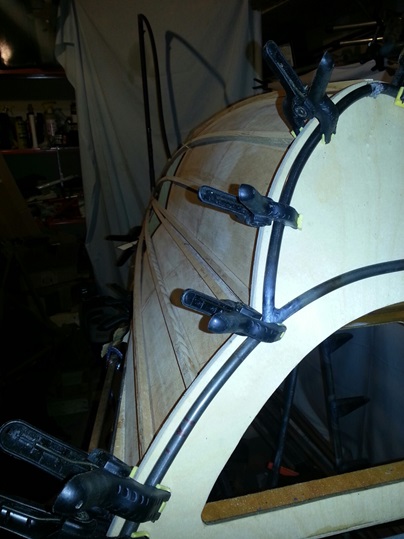
Taking a closer look at how the upper turtledeck curve meets the curve of the fuselage sides... I decided to shorten the second level stringers (let me explain... the stringers are made by building up two 5/16inch cap strips). Instead of ending the second level of the stringers at the last wood former, I've decided to end it one before it.
This helps to keep the upper stringers from being too wide (hanging over the stringers on the fuselage sides.) It didn't before, but they were close... not it's a lot less close. A nice benefit is to give the forward part of the turtledeck a more bulbous look... which I think kinda kick-ass.
Tonight I finished re-marking, re-cutting and re-trimming the second level stringers on the starboard side. Tomorrow... the port side !!!
July 24, 2013 The final pieces of the turtledeck puzzle...
you guessed it, again !!!... more work on the turtledeck.
Cut the remaining second layer stringers for the port side; cut to size and feathered the ends of each. I also cut the port, side stringer that goes from the spine to the tail cone.
I still need to do a test fit of all the stringers so that I can measure and fit that final metal former that will support the span of the stringers from the last wood former to the tail cone. I'll also need to weld on a set of stand-offs for the tail-end of the double-stringers. They need to curve down slightly after the last wood former and they're basically left hanging in the air with no direction. The stand-offs will allow me to attach/hold them in position with that bend.
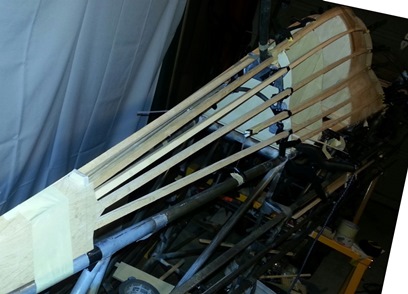
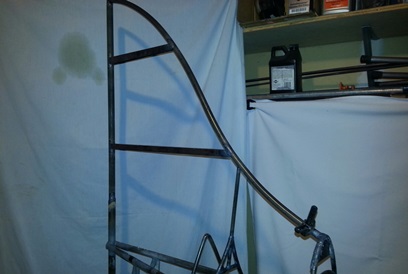
June 25, 2013 It's a keeper...
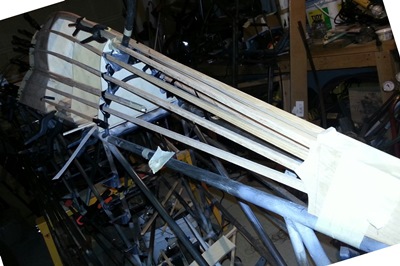
Measured and laid out the stringers for the starboard side.
Side note: If you compare the photos I took about a month ago and look at the one I took tonight... you'd probably think that there isn't much difference between the two. Believe me... there's plenty of hours and quite a bit of difference.
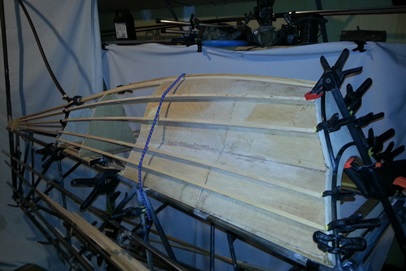
What I thought I would do... laying the top in a curve to match the spine... didn't look that good. For the upper half... what I finally ended up with is mark the stringer locations on rear baggage wood former the same distance as the bulk head. I then connected the rear of the stringer in the tail cone and let the curve go where it would naturally. I think it's a keeper. The bottom I did the same thing... although, there is no bow along the stringers. They're pretty much straight.
Before stopping for the night I measured and drew up the pattern for the metal former that will support the stringers between the last wood former and the tail cone.
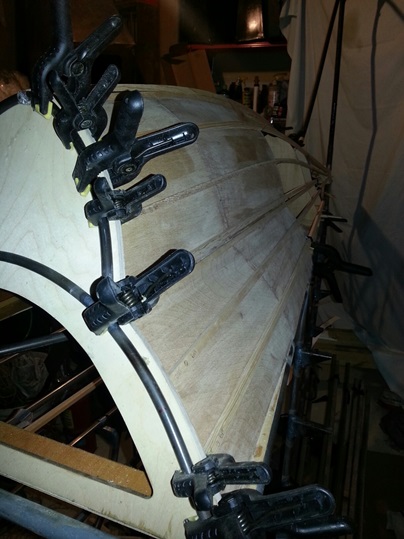
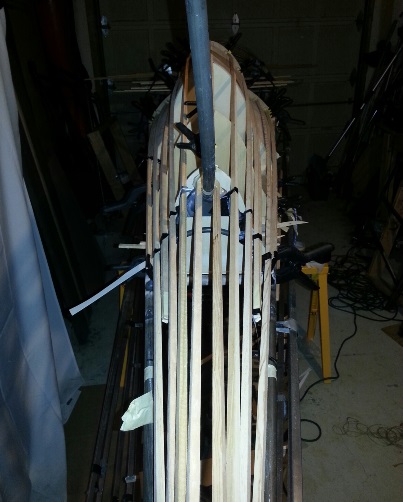
Here's a shot of the final stringer layout.
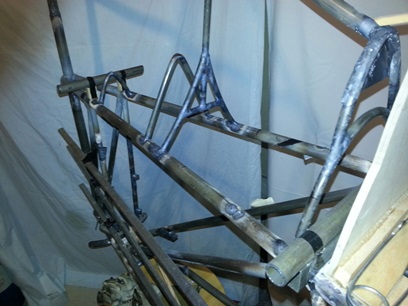
July 26, 2013 Same stuff different side...
Took the measurements from the stringers I laid out last night and used them on the port side. Here are a few photos of tonight and last night...
July 27, 2013 The mental, er metal part of the turtledeck... (actually not a part of the turtledeck)
Put a good amount of hours on the biplane today. 4point2 to be exact...
Started off the day by re-checking the look of the stringers on the turtledeck. Looks just as good today as it did last night. Dy-No-Mite !!!
I knew that the top stringers lifted off the ply turtledeck when I was fitting them up. What I needed to do is create a few wedges, that match the curved space under the two stringers, to fill in those gaps. Finished the one then went to do the second stringer and saw that the stringer was short by about 3/4inch ???? seriously ??? When the hell did that happen ?
okay... so it doesn't make any sense...
soooo.... I needed to take a little bit of time and splice on a length of 5/16inch cap strip to the one end 'cause I don't have a length of cap strip long enough to re-make it. Not a problem.
With the glue drying on both the stringer-to-spacer and stringer-splice-to-new end, I had some time to bend the triangluar former that will support the rear turtledeck stringers and figure out what/how I'll make the vertical stab cross piece.
End of day work session.
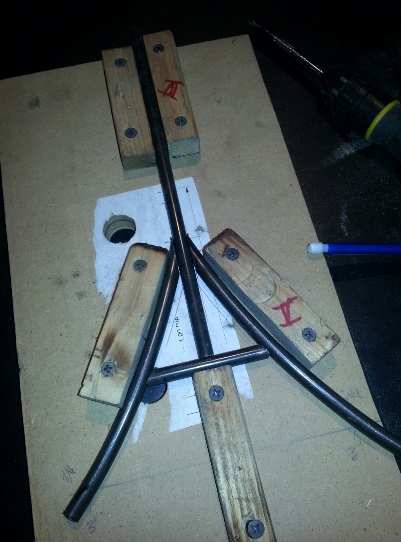
Start of evening work session.
Took the mental picture of how I would make the vertical stab cross piece and created the jig and cut the pieces for it. Pretty simple stuff... I already had the curved pieces of 3/8inch 4130 from a cut-off of another former. Just what I needed (and that doesn't happen that often !) Added a few pieces of strait tubing and it's ready for tacking together. One-point-two hours...
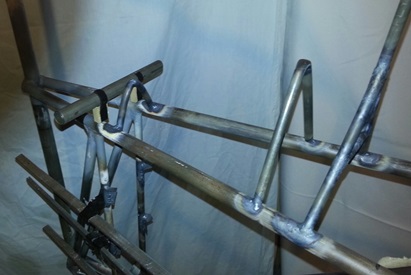
July 29, 2013 Some of the final welds
before the final fit and finish.
Tonight... I welded up the vertical stab cross piece. Took my time with it... quite a few little welds: five to be exact. Tacked it in the jig then I finished it free hand. Looks good... no twisting. Guess that's what happens when you take your time with a piece, eh ?
Took apart the turtledeck so that tomorrow I can center the leading edge of the vertical stab and weld it onto the fuselage... followed by piecing the turtledeck back together for a final fit and finish.
July 30, 2013 Dialing it in...
Worked on aligning the vertical tail tonight. A LOT of back-and-forth from the tail to the firewall to the tail to the firewall yada yada yada...
There is a very small, itsy-bitsy twist in the vertical tail. (that's some of that hand-madeness - wurd ? - ) No matter what I did I couldn't get it dead on. I tried for twopointone hours. The kicker is... the notch in the top of the vertical tube, for the vertical stab, needs to be dialed in at the same time that I'm dialing in the leading edge of the vertical stab.
A few degrees this way and degree that way... up to the firewall, check, back to the tail to dial in a few other degrees or degree this way or that. Finally got it as close as I could... a few times. It's tacked now. Leaving sit over night to check it tomorrow... to make sure I'm happy with it.
July 31, 2013 Welding it on...
More work on the vertical tail... quite a bit of work actually. Re-checked what I did last night and it actually looked better than what I left it at. Guess those two hours were well worth it.
Nothing but welding... Started off welding the top half of the leading edge to the metal former. Finished welded the splice in the vertical tube for the tail post. Tacked the leading edge of the vert tail to the tail post. Aligned, measured, cut, ground to size and nearly finish welded the lower metal tail rib. Did the same to the cross brace support for the leading edge.
Tomorrow I'll fit up the upper metal rib and finish weld the leading edge/tail post connection. CRAP !!! I hope I have the tubing for the horizontal tail group 'cause I want to fabricate and weld that on.
August 1, 2013 more of the same...
Fitted and welded on the upper metal rib to the vertical tail. That's about it for tonight... other than looking for a few small pieces of tubing that I don't think I bought. These pieces are for making the brackets for attaching the horizontal tail pieces. Looks like I'll be ordering some additional tubing...
The ribs ARE actually parallel.
August 3, 2013 Working out the endless details...
Two work session today...
Placed the turtledeck back into postion to figure out where the lower stringers would be when connected into the tail cone. Followed by... rigging up temporary 3/4inch tubing at the right hight to represent the front and rear attachments for the horizontal tail pieces.
When placing the temporary 3/4inch tubes in place I discovered that the lower two stringers would need to end a few inches short of the tail cone. So... I designed and bent up another stringer support just for those two stringers. As an aside: the vertical stab cross piece fit nicely between the two upper stringers (of which I've decided that I'll be making the transition for these two stringers into the spine slightly different than what I now have).
August 4, 2013 An endless series of putting it together...
and taking it apart...
Did close to 2hours of something today... nothing that I can see, but it was something.
Actually, it was a lot of putting things back together to figure out where and what I'm doing for the stringer supports in the tail area. Readjusted the one side of the triangular metal former. and... quite a few misc. things to fill up the time.
End result... need to make 10 supports similar to what I did for the rear-end of the aluminum stringers for the fuselage.
August 5, 2013 Sometimes it's all about...
the little things...
I tend to think of these "menial" tasks as unproductive. Far from the truth. I want to build this biplane with the thought of building it to the best of my abilities... at all times. With that said... it's still less than perfect.
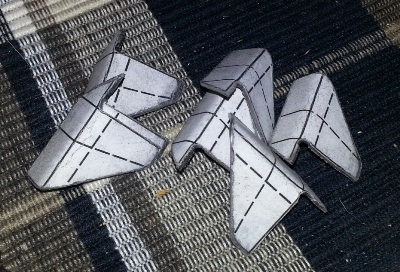
Tonight the menial task was to figure out and draw up the stringer stand-offs for the tail end of the turtledeck. Figured it out. Drew it up. Cut out a test piece. Test fit to fuselage. It works... I drew the pattern up with several different cut lines so that the same stand-off, with a few minor changes, can be used for both locations that I need them.
The test piece...
August 6, 2013 Sometimes it's all about...
more little things...
More of the small stuff tonight...
Worked on cutting out, grinding down and sanding smooth ten very small stringer stand-offs for the rear end of the turtledeck. Not much to write home about... the usual working the rough edges out by hand. They're ready for bending and then welding onto the fuselage.
One thing I wanted to mention tonight... go to Youtube and do a search for Sunshine Superman by Donovan. GREAT song !!!
August 7 and 8, 2013 I wasn't happy...
so I made myself happy....
Yesterday I pounded over the tops of the stringer stand-offs. THAT's iT !!!
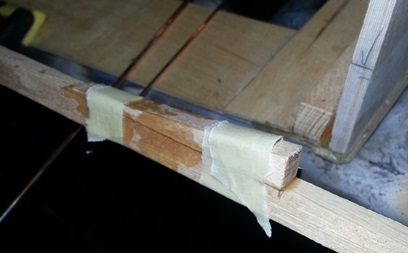
Tonight... more work on this turtledeck. The stringers once they leave the ply covered part of the turtledeck go from 5/8inch (basically two 5/16inch cap strips stacked on top of each other) down to 5/16inch. 5/16inch isn't much wood to tie it somehow to the stand-off. So... my project for tonight was to build up a small area around the stand-off with additional cap strip material.
The photo below explains it better than words can. And the tape... it's my "clamp". Not much pressure needed to hold it in place and produce a small amount of clamping pressure.
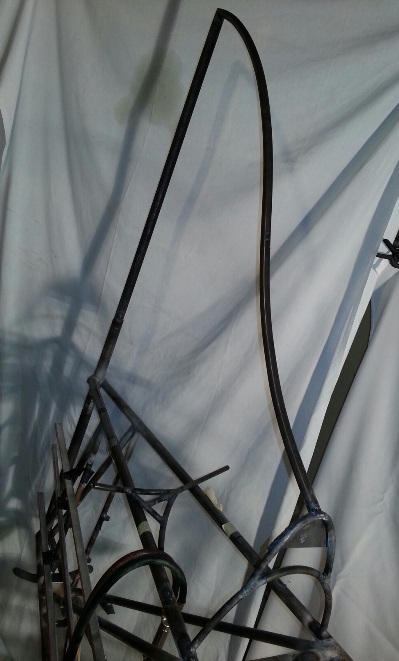
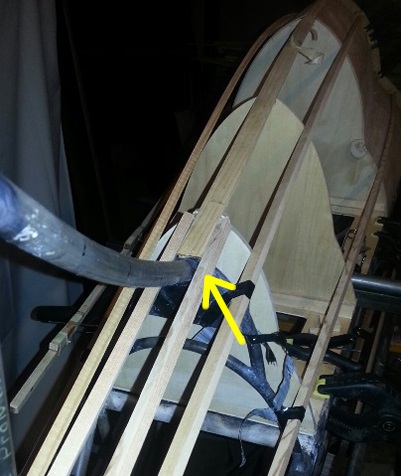
the next project...
I wasn't happy with the original spine-to-tail cone stringers so I re-made the two and have put them into position to figure out how I want this to come off of the spine. I took a photo of the area so I can mull it over; over night and tomorrow during the day. I think I know what I want to do, but just want to be sure before cutting good wook and glueing it to the turtledeck. The yellow arrow points at the area in question.