Mantua, New Jersey
Original Site:
September 2004
E-mail: usav8or@yahoo.com
The Radical Radial Turtledeck.
August 9, 2013 Learning...
sometimes you stumble into it.
I learned an important lesson tonight...
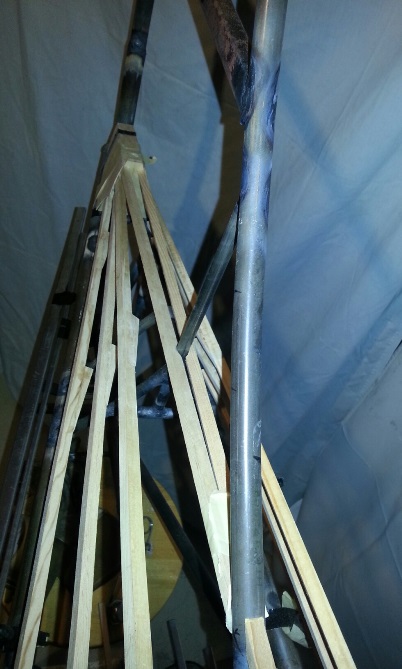
There are points in the build where you need to think of the whole picture; pieces working together with each other. Case in point... I'm thinking through how I'll make the transition from the spine to the tail cone. I've been looking at it and scratching my head for a while (a long while) now. The problem, I discovered tonight, was that I didn't have all the pieces in place. I had the spine itself in place, but the stringer that sits on top was left out of the picture. I wasn't think "whole picture". I was still thinking pieces.
I was fighting between the lesser of two evils when I didn't have that stringer in place. My options weren't looking that good... UNTIL I placed that stringer on top of the spine. (and I'm not really sure why I did that) I'm real happy with the test piece (and in this case... it was a test piece) that I made for the starboard side of the vertical stab. Spent most of the time figuring this fact out.
Started off the night looking over the glued stringers I worked on last night. They look good... I'm happy with them. Cleaned them up a little by sanding the excess glue off of them.
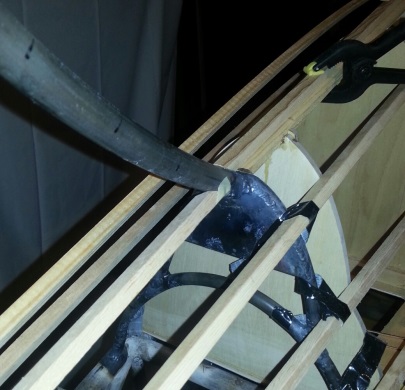
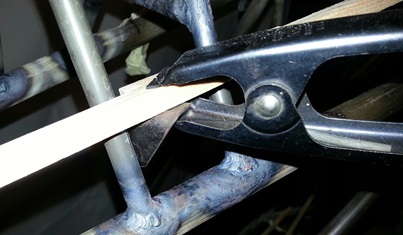
Close up of taped in spine-to-stringer.
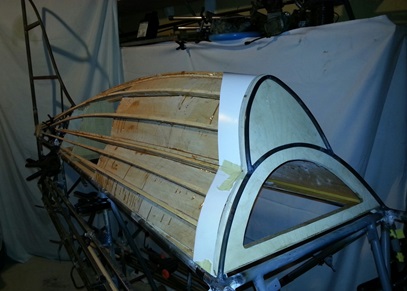
August 10, 2013 Finished with the turtledeck ???
Close, but not quite.
Got to doing stuff around the house today (Saturday) and didn't get to the project until late.
The first session I notched the two stringers that go from the spine to the tail cone. Would have been a lot quicker if I had a shop that had everything "RIGHT" there. Instead... I ran up and down a flight of steps quite a few times. It's done. It's finished. And... I'm happy with the final product.
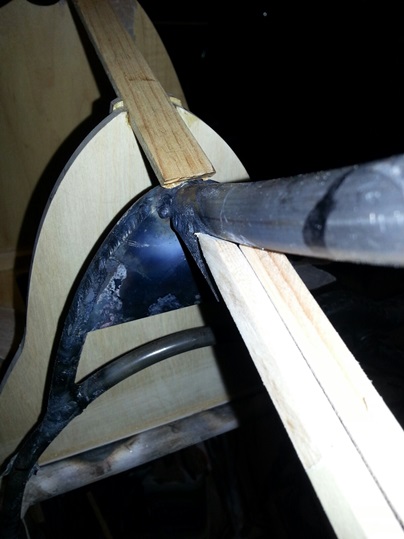
Let me re-state that... I'm EXTREMELY happy with the look of it. Just a day ago I thought I was going to have this knuckle looking intersection... where as now it's a nice smooth, flowing, almost seamless, line.
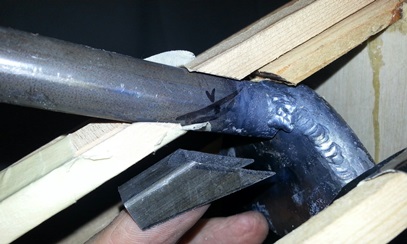
After dinner, between looking at the Phillies get their butts beat by the Nationals, I fashioned a bracket for supporting the two above stringers at the vertical stab's leading edge. I had a piece of 5/8inch rectangular tube that was about .o49. Made a quick pattern, drew it on the tube and cut the bracket to size and shape. Point six hours later and I have a nice square bracket !!!
August 11, 2013 Brackets...
and other things...
Guess what ??? Yup... more work on the turtledeck. Welded on the bracket that I made yesterday and finished welded a lot of the metal formers that I had tacked into place for the turtledeck to tail cone stringers.
Need to let these puppies cool down before working on that area again. I need to now test fit those two stringers that transition into the stringer/spine. Need to tackle the pain in the arse of positioning all those small stringer stand-offs and tacking, then welding them in place. Stuff for another day...
August 12, 2013 Some of it's...
invisible to the eye...
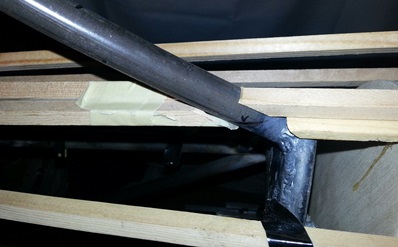
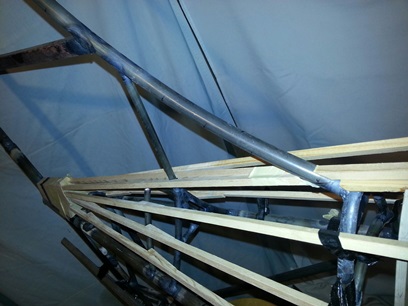
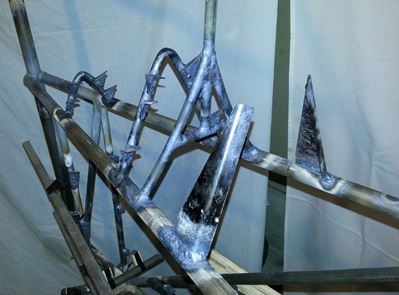
Notice any difference between this photo and other photos of that intersection between the turtledeck spine and the stingers on the tail ???
I didn't think so.
I have a little over an hour of "tweaking" the fit of those two front stringers. It's all about the details for the finish look...
I also made a saddle bracket for the third wood former... I somehow missed putting one on the first time.
August 13, 2013 Pushing things off...
Maybe... not ???
I'm not sure if I really could have done this before tonight, but in my mind I was pushing off aligning and tacking on the stand-offs for the rear end of the turtledeck stringers, maybe. (I thought that I had overcome this procrastination thing!) It turned out not to be as bad as I thought it would be.
I thought it would be a hassle taking off and putting on the stringers (over and over again) and trying not to burn them at the same time (see... I needed to clamp the stand-off to the stringer in order to get the correct angle and alignment). I have all ten aligned and tack... ready for finished welding... done in two hours.
Need to confess, I did singe one stringer... barely. With a little sanding you don't notice a thing.
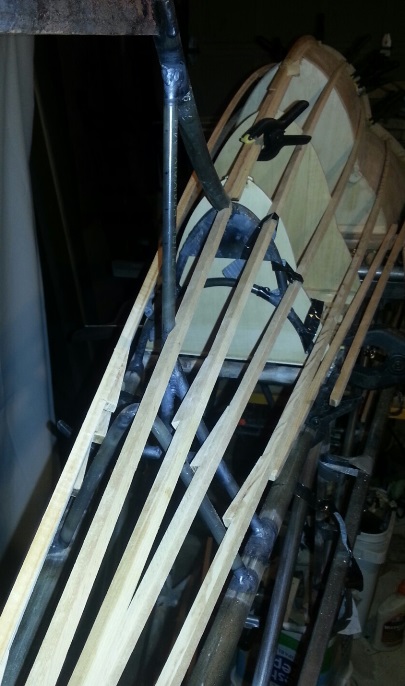
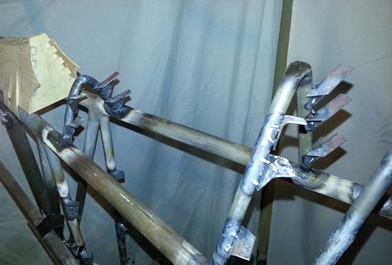
Clamped in place.
Tacked and ready for welding.
August 14, 2013 I ain't got nuthin' to say, except.. more welding...
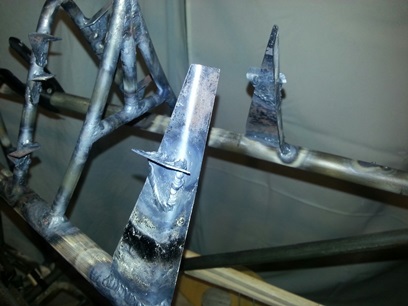
Finished welded the stand-offs that I aligned and tacked on last night. Took my time with them... the edges of the stand-offs can easily burn off. Only took about 1/2hour so I decided to locate and weld on the stand-offs for the two double-stringers (which kinda just end between the last wood former on the turtledeck and the tail cone).
Instead of the weight of another triangular former I decided to use two of the extra stand-offs I made for the fuselage sides. Two of the 5inch stand-offs will work well... Aligned, tack and finished welded the two onto the fuselage. All I need to do now is cut down those two stand-offs and make a lip/edge that the stringer can rest on, and that I can secure it to.
August 15, 2013 I ain't got nuthin' to say, except
a few more brackets and.. more welding...
As I discovered/mentioned yesterday... I needed to make a few lips/edges to weld onto the stand-offs holding the double-stingers in place.
Spent a little time locating the stringers at the correct height. Spent a little time marking, grind and filing a few pieces of .o32 4130 to bend into shape. Got one allllll the way finished... ready to weld it on and saw that I had two extra small stand-offs that I made as extras when I made the stand-offs for the metal formers in the tail cone area. These look a lot nicer than what I had made so I tossed the ones I made and... aligned, tack and welded on these two brackets. (oh yeah... had to file and sand smooth the edges that wouldn't be welded on these brackets).
Tomorrow I'll try fitting up all the stringers, since I have all the stand-offs made and in place (at least I think I do.) If I don't I'll find out then. (still need to sand off all that L-26 sheathing build-up-crap-ola that is coating the inside of the turtledeck ply)
August 16, 2013 A bit of clean up...
has been in order for some time now.
Played clean up tonight. Sanding... sanding and more sanding.
That L-26 sheathing resin that I tried as a coating on the inside of the turtledeck, as mentioned before, got HOT and THICK real quick. And I... still tried applying it. At first, before getting too thick, it went on nice... almost like varnish. As it got hot and thick it just started to glob on. Not a very pretty site.
Tonight I wanted to clean most of that off by sanding it. Got most of it... not all, but most of it off.
One point three hours... had to be done... but I'm not putting any of that towards my build hours though.
August 17, 2013 Back together...
again.
Getting there...
Put all the stringers back on the turtledeck. Fit them to the tail cone. Needed to see what was where.
Still needed to do a few things... the spacer underneath the upper stringer on the starboard side (to match the one on the port side), trim a few of the stand-offs in the tail area that are in the way of the stringers (the leg on two of the stand-offs are just a little bit too long and are in the way of a few stringers).
I think I may want to run that double-stringer a little bit farther back for a nicer transition.... Other than that, I think it's a wrap !!!
Glued up the spacer and stringer before turning out the lights.
August 18, 2013 Finding...
my way.
I stepped gingerly... but I didn't hesitate.
Yesterday I placed all the turtledeck stringers back in poition... to make sure they're where they're suppose to be. I didn't know exactly how I was going to mash them aginst the ply for a good glue fit, but I'll have to figure that out along the way. Well, today, was the way.
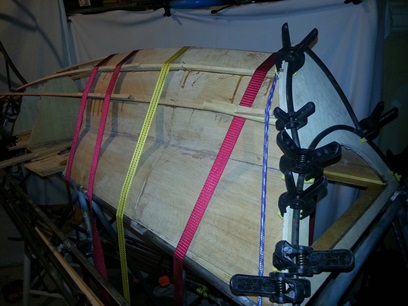
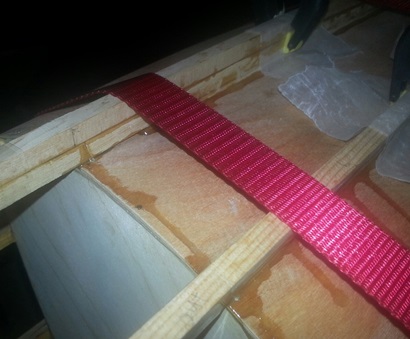
Walked out to the fuselage to see where I needed to put pressure on the stringers. Basically... needed to hit them in four areas so that it would have solid contact with the ply. Tried bungees... that didn't really work. Settled on a few tie-down straps. Worked... somewhat like a charm.
Mixed up a batch of glue and applied a liberal coat on the stringers and then placed them in position. Cinched down the tie-down straps and took a look at it. Not much squeeze out toward the front... actually, no squeeze out at all. The wood looks damp at best... thinking thoughts I shouldn't be thinking. I let them pass and then go down and mix another batch of glue.
I took everything apart, applied another liberal coat of glue, placed them back in position and cinched the tie-down straps again. Checked the spacing then called it a day.
Just went back out to make sure nothing moved... lookin' good.
August 19, 2013 Last night's are good...
today's look good..
Walked out into the garage work shop as soon as I got home from work and took a look... they're on there for good !!!
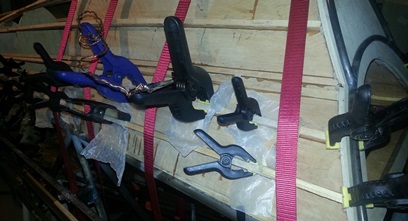
Later on tonight I took a stab at the bottom four stringers. A pain... in that the straps didn't cinch up on them as tight as the upper ones. Had to use a few more spacer sticks to take up the slack and put some pressure on the stringer/ply area.
Made up a big pot of glue this time... and STILL needed to mix up a little bit more. Applied the first coat on each stringer and let it soak in a bit, then applied the second coat and started strapping it down. A little over two hours and I think it's good to go for the night.
Glued the end tips of the double-stingers together also. They're next to go on... Then I need to put the second level of stringers on (to make them 5/8inch high.) Decided to avoid gluing both layers of stringers together prior to gluing them on the ply in case they wanted to fall over. (for what it was worth)
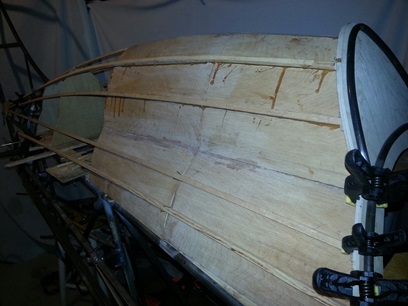
Here's a shot from today; before I glued on the lower four, but with the upper four locked and loaded.
August 20, 2013 Reminding me...
of my childhood..
Not rushing things here (as you can probably tell). The double-stringers that basically get glued at the junction of the upper and lower turtledeck are glued at the tip (since they do come together). I'm not making it easy on myself, but I'm doing it what-I-think-is the best way.
There's a slight twist to the stringers and the only way I can be sure of getting the stringers glued flat on the ply is to do them separately. And, like I mentioned earliers, they're glued together at the tip... thus the pain in the arse.
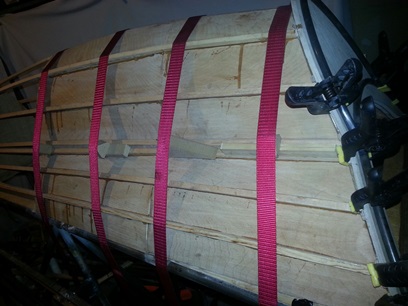
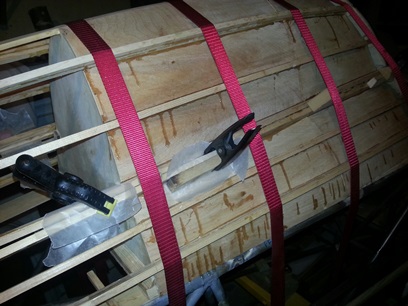
Did the six parts of A and six parts of B and mixed my pot of glue. Lathered up the bottom of each double and set them into place so that the glue could sink in some. Slid them back out... lathered on more glue and set them in position so that I could find some blocks of wood to fill the gap between the straps I wrapped around the turtledeck and the stringers. Kinda reminded me of playing with blocks when I was little guy.
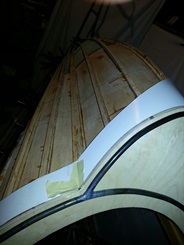
Here's the strapped down, blocked up TD !!! (you can see the two stringers I glued down last night in the photo - did the same on the port side)
August 21, 2013 repeat...
...yeah... repeat, of last night
Glued on top stringer on double-stringers. Same routine as last night. bye-bye
August 22, 2013 Leaping...
hurdles...
I'm thinking tonight... "I'm almost there." I almost have the turtledeck finished.
I didn't approach this part, or any part, of the build thinking of finishing it. I approached it enjoying the ride... enjoying the experience of figuring out how I wanted it to look, of working out the shape on CAD, of cutting each part, of putting all the pieces together.
Thinking back on the proccess of making the turtledeck... it's quite a hurdle I jumped over. I'll be making a similar leap when building the fuel tanks. I'm looking forward to that just as much.
Tonight I started gluing on the second layer of the turteldeck stringers; a second layer that will make the height of each, 5/8inches. A few more days of layering and then I'll glue on a few saddle gussets to hold the back length of stringers in place on the rear wooden formers.
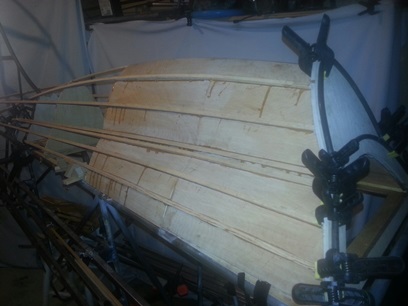
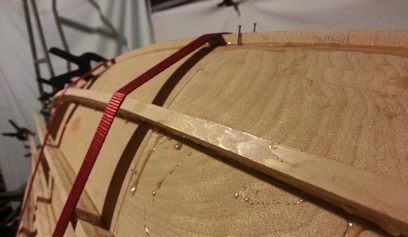
First layer of stringers glued onto turtledeck.
Close-up of double layer of cap strip to make 5/8inch height.
Strapped, clamped and taped up...
August 23, 2013 More stringers...
More gluing..
Nothing new... same stuff, just different pieces. Glued on the second layer of the four lower stringers on the turtledeck.
The spring clamps you see below are not being used to place pressure on the stringer for a glue joint. They are being used to align the upper and lower cap strip... to keep them from sliding around.
August 24, 2013 STILL... More stringers...
STILL... More gluing..
Again... Nothing new... same stuff, just different pieces. Glued on the second layer of the two lower stringers on the double-stringer for the turtledeck.
Same thing about the spring clamps that you see below...
oh yeah... I did go flying today and got my BFR out of the way... I'm free as a bird again !
August 25, 2013 STILL...
Still gluing on stringers. Still !
Early today I glued on the second layer for the upper stringer on the double-stringers. Waited all day to let it dry so that I could then...
Glued on first layer of spine stringer tonight. Marked the center of the spine. Tapped a few bronze brads into the spine to hold the stringer centered. Lathered up the stringer... set it into place for a few... took it back off and lathered it up again. Set the stringer in place to strap it down for the T-33 to cure.
Had enough glue left over that I was able to glue the tips of the double-stringers together.
Tomorrow. The final stinger piece to be place and glued for final assembly.
Still need to glue on the second layer stringer.
August 26, 2013 Still need to...
The last of the stringers !
Glued on the last, second layer stringer tonight. That's done now... but I still have plenty of work to do on the turtledeck.
Saddle gussets need to be glued into place after postioning the aft sections of the stringers. Need to make and weld on the tabs that the turtledeck will connect to, to keep it in place (along with some industrial sealant). Need to drill the holes in both the stringers and the rear attachment tabs. Need to seal the entire turtledeck. Need to drill the two holes in the back-end of the baggage compartment for the seatbelt cables. Need to figure out how I'll be putting a floor in the baggage comparment (I have some ideas). Need to make the door for the baggage compartment.
ahhhh... There's probably more I "need to", but you get the idea.
Still need to glue on the second layer stringer.
August 27, 2013 Heads up...
Took all the straps and clamps off and... it stayed together. Where to go from here ???
Decided to start fitting up the transition ply that will go just behind the bulkhead. I've been working with the stringers so long... that I felt like taking a break; change it up a little bit.
Needed to file down and trim a few of the boards so that the bottom connection on the ply would fit within the shape of the turtledeck (and not overhang the bottom ply). This is the stuff you need to take your time with. Not that I don't take my time with other areas of the build... What I'm trying to say is that there are a lot of times where you'll need to take a lot of time without a lot getting done. Me... I want to rush through times like that... kinda try and keep the time down to what I see being done.
Ain't gonna work like that. Most of the fit and finish is like this... and that's probably why they say 90percent done... 90percent to go. I'm getting more use to it now, but when I first ran into this "slow going" I would rush through it and end up doing it again.
Just a heads up...
Still need to glue on the second layer stringer.
August 28, 2013 Notching it up ???
Worked all night on the turtledeck ply transition. It's something that you see and it needs to be spot on.
I've mentioned it earlier... I strive for excellence in all the parts and pieces I make on this biplane, but the stuff you see needs to be knocked up a degree (if that's possible).


 Decided to start fitting up the transition ply that will go just behind the bulkhead. I've been working with the stringers so long... that I felt like taking a break; change it up a little bit.