Mantua, New Jersey
Original Site:
September 2004
E-mail: usav8or@yahoo.com
The Radical Radial Turtledeck.
August 29 and 30, 2013 Two rolls of tape and a paint can...
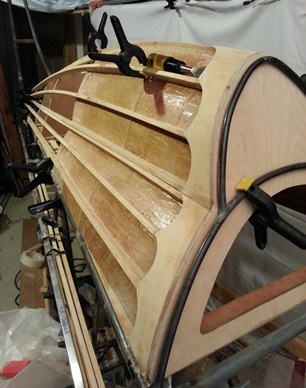
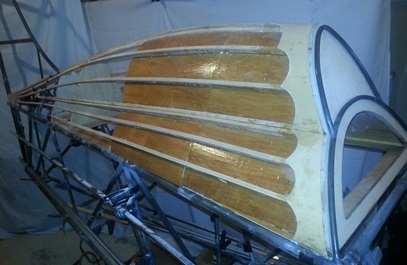
MORE work on the turtledeck. Last night (the 29th) I started to cut and fit the four pieces of plywood that would be the transition from the turtledeck bulk head to the stringers.
Drew the patterns on the ply and cut right at the line. The knife slipped a little once and I cut into the good area (can you say practice piece ???). Started on another one. Took my time and the cutting was good.... It wasn't until I cut the two upper ply pieces that I thought to cut outside the line by about 1/8inch and then file/sand to the line... like I've done in the past with ALL the metal pieces I've made. (duh !!!)
Cut all four pieces out and fitted them to the turtledeck and called it a night.
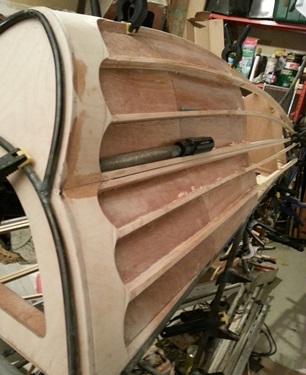
Today I trimmed the ply to size (the back-side of the pieces). Saw that I needed to tweak the fitting on the ply/blukhead intersection, so took the time to do it now (thought it was all taken care of yesterday???). Realized that I wanted to put scallops in the design and found a few rounded items laying around that I could use for the radius; a thing of masking tape, duct tape and a paint can.
Drew the patterns, cut the shapes and sanded them to come up with these...
Top and bottom sections.
August 31, 2013 Ditto of last night...
MORE of the same tonight. Spent an hour scalloping the second set (the port side) of transition ply. Period.
On another note... went up flying again today. Thermals all over the place. Stayed in the pattern and bouned around for awhile. Enjoyed the challenge of getting kicked around while doing take-offs and landings.
oh...
Went back later tonight and test fitted for a final fit... of the transition ply. Not happy with how the points on the scallops landed on the stringers on the lower starboard side so I remade it. Took exactly 1hour.
It's a little frightening...
I just looked at the hours I've put on the turtledeck since starting. I've put about 230hours on the turtledeck. Say, I was paid $40.00 an hour for my labor: so far... it would have cost me over $9000.oo to build the turtledeck. I could have gone out and purchased one for $900.oo. Grant it, it wouldn't have looked anything like this...
September 2, 2013 Finished the "still a few things I need to do"...
Time to glue on the four pieces of transition ply. Well... still a few things I need to do before gluing them into position.
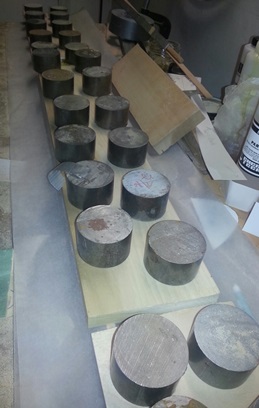
I need to create/make a glue block for the lower edge of the lower transition plys. Also needed to seal the wood underneath the ply pieces and the back-side of the transition ply pieces. Made the glue blocks and used the T-88 epoxy glue to seal the wood.
Mixed the epoxy in the same 1:1 mixture as I usually do... made a small squeegee to spread it around. and it Worked GREAT !!!
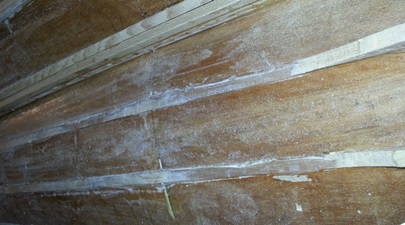
Starting to spread on the T-88 epoxy as sealer.
Close-up of lower transition ply glued.
September 3, 2013 T-88, to glue...
to seal.
More time on the turtledeck... managed to glue, and keep in place, the starboard side upper ply transition. Wrapping it around the top stringer, and keeping it in place while the glue dries, took quite a few blocks of wood.
It's put to bed now... tomorrow it'll be ready for the port side.
Continued using the T-88 epoxy to seal the trurtledeck. It's taking quite a bit of time because I can only use a small squeege to apply it to the structure. I'm also taking the time to spread it out very thin over the entire structure. AND... it's a thick glue so it doesn't spread real easy... spreads nice an smooth though.
One nice thing about using the T-88 for sealing the wood is that it is resistant to MEK and all that other stuff I'll be using to "skin" the biplane.
Yesterday's work... ply transition.
September 4, 2013 September's...
"Groundhog Day".
The last piece of transition ply was trimmed and glued into position tonight.
More of the same... using blocks of wood to create the pressure needed for the T-88 to form a good bond. Over the past few weeks... its been like that movie, "Groundhog Day" with Bill Murray. Seems like I'm repeating myself day after day after day... A lot of trimming and gluing of the pieces on the turtledeck. Which reminds me of making the ribs for the wings... repeating myself day after day after day.
Tomorrow I'll be cleaning up the glue joint between the two pieces of upper ply then moving on to something else...
September 5, 2013 The final hours...
Started blending the scallop points of the ply transition into the stringers for a smoooooth transition. Saw a few areas that needed building up so I mixed some fine sawdust and T-88 together and made the fills.
Moved on to the back of the stringers and set them all in position AGAIN... left it at that. Need to go back and make sure they look the same on both sides (distances and curves) then drill for permanent attaching. Looks like there aren't too many hours left on the turtledeck build.
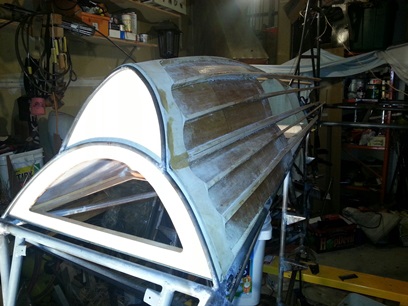
Here's a shot from tonight showing the ply transition... not much different than several weeks ago.
oh... just ordered up some System Three Clear Coat. Goes on more like varnish than glue. I'll be using that on the ply transition.
September 9, 2013 So many lines...
too many choices.
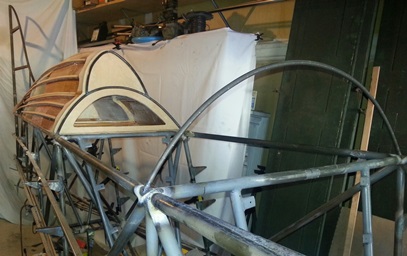
With about 230 hours building this turtledeck... you know I've been taking my time with it. Looking at it tonight... ya wouldn't think so.
There's practically no straight line on the turtledeck. All my doing... wanting it to look a certain way.
Curving up. Curving down. Stringers getting thick. Stringers getting thin. Thinking now...is anything wrong ? is anything right ? What to change ? What to keep ? I thought I had this all figured out and kept a straight course when making the turtledeck, and checking it along the way.
After looking at it for over an hour I think I might have it figured out... the two upper stringers, the double-stringer and the lower stringer look right... it's the second one from the bottom that has a curve that I wasn't happy with. I'll either need to repostion where it ends at the tail cone (thus changing the curve to a better look) or I'll need to cut off that stringer just behind the baggage compartment and splice in another stringer that will give me the "right" shape. If I choose the first idea, I'll need to cut-off and weld on new stands-offs for those two stringers.
Looking at those two photos above... am I being too anal or working towards excellence ??? Looking REAL close I can see the areas that I'm questioning now.
Just came back from looking at the turtledeck again. The stringer that is one up from the bottom looks like it should have a continous curve to it... not the curve then straight look that I was shooting for when I envisioned it in my wittle head. Since I can make the reajustment with what I have... I'll try doing that first. If that doesn't do the trick I'll buy a few more pieces of 5/16inch cap strip and try plan "B". And if that doesn't work...
October 1, 2013 They're glued...
for the re-do.
260 hours on the turtledeck and I'm still not finished it. I'm kind of proud of that too !!!
Received the additional cap strips for the stringers on the re-do on the turtledeck (as noted earlier... I wasn't happy with the look of the stringers coming off the ass-end of the baggage area of the turtledeck.
I'm leaving an over-hang on the stringers that I am laying up for a nice large glue joint to glue them onto the baggage area. I'll first cut the top half of the existing stringer off the back-end of the baggage area. It'll be a lot easier to understand once I get into it and take a few photos of the job in progress.
Tonight I glued these puppies up. (You can't see them under the wood and weights though ! duhhhh !!!) Ahhhh... can you say 2point1 hours ? Just a few weights, eh ?
October 2 and 7, 2013 Close to stopping...
the madness.
Went away for the weekend... went to see "The Head of the Ohio" rowing/shell race with Andrea. We were there cheering on her daughter who is on the rowing team of the University of Pittsburgh. A third place finish... WAY TO GO PITTSBURGH !!!
Okay... so I'm back at work on the turtledeck. Yeah... again. The stringers are all glued up and I've got to start notching the ends off the existing ones so that I can fit the new ones up and glue them into place. I've got to stop the madness soon !!!
The only way to re-do something that you've taken HOURS of time doing is to take.... it.... slow.... And that's what I did. OnePointOne hours and I have one ready for gluing up.
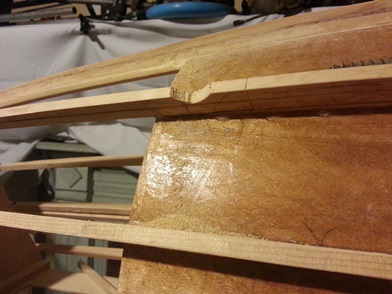
Using a rasp file to cut most of the stringer off.
A close cut with the rasp file.
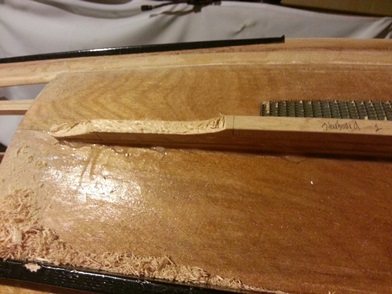
Cleaning it up with a chisel.
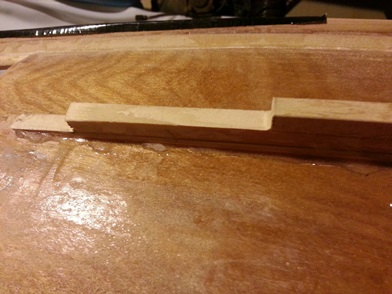
Ready for the stringer.
Ready to be glued up.
October 8, 2013 Repeat and...
insert...
Check another stringer off the list of "still need to cut and notch." All I need to do is glue it.
Repeat of the first four photos about, then insert the following photo:
October 14, 2013 One more...
time.
Another turtledeck stringer cut, chopped, notched, filed and in place !
October 15, 2013 Another more...
time.
Still... another turtledeck stringer cut, chopped, notched, filed and in place !
October 21, 2013 and Another more...
time.
no big deal... it's just another turtledeck stringer cut, chopped, notched, filed and in place ! It's on the port side, though.
October
22, 2013 One more...
time.
And another turtledeck stringer cut, chopped, notched, filed
and in place ! It's on the port side, too.
October
24, 2013 Breaking records
? Broken records ?
no...
sounding like a broken record !!!
Another turtledeck stringer cut, chopped, notched, filed and
in place !
November
6, 2013 Broken ?
now
fixed !
Hey All ! I've been working on the biplane over the past few
days... Just haven't been posting ANY updates !
All of the existing turtledeck stringers have been cut off
and the new ones are ready to be glued on (in onesies and
twosies). It will take a few nights of gluing these on before
I am ready to start notching them for the tailcone... OR,
maybe I should notch them NOW ? Probably NOW!
Tonight I glued on the first two replacement stringers. Glued
them up before remembering to notch for the tailcone. Thinking
now... I'll wait until after they're glue to make sure that
I have a tight, clean fit. On my way to finishing up the turtledeck.
November
11, 2013 A few more days...
a
few more stringers re-done.
Yeah... a few more days and a few more stringers re-done,
re-placed. Not much to write about other than I only have
one more set to go. WooHoo.. we'll see what it looks like
after gluing up that last set...
November
14 and 15, 2013 Finally back...
to
tweaking.
Back to tweaking the look of the new stringers... seeing
how they flow down the length of the fuselage. Figuring out
the contact points with the turtledeck so that I can begin
gluing on the saddle gussets.
I'm thinking, but not sure (yeah right), that I need to cut
the back metal formers off to re-do them. In the meantime
I'll just fight with them... hoping they'll work.
As a side note: I screwed up my right ankle and it has slowed
me down... hasn't stopped me, but scooting between the fuselage
and other obstacles in the garage work shop is slow at best.
November
17, 2013 Moving forward...
not
so much...
Decided that I wasn't happy with the lower two stringer re-do's
on each side. Tried sanding the juncture where the scarfed
in cap strip met the original cap strip... it wasn't working
and I'm wise enough now to know that nothing I do with it
will get it to where I'll be happy with it. Sooooooooooooooo...
I'll be re-doing those re-dos. I'll be scarfing in the stringers
at the VERY forward edge of the stringer so that they will
have a natural and consistent bend the entire length.
My re-do on the upper two worked great! Not so much on the
the lower too.
Ordered the additional cap strips to do the job... two more
times (just in case the re-do of the re-do needs to be re-done
!)
March
25, 2014 Just a test fit...
but
it's looking good...
Back on the turledeck... finally !!!
It's been so long since I've worked on these that I can't
remember why I stopped for so long. I'm thinking I knew I
needed to get the horizontal stabs on so that I could figure
out the tail-end of the turtledeck... me thinks.
I discovered an obvious since putting it back on with the
horz stabs finished... I don't really need the tail-end cap
that I put so much time in to. The horz stab and elevators
pretty much fill up all but a few inches of that area. I'm
thinking that the fabric will curve/blend from the rear-most
stringers into the tail-post. I'm almost positive it will.
So... I'm figuring out where I need to end a few of the upper
stringers before I cut the bottom two stringers off each side
(the ones that I wasn't happy with and the ones that I mentioned
in the post above) to replace them. I also need to sand/trim
the back-end of the turtledeck's spine... needing to shave
off about 1/4inch. I start sanding/trimming that center spine
but stepped back and start admiring the look of the turtledeck
with the vertical and horizontals stabs in place.
She's looking pretty good...
March
26, 2014 It just seems
to get easier and easier...
Back to cutting, or should I say chiseling, off the lower
stringers on both the port and starboard sides of the turtledeck.
I've been here before, twice before.
It seems like the more time you put into the project, at least
for me, the easier it is to take the time to re-do a part.
Also, in the beginning, I tried "fixing" something that was
screwed up, or not up to par, trying to save the hours that
I had already put into the piece. I only put more time in
on it because of the time I tried fixing the piece and then
deciding that the "fix" wasn't going to work so I'd start
from scratch again...
That brings me to the task at hand; taking off the four stringers
that I'm not happy with. Tonight I took as much off as I dare
take off with the chisel... now all I need to do is sand the
left-over pieces of the stringers down to the shell and then
glue the new ones on.
Once I've glued those into place, and am happy with them,
I'll re-fabricate the tail-end cap. Looking at that area again
last night I see that I need to have some structure around
the area where the horizontal stabs and elevators connect
to the fuselage so that I can attach an inspection/cover plate.
I have a few ideas...
Second set of stringers removed for re-do.
March
27, 2014 I'm done with
easier...
Sanding and notching... more sanding and notching... and still
more sanding...
A little over two hours and I'm just about ready to notch
the stringers to glue these puppies on. If this doesn't look
goood I think I may just do the turtledeck as a solid shell.
280 hours on the turtledeck... is way too much time to be
spending on it !
As of right now it's looking good.
March
29, 2014 My only thought...
"Years
from now..."
Now I've done it... made additional work for myself. (at
least I'm learning... I think).
Back to work on the turtledeck stringers; cleaning up the
notches and starting to notch the stringers themselves. As
I'm working at notching the first stringer... I'm looking
at the new stringer as I'm holding it up to the notched stringer
on the turtledeck. It's looking okay, but what if the transition
isn't as smooth as it needs to be. What if it turns out to
be "good enough". And we all know... good enough isn't good
enough.
There's only one thing to do... take the front transition
ply off and take the stringers all the way off. But wait...
that wasn't my first thought. I was thinking, maybe, just
maybe I can chisel the stringers off from underneath of the
transition ply, thus saving me from having to re-make the
them. So, of course I tried out my theory of saving time.
The first one I worked on was coming off, but not quite the
way I wanted it too. The point of the transition ply got a
little messed up, but nothing that a little filler couldn't
fix. I could get quite a bit of the stringer chiseled out
but the remaining stringer was all splintered and that's going
to take some time to smooth out... The more that I worked
on it the more I thought... when someone goes to rebuild it
yearrrs from now they'll see that crappy work I did underneath
the transition ply and not know why it looks so crappy. so...
There's only one thing to do... take the front transition
ply off and take the stringers all the way off. I'll need
to make new transition ply, but eh, easy enough. I've been
there before.
Close to two hour of work and I'm ready to attach the four
stringers and cut those new pieces of transition ply.
March 31, 2014 Almost...
again...
Close to having this turtledeck finished ??? I think !!!
Glued on the first set of stringers. Been here done this... before. One more set to go then it's making and gluing on the transition ply.
The toughest part of my session tonight was finding a pencil to mark both stringers for the "glue up to" marks.
April 1, 2014 Getting real close to...
Almost again...
I'm not going to say it again... but I'll write it !!! I'm close to having this turtledeck finished !!!
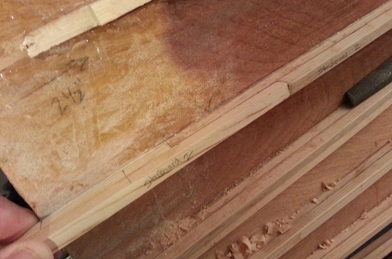
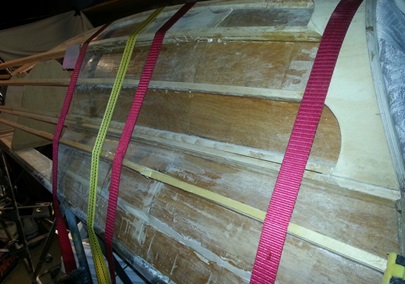
Glued on the second set of stringers. Need to let them set overnight before I can begin fitting up the transition ply. Spent quite a bit of time, after gluing on the stringers, looking for the old transition ply patterns. I can remember seeing them not long ago and thinking "I should just throw these away... I'll never need these again." But, I think I still kept them. Just can't find them.
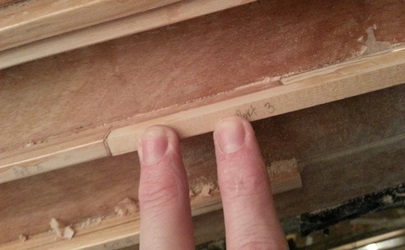
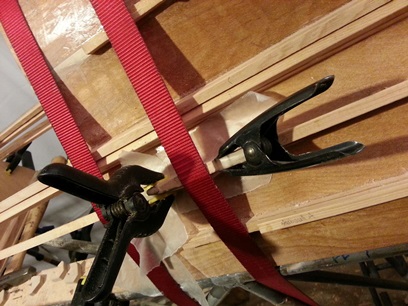
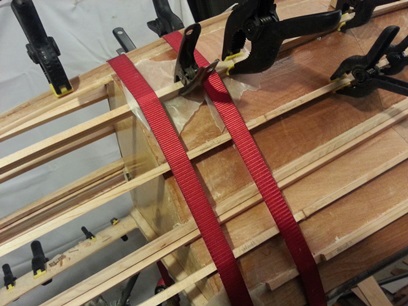
Took what was left of both the old lower transition plys and used the best one to make the new pattern on a piece of white display board. Kinda-sorta held it in place to get a feel if this will do and it looks like it will. The straps and clamps are holding down the remaining stringers so I can't get a difinitive on it right now.
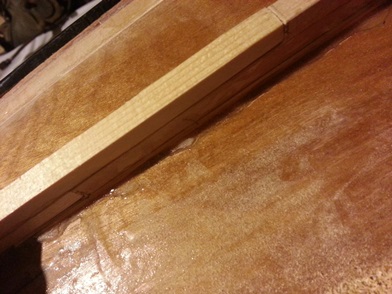
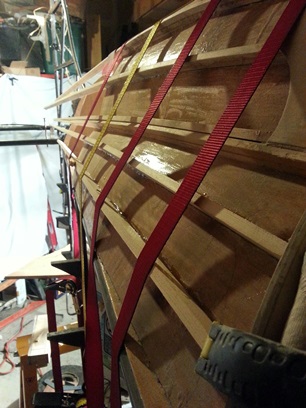
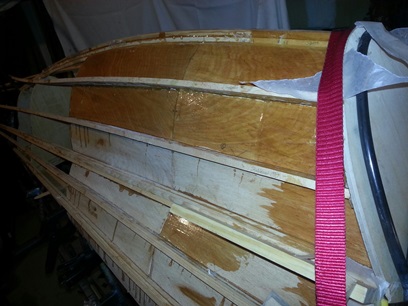
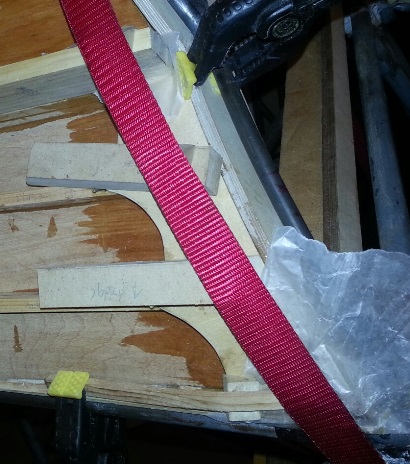
Here's one of the two remaining stringers clamped and waiting for the glue to dry.


 260 hours on the turtledeck and I'm still not finished it. I'm kind of proud of that too !!!