Mantua, New Jersey
Original Site:
September 2004
E-mail: usav8or@yahoo.com
The Radical Radial Turtledeck.
June 4, 2013 I knew it would...
and it did.
It was a little tedious tonight working on notching the forward notches for the spanning supports on the turtledeck. A few odd angles and hard to see spots made for a few hours...
I started out cutting quick using the cut-off tool on the Dremel then with a quick switch from the cut-off saw to a routing tool. "WHOOOA !!!... slow dow feller..." Push it too fast and I'll be taking off wood that I shouldn't be taking off. Caught myself before going that far.
Alot of trips up and down the steps for cutting and notching. Once I got the notches notched it was a few trips up and down the steps to get the cuts on the 1/4inch spanning cap strips.
If there was one thing that would have made this easier, it would have been to have a few VERY small chisels. It would have been a lot cleaner looking. Instead, I used a few of the VERY small diamond files that I have.
After notching and fitting the port side I made the saddle gusset patterns for the rear baggage compartment former. You can see where I left the spanning supports a little long so that I can glue the gussets into position and cut to size.
June 5, 2013 BRILLIANT !!!...
It's 6:54AM and I just thought of something... I don't have a small chisel... but why can't I make a make-shift one out of a scrap piece of 4130 ??? Eh ?
June 5, 2013 It was a waste of time...
Tried making a quick little chisel... it was a POS ! Went back to the way I cut the first two notches.
soooo.... by the end of the night I had the two additional notches cut out of the turtledeck bulkhead. Looking at them now, it doesn't look like a lot of area where the spanning supports meet the bulkhead. I'll be making a few saddle gussets for these too.
oh yeah... cut and fitted up the saddle gussets for the rear former of the baggage compartment.
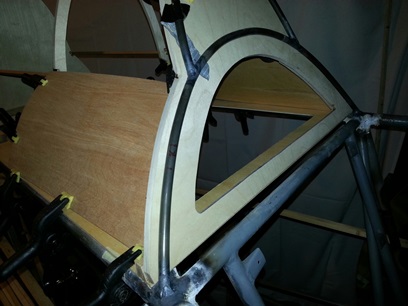
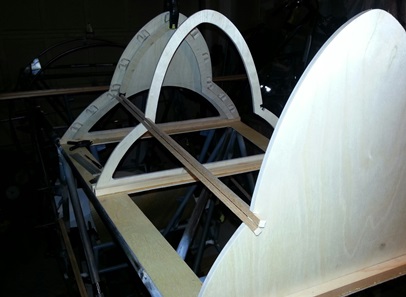
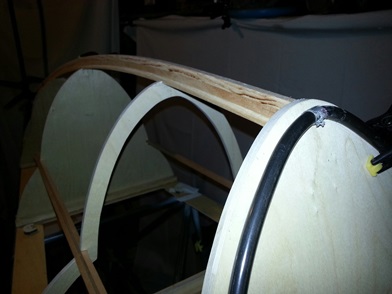
Spanning supports fitted up !
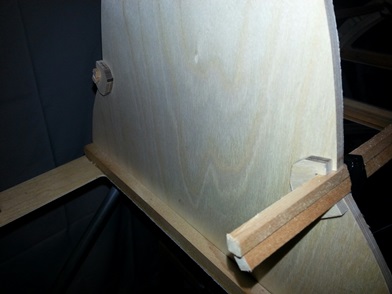
Back-side of rear former showing saddle gussets.
1/4inch cap strips need trimming.
June 6, 2013 The Right Stuff... the right tool.
Stopped by the Home Depot on the way home tonight to pick up a nice 1/4inch chisel. backing up a few... I looked on line for a nice chisel. A nice chisel on line cost about $40.00 and it's from either Germany or England. Found a really nice one at the Home Depot for $8.95 and it's made in the good ol' USofA.
just a thought...
I think the chisel is probably my favorite hand tool. It's used by craftsman for fine detail work. (the router would be my choice for a power tool).
Used the brand-spankin'-new chisel to clean up the four notches that I had made in the forward bulkhead for the baggage area. Had them cleaned up and made them a 1/3 deeper in no time... Nice to have the right tool for the job.
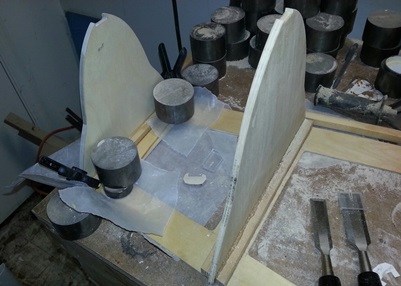
Needed to make the saddle gussets for the forward attach points for the spanning supports (for the plywood covering of the turtledeck). Had the basic pattern drawn up for both of them on 1/4inch ply... just needed to cut out and file and sand to the right shape. Cut both of them out in record time. And they's lookin' nice...
Test fitted the starboard gusset up with the 1/4inch cap strip spanning supports and saw I didn't allow for the angle (forward to back). Needed to re-make both. BUT, before cutting the notches that would support the cap strips, I'd need to mark the correct angle and then use that BRAND-Spankin'-NEW chisel to notch the angles into the saddle gussets. It was pretty tedious, but I loved working with the wood. Haven't done that for awhile now. At least not on the biplane.
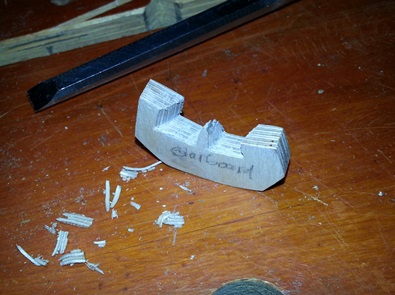
After close to three hours I had one cut to shape and notched... and it's damn close to what I need. There's a little bit more space on one side of one of the notched openings than I'd like... I'll make the second one to see how close I can get to achieving a bit of "Excellence". Depending on how the second one turns out, I just may re-do the first one.
Even though I spent close to three hours making this piece... it saved a lot of time by being able to make it correctly the first time. Not a bad looking piece either.
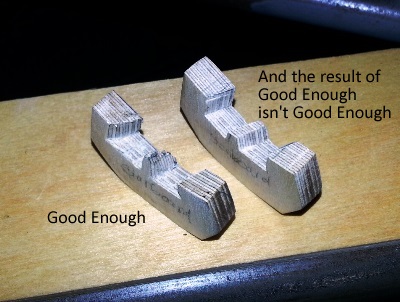
Here's tonight's three hours of work...
June 7, 2013 Good Enough wasn't Good Enough...
do ya really think I wouldn't ???
With all the time and effort you put into a project like this... would you really try and scimp on doing your best just because it'll add another hour or two onto the total ??? Really ???
Above is a shot of what I ended up with last night and the little extra bit of effort that I put into it today. A WORLD of difference between the two.
Would the first one be okay ? sure... Was it the best that I could do ? nope...
Okay... an hour down and on to the next spanning support saddle gusset. Did the same thing as I did last night and just this previous hour: made a test piece (it was part of the plan this time) and then moved on to seeing how that fit and made adjustments for the second. Between making the first cut on the test piece and the final cut on the finished piece... there was a lot of up and down the stairs (fuselage to bandsaw to the workbench and back again).
lookie... lookie...
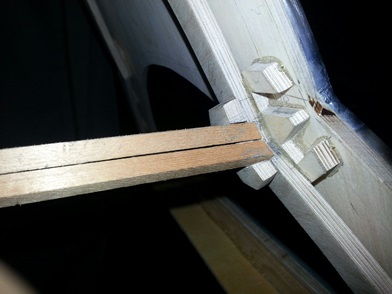
Less than a 1/16inch difference in the gap/space between the port and starboard spanning supports and in these photos it looks like the Grand Canyon. Not sure if that's an optical illusion or what... DAMN !
Starboard side.
Port side.
by the way... I went back to the Home Depot and picked up a nice set of those chisels; 1/2inch, 3/4inch and 1inch. nice...
June 6th... I'm looking at those angled saddle gussets for the stringers... I don't even need to use those saddle gussets. They were going to be used if I didn't have the ply covering the baggage area...
DAMN !!! now it's going to look like I didn't know what I was doing... Guess that's what happens when you're working things through when you're actually building it.
June 8, 2013 Giving the biplane...
a backbone !!!
Saw a box turtle running with the pup this morning. It was on the side of the road trying to climb a 6inch curb. Stopped... and put it about 10ft in the woods, not far from a stream... if it decided to walk down to it. (just relating a turtle story in my blog about the turtledeck)
Maybe some of that good karma will pass my way... paying it forward.
the biplane...
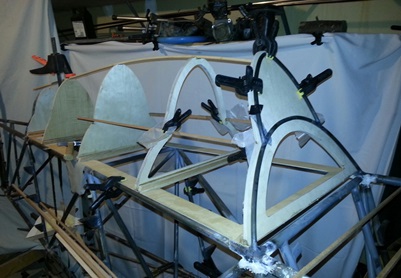
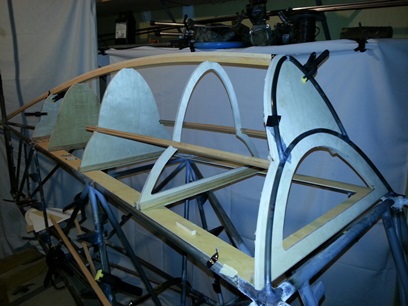
With the spanning supports all set and ready for glueing, I needed to do a little work on the spine... aka the backbone of the turtledeck.
Notched and then fitted the front of the spine into the bulkhead. I then proceeded to notch the tops of the remaining formers to allow 1/8inch of the 1/4inch x 3/4inch spine(wood) to nest into the tops; the 1/4inch being the depth.
Marked the spine so that I can put a gradual edge on it to allow a contact/glueing point similar to what I made for the spanning supports. Basically I'm supporting the top edge of the upper curved ply.
A little over 3hours today and I'm getting closer. (to tell you the truth... it doesn't look much different now that when I originally mocked it up)
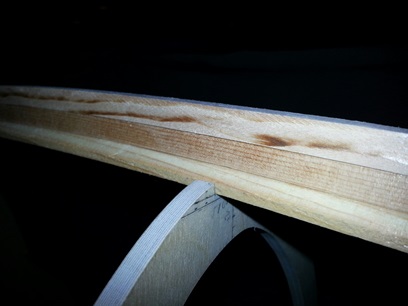
Went back out to the garage work area, picked up the spine and headed down to the basement to put the angled edges on it. About an hour later I had it finished.
Shot showing angled spine and stacked stringer.
Another view... from the cockpit.
June 9, 2013 I'm a real block head...
and me and my cheesy headlines !!!
The supporting blocks for the turtledeck formers need to be trimmed down. Right now they are squared off and... at the ends they need to follow the shape of the formers (which are angled).
I started working on them by hand, with a file, even though I want a better way of doing it. I'm thinking I need some time of jig that I can clamp into place and then I can file or sand these down pretty quick... all at the same angle.
As stated before... I started with this project even before I made a jig (still thinking of what kind or what it will look like)... the result, I lifted some of the wood, with the file, on the support block I was working on. That stopped me dead in my tracks !!!... I needed to glue that block and figure out jig for the other six blocks before doing anymore with it.
June 10, 2013 At a turtle's pace...
but that's the pace to go.
More work on the turtledeck... surprised, eh ?
It's time for the ply covering. Made a quick jig for cutting the angles on the former blocks that I started yesterday. With the former blocks trimmed I needed to start fitting up patterns for the plywood covering.
While I was fitting up the first display board pattern I discovered that I needed to make the baggage compartment plywood covering in eight pieces... the front and back for the top and bottom, port and starboard sides. A little bit more work than what I thought I would be doing, but the display board wasn't laying flat in the multiple bends that I wanted it to do, I could only image what the 1/16inch ply would, or should I say wouldn't, want to do. With this decision made, I also forced myself into making the center former of the baggage comparment another 1/4inch thick so that I would have enough edge to glue up both the front and back pieces of ply. I'm thinking 1/8inch isn't all that much for a good glue joint.
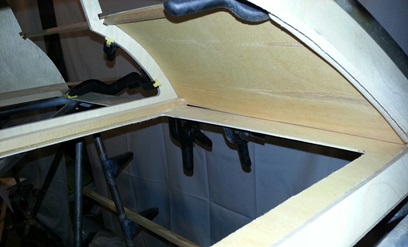
fitting the ply...
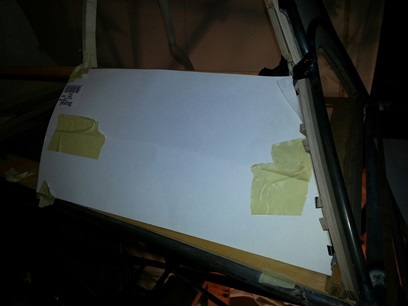
It's a slow process but one that needs to be done... step... by... step; piecing together a paper pattern then making a ply test pattern before making the actual piece, or pieces. (ignore the water stains on the ply... they're just test pieces and I used some ply that got a little water damage)
If you look close at the forward ply piece below you'll see that the ply is in 5/8inch from the side of the base. This is to allow for the thickness of the stringer.
Pattern being made for starboard side.
Ply test piece. Needs just one little tweak.
Rear, starboard test ply piece.
June 11, 2013 Even at a turtle's pace...
a lot of time... gets a lot accomplished.
Worked from home today. MAN... are there a lot of hours in the day when you don't need to commute 1 1/2 to 2 hours EACH way... had plenty of time to run the pup before starting the day, put in an hour on the project for my lunch time meal AND started up on the project again at about 5:30. It's only 7:21PM and hell, I've already put in three point two hours on it today. At that pace I could easily clock in over 100 hours a month on it !!!
But sadly... that's not to be. But HELL... I got to do it today !!! and that's a great thing, right ? ? ? right ?
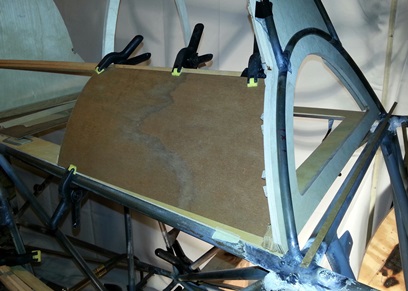
I'm happy to announce that I've cut and fitted the first final ply pieces on the turtledeck. The frame for the turtledeck needs a slight tweak... but other than that... they's lookin' good. Tomorrow I'll cut and fit the two back, lower pieces... and so on and so forth.
Before cutting and fitting those two back pieces I needed to make that doubler for the former I've been talking about: the one that the front end of the rear ply pieces will glue to (now that I'm making the turtledeck cover in front and back halves.)
Other than a little bit of time clearing the sawdust and crap off my work table in the basement work area, making that piece was cinch... wait, wait-wait-wait, cutting the blank out of the 1/4inch plywood I had was a pain in the arse. There's just no room to flip or flop that piece to get a cut on the bandsaw. Finally thought of using my jigsaw (DUH !!!) and made short work of it. After that it was just a matter of tacking the ply blank to the existing former I had in that place and route away ! After routing I took it out to the fuselage to mark where I needed to cut it (just above the former block) so that I would be able to glue it onto the exisiting former before placing that former in the former block to glue it in position. (makin' any sense here???)
Here are a few photos from today:
First piece of final ply fitted.
Another angle of same piece of final ply.
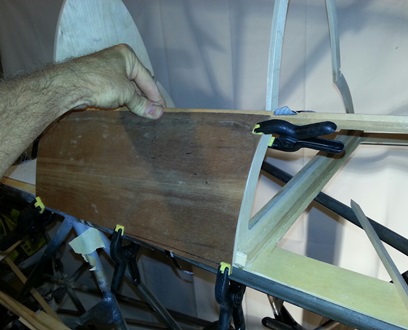
Inside view of the port side final ply.
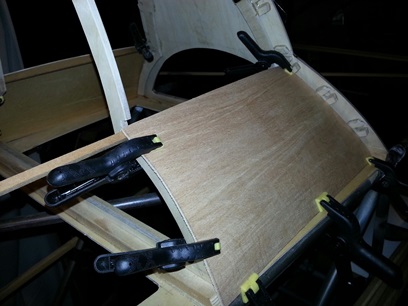
The former doubler.
June 12, 2013 Basically the same as yesterday.
With that said...
You guessed it... more work on the turtledeck. Cut and loosely fitted up the lower back ply pieces. I left overhangs... room for trimming. Also... once I lock the forward pieces into place I'll make any corrections I need to make in order for them to be flush with each other.
With that said, I need to start glueing things up so that they're locked into position so I can make sure all this measuring and cutting isn't in vain.
With that said, I mixed up a batch of snap-crackle-pop glue. The former doubler was sitting in front of me so, hell, I glued those pieces together... Walked out into the garage work area and the first thing I saw was the turtledeck bulk head so, hell, I glued that onto the turtledeck base... Next thing I saw was the third former so, hell, I glued that onto the turtledeck base. Next thing I saw was the rear former so. hell... wait ! I'm outta glue ! Guess that'll wait until tomorrow.
June 13, 2013 Stepping back...
to view the turtledeck and...
to make a few "changes".
Not sure what made me think of it again, but I thought of the horizontal stabs and their attach points. Hell, it's been so long, maybe I never thought of them to begin with... at least you would think by the placement of the rear of the turtledeck. It's TOO far back. The back edge is RIGHT at the center line where the forward attach point of the horizontal stab is.
Not a problem, but now I need to cut down the length of the turtledeck and it now doesn't have that 2inch lip all around the perimiter of the base. I'll get over it, but it just gauls me... my own fault... but still. I'll do an over lamination in that area to give the same width border. I'll know... you'll know... but ya won't see it when it's covered.
Spent the better part of tonight thinking of how I was going to work through this. Thoughts came to mind that, "Hell, it shouldn't be a problem if I move the stab back an inch or so..." and "Having the stab back a little more will give me better pitch stability." To all that... "Yeah, Right." Without going into detail, the forward horizontal stab attach points must be at station 137.o
"So suck it up, Jer... get the project moving forward again."
Why I didn't think of this yesterday, before I glued two of the formers in place... I'll never know. My accomplishments tonight... make the decision to do it the right way (as if there was any other) and cut the back-end off of the turtledeck. That's it ! I had plans for doing sooooo much more.
June 14, 2013 In the light of a new day...
I realize I was blazing new trails...
One day makes a world of difference. Yesterday... all the previous work that had been done on the turtledeck, leading up to having to make those few "corrections." I was a little peeved to say the least. Tonight... well, actually today, I thought it through and came up with my plan.
Actually, I had a clue as to what I was doing when I cut off the back-end of the turtledeck last night.
The Plan:
1. Cut back-end of turtledeck off.
2. Cut and fit new former block.
3. Cut and fit over-lay ply in front of back former block.
4. Above over-lay will beef up area that I took all that ply out of.
5. Re-make the back former to fit wider width. Also a little taller.
Tonight I checked off a few of the above list.
1. Cut the back-end off yesterday.
2. Cut, fit and glued into place the former block.
3. Glued in two additional formers.
4. Re-sized and cut rear former.
5. Cut and fitted over-lay ply.
Last night, lying in bed, I was a little confused. My head is usually filled with thinking things through... working out soemthing that I need to do on the biplane. Last night... I had no thoughts. It was an odd feeling. I guess, unsure of what to do next... or maybe, just pissed that it came to this point of building the turtledeck before realizing a change needed to be made.
Guess that's what happens when you're blazing new trails.
June 15, 2013 thin, thin, thin... ???...
or thin, thick, thin... ???
Saturday... and it was late afternoon by the time I got to work on the project. Another project, re-doing the deck with this new "armor" coating, took a lot longer than I had expected. A LOT LONGER.
I went down to the basement work area and needed to do a major cleaning. Got 3/4 of the way through the cleaning and just started working on the turtledeck (Note: I always write down the time I start and the time I stop.).
I looked at the third wood former, the one I just glued in last night, and it looked a bit odd; just didn't look like the others. In the back of my head I knew that Finnish Birch was quite a bit different than the other (USA?) Birch.
I needed to do one of two things:
1. Confirm that this was the "other" Birch.
2. Cut the damn thing out of there and cut, fit and glue in a new one.
I pondered this for a while... not sure why I pondered the issue... but I did. After the "a while" I took one of the ribs off the wall. Took a look at the nose rib and saw that it had the same thicknesses (wurd?) of layers as the one used for that former. On the Finnish Birch you have quite a few layers of thin wood. On the other type you have both thin and thick layers (thin, thick, thin, thick, thin). On the Finnish.... it's just thin, thin, thin, thin...
Okay... past that hurdle and on to the next thing on the list of things to do; glue in the rear and final wood former and the ply that goes in front of it. Clamped the former into place and... the notch was about an 1/8inch too far to the one side. I could still use this one OR cut and fit a new rear former with the correct placed notch in it. I choose the "cut and fit a new rear former with the correct placed notch in it" answer.
After making the new former... I finished glueing and weighing down said pieces... knowing that I had spent more than an hour and a half looking at and working on the project... but put down 1.5hrs just the same. (as a side... I wonder if that guy that puts down his time for picking up tools and material... puts down all the time that he thinks about the project ???)
June 16, 2013 Time to..
lock it up...
Time to start gluing up all these pieces I've been cutting and fitting and re-making and fitting...
It's the step I need to take before I can make the final fit of the front ply pieces. I need to make sure that all the pieces of this puzzle are locked into place before making any more final cuts.
I was about ready to glue in the spine and discovered that the angled edges (where the upper ply pieces will be glued to) were still a little high. Used one of the new chisels I bought to cut a more extreme angle on each side of the spine. With that finished it was time to lock the front portion of it into position and start to glue up the spanning supports.
A little over two hours and here is what I have.
June 17, 2013 Ditto..
Basically the same thing as yesterday, but with a few different pieces. Other than the placement of the clamps... it's the same photo as above.
Glued up the spine on the third former and glued in the upper spanning supports. Another night or two of this and all the pieces should be glued together ready to accept the stringers.
Sat and pondered the area just behind the turtledeck for a while tonight...
June 18, 2013 Ditto.. on the ditto and DAMN !!!
Basically the same thing as yesterday, but with a few different pieces.
I feel like I'm repeating myself.
A side note:
Tonight was the first night in a long time that I actually stood back and took a look at the complete project. Damn... I say... DAMN !!! There's a lot of work in them thar pieces !
Another side note:
I get my head wrapped so much around one piece of the puzzle that it's hard for me to multi-task; aka... continue work on the upper wing center section at the same time.
I'm gonna try... but I ain't promising anything.
June 23, 2013 away for a few days... DAMN !!!
Out to corporate for a sales meeting over the past four days... took away some time spent on the build. Back today... mid-afternoon.
Made a point on doing as much as I could on it today. It wasn't much more that adding the saddle gussets to the forward attach points of the spanning supports... cut the excess off the spanning supports and sand them flush... add a filler into the front end of the spine (moved on me when it glued up).
Those saddle gussets needed more tweaking and the area where they were to be glued needed to be cleaned up from the excess glue when I glued the spanning supports in.
oh yeah... trimmed down the back wood formers so that they are now even with the sides of the base.
Tomorrow I can fit the ply on the bottom front areas to get a mark for gluing in the base corner blocks for those areas and the angle that they need to be. Get those locked in and the ply goes on.


 It's time for the ply covering. Made a quick jig for cutting the angles on the former blocks that I started yesterday. With the former blocks trimmed I needed to start fitting up patterns for the plywood covering.