Mantua, New Jersey
Original Site:
September 2004
E-mail: usav8or@yahoo.com
The round thing you need when Earth Bound
aka The Tail Wheel...
May 28, 2014 A closer look...
at that little donut on the back...
Time to get this frame up off of the saw horses !!!
I've read quite a few posts on the Biplane Forum about the geometry of the tail wheel... but nothing on why three leaf springs over two leaf springs, or the length of the springs, or or or...
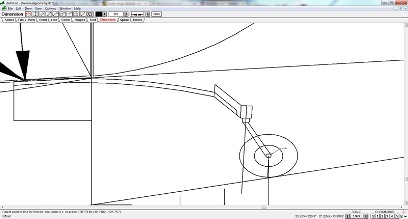
It took me a little over an hour to get the fuselage set up with one main gear attached to it and angled to 11.5degrees. At this angle the bottom of the tail post sits 16" off the ground. Once I got the measurement I drew up my tail wheel on DeltaCAD so that I could then begin to play around with what I needed for leaf springs.
A few questions I threw out to the group were:
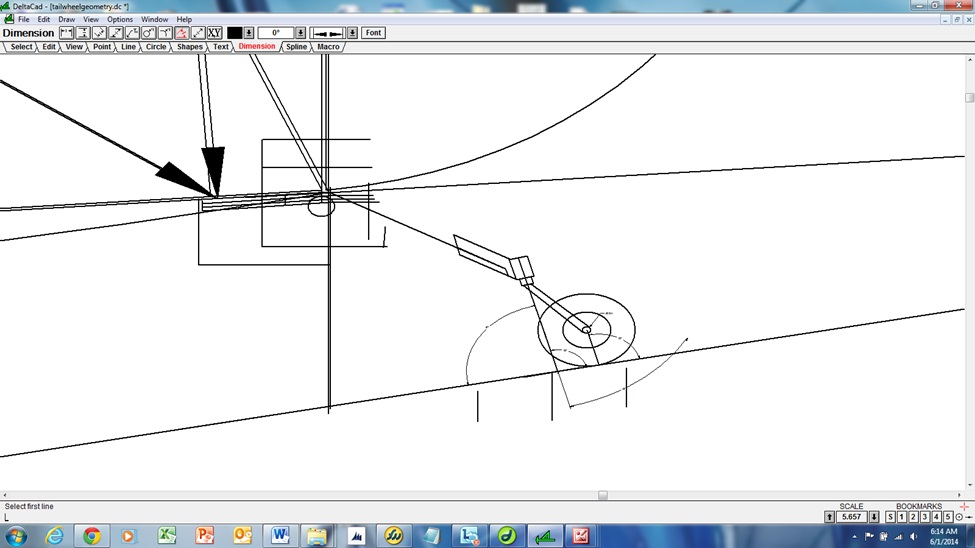
1. How far back should the tail wheel be from the tail post? Is further back better than closer? The image below shows the tail wheel 12" and 16" behind the tail post.
2. Leaf springs... is there some logic as to how many leaf springs to use? I generally see three stacked.
3. Right now, at 11.5 degrees, the bottom of the tail post is 16" off the ground. Is 11.5 degrees a good angle to have in the three point... or more or less?
Another question I just thought of was... "What set-up do most Skybolts have?" and... "Is there something stock and standard that I can buy?"
I've received a few responses to my questions. I'll need to do some study on the references that they shared; engineering data for leaf springs and a reference to 14 CFR 23.497. (just looked at the engineering data on leaf springs... a little bit more involved that what I would like to figure). I'll wait to see if I get any more responses.
Here is what I drew up on DeltaCAD to help me understand what goes where...
May 30, 2014 Survey...
says.
Looks like the better tail wheel set-up is the stringer-type of leaf spring. It gives you more moment and doesn't have any tendency to shimmy... at least this is what others have reported.
With that said, I'll still be doing mine with the old style leaf springs; the ones that are flat. The consensus shows that three leafs support the weight of the tail without it allowing the rudder to slam down into it or the ground. AND from the photos that have been posted, it looks like 8inches behind the tail post is the place most tail wheels are being located.
May 31, 2014 The shopping cart
theory.
Up early Saturday morning... to let out the pup (not sure why he's always wanting to get up at 5:30 in the morning any more.
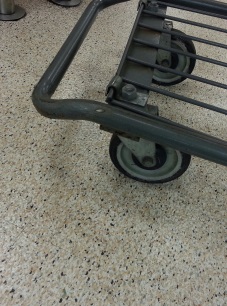
Made a cup of coffee and sat down to try and get my head around this tail wheel. Kevin says... keep it a little positive so when weight is placed on it the King Pin is vertical. The more forward the King Pin the harder it is to turn; Neil likened it to a shopping cart... if the cart's wheel is bent so that it is trailing the cart is hard to turn. If the cart's wheel is bent forward it shimmies.
Took a look on the internet for photos of Pitts Specials and the angle of their tail wheel King Pins. Answer is: no conclusive evdience of any one angle. UGH !
Okay... based on the informtaion that I have, I'll have the King Pin forward slightly so that when weight is on it it still tilts forward slightly. This force will keep it straight unless a certain amount of force is applied otherwise.
Final config ? Axle trails vertical tail post 14inches.
Wheel touches ground 14.65inches behind vertical tail post.
Worked on the biplane for just shy of 5hours today. Started off wanting to finish the tail wheel puzzle. Decided that I just need to have the leaf springs made and give it a try. Looks like I'll need three springs. Each 1/2inch thick and 1 3/4inch wide.
Now where do I get the springs made ??? Asked George (Gardler) where they use to get their stuff done for the farm and he gave me the name a of a place in Pole Tavern Circle. My brother John saw the post on facebook and gave me the name of Triangle Spring... somewhere in New Jersey. I'll have to look them both up. Get these leafs made so I can get done with it.
Since working on the tail wheel turned out to be a no-no... I worked on getting the torque tube aligned, tacked and welded into place. Followed up with finish welding a few welds I left until I could turn the fuselage on it's side and back.
June 1, 2014
Just read this article on the EAA web site... Tail Wheel Installations, by Tony B. Great article... as always.
It says that the ideal size of the tail leaf spring is 1 1/2inches wide x 3/16inch thick.
June 3, 2014 Colorado springs...
and we ain't talkin' 'bout Coors Light !!!
In a round about way I came up with a source for making a custom tail leaf set-up.
It started with my latest photo search on Bing. Not sure what the search words were, but I found a tail wheel set-up which took me to Eric Newton's Miss'ippi Mudbug Bearhawk site. I emailed Eric asking where he got his tail wheel leaf springs. At the same time I took a look on the Bearhawk web site and saw the set for sale on the site. Sent an email to them asking about the tail leaf springs. Got an email from both Eric and Mark Goldberg at the same time.
Eric pointed me to the Bearhawk Aircraft site and Mark answered saying, yes, the springs are 1 1/2inches wide. Said it would be a roll of the dice if they were the set up that I needed (I'm thinking that I could always re-bend them to my liking). I responded asking if he could take a measurement on the lengths of the arms on it and the radius of the bend. He said he expects a new batch in within the next two weeks and to give a call at that time. Then I repsonded with... sounds good and oh, by the way, if you could have your vendor do a "custom" leaf spring for me I'd be more than happy to buy it from you. Then he responded with... I'll give them a call to see if they will sell retail also. Sent me an email this morning with the name and number of the place to call.
Called Bill... had a real good conversation with. He asked me to send him the blue prints for it and he would get back to me with a price. He said it would be $85.00 to set up the file, plus the cost of the springs. Sounded good to me... they have the width and thickness I need and they understand the airplane side of things. I'll let you know what I hear from Bill.
more to come....
August 16, 2014 Putting...
the cart before the horse.
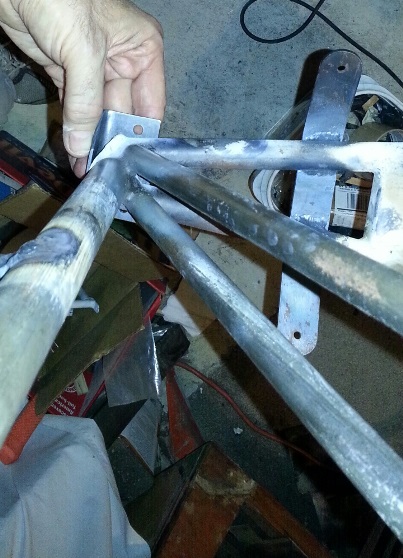
okay... the first set of springs come in... about a month ago. They looked beautiful. Went to mount them to the tail wheel... and they're too wide. What the hell is going on here ??? I triple-checked these things.
I received the new ones VIA UPS on Friday... I made sure that these were the correct 1 1/2" wide size. Took them out of the carton and sized them up to the tail wheel and they fit beautifully... Held them up to the bracket I made and guess what ??? the bracket was too large. THAT's when I discovered the mistake I made in ordering. I originally measured the inside of the tail wheel connection. Double-check it by measuring the same thing. When I went back to triple-check the measurement I measured the bracket instead. DAMN !
In any event... I have the correct size tailspring now. So, a little bit of a heads up to all your builders out there. There's a 50/50, or less, chance of having the right size leaf spring to fit the 1 3/4inch bracket, per the plans build. Do yourself a favor and wait until you purchase your tail wheel before making that bracket. Since I didn't do that... I put in a little over 3 hours on it today and I'm not even finished with the 1/2 that cups that stacked brackets.
Just found out that the 1/4inch play above the stacked springs, when they are nested in the bracket, is for a piece of rubber padding... to prevent metal-to-metal rubbing on the frame/tail spring intersection and to dampen vibration. Good to know ! and... I cut the new one down to being flush with the top of the three stacked leaf springs. I know what I'll be doing again.
August 19, 2014 Working on... "Good Enough"
I often wonder why.
Wasn't, NOPE !!!, wasn't happy with the first re-make of the tailspring attach bracket. Actually, the damn thing COULDN'T be used. It needed that 1/4" of space for the rubber-baby-bumber thingie. There was NO space above the leafs of the tailspring.
okay.. understood. So, off to make the third one, tonight. Cut the blank, prettied up the sides (the grind, file and sand bit) and went about wacking it into shape. First the one side. Then the other. Took a look at the space at the top... and on the one side I was lucky if I had 3/16inch of space. More like 1/8inch. BUT... I contined working on it regardless. Worked at filing down the other side to match. (Thinking all the while that I'll make it work.) When it was there, I prettied up both edges and thought to myself. "WHAT THE HELL ??? AM I DOING ???"
Do I get into some type of "auto pilot" where I'm just working and not thinking ? I think not ! Not quite sure why ? Maybe it takes some time to think about it, and when I've finally slammed down the gavel to make that decision... I'm just finishing up the project in question ?
Whatever the reason is... The good thing is... I always come around and realize that it's just "good enough".
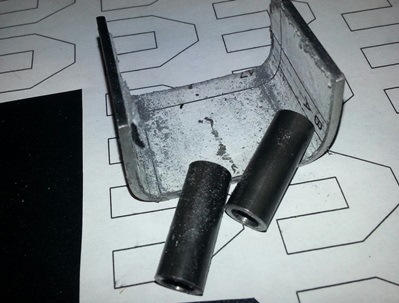
Here's the result of "good enough" and the re-make after "good enough". I'm on the forth iteration... Twopointfive hours and I even had time to cut and bend the other half of the tailspring attach bracket. These still need to be prettied up, the attaching tubes cut then welded on and a few holes drilled.
The one in the foreground is "good enough".
August 20, 2014 A moral...
without a fable.
Yesterday I pushed past "good enough" and can finally start making the rest of the bracket.
Still need to file the top of the 1/2 that holds the three-stacked leaf springs. remember... there needs to be 1/4inch gap at the top to allow room for the 1/4inch rubber-baby-bumber pad. Clamped the three leafs of the spring in the cup of the piece. Tape a 1/4inch piece of ply on top of it and started working the file. It made for a nice even piece without having to think about it.
Next I needed to cut two 3/8inch x .o63 x 1inch tubes. These need to be reamed with a 1/4inch reamer and then welded onto this cup. No problem (I've got that micro lathe working). Cut two close to 1inch long. Worked my magic with the lathe and had two 1inch identical tubes in no time. Just need to clamp them in the vice and ream. No problem... right ?
WRONG !
Didn't want to damage the outside of the tube so I used a set of rubber pads when clamping them in the vise. No matter how hard I tighten it... the tubes would twist with each turn of the reamer. I wasn't making any progress at all. Tried clamping one of the tubes in the vise without any protection. Didn't want to clamp it too tight... but in not tightening, the tube spun when I turned the reamer. Crap ! Now I've got deep gouges in the one tube; now a test piece. Didn't even want to waste my time on the second one. Grabbed a length of the 3/8 x .o63 and cut a length that was an extra 1 1/2inches longer than I needed for the two pieces. I clamped this in the vise using the part that I wouldn't be using. Wasted tubing ? Yeah, but not so much... better to waste 1 1/2inches of tube than two 1inch pieces and all that time spent on making them.
Moral of the story: Cut any pieces that need to be reamed, extra long. Using the extra length of tube... clamp it in the vise and ream. No need to worry if it will gouge the tubing. You're not going to be using it anyways.
August 23, 2014 As with all things...
it takes time to get it done right.
Sometimes it's the little things that take a lot of your time...
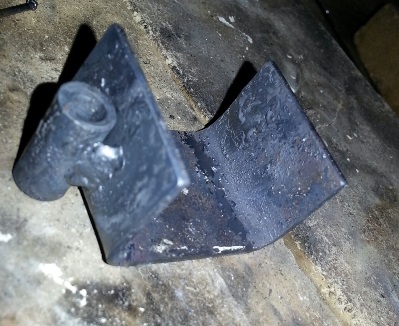
Still working on this tail spring. Holding the "cup" side of the bracket up to the three-stacked tailspring... I wasn't happy with how close the sides of the bracket were to the leaf springs. I didn't want any chance of these things moving back-and-forth at any opportune time. The only way I was going to get a closer bend is if I heat the sides of the cup and either tap them or put some clamping force on them. Thought about this and figured that tapping the sides would result in an uneven bend. Clamping... on the other hand would allow me to bend the complete side all at one time. It turned out that a C-shaped vise grip was the ticket. I'm much happier with the final piece now.
Still needed to tack, then weld, the two 1inch pieces of tubing to the sides of it. And by the way... these need to be 3/4inch, not 1inch. This gave me a chance to play with the micro-lathe again. (it makes short work of anything that I have used it for... well worth the investment) Cut the paper pattern (a duplicate of the other half of the bracket). Drilled the 1/4inch holes then stuck a few 1/4inch bolt through it to hold the 3/4inch tubes in place. Wedged the cup between the two. Tacked and then welded her up. It was a tight fit and I knew that the end result would have the tubes a little bit father out than what was on the paper print... but not to worry, I'll be match drilling this to the other 1/2.
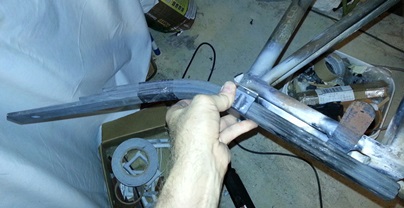
I still need to work on the 1/2 that gets welded to the tailpost. As it sits right now... It's cut to size with filed edges and bent to shape. And as mentioned earlier, it needs to have the holes match-drilled with the cup I just finished and then finish sand the edges smooth.
August 26, 2014 It takes a little bit more time
than you sometimes think...
Moving forward on this tailspring bracket... a lot of little stuff still to be done.
Sometimes it seems like it'll never end. You work at getting something completed... ready to weld it on... only to find out that one or two things still needed to be done before doing it. It gets done eventually...
Match drilled the cup half of the tailspring bracket to the part that gets welded onto the fuselage; match drilled then reamed. Filed and sanded smooth the edges of this 2nd half of the bracket.
Now to prep the lower tailpost area to accept the bracket. When I made the fuselage I left it a little long. Now that I look at it... it's a little longer than long. Started working on grinding down the tailpost while it was still upright. Turned it on its side to finish up the grind.
I'll be getting a good weld on it, but I don't want the chance of not sealing up that tailpost tube. Before welding on the bracket I plan on welding a metal disc to the bottom of the tailpost.
You get the idea.
August 28, 2014 A little too late...
to be looking a little closer.
Trying to move forward with the tailspring. I was all set to weld this puppy onto the tailpost and BAM ! not gonna happen. I guess "trying" was the key word ???
Okay... so as I was making this bracket for the 1 1/2" leaf-springs for the tailspring, I hold the 1/2 that attaches to the tailpost, up to the tailpost. Everything looks fine. Tonight, I'm looking at it real close. The spacing of the holes look a little too close. So... I try inserting a few 1/4inch bolts into it when it's in position.
Guess what ? Yep, it ain't gonna work. I could clearly see the holes on either side of the tubing, but the head of the bolts just won't allow me to insert them from the top. I could insert them from the bottom and safety wire them on and it'd be okay. But, is it really going to look okay? One of the few visible pieces of hardware on the biplane and it's not really up to "code". What are people going to think about the rest of the build? What's the DAR going to think? And just thinking about it makes my stomach turn.
With the decision quickly made I go off in search of my Dremel to cut those bushing off so that I can; 1. cut those bushing off, 2. build up a slight thickness to the side of the "C" side so that it brings the bushing out far enough to be useable with the original bracket and 3. weld the damn thing on and get past this part of the build.
Off to fetch the Dremel ? After looking for it in the usual places I would put it I remember I brought it to Lombard Street to do some Dremeling on the kitchen table. Okay, make a plan "B" to keep me busy. hmmm... need to drill the 3/8inch hole for the front bolt on the tailspring. Start it off with an 1/8inch pilot hole through the retangular tubing near the tailpost. Drilled a hole through the one wall. Off to fetch the drill block to make sure that I have a vertical hole through both walls. Looked... and looked... and looked-and-looked-and-looked and looked-and-looked-and-looked-and-looked-and-looked-and-looked. Something tell me I'm not going to finish this today. A little over two hours and I pack it up. Not much more than 1/2 of two things completed. Does that work out to be one thing completed ? hmmm ???


 Up early Saturday morning... to let out the pup (not sure why he's always wanting to get up at 5:30 in the morning any more.