Mantua, New Jersey
Original Site:
September 2004
E-mail: usav8or@yahoo.com
May 5, 2009 No doubts...
no
doubt
A few smaller sessions today...
I
aligned and welded in the bushings at the Stick Boot/Stick
Socket connection. After cutting the section between the two
Stick Boot wings out, and sanding them smooth with 120 grit
sandpaper, the moment of truth was about to arrive. I bolted
each Stick Socket into postion to test for alignment... They
looked square... but Murphy's Law might have been in play
here. It's happend before. Here goes nothing.
(drum
roll
please...)
Success
! Each of the Stick Sockets lined up... same as before. Never
doubted it... (yeah right.) I could just see myself
making two more Stick Boots... having to cut these off the
large Torque Tube... go back to bending up the .o50 4130,
drilling holes for the Stick Socket connection... cutting
and reaming the 3/8" tube for that same area... the hours...
I
had a little bit more time so I did go ahead and sand the
Collar Bearing with 400 grit sandpaper. Lookin' sweet and
shiney.
(We pause to bring you a station break.)
OK...
next session... same day. The plans say that the Stick-to-Stick
Pushrod connection has two holes that are 26" apart,on center.
This biplane is and will always be a build Part A to fit Part
B. So... I didn't take the advice of the drawings and rigged
up a long piece of 5/8" flatstock, the same stuff I used for
the levers on the Throttle Quads.
Drilled a 1/8", (to match the 1/8" pilot hole I have on the
bottom of the Stick Sockets) attached it to the one Stick
Socket. Locked the Stick Socket into a vertical positon, relative
to the Torque Tube, then locked the forward Stick Socket into
a vertical positon, held the 5/8" flatstock up to it and marked
it for drilling. Simple and fast. (Actually... it wasn't
so fast. I started off attaching turnbuckles onto the end
of a threaded rod. There was way too much slop in the eyes
for it to be accurate enough for what I needed. Thought a
little and came up with this easy solution.)
Turns
out that the distance between the two Stick Socket holes,
when vertical, is 25 15/16". Does that 1/16" matter... I think
not, but I'm always trying to be as accurate as possible.
The more accurate... the better it'll fly.
Need to cut out the end connections for the back-side of the
Stick-to-Stick Pushrod. Went up and drew it on the DeltaCAD
program. Also confirmed the exact length of the Stick-to-Stick
tube. I'm all set to work on this tomorrow.
Above you can see what I've done so far on the Torque Tube
Controls. The bolts aren't AN and they're too long... the
Collars don't have their washers... etc etc etc. But... for
the most part, everything is there. You can even see my "jig"
for measuring the Stick-to-Stick Pushrod sticking out the
right side of the Torque Tube Controls.
Just as an aside. I've spent more time on building this than
I did welding up the main part of the fuselage. I've got a
pile of parts to prove it. Which reminds me... I need to take
a picture of that pile and post it up on here for everyone
to see. And I'm damn proud of that learning too.
May 31, 2014 On to Plan "B"...
oh no... I forgot the list that had Plan "B" on it.
Originally went home to work on the tail wheel. Decided that I needed to make the leaf springs per my DeltaCAD drawings and go from there.
Okay... so now I'm here. Now what ? Forgot the list that I had written down the things I wanted to get accomplished next. Took me a few minutes of looking at the biplane and then I remembered one item was to weld in the torque tube. As always... it took more effort to work within my environment more than it was to measure and clamp the torque tube in place.
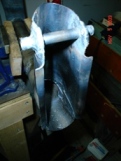
Well, I did spend a bit of time clamping it., then re-clamping it when it un-clamped itself. Then I scrounged around for a few pieces of wook I could use to hold it into place so that I didn't melt the rubber tips of the clamps. Got it tacked then had second thoughts of doing the complete welds 'cause that would mean that I would have to un-do the blocking I did to get the fuselage at the correct angle for figuring out the tail wheel. BUT, if I don't unblock it, it'll be sitting in that position for a while... or at least until I get the leaf springs made. Decided to unblock it and weld up the torque tube.
Still had daylight to burn before Andrea stopped over. Remembered that I had a number of un-finished welds I could finish. Started scanning the fuselage for these clusters... and found a few. Worked on these until I got a text from Andrea saying she was headed over... turns out that the welds I was working on needed a AW205 tip to get it heated up enough so taht I could use a 1/8inch filler rod on. I'll be leaving it until next time.
more to come....
Soon I'll be finished and no more to write about the Torque Tube Controls.


 I
aligned and welded in the bushings at the Stick Boot/Stick
Socket connection. After cutting the section between the two
Stick Boot wings out, and sanding them smooth with 120 grit
sandpaper, the moment of truth was about to arrive. I bolted
each Stick Socket into postion to test for alignment... They
looked square... but Murphy's Law might have been in play
here. It's happend before. Here goes nothing.
I
aligned and welded in the bushings at the Stick Boot/Stick
Socket connection. After cutting the section between the two
Stick Boot wings out, and sanding them smooth with 120 grit
sandpaper, the moment of truth was about to arrive. I bolted
each Stick Socket into postion to test for alignment... They
looked square... but Murphy's Law might have been in play
here. It's happend before. Here goes nothing. Success
! Each of the Stick Sockets lined up... same as before. Never
doubted it... (yeah right.) I could just see myself
making two more Stick Boots... having to cut these off the
large Torque Tube... go back to bending up the .o50 4130,
drilling holes for the Stick Socket connection... cutting
and reaming the 3/8" tube for that same area... the hours...
Success
! Each of the Stick Sockets lined up... same as before. Never
doubted it... (yeah right.) I could just see myself
making two more Stick Boots... having to cut these off the
large Torque Tube... go back to bending up the .o50 4130,
drilling holes for the Stick Socket connection... cutting
and reaming the 3/8" tube for that same area... the hours...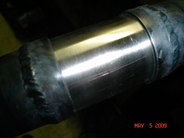 I
had a little bit more time so I did go ahead and sand the
Collar Bearing with 400 grit sandpaper. Lookin' sweet and
shiney.
I
had a little bit more time so I did go ahead and sand the
Collar Bearing with 400 grit sandpaper. Lookin' sweet and
shiney. OK...
next session... same day. The plans say that the Stick-to-Stick
Pushrod connection has two holes that are 26" apart,on center.
This biplane is and will always be a build Part A to fit Part
B. So... I didn't take the advice of the drawings and rigged
up a long piece of 5/8" flatstock, the same stuff I used for
the levers on the Throttle Quads.
OK...
next session... same day. The plans say that the Stick-to-Stick
Pushrod connection has two holes that are 26" apart,on center.
This biplane is and will always be a build Part A to fit Part
B. So... I didn't take the advice of the drawings and rigged
up a long piece of 5/8" flatstock, the same stuff I used for
the levers on the Throttle Quads. 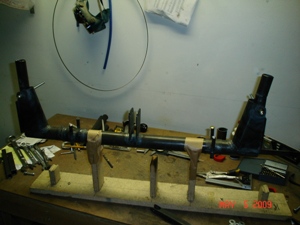 Turns
out that the distance between the two Stick Socket holes,
when vertical, is 25 15/16". Does that 1/16" matter... I think
not, but I'm always trying to be as accurate as possible.
The more accurate... the better it'll fly.
Turns
out that the distance between the two Stick Socket holes,
when vertical, is 25 15/16". Does that 1/16" matter... I think
not, but I'm always trying to be as accurate as possible.
The more accurate... the better it'll fly.