Mantua, New Jersey
Original Site:
September 2004
E-mail: usav8or@yahoo.com
even more... The Radical Radial Fuselage.
June 18, 2008 Cardboard
... and weld rods.... yeah.... I'm notching tubes
As I had mentioned in my last post... there's got to be an easier way of notching these complex multi-tube clusters.
I also mentioned a simple to make pattern maker that Tony B had mentioned in one of his books. At the risk of repeating myself... I also said that I had Denise sew me one up, using denim. And to repeat myself...
don't use that material... too thick, which doesn't allow you to space the rods close enough to get a "good" pattern to follow.
I was at a stand still. I didn't want to ask Denise to do it last night... she has a lot on her plate this weekend... graduations and parties she's preparing for. And I didn't want to "waste" tonight and some of tomorrow standing around with nothing to do. I needed to come up with something that would allow me
to create the same tool without the associated sewing.
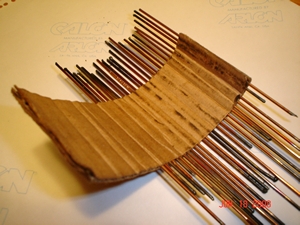
Not sure what made me think of it, but I thought of a sheet of cardboard with all that fluting it has. BRILLIANT ! Found a cardboard box that was laying around, cut off a section, found a pile of unuseable 1/16th inch weld rods (I knew they'd come in handy sometime.) Slid those puppies inside the row of holes and
WALA ! instant tube-notcher-pattern-maker. It works beautifully. Well, actually, some of the rods slide easily through the holes. Something I'll work on. But it took me all of 10 minutes to put together and it works great.
To use it, I wrap a smaller length of tubing (same diameter,) than the one that I'll be cutting. This allows me to have the tube flat against the table while I'm "forming" the pattern. If I use the actual piece I'm going to be notching... the tail end extends past the cluster on the other end and you end up with the tube being held at the wrong angle. I guess it would work "OK" but I'm trying to be a little bit more
precise than OK with this. With the pattern maker wrapped around the smaller piece of tubing, over-hanging the front end, I slide the tube into position. Being careful not to mess the pattern up, I pull the tube back and then unwrap the tube it's on. (you could use a piece of tape to keep the rods in place as you're switching from one tube to the next) I take the actual tube that I'll be notching and wrap the pattern around the end and mark my tube with the design. Repeat for the other end and other pieces of tubes.
It's not an exact science, at least I don't have it down to one yet, but it gives you a real GOOD idea of the shaped notch that you need to make on the ends.
Make sure to measure the length of tube that you need by measuring from the center of the tubing cluster to center of the tubing cluster. This will give you more than enough fudge in your factor... allowing you to creep up on the right length to notch your tubes.
Hey... you may have a better idea than this... and if you do... don't hesitate to email me and let me know. It's all about the learning.
June 26, 2008 Loosing my mind... or is it.... just a case of the supplemental plans ?
Working on the fuselage... backatit.
Took a look at the notes that I scribbled down at the end of my last session. Helps me get started with something as soon as I step into the work shop instead of spending a few minutes figuring out where I had
left off last.
Notes read: 1. Draw passenger hand hold lines on table. 2. Start notching tubes for hand hold. 3. If I have time... square up the bungee truss and tack in place.
Simple enough... but I had this nagging feeling about the first line "Draw passenger hand hold lines on table." It just didn't sit right with me. Why the hell didn't I have these line drawn on the table before I set the fuselage sides in place ?
What on earth was I thinking... er, not thinking ? I read the Skybolt manual over and over again. I look over the plans... over and over again. DAMN ! I had the plans in my hands as I was drawing the top profile of the fuselage on the table. WHY !!!! ????? didn't I take the time to lay a few lines down when it was easier than fighting with the tubes and X-buckles ?
I wanted to let it go... but I couldn't. Grant it, this is my first build, but how could I be so careless ?
It's been eating at me for a few days now... ever since I rehashed in my head what was needed to be done to the fuselage before taking it out of the jig and flipping it.
Tonight... the heaven's opened and all was revealed. I found my answer on sheet 2 of 14, Revised 3-90 by H.F.W. All this time I was looking for my answers on Drawing 210. Well, I wasn't actually looking for my answers on Drawing 210, but the R version supplemental Drawing 210 is the revised drawing for the R version fuselage.
When I went to look at the Standard Skybolt drawings to reference the tube size and placement of lines... it didn't dawn on me right away, but, about half way through tonight's session I "discovered" why I had forgotten to lay those lines down. Those damn passenger hand holds specs are on the original Standard Skybolt drawings. Drawings I didn't look at when mapping out the lines for the top of the fuselage. Here, all that time I had been looking at Drawing 210 and I should have been looking at Drawing 210 and Drawing 2 of 14, Revised 3-90 by H.F.W.
If ya didn't know, I'm tellin' ya now... you need to reference certain things on the orginal drawings. These are supplemental drawings, you know. They don't tell you what you need to reference, and I didn't expect them too... but ya gotta lay blame somewhere... and buddy... it's all on
my shoulders. I'm building the plane so I better check all sources.
Why this long diatribe ??? you may ask. My point... remember to reference the original plans with everything you draw, build, stich, glue, when you sneeze. There just may be something on them that you need to do that isn't listed on the supplemental, R version plans. We're breaking new ground here. We're playing with unknowns.
I now have a taste of what it was like for those early pioneers of homebuilding; the Wrights, Frati, Whittman, Beech, Rutan, Taylor, Bowers, Sopwith...
into the unknown.
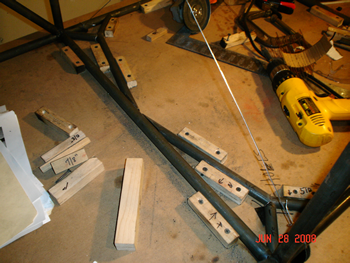
June 28, 2008 Hold on for dear life !!!.... the passenger hand holds are finally done....
One of the final things to do on the fuselage before flipping it right-side up, was to measure cut and notch the passenger hand holds. As mentioned above...
Took a few hours. And one botched notch. But it's finally done. Here's a picture of the finished product. Beeeeeautiful, ain't it ?
The only thing left now to do is to tack this and the bungee truss into place. She should be on her belly by Monday.
June 30, 2008 Unhappy with... nice welds.
Put in close to three hours on the plane tonight. Just gettin' into that groove. Back out there welding.
Time to weld the stops on the bungee truss.
A little rusty at first, but got the hang of it again pretty quick. I hope that the rest of the welding isn't as challenging as this is. There isn't a lot of room to position your torch and also get a good
angle for dipping your weld rod. Half the session was spent turning the bungee truss this way or that and balancing it in some pretty odd positions.
I wasn't stacking dimes, but the weld lines looked pretty nice. The way that you position the bungee stops on the truss... there isn't a lot of edge on the one side and the flame tends to burn it away but I thought it looked acceptable at the time. (I could always grind them down a little to smooth them out)
It took me close to two hours to weld all four stops onto the bungee truss. It was getting to be about 10:30 so I decided I would take my pup, Ammo, out for a walk and then come back and tack the truss onto the fuselage; the last thing to do before taking it out and flipping it over.
A half hour later I was back out in the work shop. I made a few minor adjustments to the truss on the lower longeron, made sure that it was square up and was about ready to put a few tacks into each
side of the truss, but suddenly stopped. I had this unsettling feeling... the more that I looked at those bungee stops, and the areas where the edges were slightly burnt, the more I wasn't happy with the way they looked.
As I had mentioned earlier, I could grind them down a bit, but the look of them just wasn't sitting right with me.
Decision time !
I plugged in the grinder and started to grind the sides down... and the tops of them off.
Looks like tomorrow I'll be cutting a few more bungee stops and grinding the rest of the original ones off. This time I'll make sure that there is enough edge to the stops so that I don't get that "burned away look.


 Not sure what made me think of it, but I thought of a sheet of cardboard with all that fluting it has. BRILLIANT ! Found a cardboard box that was laying around, cut off a section, found a pile of unuseable 1/16th inch weld rods (I knew they'd come in handy sometime.) Slid those puppies inside the row of holes and
WALA ! instant tube-notcher-pattern-maker. It works beautifully. Well, actually, some of the rods slide easily through the holes. Something I'll work on. But it took me all of 10 minutes to put together and it works great.
Not sure what made me think of it, but I thought of a sheet of cardboard with all that fluting it has. BRILLIANT ! Found a cardboard box that was laying around, cut off a section, found a pile of unuseable 1/16th inch weld rods (I knew they'd come in handy sometime.) Slid those puppies inside the row of holes and
WALA ! instant tube-notcher-pattern-maker. It works beautifully. Well, actually, some of the rods slide easily through the holes. Something I'll work on. But it took me all of 10 minutes to put together and it works great.