Mantua, New Jersey
Original Site:
September 2004
E-mail: usav8or@yahoo.com
even more... The Radical Radial Fuselage.
July 5, 2008 Little
things... mean
a lot....
We're talking planes, biplanes specifically, steel tube
and fabric biplanes to be even more specific and in this
case a homebuilt steel tube and fabric Skybolt.
Another milestone has been achived (ya gotta celebrate
whenever you can... helps you keep moving forward with the
build.) Today I could dis-engage the blocks holding
the fuselage square in the table jig.
When I flipped the fuselage and set it in the jig blocks,
that were already in position holding the top side, it appeared
that my lower longerons were slightly farther out than the
upper longerons (again - which were the longerons that were orginally
occupying the table top jig.) Unlike the Standard Skybolt,
The R Version has 1" OD tubing in the forward section on
the longerons. The Standard has 7/8th OD just like the top.
The 1/8th of an inch wouldn't allow the lower longerons
to nest into the jig fixture. Duhhh... ! I readjusted the centering for the forward section
when I re-blocked the table and that fixed the issue, which wasn't really an issue.
As I went over the frame, taking measurements I was really surprised at how close it was to being
within fractions of an inch of what it was suppose to be. At station 49.o6 it looked like the cross tube on the
lower longeron was a little bit out of wack, but when I measured it, it was actually dead on ! Guess it was one of
those optical illusions.
I have a few photos I'll be posting (along with all those other photos I was suppose to have posted already.
I'm feeling real good about the progress of the Skybolt. I was hoping to have had the fuselage welded up by now... but I haven't been slacking. Maybe building those throttle quads cut into the fuselage's earlier completion. Ah... well... it's all good.
July 7, 2008 Nothing works... all of the time.
Back out to the garage workshop tonight. Planned on working for an hour... ended up working on it close to two hours.
felt goooooood.....
There's an endless amount of tubes to cut on a biplane. The sides weren't much of a problem. We'll let me take that statement back. When I was doing them for the first time they were a challenge (how soon we forget our little "lessons.") That was then and now is now.
And now I've gotten to the point where I'm measuring, cutting and notching tubes into multiple tube clusters. Not multiple as in two, but multiple as in the tube I'm measuring cutting and notching is the forth tube in the cluster. Not to be confused with a fifth or sixth tube, which would be getting a little ahead of myself right now.
OK... so I take the measurement for the tube... center to center, over the tubes that I'll be notching in to. First notch not a problem. I'm only notching (with the Joint Jigger) it to fit into the center of one cross tube... easy. Now the opposite end is a different beast. There's three tubes creating a nasty cluster that I need to figure out how I'm going to notch this tube into.
The tube length... totally way too long. Better to be ... you know. Now for figuring out the notch.
I've read about a few approaches to figuring out patterns for complicated notches. I've always read them as the best way to do it by each of the writers. Not so my good man ! NOT SO ! Each of the various methods work well in different situations.
The "hold-it-up-to-the-cluster-and-mark-your-pattern-by-eyeing-method" works great when you're inching into the cluster by making small cuts at a time. Takes time to do it this way. But for us novices it works great. (I'll tend to use this method over the others right now.) You're not committing yourself to a final cut as you would with a tube notcher.
Speaking of the tube notcher, aka Joint Jigger. I've mentioned it before. I love this piece of equipment for making one or two notches on one end of a tube at a time. Get past two tube cuts at the one end and I'll take an hour of grinding a good cut over a swift five minute cut that's wrong with the tube notcher. That's me folks.
Dale, the guy that wrote that article that convinced me to use the Joint Jigger... He's been using it for quite a few builds/rebuilds and he knows how to use it. He'd be able to cut the tubes for the main fusealge on the Skybolt in about ten hours.
Enough of the Joint Jigger... on to the third way of making the "pattern" for the multi-tube cluster. I've seen them for sale for $50.00 each and have seen instructions on how to make them in Tony B's books. It's basically something that wraps around the outside of the tube you'll be cutting. In that sheath that you've wrapped around the tube are metal rods that move fore and aft. When you push the tube into the cluster it's suppose to form the cuts that you need to make on the tube. It's been working kinda
half-ass for me. Maybe I should buy one of those $50.00 ones.
Another method, which I'm finding works great once you've notched both ends of the first of two identical tubes, is one where you wrap paper over the end that has been notched. Take a file and file off the overhang of paper and waaaaLaaaa instant pattern. It might take me close to two hours to notch that first tube but that second one I'll have ground down to a beautiful fit in about a half hour. Still no speed record, but I ain't going for speed here.
What I'm getting at is all of these methods work at one point or another but not at all times, at least not for me. I use them in combination and it seems to be working.
July 10, 2008 Up or down... not looking far enough ahead.
I look forward to going out to the workshop and putting a few hours working on the plane each night. I really do. Nights, like tonight, although fustrating, teaches you an important lesson.
If you've been following along since the beginning of my build you'll know that I decided to go with the bungee truss instead of this new fangled hydraulic truss that is shown on the R version plans. A hydraulic truss system that, to the best of
my knowledge, hasn't been tried yet.
For the past few days I've been notching the diagonals that go between the first few stations. I seem to be getting the hang of using that small hand-held grinder. Getting to know what to grind when I hold it up to the cluster each time.
Two tubes left to cut and notch before I would begin fitting in the intercostals (tubes running from either the upper or lower longerons that end up meeting in the middle of the lower or upper cross tube.) Both of these tubes were diagonals that go from the middle of Station 0.o to the longerons at Station 5.o. For shits and giggles I decided to see how the intercostals would look going from the upper longerons at Station 24.o to the middle bottom at Station 0.o. Not good...
Where to begin ?
The truss location on the R version is at station 5.o, point down. The truss location on the Standard Skybolt is at station 13.o, pointing up. I have the Standard bungee truss at station 5.o, pointing up. Kinda mixing it up a little. I was at first thinking that I'll need to make a new truss that isn't quite so high as the one I made. But the truss is so close to Station 0.o that I don't see it going on any other way than pointing down.
It'll be hanging into the wind, per se, but then when you fair it out so that there is a smooth flow from the BIG ol' radial it would be inside of the fuselage, out of the wind. I'm thinking that this is the way it should be welded on. I threw the question, as always, out to the biplane forum to get some feed back. Might just ask Paul Musso too (a local friend that has built many biplanes.)
Hopefully I won't need to re-make the truss. If I do... good lesson learned. When making small changes to the plans... expect bigger things to come. Always look further down the the building process and see where this change will take you.
I'll let you know what I find out.
July 11, 2008
I called David Stone, at Steen Aero. I had two suggestions that he thought were viable.
1. Flip the truss upside-side down at station 5.o, like the hydraulic truss is.
2. Replace the truss at station 5.o with the same size diameter tubing (1 1/8") and move the truss, still pointing up, to station 13.o, same as the Standard Skybolt.
I sent him an email with a few drawings so that he could discuss with Paul Goetsch and Jere Larson. I'm waiting to hear back from him.
Aug 27, 2008
I heard back the other day from David Stone. Asked me to call someone that would be able to work with me through the "change." If you want to read about it click here.
Aug 29, 2008 Art and the technique of notching tube clusters.
A little dab 'll do ya.
Just a little FYI. When notching your tubes... notch the difficult notch first.
For instance, you have an intercoastal tube that needs to be notched on both ends. On one end it needs to be notched into a cluster with one or two additional tubes, and at the other end you'll need to finese that notch to mate up to a cluster of three or more tubes.
It's easy to make that notch (relatively speaking) into the two tube cluster. Now go ahead and see what your grind-by-site-and-fit notching technique produces. Try that technique on a scrap piece of tubing first. Chances are you'll need a little bit of extra tubing for those
small, let's call them adjustments (some call them errors) that you make while notching it to fit into those three or four tubes.
And by the way... take your time. As my art teacher always said in grammer school: "A little dab will do ya." In this case, a little grinding off will do ya.... and do ya... and do ya. It's kinda hard to replace that 1/4" of 4130 tubing you just ground down. It's always easier, maybe more time, but always easier to "ease" into the cluster a 32nd or a 16th at a time.


 As I went over the frame, taking measurements I was really surprised at how close it was to being
within fractions of an inch of what it was suppose to be. At station 49.o6 it looked like the cross tube on the
lower longeron was a little bit out of wack, but when I measured it, it was actually dead on ! Guess it was one of
those optical illusions.
As I went over the frame, taking measurements I was really surprised at how close it was to being
within fractions of an inch of what it was suppose to be. At station 49.o6 it looked like the cross tube on the
lower longeron was a little bit out of wack, but when I measured it, it was actually dead on ! Guess it was one of
those optical illusions.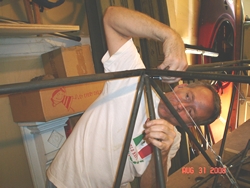 OK... so I take the measurement for the tube... center to center, over the tubes that I'll be notching in to. First notch not a problem. I'm only notching (with the Joint Jigger) it to fit into the center of one cross tube... easy. Now the opposite end is a different beast. There's three tubes creating a nasty cluster that I need to figure out how I'm going to notch this tube into.
 I look forward to going out to the workshop and putting a few hours working on the plane each night. I really do. Nights, like tonight, although fustrating, teaches you an important lesson.