Mantua, New Jersey
Original Site:
September 2004
E-mail: usav8or@yahoo.com
welding up the...Radial Fuselage.
November 19, 2008 The Never Ending
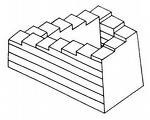
Steps... on
to the next one
Finished !
... with welding up the basic fuselage, not finished building
the biplane. Now it's on to the next phase of the fuselage.
Figured I needed some place to sit and something to land
on. Gave me the idea... hey, why not make a few seats and
then build a set of landing gear.
Started
working on the seats last night. Didn't want to cut up a
4ft x 4ft piece of MDF for the small seat jig so I ended up running
up and down up and down up and down up and down... the steps
from my living room (temporary workshop) where I had the
jig on the floor, and the chop saw down in the basement
workshop. That'll change tonight when I cut a small piece
off that LARGE sheet of MDF. Knocked a half hour off my
three and a half hour work session to correct for that up
and down up and down up and down. yeah... didn't want to
cut the MDF to save about 20 dollars... how much is this
biplane costing me and I'm concerned about 20 dollars ?
Doesn't seem like I accomplished much last night. I'm so
use to going out to the garage workshop and picking up the
torch and putting in some time. Not use to making a jig,
fitting pieces... blah blah blah. It's got to be done or
I'll be standing. I never did quite grasp that phase of
learning to fly when you stand up to do it.
Oh, for those of you who are building the "R" version of
the Skybolt... there are some details left off of the print
for the seats. I'm assuming that the depth of them is the
same as the Standard Skybolt; 13 7/8". Tubing size is .75
x .o35 4130. If I see anything else amiss I'll post it.
The beauty of these seats, over the Standard Skybolt's,
is that the pilot's seat is more recline, to take more G's,
and that places the pilot's head back quite a bit more...
which was lacking with the Standard's; your face was just
too close to the instrument panel.
I saw a few pictures posted by Al Rice on how he jigged
the seats into postion so that he could cut and notch the
additional tubes that attach to the fuselage. Looked like
a good idea, so I'll be doing something similar.
Oh... I just remembered. That lower center cluster at Station
0-o was a major pain in the arse ! If I had to do
it again, I'd leave out the bungee truss until after I welded
up that cluster at Station 0-o. What would have taken me
2 1/2 hours ended up taking me 5 1/2 hours. I could barely
get into some of the crevices to run the puddle.
(playing devil's advocate) It just may be better
to have the bungee truss on before you do this though. It
might just be worth the pain in the arse of 5 1/2 hours
as opposed to I don't know what. I may have had a hard time
fitting that bungee truss in afterwards. Anyways...it was
a major pain.
November 20, 2008 Little jiggity jigs... makes it
so much quicker not to mention... happy feet
More work on the seats tonight. First thing on the agenda
was to cut the small seat jig outta that HUGE piece
of MDF I was trying to save from cutting up (geeze what
was I thinking???) Unbelievable the time savings of
not having to run up and down up and down... you get the
picture.
Cut the four
additional tubes for the seats; the 16 3/4" tubes. Slapped
the pieces in the jig and fitted up two sets in short order.
Took the small little jig, that I now have, and brought
it up stairs into the garage workshop. (Unbelievable
the time savings of not having to lug that HUGE piece
of MDF up and down the steps and in and out of the two workshops.)
Tacked both seat frames on both sides.
Wasn't
sure if I was going to finish weld the seat frames before
I cut and fit the addtional tubes to support it in the frame
or just tack it into the frame like I did the rest of the
pieces on the fuselage. Seems like I just answered my own
question. So... that's just what I'm going to do. Tack the
mitered corners of the seat frame then cut and notch the
tubes that make up the rest of the seat, tack together,
than finish weld the entire two "structures." Figured if
I finished welded that .75 x .o35 tubing, before tacking
onto the fuselage, it'd look like a potato chip. Ain't gonna
happen.
Had time to draw out the jig patterns for holding both seat
frames at the correct angle. I'll cut those out on Saturday,
clamp them into place then start cutting and notching the
tubes that support them. (almost time to make some big
ol' radial engine noises)
November 26, 2008 Make sure your seats
are at the right angle. Keeping the G's outta akro...
Just a few more of the MANY jigs you need to build to build the biplane. (if I build another Skybolt... I'll be cutting off a lot of time just not building jigs again)
Once I had the seat, the actual part you put your arse on, measured cut notched and tacked together, I needed something to hold them in the right poistion/angle when getting them ready to attach to the fuselage along with the many other pieces of tubes that I needed to measure cut notch and tack to the fuselage to complete the seat "project." I think I mentioned it elsewhere on the site... I saw a few images of Al Rice's seating jigs and thought they looked like a good way of doing.
First plan of action... grab a piece of MDF to draw the side profile, of the angle, that you need to hold each of the seat frames in. As always... double and triple check these measurements. I took my jigsaw to the MDF to cut them out. Wanted to do it on my bandsaw but the depth of the throat is only 4". Ain't gonna do the job this time.
After cutting the sides out, two for each jig for a total of four sides, I notched the top and the bottom to hold the seat frames at the correct height. I held the two sides together with spacers I made from the same piece of MDF. Screwed these onto the sides and I was in business. Special note: before cutting the length of the sides make sure that you have enough length so that they will sit on tubing front and back, otherwise you'll need a jig to hold your jig in place. needless jig making...
Making sure that the seats are set at the right angle will help in reducing the "G" forces you experience in akro, not to mention... it will keep your nose father away from the instrument panel... which goes a long way into seeing the instruments better while flying.
Here are a few images of the jigs fitted into the fuselage.
November 26, 2008 Plumb bobs and rotisseries... trying to make sense out of an inch or two
Spent my entire time on Sunday, November 23rd, aligning the seat jigs on the fuselage then locking them into position. Re-checked them today before measuring, cutting and notching the additional tubes needed for the seats. Thank God I did.
I had a string streched from the center of the firewall to the tailpost. From this I would lay a flat edge across the two upper longerons and then drop a plumb bob from that to the center of the seats below. All was fine and dandy when I left it
yesterday. Well... they still were fine and dandy when I checked them today. Things still didn't seem right though. I took a measurement from the vertical tubes of the side walls to the outside edge of the seats; one read 6.125" and the other read 7" (or something close to that.) I started to think holly crap ! is my fuselage THAT much out of alignment ???
I took my tape measure and measured from the tailpost to the front left corner of the firewall then measured from the tailpost to the front right corner of the firewall. If it was a 32nd difference between the two measurements that would have been a lot. So... thankfully it wasn't out of square... what else could it have been ???
I went back to study the area in question; the area where the seats were. I leaned over, and while leaning over this time I put my hand on the upper longeron. It Moved ! Aaaaha ! It immediately dawned on me that the fuselage was still in the rotesserie and wasn't sitting flat/square on a solid table ! DAMN !
I spent a little bit more time on aligning the seats than I thought that I would, but happy with knowing that the fuselage is square and that the seats are centered. Wednesday I'll be back in the garage workshop finishing up the front seat, and hopefully starting and finishing up the pilot seat.
November 30, 2008 Seats are done before I knew it... This puddle jumper is turning into a complex twin.
After the difficult welds of the forward portion of the fuselage, the seats were a breeze to weld up. Seems like I just started cutting the tubing for them and I'm already finished with the welds.
Placed the order for the landing gear tubing on Friday. Should have that package here by Wednesday. What to do... what to do... oh yeah, need to cut an additional metal rib out for the tail feathers so that I can get those all bent at one time. (Steve, my neighbor across the street, knows someone with a LARGE bending brake. One night this week, or next week, we'll take them over to this guy's shop and get them bent.)
It looks like I'll be busy for the next month or so with building of the landing gear and then putting the tail feathers together.
I need to start looking at a few areas of the build now... not just the one focus that I'm use to having; the ribs then the fuselage. Although my Skybolt project was moving along at a fairly good pace, I didn't need to look that far down the road to get ready for the next phase of building; it was easy to keep ahead of it. Now that the fuselage is completed I'm in that phase of building that things will be changing constantly. The "speed" of the build is going from a puddle jumper to a complex twin in the need to stay ahead of it.
Instead of getting ready for the next "project" of the build, I need to be ready for a part that is three or four steps from where I am at the moment.


 Started
working on the seats last night. Didn't want to cut up a
4ft x 4ft piece of MDF for the small seat jig so I ended up running
up and down up and down up and down up and down... the steps
from my living room (temporary workshop) where I had the
jig on the floor, and the chop saw down in the basement
workshop. That'll change tonight when I cut a small piece
off that LARGE sheet of MDF. Knocked a half hour off my
three and a half hour work session to correct for that up
and down up and down up and down. yeah... didn't want to
cut the MDF to save about 20 dollars... how much is this
biplane costing me and I'm concerned about 20 dollars ?
Started
working on the seats last night. Didn't want to cut up a
4ft x 4ft piece of MDF for the small seat jig so I ended up running
up and down up and down up and down up and down... the steps
from my living room (temporary workshop) where I had the
jig on the floor, and the chop saw down in the basement
workshop. That'll change tonight when I cut a small piece
off that LARGE sheet of MDF. Knocked a half hour off my
three and a half hour work session to correct for that up
and down up and down up and down. yeah... didn't want to
cut the MDF to save about 20 dollars... how much is this
biplane costing me and I'm concerned about 20 dollars ?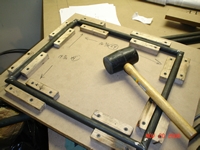 Cut the four
additional tubes for the seats; the 16 3/4" tubes. Slapped
the pieces in the jig and fitted up two sets in short order.
Took the small little jig, that I now have, and brought
it up stairs into the garage workshop. (Unbelievable
the time savings of not having to lug that HUGE piece
of MDF up and down the steps and in and out of the two workshops.)
Tacked both seat frames on both sides.
Cut the four
additional tubes for the seats; the 16 3/4" tubes. Slapped
the pieces in the jig and fitted up two sets in short order.
Took the small little jig, that I now have, and brought
it up stairs into the garage workshop. (Unbelievable
the time savings of not having to lug that HUGE piece
of MDF up and down the steps and in and out of the two workshops.)
Tacked both seat frames on both sides.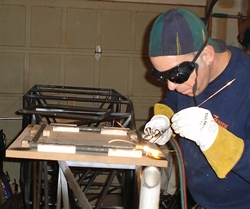 Wasn't
sure if I was going to finish weld the seat frames before
I cut and fit the addtional tubes to support it in the frame
or just tack it into the frame like I did the rest of the
pieces on the fuselage. Seems like I just answered my own
question. So... that's just what I'm going to do. Tack the
mitered corners of the seat frame then cut and notch the
tubes that make up the rest of the seat, tack together,
than finish weld the entire two "structures." Figured if
I finished welded that .75 x .o35 tubing, before tacking
onto the fuselage, it'd look like a potato chip. Ain't gonna
happen.
Wasn't
sure if I was going to finish weld the seat frames before
I cut and fit the addtional tubes to support it in the frame
or just tack it into the frame like I did the rest of the
pieces on the fuselage. Seems like I just answered my own
question. So... that's just what I'm going to do. Tack the
mitered corners of the seat frame then cut and notch the
tubes that make up the rest of the seat, tack together,
than finish weld the entire two "structures." Figured if
I finished welded that .75 x .o35 tubing, before tacking
onto the fuselage, it'd look like a potato chip. Ain't gonna
happen. 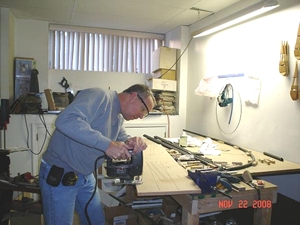 First plan of action... grab a piece of MDF to draw the side profile, of the angle, that you need to hold each of the seat frames in. As always... double and triple check these measurements. I took my jigsaw to the MDF to cut them out. Wanted to do it on my bandsaw but the depth of the throat is only 4". Ain't gonna do the job this time.
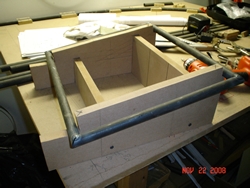 After cutting the sides out, two for each jig for a total of four sides, I notched the top and the bottom to hold the seat frames at the correct height. I held the two sides together with spacers I made from the same piece of MDF. Screwed these onto the sides and I was in business. Special note: before cutting the length of the sides make sure that you have enough length so that they will sit on tubing front and back, otherwise you'll need a jig to hold your jig in place. needless jig making...
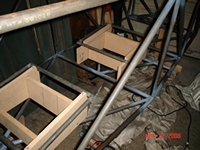

 Placed the order for the landing gear tubing on Friday. Should have that package here by Wednesday. What to do... what to do... oh yeah, need to cut an additional metal rib out for the tail feathers so that I can get those all bent at one time. (Steve, my neighbor across the street, knows someone with a LARGE bending brake. One night this week, or next week, we'll take them over to this guy's shop and get them bent.)
 I need to start looking at a few areas of the build now... not just the one focus that I'm use to having; the ribs then the fuselage. Although my Skybolt project was moving along at a fairly good pace, I didn't need to look that far down the road to get ready for the next phase of building; it was easy to keep ahead of it. Now that the fuselage is completed I'm in that phase of building that things will be changing constantly. The "speed" of the build is going from a puddle jumper to a complex twin in the need to stay ahead of it.