Mantua, New Jersey
Original Site:
September 2004
E-mail: usav8or@yahoo.com
more work on the...Radial Fuselage.
November 27, 2012 (use to be November 19 - 26) bad grammer...
and a week's worth of writing (POOF !!!)
Last night I spent time writing up what I did over the past few days. Ahhh... it was about 1AM and after re-reading it for mistakes, I give it the thumbs up and upload it to the ftp. Open my browser to check it out and the grammer was incorrect on the "What's New" page. So... instead of going back over to the other computer and opening the Dreamweaver program, I do it old school. I paste the code into notepad make the change and save it... upload to the ftp. Take a look at it again in the browser and I'm not seeing the change (even after I clear the cache).
ahhhh... whatever. Sometimes the host site gets back-logged and doesn't show the changes right away.
Looked at the page again today and it still hadn't made the change. Tried clicking on the link and the page does a funny thing and it "shows" the change... but it doesn't go off that page, it just shows the correction... but stays on THAT page. Tried clicking on the link below (which would go to the same page as the above one) and it stays on that page. To make a long story short... I saved the "What's New" page as the fuselage page I was writing on. So... now I've lost my last two posts. CRAP !!!
I wrote some pretty insightful stuff on them-thar posts...of which will be lost forever.
If I could go to the Wayback Machine and retrieve those thoughts...
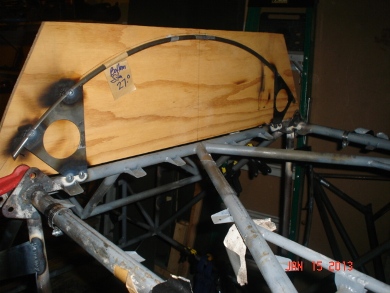
Over the past week I spent quite a bit of time (not recorded as hours) staring, in mid step... thinking of how I was going to start jigging the stringer stand-offs. Saw what others had done, but that was only the basis of what I wanted to do. After staring for quite a bit of time... letting those images and my thoughts reduce to the idea of what I was going to do... I got to working (Nov. 19 - 23) on jigging up the boards to hold the stringer stand-offs at the right height and the right distance off the fuselage box. The first two side stringers that I clamped into position looked great ! They actually formed the shape which I drew out on DeltaCAD. Spent the rest of that time measuring and cutting the jigs for the boards.
My next post (Nov. 24 - 26) alluded to a comparison between Thanksgiving and me working on the stringer jigging. The only comparison I can see now is that of a turkey and the shape of the stringer "tabs" (to me they look like turkey heads) that I discovered that I needed to design for attaching the forward and rear points of the stringers.
The 24th and 25th I continued cutting and fitting up the jigging boards for the stringers. After clamping the stringers into place I saw one place where I wanted to tweek it in just a scooch to get it to look a little bit better than great. All that CAD design paid off. After getting all the side stringers in place I saw how I wanted to attach the front and rear ends of the stringers. A pretty simple tab once I saw what needed to be done.
Here's a photo of last night's work... the turkey heads (gobble gobble):
November 27, 2012
one more small project completed...
one more small project closer to flying the biplane
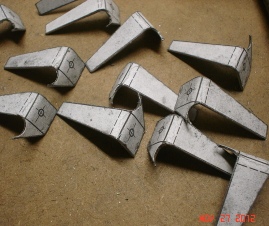
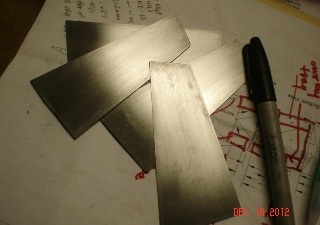
Finished up what I started yesterday... filed, sanded and bent over all twelve stringer tabs. Filed curves in the tabs to wrap around the 3/8" formers. One point eight hours and here they are...
November 28, 2012
Fractions...
as bad as grammer ???
All I wanted to do was mark the front and back points, for the stringer tabs, so that I could weld them up next session. Not sure what the problem was with adding fractions in my head tonight (I actually like fractions), but the spacing wasn't working out right. After 1.6hrs and numerous trips into the house I think I got it right.
What does this all add up to ??? Didn't weld a DAMN thing !... I'm gonna confirm tonight's work tomorrow.
thankyouverymuch...
November 29 and December 1, 2012 sometimes, time
away...
is
time well spent
This past Thursday I stepped out into the garage work area...
I wanted to weld on these front stringer tabs. Shouldn't be
a problem...
These tabs are pretty small and they're kind of odd shaped
(turkey head like). Thought I could tape the "leg" (get it... turkey leg... ahhh never mind) of each
to the former and tack weld them in place. Nope! Tape the
"leg" and the "head" (get it... turkey head... ahhh never mind) of it doesn't stay where you want it
to. Started doing a type A personality thing to it
for about 1/2 hour and then reminded myself that "It wouldn't
be a problem as long as I had the right tools... "Right"
being the key word.
Decided to put things aside for the night and head over to
Lowes (near work) tomorrow to make one of those Tony B. grippers
(alligator clip, thick copper wire and a gripper from a car's
jumper cable.) Well, tomorrow came, went to Lowes...
The only thick copper wire they had were on rolls that cost
$100.00 on up and the jumper cables cost $29.95. (nahhh... that ain't gonna work) After searching
for 20 minutes I found some indoor wiring which had three
thick pieces of copper wire (black, white and bare) in 15
foot rolls for (drum roll please) $8.97. SOLD !!! There
was a Target in the same shopping lot (big parking lot with
a lot of stores) so I decided to check there for a cheap set
of jumper cables. WRONG... the cheapest ones they had
were $25.95. Forgetaboutit... there's got to be something
that I can use at home for the gripper... I already had a
few alligator clips.
Driving back to the office (I went during lunch) I remember
I just bought all those spring clamps to hold the stringers
to the jigging boards. One of those will work... Got home,
bent the end of the thick copper wire over and stuffed it
in the end of the alligator clip, went out into the garage
to get one of the larger plastic, spring clamps and threaded
the other end of the thick copper wire onto it. Presto-chango...
a Tony B. gripper.
Late Saturday afternoon I shuffled on out to the garage again...
to try out the modified Tony B. gripper. Worked like a charm.
Just under one and a half hours and I aligned and tack welded
all six front stringer tabs into place... and it wasn't a
problem doing it.
Walking away from the biplane, and doing something else the
other night, was the best investment of time I could have
put into the project... at that particular time.
December 2 - 4, 2012
Spolier Alert...
hint... laser
The past several days I've been working on leveling the stringers front-to-back.
The day after I tacked on the front and rear stringer tabs I clamped the six side stringers into place. WAA-freakin-LAA !!! it looked like crap!; tiny waves along the length of each 12' stringer. DAMN !!!
Walked away from it that night... thinking of what I could do. Showed up the next day and nothing had changed. They still looked like waves in the ocean. DAMN !!!
I needed something that would give me a 12' straight line that would make the curve of the stringer. Snapping a string from front-to-back wasn't going to work because of the curve. Spacers between the stingers wasn't going to work because the stringers start off one distance between each other and then converge as they get closer to the tail. These were just some of the better ideas I had and discarded.
Not sure what made me think of it but... LASER LEVEL !!! popped into my head. I remembered that I had one. It only shoots a point; not what I needed. Took a trip to the Home Depot today (Tuesday) and picked up one for about $50.00. (not something that would work for more precise jobs) The line went anywhere from 3/16" to 1/2" thick. I knew something had to be wrong with it. I took it back and picked up the Bosch $109.00 laser level. (after reading a few of the reviews, on the first one I picked up, later tonight... I saw that someone mentioned that there is a protective film on the plastic window where the light shines through. If you don't take it off, the line is like what I saw. I guess I should have read the directions, eh ?) With all that said, the Bosch works GREAT.
Took the Bosch out to the garage work shop and leveled the front and back stringer tabs with the laser line. Took my time leveling the one stringer with shims at the places that I'll be attaching stand-offs. Straight as an arrow !!! Did all that in under 1/2 hour. SWEET !!!
December 5, 2012
two...
point five !!!
Two point five hours and I tacked on three stringer stand-offs... seriously ???
okay... so I'm always working toward "excellence." But that's not why it took two point five hours to tack on three stringer stand-offs. It's the lack of work room. I've got to crawl under and around the fuselage to work on it. I'm not complaining... but two point five hours to tack on three stringer stand-offs ??? Really ???
December 6, 2012
Working with...
not against your environment...
Tonight I spent one point seven hours on the build.
What did I get for my efforts ??? One stand-off ground and tacked to the fuselage and my second stringer... straight as an arrow. Ready for the stand-offs to be ground to shape and tacked on.
Doesn't seem like a lot for the amount of time put in on it. But it's quite a bit of work leveling a 12' stringer. Am I happy with what I accomplished in one point seven hours ? Hell yeah !!!
Tonight... I slid around that fuselage like a baseball player sliding back to base and picking himself up, just before the pitcher picks him off. Same circumstance as last night... just a different mind set.
Last night... sometimes you just need to let it out and bitch about things a little.
December 7, 2012
Working with... repetition
Took the day off today (it's a Friday) and decided that I'd put in some time on the project during the daylight hours.
A few double-walled sheets of cardboard on the floor, under the fuselage, makes a world of difference in crawling under it. It's almost a pleasure...
More work on aligning the stringer stand-offs. As with everything on the build, the more repetition you do on a particular part... the easier it gets. And so it is with the stand-offs. also... I can't emphasis how easy it is making these stringers straight and level by using this laser level I picked up.
I'm just about finished the third stringer on the right side. Tomorrow I'll finish it up and then start working on the left side. Then the bottom. Then... it's on to something else.
December 8, 2012
The End...
is near ???
More work on the stringers today. A total of 2.7 hours. Actually closer to 3, but forgot to write down the exact time on my second session so I'm playin' it safe with the hours (as if .3hrs is gonna make a difference in total time, eh ?)
a thought... The strangest feeling has been coming over me for the past month or so... is the end near ?
No... not the end of the world as some people are saying the Mayan calendar is telling us. (by the way... it's just the freakin' end of their calendar... like December 31st on ours.... jeeeeeeeez)
I've been working on the biplane for ohhh sooo many years. I'm now starting to add small pieces (that I've made already) to the fuselage and I'll be getting ready to put the wings together. Just an odd feeling thinking that there is an end to my hard work. Soon I'll be covering it and hanging that BIG OL' Jacobs on the front of it.
That'll be the day...
December 10, 11, 12, 2012
There's no stopping...
More work on the stringers. A total of 1.4 hours, today; 4.3 since Monday.
Just a lot of crawling on the floor, aligning stand-offs, grinding down to size and tacking on the fuselage. I've been thinking of changing it up a bit and working a little on the fuel tanks again... but, I'm on a roll so I ain't gonna stop with them now...
December 14, 2012
They're finished...
then again (and again and again...)
Finished tacking the stand-offs for the third of three stringers on the left side of the fuselage. I've been waiting for this day for quite some time... the stringers with their stand-offs on the fuselage; a shape to the bird.
Actually, I'm getting a little ahead of myself. I have the side stringers leveled and the stand-offs tacked into position. Still need to do the three on the bottom and then finish weld all of them and then cut down the stand-offs to their finished sizes then drill holes in the stand-offs then align the stringers and match drill holes in the stand-offs/stringers... then I think I'm finish with them...
What's this all mean ??? ' guess I'm still dreamin' of the day they'll be finished...
December 15, 16, 2012
still...
another step
Welded on all the stringer stand-offs and tabs (front and rear). The welds... not the prettiest (having not welded for quite some time) but they're solid and they're not that bad looking.
Next on the list is to weld on the front former stand-offs. Still need to tack on the front, side former stand-off (if that makes any sense). Need to weld those up to make sure that the front former is solid and in position before cutting the stingers to size.
December 17, 18, 2012
A case of the...
wobblies... and I ain't doin' acro yet !!!
I was all ready to go out and attach the stringers to the formers and BAM !!! I got side tracked.
okay, let me back up a few steps... I go out and mark the stand-offs for the stringer locations. I'm all ready to start clamping the stringers to the stand-offs and the first one I clamp it to does a little wobbly thing. Damn !!!, the front formers have been tacked to a set of stand-offs, but, they're only on one side of the former. With it only having the stand-off on the one side, the former isn't locked in position; it can still move front-to-back.
Anyway... what I'm sayin' is I didn't get to clamping the stringers onto the stand-offs tonight. What I did was make four additional stand-offs for the side-formers at station 24.o.
Tomorrow I'll tack these on, clamp the stringer in position and cut down the stringers to length. At least that's my plan...
Lookie here... I wasn't lyin'.
December 19, 20, 21, 2012
I finally did it... no hesitation
a lot of double checking... but no hesitation
No hesitation... moved right ahead with marking and cutting back the stringer stand-offs.
Over the past few days I've been working at getting to the point where I can start cutting the stand-offs to the correct length. It all started with me needing to lock in the formers at station 24.o. With that completed, I confirmed the marks for the stringers... then started cutting off the excess.
As a side bar... after seeing the side stringers in position, I see where I'll be making a slight modification to one of the turtle-deck formers.
Anyway... another day of grinding the side stand-offs to size then on to the bottom stringers...
December 23, 26, 2012
I might as well get use to it...
some things are just gonna take longer than they should.
This past Sunday I cut down the rest of the side stand-offs.
I think I would have done it a bit different if I had to do it all over again. I would have drilled both the stand-off and stringer before trimming to size. That way I would have a mark that I could easily align the stringer to. Now I'll need drill the stand-off then clamp a small "straight edge" to the inside mark so that I can align the stringer (there is no aligning the stringer to the outside of the stand-off because I trimmed it short by 1/8th inch) then clamp the stringer to the stand-offs and drill the stringer.
It won't be any trouble doing it the way I'll be doing it... just a little bit more time intensive (what's new, eh ?).
With the side stand-offs all welded into place I needed to work on the bottom formers and stand-offs...
Today...
Let's just say it was a pain in the ass flipping the fuselage. There's not much room in the one-car garage. And there was only me doing the flipping of a frame that weighs around 100 pounds. And there is the Harley Sportster that sits a mere inches away from the turning fuselage. And the front and back supports... ahhhh, let's just say... it took a little over an hour to flip and level the fuselage when it should have only taken a quarter of an hour. The good thing... the fuselage has no damage and the Harley Davidson sits untouched !!!
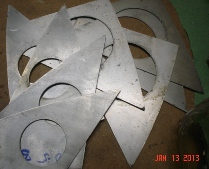
Looking over my notes I saw that I need to tack on a few formers then a few former/stand-off combinations then on to just the stand-offs. The front formers are a lager diameter than just allowing me to tack them onto the square frame so... I needed to figure out the gusset shape for the first former, at station 10.5, and get to work making them.
Another 2.2 hours after flipping the fuselage and I have these formers made.
December 27, 2012 and January 8, 2013
Lovin' the pup and Comcast...
no more re-runs of re-runs.
I was busy getting things ready for the holidays so I wasn't too concerned about putting in a lot of hours before Christmas... heck I had the entire week off afterwards. Plenty of time to put in hours on nuthin' but the biplane project. I'll be making a lot of progress. or so I thought...
Well... from December 27th until January 5th I was fighting a pretty bad cold. (a lot call it an upper respiratory infection... to me... just a really bad cold) It wasn't bad enough to go to the doctors, and hell, fight off the first one and you'll be that much more resistant to the ones that follow, or so goes my theory.
Fighting off that cold took close to two weeks. Should have gone to the doctors and gotten some meds and would have been done with it in a few days. The cold not only took me down... it drug down working on the biplane. Didn't feel much like going out into sub-zero temps with that cold.
Since the 5th I've been struggling to get back into the project. I'd be off in that thousand yard stare... wondering what to do if I'm going to be doing anything at all.
Late yesterday my sister Iantha calls me up at work. She dropped off some of that GREAT TASTING turkey soup she makes. Asked me if I unplugged the TV... I replied no, but asked her why she asked. Long story short. The pup decided to chew the hell out of the cable box cord. Hmmm... checked online to see the hours of the local Comcast office. Closed on Monday at 5PM. Tuesday's hours are until 8PM. So... no watching re-runs of re-runs of "Everybody Loves Raymond" tonight. You'd think that would motivate me to start back up on the project. Nope ! Decided that I would do some studying up on the FARs and some aeronautical stuff to get ready for the bi-annual review next month.
Tonight... after work; fed the dog and off to the Comcast office to get a new cord for the cable box soes I can watch some re-runs of re-runs of "Everybody Loves Raymond". Pull up to the offce around 7:20PM and see the girl at the counter. Get my stuff and try opening the door... and it's locked. Rattled it a few times... look at the girl and she mumbles something to herself. Rattled the door again only to see that they close at 7PM every night of the week. Hmmm... guess I won't be watching re-runs of re-runs of "Everybody Loves Raymond".
Got back from my failed attempt and had a nice hot bowl of that turkey soup. Hell... it's only 8:30PM... hmmm... guess I'll walk out into the garage to see what I needed to get doing to get back into it. Spent a little over 1/2 hour thinking things through preparing for tomorrow night.
As always... it feels great to be working on the biplane again. Guess I have to thank the pup for chewing up the cable box cord AND Comcast for changing their office hours. Now, if I could only find those gussets I made for the formers at Station 10.5, I'd be back in business...
January 12, 2013
Standing and staring...
thinking and waiting.
Sometimes I just laugh... the amount of time I take squeezing around the Harley in the garage workshop and the time I take looking for pieces I've made... and have put away where I wouldn't forget where they were. Guess I need to make a list of all those parts and the places I put them.
Went out to the biplane to make sure those gussets I made for the formers at station 10.5 and 27.o are correct. Check ! Did the thousand yard stare for quite awhile thinking of how I wanted the front-underside to look; flat back to station 27.o and then I'll start curving the bottom up using stringers (most of the plane is going to be formed out with stringers).
The gussets for these locations are pretty big. Figured I'd drill a few lightening holes in them. (per Tony B... you take more out of a piece with a larger hole than two smaller hole; (1) 2" instead of (2) 1"). Didn't have the 2" I wanted to use, but a 2 1/2" will work. Set about drilling these out of gusset 27.o. I kind of remember it taking awhile to cut the holes... but 20-30 minutes for each one ??? All I did was stare at those pieces of metal for an hour and a half.
Well... got three holes cut... tomorrow I'll cut the hole in the last gusset.
January 13 and 15, 2013
Faster...
is sometimes better.
Continued working on the belly formers.
Sunday I cut the ligthening hole in the remaining gusset for station 27.o and cut all four out for the gussets at station 10.5. I'm thinking... the faster you cut the 4130, the better it is... otherwise it seems to "harden" the steel and makes it almost impossible to cut through. Don't quote me on this... just an observation.
Tonight I ripped a piece of plywood to use as the jig for holding the belly former at station 27.o. Marked the ply with the pattern... nailed a few brass brads into place to hold the former into positon.
Needed to confim the center of the fuselage so I took some nylon fishing line... stretched from front to back. Confirmed the center then locked the jig into position. Tacked the gussets on the front-side of the former... I'll confirm it's correct position tomorrow and then tack the back-side gussets on locking it into place.


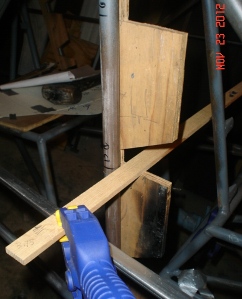 Over the past week I spent quite a bit of time (not recorded as hours) staring, in mid step... thinking of how I was going to start jigging the stringer stand-offs. Saw what others had done, but that was only the basis of what I wanted to do. After staring for quite a bit of time... letting those images and my thoughts reduce to the idea of what I was going to do... I got to working (Nov. 19 - 23) on jigging up the boards to hold the stringer stand-offs at the right height and the right distance off the fuselage box. The first two side stringers that I clamped into position looked great ! They actually formed the shape which I drew out on DeltaCAD. Spent the rest of that time measuring and cutting the jigs for the boards.
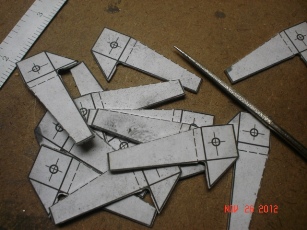
 Driving back to the office (I went during lunch) I remember
I just bought all those spring clamps to hold the stringers
to the jigging boards. One of those will work... Got home,
bent the end of the thick copper wire over and stuffed it
in the end of the alligator clip, went out into the garage
to get one of the larger plastic, spring clamps and threaded
the other end of the thick copper wire onto it. Presto-chango...
a Tony B. gripper.
Driving back to the office (I went during lunch) I remember
I just bought all those spring clamps to hold the stringers
to the jigging boards. One of those will work... Got home,
bent the end of the thick copper wire over and stuffed it
in the end of the alligator clip, went out into the garage
to get one of the larger plastic, spring clamps and threaded
the other end of the thick copper wire onto it. Presto-chango...
a Tony B. gripper.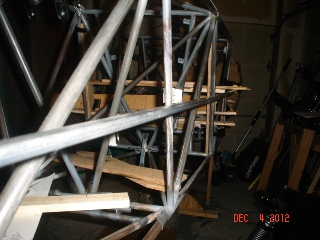

 Sunday I cut the ligthening hole in the remaining gusset for station 27.o and cut all four out for the gussets at station 10.5. I'm thinking... the faster you cut the 4130, the better it is... otherwise it seems to "harden" the steel and makes it almost impossible to cut through. Don't quote me on this... just an observation.