Mantua, New Jersey
Original Site:
September 2004
E-mail: usav8or@yahoo.com
more work on the...Radial Fuselage.
February 11, 2013
Whop whop whop...
ping !
Tonight's plan was to cut the belly stand-offs down to the length that the aluminum stringers would need to be off of the fuselage (note: they'll still need to be cut back 1/8" to allow the stringers to over hang). Why am I doing it that way... it's just the way I'm doing it.
Anyways... let me repeat... Tonight's plan was to cut the belly stand-offs to length... Okay... I was through cutting two of them down, working on the third and... the stand-off started to vibrate a little from the grinder... and then a little more... and before I could back off... PING !!!
DAMN !!!
Son-of-a-gun... the damn stand-off just broke loose from the fuselage (only had it tacked) and fell to the floor. DAMN !!!
Back to plan "B"... as if I had a plan "B" today. okay... to do it right I need to level the stringer front-to-back again with the laser level, clamp on the wood straight-edge and tack it back onto the fuselage. Either that, or I could give it the ol' "Looks good from here" level. naaaaaa... Looks like I'll be leveling the fuselage the laser again.
More of that back-and-forth-back-and-forth-back-and-forth-back-and... Well, you get the picture. I've written about it enough over the past few days. It's level. It's tacked. Packed up the welding equipment. Turned off and purged the torch. Take a second look at the stand-off and... It's a little too low ! DAMN !!! I'm thinking "Okay, it's a little low, but welding it is going to move it so it's "good enough", right ? RIGHT ???
HELL NO !!! Good enough is not Good enough !
I get the Dremel tool. Cut the tack. Open the valves on the tanks. Grab the torch and 1/16 inch rod and re-tack the stringer. Made sure it was level before packing it in... and we're back to where we were last night. Mission accomplished, NOT !
February
12, 2013
Getting yesterday
done...
today
?!
Got back out to the garage workshop and did what I was suppose
to have done yesterday... finish welded all the belly stand-offs
to the fuselage. Got real close to getting the formers welded
on... just need to turn the fuselage to finish up one of them.
The front, belly former gussets still need to be finished
welded. Need to attach the main landing gear to make sure
that they clear the gussets. Maybe tomorrow...
wait !... I need to cut these stand-offs down to size. So...
actually I haven't done was I was suppose to have done yesterday.
hmmm....
February
14, 2013
As I go along...
drivel and adjustments.
For some reason I find the need to watch "The Big Bang Theory"... for some reason (actually... I find string theory and quantum physics facinating.) Watched the new episode and then for some reason... watched "Two and a Half Men"... which is now more like two men since the kid joined the Army. ( still not sure why I watched "Two and a Half Men.")
Anyways... it got to be about 9 at night and I headed out to the garage to work on the biplane project. Still plenty to do on the stand-offs and formers. Since I have the fuselage on its side I work on everything that can be worked on when it's in that positon. aka... finish weld the gussets that are easiest to weld when it's on this side... measured and cut down the stand-offs that are easiest to measure and cut in this position.
I have the center belly stand-offs left to trim down to size. Then I need to mark and cut the angle from the tip to the base of the side belly stand-offs. The way they are now, the leg/angle isn't sharp enough and the fabric has a good chance of hitting the leg.
This is probably all drivel to you... just things I'm thinking of as I go along in the build; adjustments that I need to make from my original plan "A".
February
16, 2013
Finish it later.
Seriously ?!!!
Worked on something I thought I was going to just leave for now... finish it later, for some unknown reason.
I was going to cut down the stand-offs to the length that the stringers need to be and leave them for later... to cut down another 1/8". How idiotic is that ??? Where, or why would I even come up with a thought like that ???
Needless to say... I'm cutting down the stand-offs to the 1/8" shorter length to allow for the overhang of the stringers.
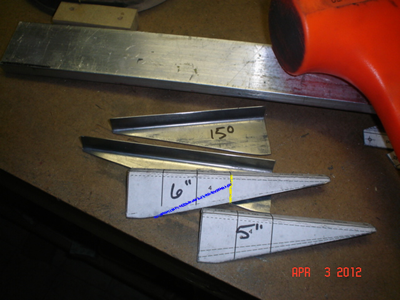
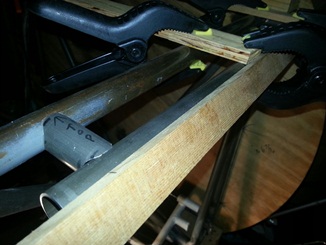
After working on the project tonight... The belly stand-offs are all cut to the correct length. I also adjusted the angle on some of the stand-offs so that the down leg wouldn't interfer with the fabric when covered. (I made several standard sizes. Some of these needed to be cut down a fair amount, thus leaving a very long vertical on the stand-off. This vertical length would have a good chance of hitting the fabric when finishing off the biplane.)
Here you can see what I did. The yellow line shows the length that I cut the stand-off to. You can see the vertical on that line is pretty long. I cut a new angle (blue line) to prevent the stand-off from hitting the fabric.
February 17, 2013
The shape of...
the belly.
More time on the belly stand-offs.
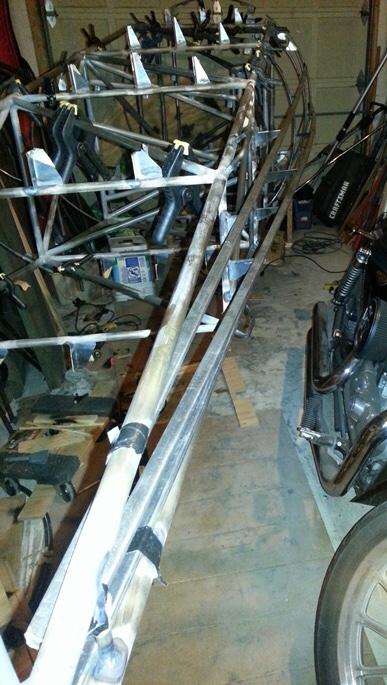
Yesterday I cut and trimmed everything to size (plus the 1/8" for the stringer overhang). Today... just a matter of filing and sanding smooth all the grinding that I did yesterday. Not much to write about... other than I've got the belly stringers taped into place. They've been cut a little long for now, but upon final fit... these will be trimmed to length.
Drum roll please...
Note: The angle of the camera is such that it looks like the front part of the center stringer is bowed out further than the forward formers...
February
18, 2013
It's not perfect...
but that's its beauty.
Worked on the starboard side stand-offs. Needed to confirm their lengths then put the correct angle on the legs so, like the ones on the belly, they don't interfere with the fabric covering.
I mark and hand grind the stand-offs to shape and size. and... I'm thinking as I do this, that these aren't all the same shape. These arn't the same exact shape ! I'm kind of (hmmm... what's the word ?) disappointed (I guess that's close enough) with myself. BUT as I thought about it... as I'm grinding these down to size... THAT's the beauty of it. This is a hand-crafted biplane. Nothing on it is CNC routed, nothing has been die punched, nothing has been done other than me cutting and grinding, cutting and sanding, cutting and pounding to shape, cutting and bending to shape...
I'm thinking about it some more... and I'm kind of (hmmm... what's the word ?) pround (THAT's the word !) of myself.
February
19, 2013
Mindless work...
time to think.
As I had mentioned in yesterday's post... tonight was for working on the belly stand-offs. As promised (I seem to be keeping these promises more often) I filed down and sanded smooth, the belly stand-offs that I trimmed to size and shape yesterday.
Other than the eye-hand coordination, not much to think about as far as my focus on the biplane project tonight. Gave me time to let my mind wander; thoughts of fractal geometry... and just a thought...
If nature is a repeat of itself in shape, why not in every other aspect too ?
February 20, 2013
Two less turkeys...
Needed to create new tabs for the bottom, rear stringer attach points. As of yesterday, the bottom, rear tab on each side of the fuselage allow the stringers to hit up againt a rear diagonal. Thought about cutting a few more of those "turkey tabs" to replace the two originally used and attach them to that diagonal. so... I cut out the patterns to see if it would work. No matter how I turned or twisted them they weren't cutting it. Took a look at one of the stand-offs and said what the hell.
Held the stand-off up to the diagonal, marked and cut to size. Close to working, but... no matter how I twisted it, it would still stick out past the side of the fuselage. Not a good thing. Thought about it for a little while, while flipping it around, THEN thought of fitting it up to the OTHER side of the diagonal.
WINNING !!! (yeah, sometimes it's the little things that make us happy)
The first modified stand-off was a little off. Cut down and trimmed a second and it was close to being perfect. Did the same for the other side.
It was just about 10PM... calling it a night. I'll get these tack and welded on tomorrow.
February 22, 2013
That looks good.
Not to be mistaken with...
You guessed it !!!... more work on the tabs and stand-offs tonight.
Flipped the fuselage upright and then positioned and welded on the new, rear stringer tabs I made the other night.
I was trying to figure out how to weld them on at the same angle... turned out using the "That Looks Good" method. (Don't mistaken this for "That's good enough" thinking.) I climbed under the fuselage, closed one eye and lined up the bottom center stringer with one of the diagonals... saw how the first one was angled then closed the other eye and did the same for the one I needed to tack on. Damn near spot on for just eyeing it up.
The only thing left to do for the stringer portion of the build (I think) is to re-measure the port stand-offs to make sure that they are at the same length as their starboard counter parts and then cut down the leg on them like I did the belly stand-offs. Put about 1/2 hour of time on getting that marked off the "to do list". It's not marked off yet, I only completed the stand-offs at station 49.o6. Tomorrow I'll finish the rest then tape on the stringers to give it a good look to see if it looks right. Then... it's on to another piece of the puzzle.
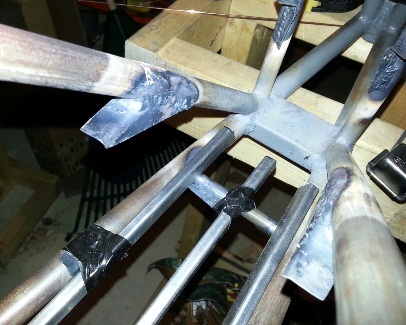
Here's a photo of the new rear tabs welded in.
February 23, 2013
A little duct tape.
and the stringers are on !
More work on the side stand-offs. A lot more grinding and sanding. Close to three hours later and they match the starboard stand-offs. Took some black duct tape and taped the stringers into positon... and it's looking good. (you do realize this is just temporary)
The stringers still need trimming to final size, but the photo will give you a good idea of what they look like on the fuselage.
I knew I needed to do something to the longeron area between stations 27.o and 49.o6. Where the fabric would normally attach to the longerons in these areas... the roundness of the fuselage won't allow it. I'll need to make a few false longerons to build up the area. I also need to re-make the upper former at station 49.o6. The first one was a little shy of being wide enough (by about 3/4")
Spent about a half hour making the new former pattern tonight. More work on it tomorrow...
February 24, 2013
Sometimes...
there needs to be change.
Needed to figure out what I was going to do between station 27.o and 49.o6. In addition to what I mention above, I need some type of support for attaching the tabs for mounting the sheet metal to the forward fuselage.
A lot of head scratching. Took a look at both the "Standard" and "R" plans. Needed to figure out where the spars and flying wires attach; see what areas I had to avoid. Discovered that the gussets that I have on the upper former at station 27.o are too close to the longerons. Took a few measurements, cut the pattern, cut out the parts and sanded the edges smooth. Other than some cleaning up, they're ready for mounting... tomorrow.
I've got to look at a few more bare fuselages to see what other have done at the forward end.
February 25, 2013
faking it...
As usual... thinking about the build throughout the day... what to do for the two false longerons between station 27.o and 49.o6.
Tossed around a few ideas but really needed to see the fuselage again. Tonight... looking at the fuselage I was still undecided. Tacked on the new gussets at station 27.o then fitted a few diagonal tubes between the upper and side formers at the same station. Wanted to connect the tubes instead of having them just float out there...
Finally decided that I'll stand-off the same size tubing as the longerons; come straight out from the firewall to station 27.o. From 27.o to 49.o6 I'll angle it back to the real longeron. Since it won't be structural I'll make it out of a thinner walled tube. I'll have to see if I have any of "that" size tubing laying around, if not, I'll have to order up some.
February 26, 2013
It was all about .944 tonight !!!
Planned on cutting some 7/8 inch tubing to make the false longerons I've been talking about for a few days.
Found an 8ft length of 7/8 x .o49 4130... but got to thinking about it before cutting it down. Hmmm... ??? How much weight will I save if I buy some 7/8 inch x .o35 instead of using the .o49 I have. Can't be much... four, two foot pieces, right ?
We'll here are the stats on it:
- 7/8 x .o49 = .432 lbs/ft.
- 7/8 x .o35 = .314 lbs/ft.
Eight feet of 7/8, .o35 tubing will save me .944 lbs... that's close to a pound of weight! Surprised me. I thought it would only be fractions of a pound.
Guess what I did ? Yup... ordered up a few lengths of 7/8 x .o35 tubing. Well worth a few days waiting to save the weight... any day !
NOTE:
Now... this isn't structural. It's building up the cage around the main structure to attach my sheet metal around the cockpits. I wouldn't be making a change to the plans to save some weight.
February 27, 2013
Some of that other stuff...
While waiting for the one pound lighter shipment (the new 7/8 inch tubing) I'm keeping busy with other stuff.
Tonight, that other stuff was tacking on the fairleads for the rudder cables. I've had them cut to size with the edges sanded smooth for some time now. They've just been waiting in the parts pile to be attached.
One point seven hours (and that's with point two hours taken out to look for items) and all four are welded on... still need to finish welding up the bottom side of the fairlead tubes.
Now... attaching them is a little bit more than clamping them to the fuselage and tacking them on... I ran fishing line from the rudder pedals back to the tailpost. That gave me the right height. Took that height and then fought the c-clamp-brass wire-alligator clip holder to hold the fairlead tube at the right height at the right location on the side tube. Do that four times... and it's close to two hours. Well, at least it is for me.
March 2, 2013
Friction cars and ray guns...
That one pound lighter package came on Friday. Went and saw my nephew Jonathon in his highschool play, Oliver Twist. Good show! So... no work on the biplane Friday.
Saturday I was able to work on it for a few hours. Took those light-weight tubes and started cutting and notching them. The first one took about an hour and forty minutes to notch... the second only an hour, and that included making the pattern and finding a marker (that would show up) to mark the pattern on the second tube.
Thinking... one reason I enjoy making this 4130 steel tube fuselage... all this grinding... the smell reminds me of the old friction cars. Or, one of those sparking ray guns... yeah... the good ol' days growing up.
Anyway... these two rear, false longeron tubes are close... on to notching the other tubes, then I'll fit everything up together and make the final adjustments to make them all work in harmony.
March 3, 2013
Tonight... long time
Started and finished working on the tubing for the front starboard false longeron. Make any sense ?
I wanted to keep the stand-off tubes back from the edge of the false longeron which meant that I didn't make the nice forty-five degree end joint that I would have liked to have had. the reason... I'm trying to look ahead and want to avoid the possibility of tubes on the end interfering with any wires, etc. Call me crazy.
A lot of stair climbing tonight. A lot of time for the small amount of work I actually completed. Not one to cut it to the line, I think it needs to be cut to, the first time... I'm not one for cutting too much off a valuable piece of tubing only to call it a "test piece." So... a lot of up and down the stairs; creeping toward the final cut.
The other side will go much faster. I'll take the two I notched tonight, fit them up to the false longeron on the port side... and, if they fit (which they will)... I'll make a few paper patterns from those tubes, mark the new ones, and have them notched in no time.


 As I had mentioned in yesterday's post... tonight was for working on the belly stand-offs. As promised (I seem to be keeping these promises more often) I filed down and sanded smooth, the belly stand-offs that I trimmed to size and shape yesterday.
 More work on the side stand-offs. A lot more grinding and sanding. Close to three hours later and they match the starboard stand-offs. Took some black duct tape and taped the stringers into positon... and it's looking good. (you do realize this is just temporary)
 A lot of head scratching. Took a look at both the "Standard" and "R" plans. Needed to figure out where the spars and flying wires attach; see what areas I had to avoid. Discovered that the gussets that I have on the upper former at station 27.o are too close to the longerons. Took a few measurements, cut the pattern, cut out the parts and sanded the edges smooth. Other than some cleaning up, they're ready for mounting... tomorrow.
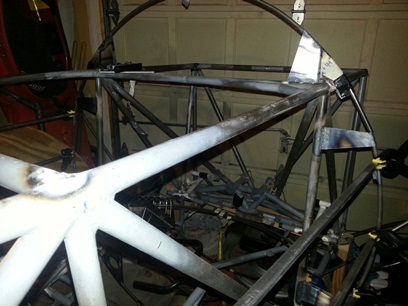
 While waiting for the one pound lighter shipment (the new 7/8 inch tubing) I'm keeping busy with other stuff.
  Thinking... one reason I enjoy making this 4130 steel tube fuselage... all this grinding... the smell reminds me of the old friction cars. Or, one of those sparking ray guns... yeah... the good ol' days growing up.
 I wanted to keep the stand-off tubes back from the edge of the false longeron which meant that I didn't make the nice forty-five degree end joint that I would have liked to have had. the reason... I'm trying to look ahead and want to avoid the possibility of tubes on the end interfering with any wires, etc. Call me crazy.