Mantua, New Jersey
Original Site:
September 2004
E-mail: usav8or@yahoo.com
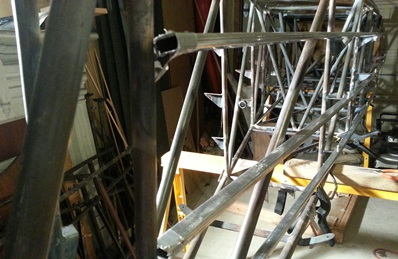
more work on the...Radial Fuselage.
March 4, 2013
I'm repeating...
myself...
Repeat of last night. Well, close to a repeat.
Took the first set of false longeron stand-offs to the port side to see if they worked. Needed to adjust the front firewall blank... sooch it to the port side slightly. This meant that I needed to cut down the front stand-off, from the first set, slightly.
Between sooching and filing down... it took close to an hour to do. With the first set of stand-offs damn near dead on... it was time to make the second set. Paper patterns, filing and grinding... another hour and I had the second set close to complete. Tomorrow I'll fit these babies up to the fuselage and see what I have. Then it's off to making the two front stand-offs for the angled, rear, false longerons (that's a mouthful !)
March 5, 2013
More care needs to be taken...
in setting up for the photo...
Close to finishing up the false longerons. Just a few things before tacking them onto the fuselage.
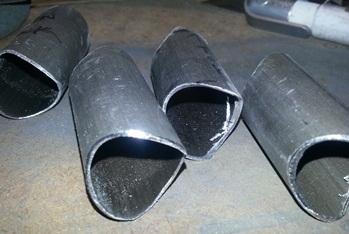
Needed to cap the ends of the two forward tubes. Cut four "caps" using a 1" hole saw then welded them on the ends of the two tubes. Lined up and aligned the two, with the stand-offs, on the fuselage and tacked them in place.
I'm giving it my "grace period"... letting them sit over night. I'll check the measurements and positioning tomorrow to make sure that they're done right.
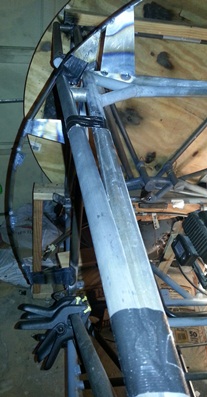
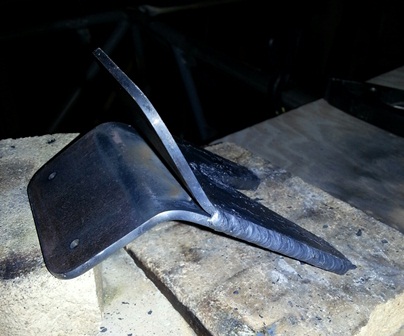
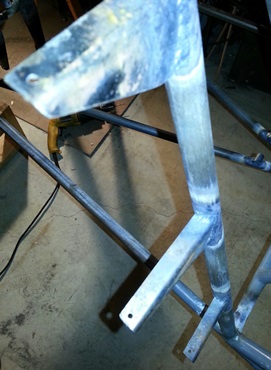
Here's a shot of the forward, port-side false longeron. I'll need to file some of the weld off the caps (not something you do with structural components) so that they're flush with the firewall. This isn't the best shot... it looks like the firewall is about 1/2 inch further out than the false longeron. Not the case... I took the firewall blank off to tack the forward stand-offs better and when I placed it back on for the photo... well, you see what I did.
March 6, 2013
Sometimes you don't even get to...
Plan A...
Late start... almost no start... tonight. Had a few things to do before even getting home from work, and I normally get home pretty late without a few things to do before getting home.
Did the normal stuff after getting home, and then it was "late". Wondering whether I'd even go out to work on it or not. Think about it a few times... and you'll end up going out to put some time on it (at least I did).
Okay... wanted to just confirm the back, angled pieces of the false longerons and then cut and notch the two front stand-offs for both of them. Well... I didn't even get to what I wanted to do tonight. Spent a little over an hour tweaking, re-notching, whatever you want to call, getting those two tubes to where they are suppose to be. The real kicker to it all was finally having the front, false longeron tubes in place so that I knew where the back ones needed to fall.
Tomorrow night I'll work on tonight's Plan A.
March 8, 2013
Getting to Wednesday's...
Plan A...
The plan is... the other day's plan. Yeah... notching the tubes for the false longeron stand-offs. As usual, the first one takes about 1 1/2 times longer to do than the second one. Of course, the second gets the help of a pattern to go by.
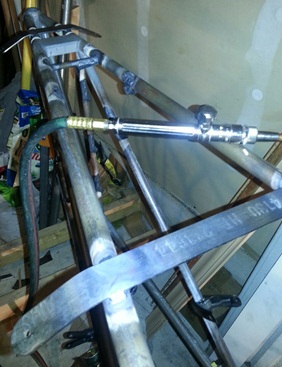
Here's a photo of the port side, rear, false longeron taped into position with the stand-off I just notched. Still need to cut the caps for each of the two rear tubes... then it's tacking them into place and on to the next project.
March 10, 2013
Wednesday's Plan A...
again.
In tweaking the two stand-offs for the rear, false longerons... I screwed things up somehow. Actually, I know how. As a result I needed to re-make the two stand-offs.
Finally, after close to two hours, I was able to move forward with the project. Made the end-caps for both rear, false longerons. Welded them on. Filed and sanded them smooth... then tacked them into postion. I'll wait until tomorrow to finish weld them. Another one of those... wait a day, check to make sure I did it right... then lock them into position.
March 11, 2013
One man...
balancing act.
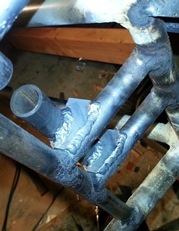
Started welding up the false longerons. Felt like I was spending more time flipping, or trying to figure out how to flip the fuselage, for welding the underside of the various tubes.
As always... tight quarters; very little room between the fuselage the Harley and the wall. and... I needed to flip the fuselage for the under-welds. You can make good welds from any angle... you need to have good access to the weld joint for pretty looking welds.
March 12, 2013
Another day...
One more night...
More welding on the same pieces. and... I'm still not finished. Still need to flip the fuselage back over and finish weld the up-right side. I should be finished with these tomorrow... "should" is the key word.
Here are a few photos of what I've been working on for so long.
March 13, 2013
Wednesday's Plan A...
Didn't get to it...
Got to thinking last night... yeah... got to thinking.
It's a royal pain in the ass flipping the fuselage over and over and over and over. So... before flipping it upright I saw a few parts I wanted to finish welding on and/or position and weld on.
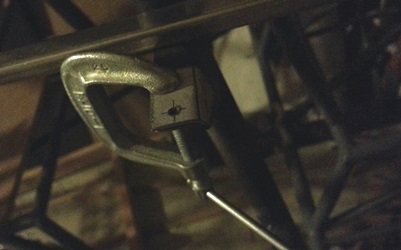
A week or two ago I welded on the top-sides of the fairleads. Still needed to weld the bottoms. I can now check that off the list of things still to do.
I've had the stabilizer wire attach straps finished for some time now; collecting dust and soot sitting on a shelf in the garage work area. Measured to Stations 142 and 163, centered and squared up both then welded the bottom sides. Another item checked off the list... well, lets put that back on the list until I flip the fuselage (tomorrow) and weld the top sides.
Tomorrow I'll get around to what I wanted to originally do tonight which was finish the welding on the false longerons.
March 16, 2013
Well...
it wasn't tomorrow.
Two work sessions today. First I needed to flip the fuselage to weld the top-sides of the false longerons. What a pain in the ass !!! Got it just about flipped and the front wooden support did what I knew would eventually do... kick out from under the front of the fuselage. No problem... I gently sit it on the floor of the garage and reposition the front support and I'm golden.
Pretty much finished doing the welds on the up-right side. Ran the top weld on the rear false longeron a little bit further forward than I did on the bottom for an easier wrap around the front. What's this all mean ? I need to flip it again to finish the weld on the under side. I hate welding upside down. But before I flip it...
I want to start/finish welding on the rear strut attached. It's positioned at station 24.o, right where I have one of my formers with gussets holding them in place. problem... becase I need to cut back the original gussets that I have on there to allow enough room for it to fit (the fitting overhangs the longeron by about 2inches. I'm 2inches too close to the longeron for it to fit. DAMN !
okay... Not a problem. All I need to do is cut the tack on the gussets (on the one side - 'cause the other side was okay). I tape the gusset in position to make sure that I leave enough room when I move the gusset, cut and then re-tack the two sandwiched gussets into position. DAMN !! When I re-checked the position of the re-tacked gussets they were still too DAMN !!! close to the gussets and would be rubbing up against them. DAMN !!!!
Repeat above procedure and I finally get it right.
My next plan of action is to weld on the 3-piece strut attach but I first need to drill the holes in the outer two, then match drill these hole with the third piece that get welded at an angle between the first two. (yeah... it doesn't make any sense without any photos... I'll post some in the next blog update)
March 17, 2013
Remeasured...
and I'm glad I did.
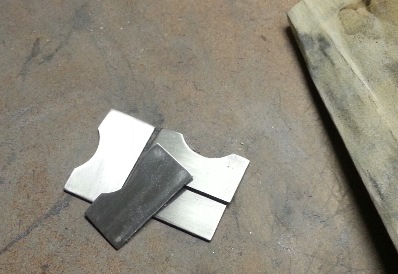
The angles on the brackets I made so many moons ago have to be right. I made them... so why wouldn't they ? Why do I even need to take the time to check them ? Eh ?
Well, I better, just in case...
Glad I did 'cause... they're just about dead on !!! (I'm so proud of myself.)
Needed to confirm the angles before making the under-sized holes, before welding these pieces together. Here's a photo of the one 150 degree angle measured with my precision protractor (and it is a fine instrument indeed).
March 18, 2013
When a 1 or 3...
and won't do.
Last night I confirmed that I bent these brackets right. Tonight... I need to start welded them up before I weld them onto the fuselage.
A 2-o-one didn't work...
a 2-o-three didn't work either...
Had to go to the 2-o-five.
Yeah, the 205 tip worked on the torch... but it still needed to blast it pretty good to weld these two thick pieces of metal. Close to two and a half hours and one of them has been welded up. Tomorrow... the other one. That is, unless I run out of either A or O. It's getting close.
Here's that bracket...
June 3, 2014
More...
than I thought.
Back working on a few left-over welds on the fuselage... parts and pieces that I've put on but didn't weld because I was unable to flip over the fuselage.
I finally flipped the fuselage... and remember at the same time that I had a few un-welded weld clusters. The first one I looked at (aka... worked on) wasn't cooperating with me. No matter what number torch I used and no matter what thickness rod I tried... it just wasn't lookin' purty. After messing with it for a while, I decided the only thing to do was to make a few brackets to hold the tubes in place. Got all eight cut and trimmed. Four of those are filed and sanded and one of those have been tacked into place on the fuselage.
I'll finish up those four next time.
Tonight's session got me thinking...
Seems like no matter how much I get accomplished on the biplane in a night... it just doen't seem like I've done anything to it if I wasn't able to accomplish the task I originally wanted to complete. And so it was tonight! I wanted to weld the eight spots I had earlier tacked.
It wasn't working no matter how much I fought with it. As mentioned above, I got all eight cut and four of them ready to weld on. But, not completing the task I wanted to accomplish made it feel like it was a wasted night.
Anyway... it's all in my mind. I got a lot accomplished tonight even though it didn't seem like it. Just wasn't what I wanted to accomplish. (Is any of this making any sense?)
Four of eight brackets.
June 5, 2014
More...
left-overs.
Growing up... I always liked left-overs. Kinda-do now. With the biplane project... left-overs... not so much.
Left-overs on a project means having to look over the project with a very keen eye after the fact to make sure that you've "completed" everything. Better to just get it done all at one time... But in the case of some of the welding, having to flipped the fuselage over and over and over is just more work (aka time) that I'd be putting on the project.
So... that's why I put more work on the brackets today; the ones that hold the walking beam.
Finished up filing and sanding the remaining four then clamped them on the fuselage (along with the three I had finsihed-sanded), tacked... then finished welded. Took a little over two hours.
Just a few more left-over welds to finish. I'll leave them for next time... (yeah, more left-overs)
What next ???
Brought the plans back to the place on Lombard Street to see what material I need to purchase for a few of the aluminum parts I want to make; battery box, seat pans and backs, heel trays, etc.
June 7, 2014
MORE left-overs...
and something new on my plate.
Started off today with making the brackets for the reverser (to finish weld the tubes that hold the reverser). Finished them up and began fitting them up to the fuselage when I noticed that two of the four areas where they are to attach... were already finished welded. DAMN !!! So... I finished welded the remaining two contact points. DAMN !!!
Searched the fuselage for more left-overs and found two that were half welds on the upper former just in front of where I sit. Finished that I in short order. Saw a few more that needed to be welded but more work needs to be done to those areas before finishing them up.
Had a few things I wanted to confirm and couldn't remember what they were so I sat in the cockpit for a bit... remembered on of the items was to confirm the width and depth for the front and rear instrument panels. THEN I remembered that I wanted to confirm the material that I had for the instrument panels.
Went down to the basement work shop and found a lot more aluminum than I thought I had (some of it was slated for the throttle quad... which I had already made.) Went back up stairs grabed the display board (that I'll be using to make a prototype of the instrument panels) and headed over to Mom's for a visit.
June 26, 2014
Working towards EXCELLENCE...
even though you can't see it.
I have a few things lined up in the que but things need to happen before I can do anything else with them. I was thinking all day (or at least a large part of it) of what I could tackle tonight.
The thought didn't occur to me to print out the additional parts and pieces I need to make for the trim/servo... I haven't ordered the additional tubing and bearings either. (what's up with that ???)
Got home... and STILL didn't know what I was going to do. Walked out to the project and there... staring me in the face were the stringer stand-offs. STILL needed to drill the stringer mounting holes in all of those. Found my project for the night. Spent a good amount of time looking for the section I printed out of the Skybolt Newletter with how far in and what size hole to make in them. Gave up the search and decided I'd make the holes undersize. I did remember that the stringers were to hang past the end of the stand-offs 1/8inch. I took a look at the width of the stringer and decided that another 3/16inch past the 1/8inch would center the hole over the remaining material left.
I have quite a few extra stand-offs left that I could make drill jig patterns from. Picked up a left and a right and DAMN !!!... there on one of the stand-offs, on the pattern still glued to the stand-off, was an 1/8inch hole 3/16inch from the end. sweet !!!
Quick made the drill patterns by drilling out the undersized hole in both the left and right spare stand-offs. They were off the center mark slightly... looked at it... hesitated... then said... "Ya gotta re-do these drill jigs" Went out found two more. Clamped these on a block. Started each hole with a center drill THEN drilled the undersized holes.
Both were pretty damn close to spot on.
Went out to the biplane fuselage and methodically went around and clamped and drilled all of the standard stand-offs on the sides. Miss-drilled one and will be going back, welding over the hole then re-drilling during my next session. Still need to drill the mounting holes in the belly stand-offs and the odd front and rear stringer attachments.
July 5, 2014
Not doing something...
that couldn't have been done in the first place ???
A trip over to the project... got quite a bit accomplished today. Wasn't all on the project per se.
Picked up a section of the Skybolt manual that I had printed out oh-so-many years ago. It discussed the trim/servo area. Started looking that over again and remembered I still needed to purchase a few lengths of tube and a few bearings. Didn't want to waste any time on something I wasn't going to be doing so I quickly put it down. Thought for a second and remembered I wanted to get the holes drilled in the stand offs.
Went down to the basement workshop and grabbed the drill, centering bit and the drill bits. Walked out into the garage work area and decided to spend a little bit of time cleaning it up. (I'm one to put all the time I have into working on the project... the 1/2hour of clean up is left until a time like this.) Picked up and threw away a number of boards that I had used when I was aligning the stand-offs... cleaned the crap up off of the workbench... an overall cleaning with the broom. Spent about a 1/2hour doing that today.
Back to the project... Drilled all the remaining holes in the stand-offs that I could. The rear most attaching tabs will be left until I see where they fall after I've cut the stringers to length.
For the most part it wasn't any big deal to drill the holes. Use the centering bit to start most of the holes then use the drill bit to drill the final hole through the piece of metal. I'd say about a half dozen of the stand-offs were difficult to get at. When I was doing it I was thinking... "Why the hell didn't you drill these holes before welding them to the fuselage?" Thinking back on it now... I couldn't. I aligned and welded the stand-offs with several "standard" length stand-offs that I made. Once they were welded on I positioned the stringers and marked their locations then cut to length. Prior to that I didn't know how long they would be, thus I wouldn't have known where to drill the holes. So I wasted all that time kicking myself for not doing something that couldn't have been done in the first place.
July 8, 2014
Not the tortise...
or the hare.
With the stand-offs drilled it was logical to begin match drilling the stringers to the stand-offs.
A while back I had left the stringers full length... planning to cut them to size when I attached them to the stand-offs. Taking an 1/8inch thick piece of 4130 I aligned the stringer so that they had an overhang of 1/8inch. Aligned and clamped the entire length before going back to mark them... then used the centering drill bit to start the hole then used a standard drill bit to drill the holes.
In the beginning of tonight's session I found myself thinking of not needing to use that centering bit... it'll be unnecessary, it'll slow things down, it will be a pain in the ass. But it's not a contest of seeing how fast I can get it flying. I'm not building this because I have to. So... KEEP THINGS AT A MODERATE PACE, Jerry !!!
A little over two hours and I have the starboard stringers match drilled and temporarily bolted into postion. Tomorrow I'll align and match drill the port side then the belly stringers.
Looking at this photo now.. I'll probably cap both the front and back of the stringers. Maybe not...


 Took the first set of false longeron stand-offs to the port side to see if they worked. Needed to adjust the front firewall blank... sooch it to the port side slightly. This meant that I needed to cut down the front stand-off, from the first set, slightly.
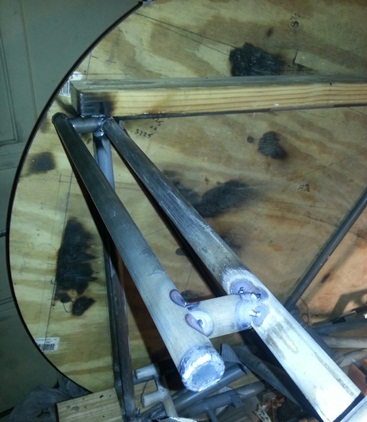
 Started welding up the false longerons. Felt like I was spending more time flipping, or trying to figure out how to flip the fuselage, for welding the underside of the various tubes.
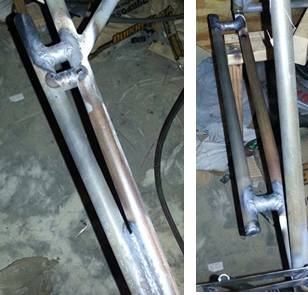
 A week or two ago I welded on the top-sides of the fairleads. Still needed to weld the bottoms. I can now check that off the list of things still to do.
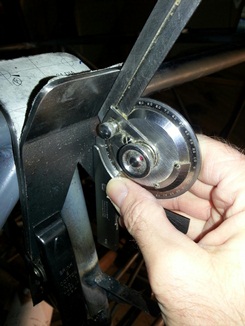
 Growing up... I always liked left-overs. Kinda-do now. With the biplane project... left-overs... not so much.
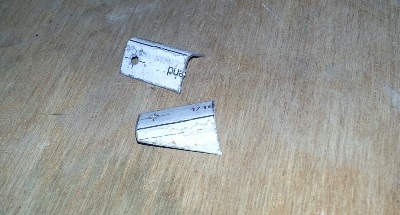
 For the most part it wasn't any big deal to drill the holes. Use the centering bit to start most of the holes then use the drill bit to drill the final hole through the piece of metal. I'd say about a half dozen of the stand-offs were difficult to get at. When I was doing it I was thinking... "Why the hell didn't you drill these holes before welding them to the fuselage?" Thinking back on it now... I couldn't. I aligned and welded the stand-offs with several "standard" length stand-offs that I made. Once they were welded on I positioned the stringers and marked their locations then cut to length. Prior to that I didn't know how long they would be, thus I wouldn't have known where to drill the holes. So I wasted all that time kicking myself for not doing something that couldn't have been done in the first place.