Mantua, New Jersey
Original Site:
September 2004
E-mail: usav8or@yahoo.com
more work on the...Radial Fuselage.
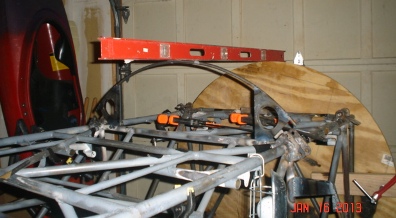
January 16, 2013
Why should I be...
a little peeved ???
Let me start with... I don't have all the gizmos that make things easy... or gizmos to align and jig things to the closest tolerences... and most times it takes me a lot longer to get things done 'cause of the tight quarters I work in. But I won't accept sloppy work and a "good enough" attitude. Which brings me around to my thoughts tonight.
I leveled the fuselage both ways and then squared up the jig for belly former 27.o. Tacked the back-side gussets onto the former... sweet !!! I step back and admire my handy work and.... damn !!! what's up with the side formers at station 27.o ??? They aren't square with the belly fomer I just tacked on... and I know that I took my time to square those side formers up when I tacked/welded them into place.
No sense in just staring at it and thinking... I planned on capping the front of the fuselage with the 44" diameter firewall blank that I had on awhile ago... I battled the thought of those mis-aligned side formers while I tried to figure out how one guy is going to attach the firewall blank to the turned-turtle fuselage (it's on its back). When I had it on the first time I had it screwed to a 2x4 that rested on the upper cross tube at station 0.o. Wanting the same set up now means that the 2x4 is on the wrong side of the round circle. It took some time... and it doesn't really matter what I did for the fix. It's hanging on the business end of the fuselage...
My mind wandered from the mis-aligned side formers while figuring out the task at hand. As I walked away from the firewall I glanced down at one of those side formers... seeing/realizing that the side tubes are at a slight diagonal. Not the problem that I had thought it was. I'm happy that I was concerned about it... but a little peeved that I spent time wondering...
January 17 and 21, 2013
It's got the big...
belly !
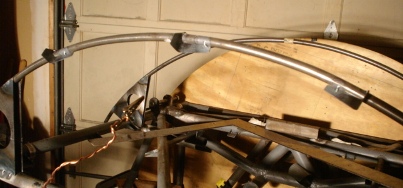
Working on the front belly former at station 10.5. A lot of time playing around with trying to get the angle from the firewall to station 27.o. It's not straight across... the top-center is straight but it falls off from there. The pattern that I made for station 10.5 isn't dead on. Ahhhh... no matter what I did... it wasn't working.
Left the garage workshop thinking that I would just do a partial former at station 10.5; up six inches behind each of the forward landing gear attach points. Figured, if I can't get it to work I'll do it this way...
Before working on the biplane tonight (Monday the 21st) I wanted to check the plans for the standard Skybolt to see how they had the formers at the landing gear attach. It's further back (I think at station 13.0) and they had a full former on either side of it. DAMN ! guess I'll be figuring out how I'm going to be doing it with mine.
The firewall is just ahead of the forward landing gear attach so I'm not putting an additional former between that and station 5.o... that's just nonsense and it'll be adding un-needed weight.
Saw in the Skybolt builder's manual where they used a sheet of aluminum to span the space between the formers for doing some other tasks... I didn't have any sheets of aluminum that I wanted to cut up just for that right now but it gave me the idea to use a few sheets of laminate (that I have) to give me the shape I need to fit the former at station 10.5. Found the partial sheets I had and started messing around with them and it somewhat worked, but not good enough for getting a nice, close fit.
hmmm...
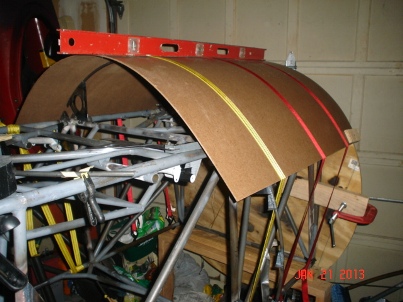
Started poking my nose around looking for something that would work... finally spied a sheet of 1/8th inch masonite that just might do the trick.
Drug it out to the garage and sized it up on the biplane... it was just about the right size. But, just a little too stiff to just wrap around the 44" diameter fuselage. After screwing it to the firewall and putting a few straps around it to hold the shape... I'm in bidness !!!
January 26, 2013
More work on the...
belly !
Over the past week, the cold temps have kept me from working on the project. 12 degrees... just a wee bit too cold to work out in the garage work shop.
During the day, today, it got up into the high 20's. Bundled up and checked the gusset pattern... checked out okay so I went ahead and marked, cut and filed down the other three. When admiring my work after cutting them down... I noticed that one of them had the lightening hole off-set from all the others. (nobodys gonna see it... right???) Well... good enough isn't GOOD ENOUGH !!! I'll be remaking one of these tomorrow.
Checking out the former again... laying up against the bent masonite... and its still not following the curve (didn't do anything to it so what would make me think things would have changed). Used the pattern that I had made awhile back... to bend the former (using the radius of the pattern as the outside bend on the tubing). Made the bends and tried it out against the curve of masonite. Still not there...
Held the pattern against the masonite and... I really need to modify it to fit nice and tight. Made a few marks. Cut some display board. Taped them where they needed to go on the existing pattern. Held the pattern against the masonite and, DAMN ! that's what I'm talkin' 'bout !
Took the pattern down to the basement work shop and made a few small bends to conform to the modified pattern... back up to the garage. Still needs a little bit of work.
Looks like I'll be doing a little tweaking on this tomorrow too...
January 27, 2013
Spending a lot of time...
between the garage and basement !
Did a lot of crawling around on the floor today. Did a lot of backing up underneath the fuselage today. Did a lot of walking up and down the steps today. Did a lot of bending back-and-forth of the former for station 10.5 today.
Did a lot of stuff today... but most of it was time in between doing work.
Started off today re-making the one gusset for station 10.5. Took me a little under and hour to do, start-to-finish.
Next on the agenda was to get the former to the right shape and then tack two of the gussets on and then tack the former to the gussets. The bending jig is down in the basement. The fuselage is up in the garage. Now ya can see where all the time was spent; hold the former up to the masonite former jig, see where it needs to be tweaked then go down to the basement to make those tweaks.
Multiply that by 12 and ya can see where all my time was spent... in between the fuselage and the bending jig.
Got it done though... gussets are tacked into place and the former is tacked too.
January 28 and 29, 2013
On a one-of-a-kind project of this size...
you'll be working with a few oddballs
from time to time.
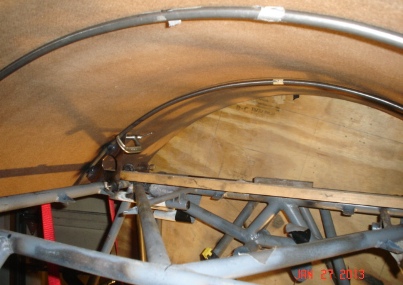
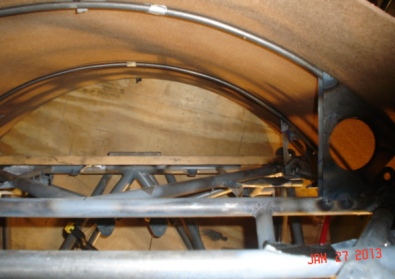
A little bit more work on the former at station 27.o. Needed to square the former up to the fuselage... tack on the remaining two gussets then tack the gussets to the former. With that completed I turned my attention to station 49.o6.
An oddball of a station... Backing up a few... I'm running the stringers back from station 27.o. A few tabs and I'll have them attached at 27.o. Looking at the CAD drawing I did of the Mystery Skybolt, I would need a 9" stand-off at station 49.o6 to hold the center stringer. I didn't want a stand-off that long for two reasons... 1. I didn't want stand-offs that long thinking there might be a chance of it giving slightly under the shrinkage of the fabric and 2. I have a pretty good suspicion that when I go to bang the leg on the stand-off with my deadblow its going to cup on me.
My solution:
Put a former at that location that is smaller than the radius I want at that location. I'll attach short stand-offs to it to achive the correct length. BRILLIANT !!!
Determined the size that I wanted the former... cut it to size, squared it up to the fuselage and tacked it in place. BOOM !
Okay... on to tonight's work; the 29th.
A repeat of what I did a few months ago... around Thanksgiving. Needed to make the tabs that the front and the rear of the stringers attach to. Had the patterns already printed out so all I needed to do was cut the patterns, glue to the .o32 4130, cut the shapes, grind the sides, file, sand and bend to shape. A little over an hour and I have six of these puppies ready for mounting and welding onto the beast.
January 30, 2013
Head scratching...
and blank stares
Started working on laying out the belly stringers. Decisions... decisions...
It's a no-brainer where I'll be connecting the front points on the stringers. The back ends another story.
Went back to the prints to see what kind of business was going on at the tail of the biplane; tailwheel, wires for the horizontal stabs, braces for the wires for the horizontal stabs... Just a few things to think about, er, work around.
After rough jigging the center belly stringer... there was quite a long thousand yard stare... Time well spent 'casue I've got a plan. I'll be ending the belly stringers just in front of the forward tailwheel mount. I'll need to weld in a 3/8" x .o35 cross tube which will allow me to weld on the back tabs. The belly stringers will end just before the side stringers (close... sweet !) .
I'll let this plan sit and stew for a day. My way of making sure it's something that I want to do; aka... the best way I see doing it. Tomorrow, after I'm sure, I'll mark the center points and side points (forward and aft) so that I can tack on the tabs.
From my initial rough jigging it looks like I'll be doing another one of those oddball former/stand-off combinations at station 77.o. The stringer falls to this natural curve. But... it's another thing I'll be confirming. If I can get away with just the three stand-offs, I'll be doing that... the original plan.
February 1, 2013
Thoughts...
without thinking
DAMN ! just had a brain fart... I know I've been working on the stringers, but there was quite a bit of work other than putting on a few tabs. All those days I spent on lining up the formers completely failed to register just now. DAMN !!!
anywho...
Spent tonight working on the front and rear tabs for the belly stringers.
I had the tabs already made so it was just a matter of welding them in place. well... not quite that fast or easy... The rear, center stringer tab needed to have a 3/8" x .o35 cross-tube cut, fitted and welded into place (I half-welded the top, er bottom half of the tube... waiting until I flip the fusealge to do the other 1/2). The cross-tube allowed me to mount the tab forward of the forward attach point for the tailwheel. I modified the two outside stringer tabs so that I could mount them to the lower longerons. They're now welded in place.
Intermission
After breaking for a few minutes (about an hour) I fitted up the front stringer tabs and tacked them into place. These are ready for me to finish weld tomorrow. It's just about time to lay this puppy on its side to level the stringers and tack on the stand-offs. Which reminds me... and this probably happens more times than I think...
I'm not sure what to do, or I'm not really sure of what I'll be doing, for the area between stations 27.o and 49.o6. Usually you have the stand-offs holding off the stringers on the sides and the bottom... these usually gradually blend into the fuselage, using the longerons as a "stringer" of sorts to hold off the fabric. well... this puppy has such a rounded fuselage it doesn't come close to blending in to the fuselage, thus I'm "missing" these longerons for the fabric support. I'll need to form pseudo-longerons in there somewhere somehow.
Which brings me to my "and this probably happens more times than I think..." I've been thinking on this for awhile... more than awhile. It's been a long time. It's a part of my constant thinking of the project and what I'll be doing with "this" or "that." Just an observation that some of these part and pieces are thought on long and hard without it really being thought of.
February 2, 2013
Four and a half...
the magic number !
Felt good to go out and work on the biplane project today... as always. Just seems I need to push myself after work sometimes to get things going. Guess that's a good thing.
okay...
Time to attach the stringers on the belly.
First thing on the agenda is to flip the fuselage on its side. Took a little doing... not wanting to hit the Harley a few inches away.
The front and rear tabs are locked into place. All I need to do is clamp a stringer at both locations and level it up... and that's just what I did. Turns out the stringer is a little too long and I needed to push it around the tailpost. and... Turns out that's not a good thing because it really twists the stringer. So... I had to do what I didn't want to do. I trimmed a few inches off the stinger. (whenever I need to do something with the stringers I keep thinking of the $250.00 shipping charge and not wanting to order more of these things)
Thinking back, remembering how I originally started leveling up the last stringers only emphasizes the beauty of this laser level. It is one sweet ! tool.
The way that the sides of the fuselage angle in... there is a large difference between the front tab and the rear tab. I took the laser and hit the center of the forward stringer. Went to the back and it's about 5" too low (grant it, I hadn't leveled it yet). Blocked the tailpost up so that the laser hit mid point on the rear stringer and go to the front... and it's off two inches or so... Back and forth a few times and it's finally hitting the center of both the front and rear points.
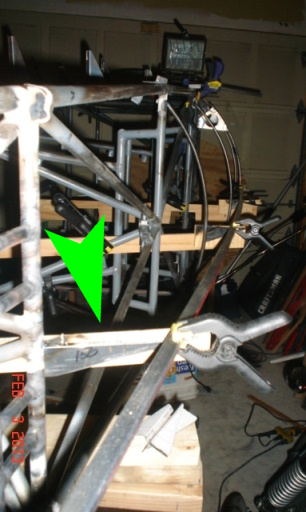
Now it was just a matter of time before I had all the stand-off locations leveled... and the entire stringer is leveled. After seeing it leveled, and it blocked out to the right distance I decided that I want to put an oddball at station 77.o. Had the former already bent. All I needed to do was determine how high I wanted it to stand off of the fuselage and then cut and tack it on the fuselage. 4 1/2 inches was the magic number ! (for some reason the song "Three" by "Blind Mellon" just popped in my head) Went down and cut to size... we're this far into the construction of the fuselage that I don't need to tell you how I did this...
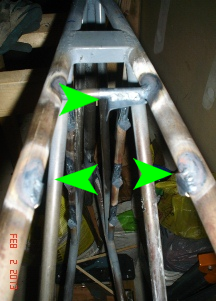
Tacked the former on at station 77.o and I think tomorrow I'll measure-cut-and tack one at station 105.o. From station 105.o back the stringer is pretty close to the fuselage.
arrow points to new former
February 3, 2013
Going back on my word...
the written word.
Walked into the garage to start grinding and tacking these stand-offs on to the fuselage.
Had to sit back and think about which stand-off where and to make sure that I had plenty of each one that I needed (depending on where it is, the flat-side always facing forward, I needed to make sure that I had the right stand-off at the right place, facing the right way) By the way... I have plenty. side note: I think I'm going to do the turtledeck in either thin ply or carbon fiber. (Probably thin ply). I had made stand-offs for the turtledeck,, thinking that I would do it with stringers. (thus the extra stand-offs) But... I'm still thinking about what to do with it.
With what-stand-off-where figured out I saw that most of the alignment boards were on the wrong side. They need to be on the front side to allow for easy alignment and tack-welding of the stand-offs. Spent the first hour changing over the boards and re-aligning what I had already aligned.
Broke for lunch and when I returned it was back to doing what I had done a month or so ago with the sides... grinding the stand-offs to fit and tacking onto the fuselage. Earlier, when I was seeing which stand-off went where I decided that what I originally wanted to do at station 105.o is what I am going to do. So... I'm going to have to go back on my writtenword from yesterday. I'm not doing the oddball at that location... which meant that I had to grind off the tack welds from the former.
six inch stand-off at station 105.o
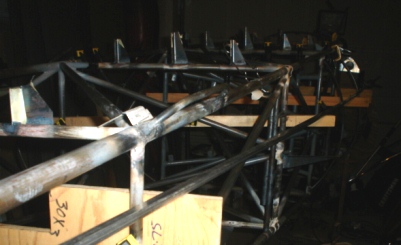
I'm happy with how it looks. The six inch stand-off is a pretty stout fitting. It ain't goin' nowhere !
In the photo above I have all the center stand-offs tacked in place. You can see the shape of the belly from here.
February 4, 2013
I hate welding...
wait... let me rephrase that.
I dislike... no, I HATE welding a vertical line. And... that's what I needed to do tonight. Wait... let me rephrase that. I HATE welding in close quarters.
Tonight I worked on welding the center belly stand-offs to the fuselage. Did it... but wasn't happy with the working conditions.
If I could move the Harley out of the way AND get my head in the right place to look at the weld... I'd be okay with it. BUT, tonight... the bike was in the way and a cluster of tubes wouldn't allow me to get a good view of the weld.
End result... messy looking welds. I made sure that they were solid welds... just looked messy. I'm thinking of going over the messy looking ones when I flip the fuselage upright again. Let me rephrase that... I WILL go over these messy looking welds when I flip the fuselage upright.
With the messy welds completed I needed to figure out the length of the stand-offs for the outer two stand-offs. The two that needed figuring out were at stations 49.o6 and 77.o. The other lengths at 105.o and 133.o would just fall to the natural bend of the aluminum stringer. Got the lengths figured out and I'm ready to level a few more stringers tomorrow.
February 5, 2013
starboard stand-off...
just One of One helluva lot...
of decisions to be made.
I wasn't sure if I had made the right decision about the spacing on the belly formers.
Let me back up about an hour. Tonight I worked on leveling the starboard belly stringer. Took awhile; quite a few back-and-forths leveling and re-leveling and re-re-leveling.
Okay... I'm finished leveling the stringer and I take a look at it and its reference/look to the center stand-offs I welded up yesterday. I knew that they would diverge on each other a little faster than the sides of the fuselage came in, but hmmm... ???
If what I was looking at was right... these things were coming in a lot faster than what I first thought. I started thinking I'd be making a change to the attach points on the rear of the two outer stringers. But before undoing all the work I had done, I decided to take a tape measure to it.
Yeah... they come in a bit more, and aren't spaced as far from the center stand-offs as they are from the longerons, but not by much. It's only about 1/2" of a difference.
Guess it was one of those optical illusions when viewing it from the front.
February 6, 2013
starboard stand-off...
leveled and tacked... on to port
More work on the belly stringers. Quite a bit of tweaking of the stand-offs. Spent close to two hours getting the second set of stringers fitted and tacked on...
One more stringer to go. After I get that leveled and tacked I'll flip the fuselage so that I can finish weld them.
February 8, 2013
I'M FINALLY FINISHED !!!...
the stringers... kinda-sorta
More work on the stringers... before starting my work I texted a shout out to my man Ray in the Night Time... on MGK. He gave me a shout back on the radio. (We've been in communications for years... and he knows I'm building this biplane, listening to him in the night time.) And, yes... Mr. Koob, I'd be happy to give you a ride in the biplane when it all gets finished !
Close to two hours of work tonight and I got the stringers leveled. There's more to it than just leveling the stringer from front-to-back. First the fuselage needs to be leveled from the front attach point to the rear attach point, THEN the leveling of the stringer between the two points. BUT, before I do all of that I need to get the laser level close to being at the right height... then make adjustments along the way.
All told... like I said before... close to two hours of work; 1.7 to be exact.
I re-inventoried my stand-offs. I've decided to have them all facing the same way on the belly. Which means... I needed to modify a few of the stand-offs that I had; cut-down and re-shape a few 3 inchers into 2 inchers.
Now that I have all that completed (and this is where the kinda-sorta comes in to play), I can grind these stand-offs to size and tack them on today. If I have time I'll flip the fuselage to the right position for welding them on (I'll grind down and re-weld those others as well.) It's a snowy day out there today so I'll have plenty of time to be doin' it.
February 9, 2013
Getting a few kicks...
with the laser level and the biplane
I get a kick out of building this biplane... I really do. and... Other than kicking the batteries in the laser level, things went along just fine today.
More of the same with confirming the levelness (wurd?) of the last stringer. After confirming, I went about tweaking/grinding the stand-offs and then tacking them in place. Two point two hours and I'm ready to flip the fuselage to finish weld all that I've tacked on over the past several days. Once they're tacked I'll go back and cut to length (the length before the 1/8" set-back).
Looks like it's close to being sent off to the sand blaster and paint shop (NOT !) Still a lot of bits and pieces to attach... I think I have most of them made.


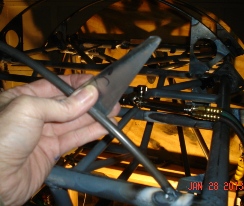 An oddball of a station... Backing up a few... I'm running the stringers back from station 27.o. A few tabs and I'll have them attached at 27.o. Looking at the CAD drawing I did of the Mystery Skybolt, I would need a 9" stand-off at station 49.o6 to hold the center stringer. I didn't want a stand-off that long for two reasons... 1. I didn't want stand-offs that long thinking there might be a chance of it giving slightly under the shrinkage of the fabric and 2. I have a pretty good suspicion that when I go to bang the leg on the stand-off with my deadblow its going to cup on me.
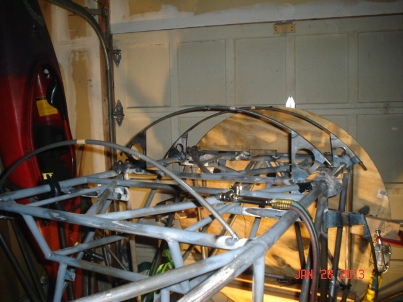
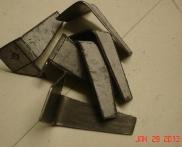 A repeat of what I did a few months ago... around Thanksgiving. Needed to make the tabs that the front and the rear of the stringers attach to. Had the patterns already printed out so all I needed to do was cut the patterns, glue to the .o32 4130, cut the shapes, grind the sides, file, sand and bend to shape. A little over an hour and I have six of these puppies ready for mounting and welding onto the beast.
 I had the tabs already made so it was just a matter of welding them in place. well... not quite that fast or easy... The rear, center stringer tab needed to have a 3/8" x .o35 cross-tube cut, fitted and welded into place (I half-welded the top, er bottom half of the tube... waiting until I flip the fusealge to do the other 1/2). The cross-tube allowed me to mount the tab forward of the forward attach point for the tailwheel. I modified the two outside stringer tabs so that I could mount them to the lower longerons. They're now welded in place.