Mantua, New Jersey
Original Site:
September 2004
E-mail: usav8or@yahoo.com
even more of... The Radical Radial Fuselage.
May 19, 2008 Riddle me this
... What's
the difference between.... A
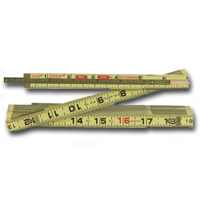
wooden fold-up carpenter's ruler
and
a Fat Max tape measure ?
A lot more than I thought there was... and it's not just
the looks.
On Sunday I went out to the garage workshop to work on the
fuselage. Figured I'd square it up and get to measuring,
cutting and notching those cross tubes in the back portion
of the fuselage. To get it nice and squared I'd do the same
thing as I did with the forward portion of the fuselage.
The bottom is blocked so I would just need to take the measurement
between several stations on the longerons that were attached
to the table (which are the upper longerons) and transfer
that measurement to the lower longerons (which are currently
up in the air.) Simple enough... right ?
OK... taking
my nicely crafted wood fold-up ruler, that I've owned for
more years than I can remember, I take the measurement of
three stations. I'm using this ruler because on the one
end there is a metal rule that slides out and makes it easy
to measure in between points with greater accuracy.
I take those meausrements and using my Fat Max tape measure,
I cut up a few pieces of MDF to make my spacer bars for
the lower longerons.
With the spacers in place on the lower longerons, which
are actually the upper one right now, I fabricated the X-turnbuckles
and begin to dial in a square frame.... and dial... and
dial... and (well, you get the point.) No matter what I
did I couldn't get the fuselage to square up. It always
ended up that the lower longerons (ones in the air) were
always further apart than the upper longerons (ones on the
table.)
I was so wrapped up into trying to dial in the right numbers
that quite a bit of time passed (wasted time) before I begin
to question the obvious... "If the lower longerons (yes,
the ones in the air) started out further apart than the
ones on the table, no matter what I did I wouldn't be able
to bring them closer together to make the frame square.
At some point I questioned that. Grant it, it was some time
before asking it.
I took the measurement
again with my "trusty" nicely crafted wood fold-up carpenter
ruler and sure enough, my measurements were "correct," the
same as what I had originally measured. Not just one, but
all three were dead on to what I had measured. Took my Fat
Max and measured the spacers and they were dead on too.
But, dead on wasn't working. Something got lost, or should
I say added, between the time I took the measurement in
the garage workshop and cutting it down in the basement
workshop.
It was when I placed both tape measures down to begin to
pull my hair out, in fustration, that I realized that I
had commited one of the most mortal of sins for any builder...
I had used two tape measures to measure one cut.
Once discovered I still used both rulers for measuring,
BUT I measured the wood rule with the Fat Max after
I got the initial reading.
Again I pose the question, "What's the difference between
the two rulers?" About three eigths of an inch. yeah...
don't ask me how I know, 'cause now ya know. But three eigths
???? who would have thought ?
Moral of the story. Measure twice, cut
once. Especially if you're using two rulers.
May 27, 2008 Looking over.... your
own shoulder...
No, I haven't placed the project on hiatus, again. I'm still
putting in my time building the Skybolt. What with the holiday
weekend, I found less time to work on her the past three
days than I do coming home after work at nights; three hours
over the weekend as compared to three point one hours tonight.
Guess I could always wake up and hour earlier and head out
to the shop before going to work....
anyhow...
Sometimes, we...i...me... get so wrapped up in the task
at hand that we...i...me... deal with what we're handed
and just kinda move on. Happens to me every once in a while,
but I'm glad that I catch myself each time it happens (at
least I hope that I do.)
The other day, for example, I'm measuring, cutting and notching
the cross-tubes for the back portion of the fuselage. I'm
measuring the angle for the cut with my adjustable square,
cutting the tube to size, locking it into the Joint Jigger,
notching it, taking the angled measurement for the opposite
end of the tube, positioning and then locking the tube back
into the Joint Jigger to make the final notch.
The first tube... fine...
the second tube... fine...
the third tube... fine... or so I thought, until I thought...
about what I just did or was about to do. Maybe I was so
use to having different angles cut each time I made a cut
for the fuselage sides that I fell back into that thinking.
Not sure who, or why, I thought about what had just taken
place, but I was sure it wasn't what should have taken place.
The second angled cut on the third cross-tube was measured
to be at a different angle than the first notch I made.
If the fuselage was square than this wouldn't be an issue.
But an issue it was. After all that time I had put into
making it "square" to only find out it wasn't square...
ah well...
The guy looking over my shoulder asked me to just step away
from the table for awhile... come back tomorrow. Think about
it.
If what I did wasn't working, then maybe I should look elsewhere
for the answer. And that's just what I did. I went to the
homebuilt Guru, Mr. Tony Bingelis. Took out his yellow and
blue books and started to thumb through them and found the
chapter on "How to square up your slightly outta square
fuselage before you go ahead and weld it up outta square."
Just like the bible... Tony's books will answer any questions
that you may have... about building an aeroplane. All you
need to do is ask.
Found it interesting, his method of making sure the bent-in,
back portion of the fuselage, is square. When laying down
the lines for the fuselage you generally have a center line
that you reference. Unlike myself, mark it with a dark colored
pen so that it's easy to see. Pencil ain't too easy to see,
especially after working with the fuselage on that table
for awhile. Anyway... just make sure it's nice and easily
readable.
After measuring and making the spacer bars put them into
position. Marked the center of spacer bars and drop a plumb
bob from them. Using your X-turnbuckles you can now square
up the sides with confidence in knowing that the lower longerons
are now squared with the rest of the fuselage. They may
be a wee bit narrower or a wee bit wider than the upper
longerons but they're square and symmetrical.
Whether it's a chapter member, or yourself looking over
your shoulder, step back when something doesn't seem just
quite right... 'cause probably 100 percent of the time...
it ain't.
June 16, 2008 It's painfully.... slooooooooooooooow
I've started back up on the fuselage... measuring, cutting
and notching the angled pieces that are in the upper-back
section of the fuselage.
I was out there for a little over an hour and a half and
I still haven't finished notching out the first tube that
I started on. What's up with that ? Ok... ok... so some
of that time was me running around looking for item's that
I placed in the perfect spot so I'd know where they were
the next time I needed to use them... ok... ok... so maybe
I worked on the actual plane for an hour. STILL...
an hour on one tube that isn't even completed yet ????
Not that I don't enjoy going out there, listening to some
MGK... Ray Koob.... spin some Stone's music... but an hour
on one tube ? What gives ?
I'm sure that I'm not the only one that takes an excessive
amount of time notching these complex multiple tube notches.
And yes... there is an easier way. Enter Tony Bingelis.
Tony B has a simple little device that he came up with to
mark the complex angles of tubes. You take pieces of 1/16th
inch welding rod and sew them into a thin material parallel
to each other. Wrap that around the tube that you need to
notch into the other tubes, with a little over hang, press
it into the tubes that you'll be notching it into and waalaaa
! instant shape that you can now draw on the tubing and
notch real quick... unlike my method of hand marking the
tubing with something close to what you need notched, grind
a little, hold up to fuselage, grind, hold up to fuselage,
grind, repeat repeat repeat. An hour later, still repeating.
I actually had Denise sew me up one of those "marker-thing-a-majigs"
a few months ago. Asked her to use denim so that it would
take a little punishment from me. Don't use it.... much
too thick to get the welding rod close enough together to
make a useable pattern to mark. I'm acutally thinking nylon
stockings as the material... would allow the weld rod to
move freely and it's ultra thin.
Hint. Don't even think of notching without this "marker-thing-a-majig."
You'll only make your life go by painfully slow.


 OK... taking
my nicely crafted wood fold-up ruler, that I've owned for
more years than I can remember, I take the measurement of
three stations. I'm using this ruler because on the one
end there is a metal rule that slides out and makes it easy
to measure in between points with greater accuracy.
OK... taking
my nicely crafted wood fold-up ruler, that I've owned for
more years than I can remember, I take the measurement of
three stations. I'm using this ruler because on the one
end there is a metal rule that slides out and makes it easy
to measure in between points with greater accuracy. I took the measurement
again with my "trusty" nicely crafted wood fold-up carpenter
ruler and sure enough, my measurements were "correct," the
same as what I had originally measured. Not just one, but
all three were dead on to what I had measured. Took my Fat
Max and measured the spacers and they were dead on too.
But, dead on wasn't working. Something got lost, or should
I say added, between the time I took the measurement in
the garage workshop and cutting it down in the basement
workshop.
I took the measurement
again with my "trusty" nicely crafted wood fold-up carpenter
ruler and sure enough, my measurements were "correct," the
same as what I had originally measured. Not just one, but
all three were dead on to what I had measured. Took my Fat
Max and measured the spacers and they were dead on too.
But, dead on wasn't working. Something got lost, or should
I say added, between the time I took the measurement in
the garage workshop and cutting it down in the basement
workshop.