Mantua, New Jersey
Original Site:
September 2004
E-mail: usav8or@yahoo.com
November 23, 2007
Are we ready to Weld...
nope, still got that other 90% to do.
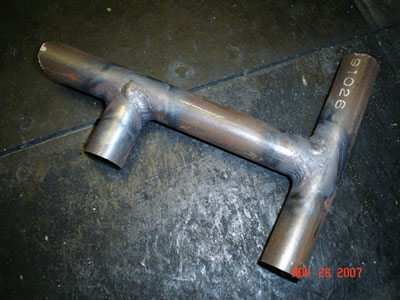
I love building this biplane. Really...
I was finally ready to start welding the rudder pedals together.
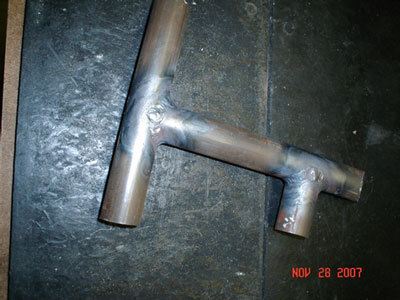
I got all the pieces together in one place and took a look
at them. Hmmmmmmmmmm.... "Houston we have a problem."
First off, the fittings that connect to the rudder cables
needed holes drilled and reamed in them, which I've never
done before (the drilling and reaming of metal.) They also
needed their final sanding to get all those grinding marks
out of them and take the scratches off the front and back
surfaces. I also need to cut the 7/8" caps for the two brake
pedals, the type of welding which I've been practicing for
the past few night.
So... it doesn't look like I'll be welding
these up today.
I'll tackle drilling and reaming the holes and then sanding
out the grinding marks. Drilling and reaming... a topic unto
itself. Of which, I'll explain here.
If you've drilled and reamed before... you can skip this entry
all together. Just a post for those, like myself, that haven't
had the joy of completing so many tasks for the outcome of
one item, drilling a hole.
OK, we've already drawn out our fitting, glued it to the 4130
that we're going to cut it out of and after cutting out on
the bandsaw have ground down the sides to the point that the
fitting is a little oversized (for the final sanding.)
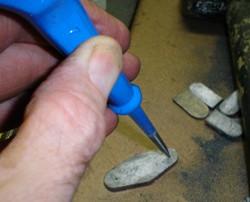
We're ready to drill holes men. Taking a center punch/scratch awl mark the center of the hole that you are about to drill.
The bit will tend to "drift" off it's mark if you don't do this first.
Next we need to clamp the metal fitting down to the drill
press. Use a piece of plywood underneath the fitting so that
you won't be drilling holes into the drill press table (we
are using metal drill bits here.) By the way... get the
best metal drill bits that you can afford. Treat 'em right
and they'll last forever. Take the time to make sure that
the bit is centered over the mark. I'll say it again... T
A K E T H E T I M E to make sure the bit is over
the mark. We're drilling precision holes here and if you make
a mistake now you might as well go back to cutting another
piece of 4130 and starting all over again. OK.. so we have
our fitting good and snug so that it won't move when drilling.
Chuck your under sized drill bit into your drill press. I've drilled mine two numbers down from the final size hole
that I'll need. Why do we use an under sized bit, you ask... you'll need to ream it to size once you're finished drilling the "pilot" hole. (The purpose
of reaming is to give you a hole that doesn't have any rifling marks, marks that may lead to cracking.
We're just about ready to drill. Now put a drop of that cutting fluid you have on the spot that you'll be drilling. You do
have cutting fluid, don't you ? You'll get away by not using cutting fluid, BUT you'll be going through drill bits
like they were toothpicks after eating corn on the cob. (I'll wait here while you run out to the local hardware store to
buy some of that cutting fluid.)
For those of you that did your homework and have that fluid now, we'll move one. They can catch up when they get back.
Set your drill press to spin at 500 - 600 rpms. The lowest
mine will go is 600 and it's working fine for me. SPEED
kills drill bits when drilling into 4130. Slowly lower the
bit to the fitting and allow it to slowly begin to
chip away at the metal. I don't know if it's a common practice
but on thicker pieces of 4130 I'll use another drop or two
of cutting fluid as I progress with drilling of that hole.
It's a lot cheaper than buying another drill bit. (By the
way, as far as drill bits go... buy an entire set and then
extras of the ones that you more commonly need. Yeah I know
I said that if you take care of your drill bits they'll love
you forever. For some reason, some night, you'll be happily
working on drilling holes in your fittings and you'll end
up breaking one, due to your own doings. Spend a few extra
dollars now so that doesn't ruin your evening.) OK... back
to drilling this one hole.
The hole is drilled, now what ? You'll need to ream this to
it's final size. What I do, as suggested by Randy on the biplane
forum, is chuck the reamer into the drill press. WAIT
don't turn that thing on. What you want to do is slowly lower
the reamer into the hole while hand turning it. Take your
time and do it very slowly. Every so often back the
reamer up so that it can clear itself of the metal. You can
actually heard the metal make a snapping noise some times.
Be sure to ream the entire length of the hole with the larger
diameter part of the reamer. It's fluted, and if you don't
ream the entire hole you'll be working with an under sized
hole which will bite you in the ass later on.
I use a left-hand spiraling hand reamer. JimW from the biplane
forum suggested getting the hand reamers. You can use a hand
reamer in a chuck or take a reamer handle and turn it by hand.
If you get a chuckable reamer you can only use it with a drill.
Side Note: What kind of reamer to buy.
Hand - Reamers Diameter: 1 Flute Type: Left Hand Spiral/Right Hand Cut Material: HSS
Bought my reamers from MSC Direct.
After drilling and reaming the holes for the piece you're working on you'll want to take a piece of sandpaper and cut the
sharp edge off (bevel) of the entrance and exit of the hole(s) you just drilled. At this time I'll take the entire piece
over to my table top sander and clean all the grind marks off with 150 grit metal sandpaper and spray a shot of primer on
it if I'm finished with the piece.
All that for one hole, you say. Yep, all that for one hole. Goes pretty quick once you've done it a few times.
November 28, 2007
Took a few minutes to scrape the cadmium plating off a few expensive AN bolts. Click here... to prevent a tragedy like this from happening to you.


 We're ready to drill holes men. Taking a center punch/scratch awl mark the center of the hole that you are about to drill.
The bit will tend to "drift" off it's mark if you don't do this first.
We're ready to drill holes men. Taking a center punch/scratch awl mark the center of the hole that you are about to drill.
The bit will tend to "drift" off it's mark if you don't do this first. 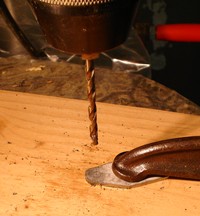 Chuck your under sized drill bit into your drill press. I've drilled mine two numbers down from the final size hole
that I'll need. Why do we use an under sized bit, you ask... you'll need to ream it to size once you're finished drilling the "pilot" hole. (The purpose
of reaming is to give you a hole that doesn't have any rifling marks, marks that may lead to cracking.
Chuck your under sized drill bit into your drill press. I've drilled mine two numbers down from the final size hole
that I'll need. Why do we use an under sized bit, you ask... you'll need to ream it to size once you're finished drilling the "pilot" hole. (The purpose
of reaming is to give you a hole that doesn't have any rifling marks, marks that may lead to cracking.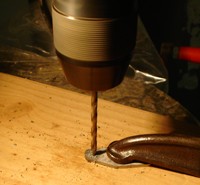 Set your drill press to spin at 500 - 600 rpms. The lowest
mine will go is 600 and it's working fine for me. SPEED
kills drill bits when drilling into 4130. Slowly lower the
bit to the fitting and allow it to slowly begin to
chip away at the metal. I don't know if it's a common practice
but on thicker pieces of 4130 I'll use another drop or two
of cutting fluid as I progress with drilling of that hole.
It's a lot cheaper than buying another drill bit. (By the
way, as far as drill bits go... buy an entire set and then
extras of the ones that you more commonly need. Yeah I know
I said that if you take care of your drill bits they'll love
you forever. For some reason, some night, you'll be happily
working on drilling holes in your fittings and you'll end
up breaking one, due to your own doings. Spend a few extra
dollars now so that doesn't ruin your evening.) OK... back
to drilling this one hole.
Set your drill press to spin at 500 - 600 rpms. The lowest
mine will go is 600 and it's working fine for me. SPEED
kills drill bits when drilling into 4130. Slowly lower the
bit to the fitting and allow it to slowly begin to
chip away at the metal. I don't know if it's a common practice
but on thicker pieces of 4130 I'll use another drop or two
of cutting fluid as I progress with drilling of that hole.
It's a lot cheaper than buying another drill bit. (By the
way, as far as drill bits go... buy an entire set and then
extras of the ones that you more commonly need. Yeah I know
I said that if you take care of your drill bits they'll love
you forever. For some reason, some night, you'll be happily
working on drilling holes in your fittings and you'll end
up breaking one, due to your own doings. Spend a few extra
dollars now so that doesn't ruin your evening.) OK... back
to drilling this one hole.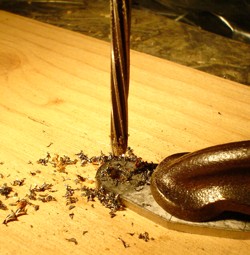 The hole is drilled, now what ? You'll need to ream this to
it's final size. What I do, as suggested by Randy on the biplane
forum, is chuck the reamer into the drill press. WAIT
don't turn that thing on. What you want to do is slowly lower
the reamer into the hole while hand turning it. Take your
time and do it very slowly. Every so often back the
reamer up so that it can clear itself of the metal. You can
actually heard the metal make a snapping noise some times.
Be sure to ream the entire length of the hole with the larger
diameter part of the reamer. It's fluted, and if you don't
ream the entire hole you'll be working with an under sized
hole which will bite you in the ass later on.
The hole is drilled, now what ? You'll need to ream this to
it's final size. What I do, as suggested by Randy on the biplane
forum, is chuck the reamer into the drill press. WAIT
don't turn that thing on. What you want to do is slowly lower
the reamer into the hole while hand turning it. Take your
time and do it very slowly. Every so often back the
reamer up so that it can clear itself of the metal. You can
actually heard the metal make a snapping noise some times.
Be sure to ream the entire length of the hole with the larger
diameter part of the reamer. It's fluted, and if you don't
ream the entire hole you'll be working with an under sized
hole which will bite you in the ass later on.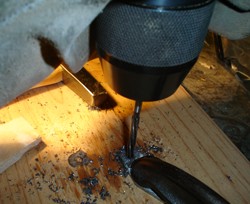 I use a left-hand spiraling hand reamer. JimW from the biplane
forum suggested getting the hand reamers. You can use a hand
reamer in a chuck or take a reamer handle and turn it by hand.
If you get a chuckable reamer you can only use it with a drill.
I use a left-hand spiraling hand reamer. JimW from the biplane
forum suggested getting the hand reamers. You can use a hand
reamer in a chuck or take a reamer handle and turn it by hand.
If you get a chuckable reamer you can only use it with a drill.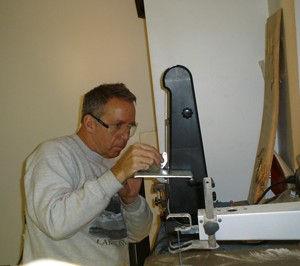 After drilling and reaming the holes for the piece you're working on you'll want to take a piece of sandpaper and cut the
sharp edge off (bevel) of the entrance and exit of the hole(s) you just drilled. At this time I'll take the entire piece
over to my table top sander and clean all the grind marks off with 150 grit metal sandpaper and spray a shot of primer on
it if I'm finished with the piece.
After drilling and reaming the holes for the piece you're working on you'll want to take a piece of sandpaper and cut the
sharp edge off (bevel) of the entrance and exit of the hole(s) you just drilled. At this time I'll take the entire piece
over to my table top sander and clean all the grind marks off with 150 grit metal sandpaper and spray a shot of primer on
it if I'm finished with the piece.