Mantua, New Jersey
Original Site:
September 2004
E-mail: usav8or@yahoo.com
October 21, 2007 A little bit of air and glasss...
to clean things up.
Put the Sand
Blasting contraption together today. Purchased it from Harbor
Freight about a month ago, along with the light that fits
into the cabinet. The cabinet went together without a problem.
The light, on the other hand, was a little confusing. Here
in America when you're dealing with electricity black goes
to black and white goes to white. Green is the ground. Well...
it ain't so with this Chinese import. (By the way... that
isn't me or the contraption in the photo.)
Apparently white goes to black so that you can use the little
gray wirenut they give you. And when you hook it up like this,
even though it doesn't make any sense, you don't trip one
of the breakers in your electrical box. Go figure.
OK... got it all together... figured I'd hook it up and clean
up a few fittings I had purchased way back when and then spray
a coat of primer on them. It's never that easy... is it.
No fittings for hooking up to the air compressor came with
the sandblasting contraption. Off to Home Depot I go. Lucky
it's only a mile from the house.
Fitting
in hand, I leave Home Depot and head back home. A little teflon
tape on the end of the threaded flange and on goes the nipple
fitting. Beautiful ! Compressor is already charged
so I don my goggles, even though there is a glass shield between
the gun and myself and the cabinet is locked securely. Figured,
what the heck. The more protection the better. Pull the trigger
and I start cleaning up. The end of the nozzle is a bit larger
than what I would think it should be, but hey, they must know.
Just at that point the air compressor kicks on.
It hasn't been any more than 30 - 45 seconds and the compressor
is kicking on already ? Whats up with that ? This is going
to take a bit longer than I thought it was going to take.
The
blaster works great when I have air to supply to it, but when
the air gets low I don't really think I'm achieving much by
keeping the trigger pulled. So every 30 - 40 seconds I'm releasing
the trigger so that the compressor can build pressure back
up. The DeWalt air compressor that worked so great for shooting
brads into wood trim is putzing out on me when I use it for
sandblasting. At this point I'm not going to be going out
to buy a larger compressor, but for those of you who are looking
to get a set-up for sandblasting... go with as large a compressor
as you can... none of that portable stuff.
With that being said, and probably twice as long as it should
have taken, I have the eight fittings all cleaned up and primered
just waiting for their final coat. Actually, I'll be sandblasting
them again to get the primer off and then re-paint with the
system that I will finish the Skybolt in.
Guess I'll be using that new lathe of mine to make a smaller
nozzle for this sandblaster. It'll be some good practice for
me.
October 22, 2007 Back on the bandsaw wagon...
When my bandsaw went south on me the other night I tried cutting some small fittings out with a hacksaw...
it can be done, but it's no fun at all compared to the bandsaw. Figured why put hours on hand cutting when I have other things to do, like practice welding.
Took a drive down to Vineland, New Jersey, this weekend. The home of
Harbor Freight and the only place around that has 64 1/2" bandsaw blades in stock. (I'll be waiting a few weeks before I get the "custom" ones
I ordered over the internet. Picked myself up an 18ppi (points per inch) blade. As I've mentioned before, you need to have at least two teeth within the width of the piece of metal
or you're going to break a tooth. Once that happens you'll need to replace the blade because it'll keep getting hung up on the one area where the tooth has broken off.
Tonight I made a point of trying to figure out just what happened to
the bandsaw. I'm no machinest, and I'm not really sure of
how to align things, but figured it'd be kind of self explanatory
in aligning blade with the guide wheels and trimming it out to stay on
the pullies. After tinkering around with it for about 45 mintues
I was ready to cut out that .100 4130 I've been waiting over
a week to do.
As always... it cut that metal like budda. I'm back in business.
October 24, 2007 Lost a tooth... back to being a hacksaw and file guy
Had to cut
a piece of .070 4130 into some fittings. Held the blade up
to the piece to make sure that at least two teeth were within
the thickness of the metal. Yup... good to go... or so I thought.
Applied the Boelube so that I'd have no issues with the blade overheating. Made six cuts... and the blade jams on me!
Actually, it didn't seem like it was a broken tooth. When I looked at the blade it looked like the teeth in one section had worn down already.
POS blade ! Used it twice and it's already shot. Looks like I'll be hacksawing a few of these fitting out of the thinner 4130. I'd wait for the new
blades to come in but I want to get these rudder pedals finished.
Finished cutting (by hand) the four 3/4" x 4" fittings that are welded up to the back of the rear brake pedals. Took them to the grinder and only need to finish sanding to size.
A little off topic... received the set of center drills that I won on eBay in the mail today. Sweeeeet ! An older set of center drills that were used by a machinest. Beautiful set for
just about nothing. I'll be using these to start the drill holes in the rudder pedal horizontal tubes on the lathe.
January 20, 2008 A 3/16" bolt doesn't always fit...
into a 3/16" hole
better know as...
Ripping cadmium off my Bolts
Thought I'd take extra step and make every part of the aircraft a little bit nicer, without adding weight of course.
One of the guys on the biplane fourm mentioned that he used AN bolts to connect the brake pedals to the rudder
pedals. Most just used 3/16" threaded rod. I figured I'm doing it up right so I'll go the extra and buy some
nice looking 3/16" bolts.
Ordered them from Aircraft Spruce. I've had them a little while and decided I wanted to put the pedals to bed, which
meant that I needed to attach the brake pedals to the rudder pedals. Ah... what will it take, five or ten minutes, at
the most ? WRONG ! again.
First off... I found that I needed to screw the bolts threads into the opening. (ut-oh, this doesn't seem right) Then when the shaft of the
bolt hit the opening it wouldn't "thread" through the opening in the fitting. I started to tap on it gently with a
small tack hammer. (son of a gun) It just wasn't working. It was such a tight fit I had to back the bolt out by
pulling on it with a set of pliars. When the bolt was finally extracted from the opening I saw that the cadmium
plating was ripped from the sides of the bolt. (what the hell...???)
I knew the hole was reamed to the 3/16" size.... I know 'cause I triple checked it. I wanted to be sure not to
scrap any of the plating off because that plating was protecting the bolt from rusting. What am I doing wrong ?? Couldn't
figure it out. Should I be making the hole a little larger so that there is a slight amount of "play" in it so that
the bolt would be able to slide ? I'm told that sliding duct tape against duct tape is a lot easier than sliding
metal against metal. It seems logical that I should "open" the hole slightly, but everything I've been told, and read, says to have a "tight" fit. What's
tight though ?
OK... forum time.
Threw the question out to the group. Scottly, the first to reply.
Scottly wrote that AN bolts are usually sized, THEN plated. So, my 3/16" bolt is actually larger than 3/16." That
perfect 3/16" hole I've worked so hard to get isn't the right size after all. Another damn! His suggestion...
an adjustable reamer. An adjustable reamer allows you to make a slightly larger hole than the one you "need" to
make. Is that funny or what ? Ream to 3/16" but add a few thousanths to it ? hmmmmmmmmmm... Sorta like when I was taking Linear Algebra
in high school. Don't need to know why... it just is. Ok.
Neil wrote that the parts need to fit snug but not "dowled" together. His suggestion was to drill the hole slightly
larger, maybe use a #12 or #11 drill. And added, that a good sharp drill makes a perfectly acceptable hole.
What my 3/16" hole, or any hole, needs is a couple thousanths clearance. Make that a #11 on a 3/16" and you'll be in the groove.
OK... not a problem, but where do I need to ream and where is it OK to just drill a slightly over-sized hole ?
Neil wrote that there aren't a lot of places that require a reamed hole. The ones that do are welded fittings that
have long bolt passages, such as a cabane or landing gear fitting. He said that a reamer not only sizes the hole
but it also insures that it is straight. His closing line, "Try to maintain as good a fit as possible. Bolts
should slide through the hole without scraping the plating off, yet not move about in the hole."
Now a little about adjustable reamers. If you're going to drill a 3/16" hole get an adjustable reamer for that size hole. A 1/4" hole
the same thing... etc. As a general rule, you'll have an adjustable size reamer for each size hole you want to
make slightly over-sized.
In closing... Beej made the following post, which I feel pretty much sums up building any part on your biplane.
"IMHO, while reaming to size is perhaps not always neccessary, it is a solid blanket rule that us non-engineer types
can follow to keep us on the straight and narrow. " In other words, stick to the "standard practices" and only
stray from these when neccessary. And, then, and only then, after consulting with those more experienced.
One last thing about holes in metal. Make sure you take the "edge" off of the hole. I use an over-sized bit to put a slight bevel
on each end. This bevel helps prevent, what would otherwise be a sharp edge, from scraping the hardward as it passes through the opening.
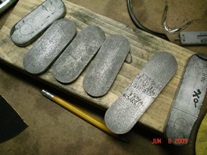
June 8, 2009 Orange peels or steel... what am I looking at ?
It's not that I didn't notice how rough the .190 4130 was when I bought it... I just didn't give it a second thought. But now that I'm finishing off these fitting that I cut out of the stuff... I'm wondering if what I have is what I should have. Compared to all the rest of the flat 4130 I've been working with... this stuff looked like it was growing on an orange tree. So... I threw the question out to the guys on the biplane forum.
Asked the group if Aircraft Spruce was in the business of selling fruit... oranges in particular. Got my replies in no time. Most of the stuff we're (us builders) working with is the thinner material... and it's cold rolled. This thicker stuff... is hot rolled and that's how it looks... pretty damn rough. More work... in my thinking... to sand it smooth.
If you haven't figured it out yet... I was filing and sanding more fittings. Here's a picture of them. You see the back side on most... it's a photo I took to show the guys on the forum what I was talking about. If you could see the edges, you'd see how nice and smooth and shiney they are.
Orange glad I told you about this ? (just had to write that)


 Put the Sand
Blasting contraption together today. Purchased it from Harbor
Freight about a month ago, along with the light that fits
into the cabinet. The cabinet went together without a problem.
The light, on the other hand, was a little confusing. Here
in America when you're dealing with electricity black goes
to black and white goes to white. Green is the ground. Well...
it ain't so with this Chinese import. (By the way... that
isn't me or the contraption in the photo.)
Put the Sand
Blasting contraption together today. Purchased it from Harbor
Freight about a month ago, along with the light that fits
into the cabinet. The cabinet went together without a problem.
The light, on the other hand, was a little confusing. Here
in America when you're dealing with electricity black goes
to black and white goes to white. Green is the ground. Well...
it ain't so with this Chinese import. (By the way... that
isn't me or the contraption in the photo.)  Fitting
in hand, I leave Home Depot and head back home. A little teflon
tape on the end of the threaded flange and on goes the nipple
fitting. Beautiful ! Compressor is already charged
so I don my goggles, even though there is a glass shield between
the gun and myself and the cabinet is locked securely. Figured,
what the heck. The more protection the better. Pull the trigger
and I start cleaning up. The end of the nozzle is a bit larger
than what I would think it should be, but hey, they must know.
Just at that point the air compressor kicks on.
Fitting
in hand, I leave Home Depot and head back home. A little teflon
tape on the end of the threaded flange and on goes the nipple
fitting. Beautiful ! Compressor is already charged
so I don my goggles, even though there is a glass shield between
the gun and myself and the cabinet is locked securely. Figured,
what the heck. The more protection the better. Pull the trigger
and I start cleaning up. The end of the nozzle is a bit larger
than what I would think it should be, but hey, they must know.
Just at that point the air compressor kicks on. The
blaster works great when I have air to supply to it, but when
the air gets low I don't really think I'm achieving much by
keeping the trigger pulled. So every 30 - 40 seconds I'm releasing
the trigger so that the compressor can build pressure back
up. The DeWalt air compressor that worked so great for shooting
brads into wood trim is putzing out on me when I use it for
sandblasting. At this point I'm not going to be going out
to buy a larger compressor, but for those of you who are looking
to get a set-up for sandblasting... go with as large a compressor
as you can... none of that portable stuff.
The
blaster works great when I have air to supply to it, but when
the air gets low I don't really think I'm achieving much by
keeping the trigger pulled. So every 30 - 40 seconds I'm releasing
the trigger so that the compressor can build pressure back
up. The DeWalt air compressor that worked so great for shooting
brads into wood trim is putzing out on me when I use it for
sandblasting. At this point I'm not going to be going out
to buy a larger compressor, but for those of you who are looking
to get a set-up for sandblasting... go with as large a compressor
as you can... none of that portable stuff. Had to cut
a piece of .070 4130 into some fittings. Held the blade up
to the piece to make sure that at least two teeth were within
the thickness of the metal. Yup... good to go... or so I thought.
Had to cut
a piece of .070 4130 into some fittings. Held the blade up
to the piece to make sure that at least two teeth were within
the thickness of the metal. Yup... good to go... or so I thought.
 It's not that I didn't notice how rough the .190 4130 was when I bought it... I just didn't give it a second thought. But now that I'm finishing off these fitting that I cut out of the stuff... I'm wondering if what I have is what I should have. Compared to all the rest of the flat 4130 I've been working with... this stuff looked like it was growing on an orange tree. So... I threw the question out to the guys on the biplane forum.