Mantua, New Jersey
Original Site:
September 2004
E-mail: usav8or@yahoo.com
The Radical Radial Fuselage.
March 1, 2009
SCRAP... practice on it... instead of making it
Welding a piece of the biplane has a permanance about it... whether it permanently attaches the piece to the Skybolt or it
permanently screws up the piece. All depends on how my welding is. I have to say though, that I've been happy with all my welding
except the time I welded up the caps for the bungee truss. I wasn't happy on how they looked. Could have gotten away with
it, but you know... "good enough, just isn't good enough."
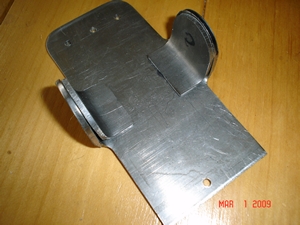
Over the past few days I've spent a considerable amount of time working on the main landing gear fittings. Spend all that time on
something and you just hate to screw it up by doing something stupid towards the end of that small "project." And so it was with
these fittings. One of the last steps to completing the forward fittings was to add additional support by welding an additional thickness
to the "ears." Essentially you're adding another .100 piece of 4130 tubing to the ear that the bolt runs through. It's basically all
edge welding. Not hard, but if you haven't been welding for awhile it's best to take a practice run on some scrap before making your
fitting into a piece of scrap. Enough said...
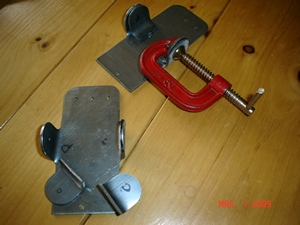
I took the scrap I was going to practice on, clamped them together and started heating it up. Close to a quarter inch of metal takes a
little while to heat up. Ran the SW201 tip and got good results with the test piece. Once I started working on the actual fitting I
found that I needed to switch the tip to the SW203. Just be sure, when welding the edge, to pull it back (the torch) when nearing the end... that
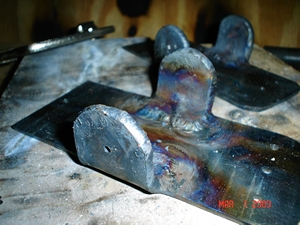
metal is pretty hot and might want to burn away. Each of the fittings took about 45 minutes to tack and then weld up. Only thing
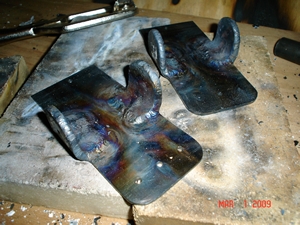
left to do is put the final bend in it, sand it smooth and then align and weld it onto the fuselage. Sweet.... !
A few photos for your enjoyment.
May 19, 2009
Finally on a roll... with the main gear.
The Stabilizers and Elevators are finished... just need to fit and weld in the second Servo Trim Tab. That being said, and that being done, I can finally move on to the Main Landing Gear.
I'm looking forward to this new experience. I've said it before and I'm saying it again. The previous part of the build prepares you for the next part. Having measured, cut, notched and welded up the Fuselage, Tail Feathers and Torque Tube Controls... I'm now prepared to craft the Main Landing Gear.
It's a part of the puzzle that needs to be spot on... not to say the rest of the biplane doesn't need to be spot on. But if you're a litle spot off here... you're going where you don't want to go when you want to go; aka give it gas and it's going down the runway, er off the runway.
May 21, 2009
Going with Plan "B"... the original plan "A" modified.
I can't imagine working on my biplane project in two totally different locations without an entire set-up
in each location. I waste enough time just running back and forth between the basement and garage work shops...
let alone here and one at the airport, or in my case, an out building at Denise's.
Today I set about getting the fuselage, which is at Denise's, up on it's supports and level in all direction. Simple enough, eh ?
Well... not quite that simple.
I had thought about what I needed to take with me, and what I would be doing, for some time now. Even took the time to write down
everything that I would need, to make sure that I checked it off as I placed it into my truck. Everything that I had on the list
was checked off. Everything that I needed, as I discovered once I started working on the fuselage today, wasn't.
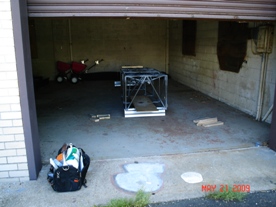
For starters, I brought a few saw horses to set the fuselage on (these are the newer folding metal ones.) With the gear as long
as it is on the Radial version of the Skybolt... setting the fuselage up on the saw horses, with the legs unfolded, put the axels
up approximately eight feet in the air. A little bit higher than I wanted to work on. Working on the main gear is tedious enough without
having to balance on a step ladder.
OK... so the conventional saw horse set-up wasn't going to work... OK... I'll just leave them folded up... this, with a piece of two-by-four,
would raise the fuselage enough to clear the partial tailpost from touching the floor. Great ! I got everything ready and then asked Denise
if she'd help me flip the fuselage onto it's back so that I could get it leveled and start marking the points for my chalk lines. It took a
little bit of time to shim the different points before I read 0 degrees on my digital level, in both directions. Beautiful... everything is
running smoothly... until...
As I re-read the Skybolt Builder's Manual, and looked at the fuselage, I realized that the way I had it sitting, up on those saw horses, I wouldn't
be able to snap the lines that I needed to, in order to align the main gear. Hmmmm... (head scratching time) OK... plane "B." Problem is... I'm 20 miles from
home, where most of my tools are, to go to plan "B." There ain't no stinkin' plan "B" 20 miles from home.
Plan "B" is actually my original plan "A" until I remembered I had those saw horses. Should've stuck with the original plan "A." Oh... yeah... the original plan "A" was to
build up frames from 2x4s. Simple enough. Actually (I've noticed I write that a lot.) my original frames wouldn't have worked as well as the design that I now have. I at
least got a start on it. And getting past that "new project" hurdle can be a big one in building a biplane, as mentioned before; going into the unknown. I'm past that, I'm
happy to report.
OK... back to 20 miles away, in the other direction, which is where I am now. I figured it'd take me about an hour to get everything set up and aligned... so made a date with Denise for lunch. Well... she's
the one that treated (thankyouverymuch Denise:). It did't take me an hour to set it up... 'cause I never really got to set it up... but in that time I refined my original plan "A." Took the time to diagram and
list everything that I needed to complete the project of building those stands. At about that time Denise walks up with Jerry (the other Jerry) and Chris, a few of the guys that she has working for her at The Towers.
After an amusing discussion about the Skybolt, and plans for the weekend, Denise and I head off to have our meal.
After a relaxing lunch with Denise I headed back 20 miles... to take a ride on my Harley (wait ! what the heck about plan "A" ?) Yeah... plan "A"... it was such a nice day, I had to put plan "A", er the modified plan "A", on temporary hold
as I took that ride.
OK... back to work... Stopped by the Home Depot, picked up five 2x4x8s, pulled my Dewalt electric compound miter saw off the shelf and made short order of the pieces I needed for those stands. Tomorrow I'll glue and screw them together. I'll have her
ready in just a few more days.
Plan "B" turned out to be a pretty good plan after all.
May 22, 2009
Plan "B" works... if only the jigs did
Over to Denise's to set the fuselage up on it's new stands and to drop a few lines to get it ready for main gear makin'.
All set and leveled... put the Axel Jigs in place... look at the plans again to see where the actual axel needs to be... yeah... figures.
I have the axels sitting at Station 5.o. They're suppose to be 2.375" in front of Station 5.o. Looks like my work here is done today.
fast forward to May 24th
Today I cut the tack welds off the Axel Support Jigs and re-jigged them in the wood jig that I made them in (after I made the changes so that the axels now fall at the right location.)
I'm heading over to Denise's tonight to have dinner so I thought I'd better try these out on the fuselage to make sure my calculations are correct. Otherwise... I'd make a trip over there sometime this week only to find out that
they may not work, again, only to have wasted my time in traveling there.
A quick trial-fit of the Axel Support Jigs, before dinner, and my fears were laid to rest. They're holding the axel at the right location. Now all I need to do is bend the forward Landing Gear/Flying Wire brackets, weld them and the Rear Landing Gear brackets onto the fuselage and then I can begin measuring, cutting and notching the main gear. finally...


 I can't imagine working on my biplane project in two totally different locations without an entire set-up
in each location. I waste enough time just running back and forth between the basement and garage work shops...
let alone here and one at the airport, or in my case, an out building at Denise's.
I can't imagine working on my biplane project in two totally different locations without an entire set-up
in each location. I waste enough time just running back and forth between the basement and garage work shops...
let alone here and one at the airport, or in my case, an out building at Denise's.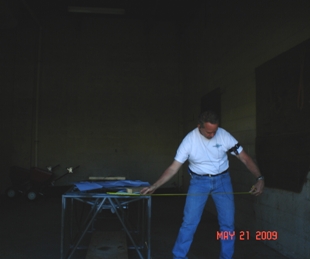 OK... so the conventional saw horse set-up wasn't going to work... OK... I'll just leave them folded up... this, with a piece of two-by-four,
would raise the fuselage enough to clear the partial tailpost from touching the floor. Great ! I got everything ready and then asked Denise
if she'd help me flip the fuselage onto it's back so that I could get it leveled and start marking the points for my chalk lines. It took a
little bit of time to shim the different points before I read 0 degrees on my digital level, in both directions. Beautiful... everything is
running smoothly... until...
OK... so the conventional saw horse set-up wasn't going to work... OK... I'll just leave them folded up... this, with a piece of two-by-four,
would raise the fuselage enough to clear the partial tailpost from touching the floor. Great ! I got everything ready and then asked Denise
if she'd help me flip the fuselage onto it's back so that I could get it leveled and start marking the points for my chalk lines. It took a
little bit of time to shim the different points before I read 0 degrees on my digital level, in both directions. Beautiful... everything is
running smoothly... until...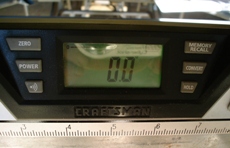 Over to Denise's to set the fuselage up on it's new stands and to drop a few lines to get it ready for main gear makin'.