Mantua, New Jersey
Original Site:
September 2004
E-mail: usav8or@yahoo.com
The Radical Radial Fuselage.
May 28, 2009 A half hour debating... A bad idea.
I know how it should be done... I just don't quite have the right tools to do it the way it should be done. Should I or shouldn't I ? Why am I even asking such a dumb question ?
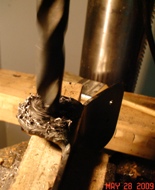
Today I assigned myself the task of drilling the 9/16" holes in the ears of the Forward Landing Gear/Flying Wire brackets, for the 9/16" bushings. Yeah... another odd size bit to be had, of which I didn't... have. After a bit of thinking (get it ?.... ah, never mind) and searching around I came upon the fact that I've used a Uni-bit to drill holes in the past... and I could use it for this purpose. Great !
Grabing one of many Uni-bits I have laying around I hold it up to one of the ears on the bracket. Hmmmm.... would have worked like a champ if I hadn't welded on those additional .o71 reinforcement ears. But you know what... it looks like it will be real close... I might just be able to pull it off. It may just go through both of those pieces of 4130. Just maybe...
I'm not even sure why I'm debating this. Actually... I do. It's the fact that I don't have the right size bit and getting the right size bit means driving a mile down the road to the Home Depot. So instead of doing the right thing from the get-go, I'm debating a non-debatable topic. Just get in the truck and drive to the store and pick up the right bit... will ya ? I could have been back by now.
Twenty minutes later I'm back, $15.00 less in my pocket, and holding a Milwaukee (good bi-metal bits) 9/16" bit in my hand. Clamped the bracket into the cross-sliding vice and drilled the holes. Sweet ! If I hadn't taken the time to get the correct tool for the job... I wouldn't be saying "Sweet." Probably would have been another "S" word and it would have been prefaced with "Oh..."
Enough about my internal debates... After drilling the holes in all four brackets, I deburred the holes, inserted the 9/16" tubes, centered them and then welded them in place.
Quite a bit of heat had to be applied to the brackets... figure
I have .142 (two plates of .o71) to heat up in addition to
the .o65 walled 9/16" tube. I got it done though. On time...
and a little over budget (yeah... the $15.00 for the drill
bit.)
Let's see....
what else to get ready before I can start on the main landing gear ?
I have the four rear landing gear brackets all cut out with their edges sanded smooth... holes drilled with an 1/8" pilot hole. Need to open those holes up to 5/16" and 3/8"; one of each on each bracket.
NOW, I can make use of that Uni-bit that I located earlier today. Clamped each bracket on a 2x4 that I had clamped and leveled in the cross-sliding vice, aligned it and then C-clamped it in place. Drilled all eight holes in less than an hour. And that was non-stop working.
I think I'm finally ready to get started on the main gear. I hope. You know what ? I still need to cut the center sections out of those bushing that I just welded in the front brackets. It shouldn't take that long he says now.
(Note: The Uni-bit in the above photo is actually going in at a 90 degree angle... it's the angle that I took it at that makes it look like the bit is going in at an angle. For some reason I thought I needed to say that. : )
June 1, 2009 Almost finished ... getting ready to start the main gear.
Amazing... on a project like this, you spend half the time getting ready to the point where you can begin what you intend to be doing.
If I had a kit... I could pull these brackets out of the box and... hell, they're welded on, so they'd probably already be welded onto the fuselage, ready for me to take the four bolts (out of the plastic bag) to bolt on the two main gears that I would be pulling out of the box. But it ain't like that... 'cause I don't wanna do that (at least not right now for this biplane.)
Didn't think it would take this long to get these forward and rear brackets ready for me to weld onto the fuselage. Matter of fact, I never do... think that it would take as long as it does to do a certain task. Not that it took an excessively long, or longer, time that what it sould take. Just... heck, you know what I'm tryin' to say.
A little over two hours later and I have the two Forward Landing Gear/Flying Wire brackets ready to be welded onto the lower longerons. Tomorrow I'll set up a temporary lower longeron in my workshop to make sure I have all the kinks worked out of aligning the brackets before I go to Denise's to do the actual work... wanna be sure that I'm not wasting a trip going up there to find out that I need to do something else or make a modification.
June 2, 2009 A whole lot of sanding ... still
getting ready.
Spent a few hours today on what I thought would be getting
things aligned on a mocked-up lower longeron. Not so my friend.
Wanted to make sure that all the scratches were sanded out
of the four Rear Landing Gear Brackets. A little over two
hours later and I'm finished with that task. Now on to getting
the Forward Landing Gear/Flying Wire bracket and the Rear
Landing Gear brackets aligned.
Found
a 48" piece of 1" 4130 tube (the size of the lower longeron),
clamped it into the vice, blocked the Forward Landing Gear/Flying
Wire bracket into position, slid the 3/8" tube (for alignment
purposes) and... Houston, we have a problem. Yeah... we
knew we had this problem. Just hadn't gotten around to getting
a fix for it yet. We'll now was the time for the fix.
The
Forward Landing Gear bracket has a 7/16" hole, the Rear bracket
a 3/8" hole. These two need to be aligned together. So...
I need to make a temporary bushing for the Forward Landing
Gear bracket so that a 3/8" rod will fit snug as a bug inside
of it. An hour later and I'm happy to say that I have that
bushing made. Took a 1/2" brass tube that I bought at the
Home Depot, sliced about a 1/16" piece out of the diameter
of the tube. Slid it over the 3/8" tube and carefully squeezed
it so that it was a tight fit then filed filed filed... sanded
sanded and sanded. Yep... an hour later and I have a bushing
that fits real nice into that 7/16" hole to hold that 3/8"
tube. In the top photo you can see the bushing on the end
of the 3/8" tube.
Above you can see the brass bushing, that I made, in the bracket;
it's on the left side. I tried it out to see how it would
work. When I did the "test" I saw that there was more play
in the other 7/16" hole than I would like. (spent all that
time making sure the one hole would be aligned... couldn't
allow the possibility of having it skewed because of the other
hole.) I was about ready to take another hour and make
another bushing but thought of using some brown packing tape
to see if it would do the job. Worked like a champ. Heck...
I could have saved myself an hour if I had thought of it earlier.
June 4, 2009 Yeah... you heard it here first ... just about ready to make the gear. (when will this beginning end ?)
Ah-gee-baba ! When I think I'm there... I'm not. Every time I think I reach that point... I haven't.
Went out and purchased the 3/8" bolts and the 7/16" bolts (yeah, that's not a typo) so that I could attach the Rear Main Gear brackets together... it's all a part of the jig. Got them home, went down to the work shop and low and behold the 3/8" bolts fit in the 3/8" holes but the 7/16" bolts don't fit into the 5/16" holes. Who would have thunk ? Amazing stuff... these fractions.
Why didn't I write down 5/16" ? Because I knew they were 7/16". (The 7/16" hole I was thinking about was the one I reamed in the 9/16" tube... for those interested in knowing.) Another lesson learned. Never trust your memory. I thought I had learned that already ?
OK... back out to the Home Depot. I needed to pick up a 5/16" drill bit. Might as well get the 5/16" bolts while I'm there. Good idea, eh ? fast forward... I'm back with a new bit and a few 5/16" nuts and bolts, ready to get ready to make the main gear. Drill the holes in the jig block I had glued up and waa-laa ! these puppies all line up even though I drilled each one separately. (I need to make a note to match drill sets from now on. Put it in BIG red letters and hang it front of the drill press.)
Clamped all four together to file out the 1" opening to accept the 1" tube. Previously I had only roughed out the hole under-sized. Clamping all four together would guarantee that I would have four similar brackets to work with. Thanks to the large round file that Howard gave to me a few years back, I was able to make short order on making those holes the size they needed to be.
As I had mentioned in an early post, I wanted to do a dry run of my main gear bracket jig before driving over to Denise's to do the actual work. The lower longerons on the Radial Skybolt are 1" diameter. Pulled a length of that out, clamped it in the vice and started marking out the measurements I needed; 21" on center between the two brackets. Made a few more measurements that would give me the outside dimensions of each bracket so that I could visually see the mark when aligning things. Made my marks and double-checked my double-checks. All looked fine.
In a few minutes I slipped the 3/8" rod into the forward bracket, into the brass bushing that I had made, and into the rear bracket, that was now bolted together with the 5/16" bolt onto the spacer block. The 3/8" x .o58 tube is stiff enough that I don't need to block that up off the longeron. It's a beautiful thing ! Take a look at the photos and see for yourself.
I'll still need to do a little tweaking of the Rear Main Gear bracket so that it will fit up to the vertical tube and cross tubes at Station 26.o. At least I know that the basic idea of the jig works... just a matter of making the brackets work. I need to write myself one of those BIG red lettered notes to remind myself to center this on the longeron. Piece of cake... right ?
So it looks like all I need to do now is tweak the brackets and weld these babies onto the lower longeron and get started with the main gear... finally ?
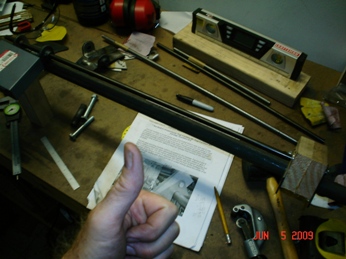
June 5, 2009
Not worthy of it's own posting... but I spent an hour today to make sure that the second Main Gear Bracket jig worked. Glad I did because I needed to cut the 3/8" tube, used in the jig, a little bit longer. Everything else worked beautifully.


 Today I assigned myself the task of drilling the 9/16" holes in the ears of the Forward Landing Gear/Flying Wire brackets, for the 9/16" bushings. Yeah... another odd size bit to be had, of which I didn't... have. After a bit of thinking (get it ?.... ah, never mind) and searching around I came upon the fact that I've used a Uni-bit to drill holes in the past... and I could use it for this purpose. Great !
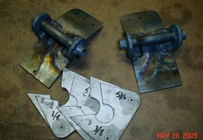 Twenty minutes later I'm back, $15.00 less in my pocket, and holding a Milwaukee (good bi-metal bits) 9/16" bit in my hand. Clamped the bracket into the cross-sliding vice and drilled the holes. Sweet ! If I hadn't taken the time to get the correct tool for the job... I wouldn't be saying "Sweet." Probably would have been another "S" word and it would have been prefaced with "Oh..."
 I have the four rear landing gear brackets all cut out with their edges sanded smooth... holes drilled with an 1/8" pilot hole. Need to open those holes up to 5/16" and 3/8"; one of each on each bracket.
 If I had a kit... I could pull these brackets out of the box and... hell, they're welded on, so they'd probably already be welded onto the fuselage, ready for me to take the four bolts (out of the plastic bag) to bolt on the two main gears that I would be pulling out of the box. But it ain't like that... 'cause I don't wanna do that (at least not right now for this biplane.)
 A little over two hours later and I have the two Forward Landing Gear/Flying Wire brackets ready to be welded onto the lower longerons. Tomorrow I'll set up a temporary lower longeron in my workshop to make sure I have all the kinks worked out of aligning the brackets before I go to Denise's to do the actual work... wanna be sure that I'm not wasting a trip going up there to find out that I need to do something else or make a modification.
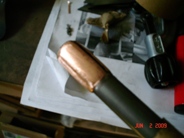 Found
a 48" piece of 1" 4130 tube (the size of the lower longeron),
clamped it into the vice, blocked the Forward Landing Gear/Flying
Wire bracket into position, slid the 3/8" tube (for alignment
purposes) and... Houston, we have a problem. Yeah... we
knew we had this problem. Just hadn't gotten around to getting
a fix for it yet. We'll now was the time for the fix.
Found
a 48" piece of 1" 4130 tube (the size of the lower longeron),
clamped it into the vice, blocked the Forward Landing Gear/Flying
Wire bracket into position, slid the 3/8" tube (for alignment
purposes) and... Houston, we have a problem. Yeah... we
knew we had this problem. Just hadn't gotten around to getting
a fix for it yet. We'll now was the time for the fix. The
Forward Landing Gear bracket has a 7/16" hole, the Rear bracket
a 3/8" hole. These two need to be aligned together. So...
I need to make a temporary bushing for the Forward Landing
Gear bracket so that a 3/8" rod will fit snug as a bug inside
of it. An hour later and I'm happy to say that I have that
bushing made. Took a 1/2" brass tube that I bought at the
Home Depot, sliced about a 1/16" piece out of the diameter
of the tube. Slid it over the 3/8" tube and carefully squeezed
it so that it was a tight fit then filed filed filed... sanded
sanded and sanded. Yep... an hour later and I have a bushing
that fits real nice into that 7/16" hole to hold that 3/8"
tube. In the top photo you can see the bushing on the end
of the 3/8" tube.
The
Forward Landing Gear bracket has a 7/16" hole, the Rear bracket
a 3/8" hole. These two need to be aligned together. So...
I need to make a temporary bushing for the Forward Landing
Gear bracket so that a 3/8" rod will fit snug as a bug inside
of it. An hour later and I'm happy to say that I have that
bushing made. Took a 1/2" brass tube that I bought at the
Home Depot, sliced about a 1/16" piece out of the diameter
of the tube. Slid it over the 3/8" tube and carefully squeezed
it so that it was a tight fit then filed filed filed... sanded
sanded and sanded. Yep... an hour later and I have a bushing
that fits real nice into that 7/16" hole to hold that 3/8"
tube. In the top photo you can see the bushing on the end
of the 3/8" tube. Clamped all four together to file out the 1" opening to accept the 1" tube. Previously I had only roughed out the hole under-sized. Clamping all four together would guarantee that I would have four similar brackets to work with. Thanks to the large round file that Howard gave to me a few years back, I was able to make short order on making those holes the size they needed to be.
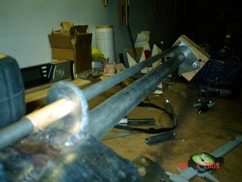 In a few minutes I slipped the 3/8" rod into the forward bracket, into the brass bushing that I had made, and into the rear bracket, that was now bolted together with the 5/16" bolt onto the spacer block. The 3/8" x .o58 tube is stiff enough that I don't need to block that up off the longeron. It's a beautiful thing ! Take a look at the photos and see for yourself.
  I'll still need to do a little tweaking of the Rear Main Gear bracket so that it will fit up to the vertical tube and cross tubes at Station 26.o. At least I know that the basic idea of the jig works... just a matter of making the brackets work. I need to write myself one of those BIG red lettered notes to remind myself to center this on the longeron. Piece of cake... right ?