Mantua, New Jersey
Original Site:
September 2004
E-mail: usav8or@yahoo.com
The Radical Radial Fuselage.
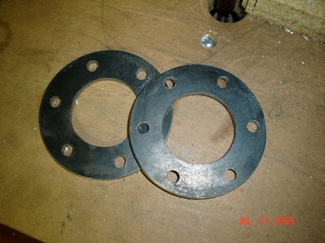
July 31, 2009 I don't know who kicked who's butt.. but the Brake Backing Plates
are finally finished.
After working on these for twelve point six hours... I'm not really sure if my completing them was worth the effort. I said I would... and I did... 'nuff said. Here's a photo of the finished pieces. (well, almost finished... still need to be deburred, etc)
Funny thing is... It took me ten hours to make the first two holes (I think some of that was me not putting enough pressure down on the holesaw when making the holes) and it took me two point six hours to drill the 12 additional holes and cut/file/sand the outer circle on the two Brake Backing Plates. Go figure.
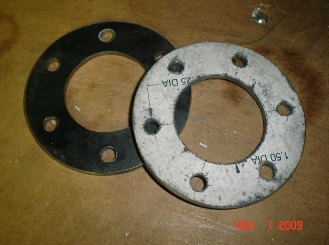
August 1, 2009 Another one point nine hours.. the price of excellence
I always take a look at my work again the day after, with a much more "judging eye" than the day before. Actually, when I looked at the above photo, that I posted last night, I saw something that I wasn't real happy about, but I thought maybe it was just an un-even sanding on the edge of the plate. I was half right and half wrong.
The filing/sanding was a little bit closer, or should I say past the edge than is acceptable. It wasn't by much... instead of a 2.875" diameter outer circle, it was a 2.855" diameter circle; .020 out. Hmmm... and it was a little under-cut. So it was a little bit more than a little... maybe it was .030 off the mark.
Why I choose to make this a point of excellence ?... I'm still thinking about that one. But, with my mind already made up, I started cutting metal to make another Brake Backing Plate. As I was working on this piece I thought of all the times I've thought I didn't know how to do something. Well, easy enough... just start doing it, if you don't know now, make one or two or three or four of them and you'll figure it out.
Just a little under two hours. Yeah... I've finally figured out what to do and what not to do. Would I do it again. Hell yeah !
Here's a shot of the latest one (with paper still on it) and one of the other ones that I was very happy with the first time, er forth time round.
August 3, 2009 Putting the brakes on.. what's this got to do with a can of PVC glue ?
Went over to Whitey's today to discuss mounting of the Brake Backing Plates and to see how the brakes are suppose to be mounted onto the plates. I'm an idiot as far as that goes... at the moment... learning more each day. Need to figure this out before I go ahead an weld these Brake Backing Plates to the axles.
In discussing the Brake Backing Plates, and the mounting of the brakes, we talked about the entire set-up. Took a few pictures of the vertical, remote reservoir, brake cylinders that Whitey is using in his Ford powered Bellanca. I should have gotten a pictue of the PVC Cement can he is using for the reservoir. He gave me an old PVC Cement can so that I could do the same. The reservoirs don't cost that much... but hell, Whitey gave me the can... it's just a matter of brazing on a fitting on the bottom and an air inlet at the top. (I'm now wondering how that will work, the opening at the top, when doing acro. - Just took a look at the Aircraft Spruce site and saw a reservoir that can be unsed for inverted flight... it has an 1/8" NPT male outlet at bottom and filling port with unvented plug at top. Sounds like a plan to me.)
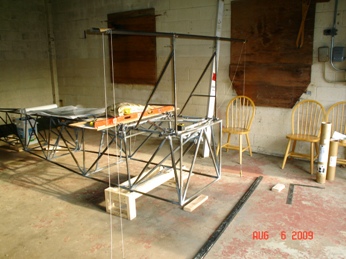
August 6, 2009 I think I'm set.. like
I said... I think I'm set to
begin building the gear.
Drove over to Denise's to get this fuselage ready for it's
Main Landing Gear. Shouldn't be a problem to get it ready...
just a little bit of time... that's all.
First thing to do is level it again. It was once level...
only to be turned and twisted and up-ended so that I could
get at the weld points. Now that that's finished, like I said,
I can re-level it.
OK... level both for-and-aft, and side-to-side. OK... need
to mark the lines on the cement as to where the landing
gear needs to be; dropped a plumb-bob from the center at Station
0.0, dropped a plumb-bob at the rear. Made my marks as to
where the outside edge of the axles need to fall. With all
of that finished I needed to attach the Landing Gear Jigs,
that have been sitting around forever, up on the lower longerons,
and clamped onto close to where they need to be. Took the
1 1/8" tube that I ordered from Aircraft Spruce, just for
jigging the Main Landing Gear (ordered back on June 10th)
and saw that it was a 1" tube. DAMN ! Where's that
1 1/8" tube I ordered ? There was only one tube in the box...
and I didn't look at it until now. hmmmm... another lesson
learned.
OK... so they sent the wrong tube... can't let that stop me,
so I continued measuring up and leveling the 1" tube for the
axles (at least I can get it close to where it needs to
go). I'll call Aircraft Spruce tomorrow and have them
send me the correct tube. It'll push back getting this started
a few more days... what's new. I really didn't want to start
cutting the day that I jigged it. Always best to come back
to it with a fresh eye.
Saturday I'll drive back over and make sure that all the lines are
squared up. I'll have Denise help me snap the lines that I
didn't snap today. I want to make sure that all of the Landing
Gear Fittings are still squared up too. Monday, I'll head
back over with the new 1 1/8" tube and maybe start cutting
and notching tubing. Who knows, come September, this gear may be finished.
Yep... like I said... I thought I was set... not quite yet.
(sounding like Dr Seuss)
August 7th - Update on tubing: Spoke to Aircraft Spruce. They were very appologetic. Sending out the 1 1/8" tube today. Not worth the money to pick up the 1" tube so... I have a 1" x .o58 tube... collecting dust.
August 17, 2009 Yep, you guessed it... still getting ready to make the Main Landing Gear
Went back to Denise's this past Saturday to make sure that the fuselage is all set and ready for making the Main Landing Gear. It's all level.. went to check the fitting of the front bushings on the fittings and they were a little too long... still. Went to Whitey's yesterday to square them up in his lathe (mine seems to be spinning out of control and it's chewing up my new bits.) damit !
OK... so back to the fuselage tomorrow to make a final check of the alignment of the front and back fitting to each other. I have the 1.25" tube that I need for the "jig." (yes, you read that right, 1.25" tubing for the jig, not the 1.125" tubing that the Builder's Manual lists... too much slop in the 1.125" and a chance of it being pushed out of squareness, so I'm changing it to 1.25"... JimW agrees) I'll get that locked into place and leveled too. That is... if the front and back fittings are still in alignment and that the front bushings now fit. A lot of ifs.
I'm getting closer... I can almost taste it.
August 18, 2009 Yep, you guessed it... still getting ready to make the Main Landing Gear
Over to Denise's today to check the alignment of the landing gear fittings. The one side is off by about 3/64ths. three sixty-forths ! I wonder if they were concerned about that in the times of building biplanes ?
Threw the question out to JimW, on the biplane forum. Said to go ahead (the final decision is mine though) build the gear and weld up the three that I'm real happy with, cut it loose and see if that forth fitting is ok; no binding. BRILLIANT ! If it binds... un-tack the welds at that fitting and adjust so it's not binding.
Thank you Jim.
August 20, 2009 I'm ready to make the gear... REALLY
I knew this day would come... because I've worked through so many other incidentals before it, and the out come is always the same, success !
I've been working on getting the fuselage ready to build the gear... for how long now ??? I just looked, it was July 9th, that I placed the forward and rear alignment jig on the fuselage. Close to a month and a half just getting it to the point that I can begin to build the gear.
I'm positive that it's ready. Had some issues, of my own doing, that I needed to work through today. They were measurement issues.
I knew they were of my own doing because I checked the squareness of the fuselage after I welded it all up. It was within 1/32 of an inch; one side of the firewall to tail post as compared to the other. My measurements today were telling me that I was 5/16" off. 5/16ths ! I had to check that several times before I was certain I was taking the measurement correctly... and facing to the posibility that there might just be something drastically wrong.
Long story, short, I didn't have the front measurement perfectly square with the forward tubes... and a little off... is a lot off... as I experienced.
I left tonight with everything, except the height of the axle jig, lined up. Saturday, that will be the first order of business... followed by cutting the axle tube "jig" down so that I can slide the axles on and begin making the Main Landing Gear. I'm almost excited about this as I was at hitting the 1250 hour mark.
Here's a picture of it from August 6th. It looks the same today as it did on that day. Oh yeah... the axle jig tube is 1.25", not 1.125".
August 24, 2009 I'm ready to make the gear... just triple checking the plans
I'm not obsessing (when you say that... are you ?) over the Main Landing Gear, there's just a few things not in my favor... on having the numbers right from the get go. And having to look over the plans... for hours... seems like I'm not working on the biplane. I always feel that way when I look at the plans for an extended period of time. I shouldn't, but I do.
For starters, I'm putting the old style bungee gear on my Skybolt, the R version has that new hydraulic type gear (untested as far as I'm concerned.) Number two... I want to widen the gear 12". I've seen a few of the Radial Skybolts, converted from a Standard Skybolt, that look like they're up on stilts. The plans call for it to be 7" higher, but the width remained the same.
I knew from past conversations that Paul, one of the guys on the biplane fourm that lives in Austrailia, had purchased the Culp Special plans (he's building the Skybolt though.) I asked him, last night, if he could check the height and width of the Speical's gear. Damned if it wasn't exactly what I was thinking of doing; it's 34" high, just like the R Skybolt, and he drew it up to be 84" wide. It's EXACTLY the dimensions that I had thought of. Well, the 34 was a given, it was the 84", from outside axle to outside axle, that I had thought of. Thanks for getting back to me on that, Paul.
Anyways... enough patting myself on the back. Time to get to work.
I had estimated the tubing back in December '08, and I think that I estimated it to the wider size. I messed with DeltaCAD for about three hours today. I should have just physically laid out the dims to see if the tubing would work. Three hours later and I'm still not sure. Another one of those learning experiences. Just hope I remember the next time I need that learning.
Oh yeah... figuring out that tubing back in December had me scratching my head as to what size tubing I was going to use, and where (this stems from the my first argument of changing the plans from the hydraulic to the bungee.) Spent a little bit of time, over the past few days, figuring that out too. I knew I had it listed somewhere, but I just couldn't find it. Tonight... after re-reading my earlier entries on this website, I found it.
OK... the plan is... I'll go over to Denise's tomorrow to check out the fuselage for a few hours. Do a few simulated senarios to see what will work. Hope that the tubing I have will work. If not, I'll need to buy more. I'm not letting a few dollars of tubing keep me from having that wider gear.
Maybe I can even do a little notching. Who knows... I might even get this gear eventually done. Who knows....
August 26, 2009 I'm ready to make the gear... just took me three hours to tweak it.
Took me another three hours to do all the doing that you do before you do it... it, being, making the gear.
I'm second guessing myself on this; the measurements, the squareness, the "you name it." "Is it a difference of a 32nd or closer to a 16th between the two measurements ?" I know I'm as close as I can get to being "perfect" so I'm at my point of excellence. Time to stop the obsessing and time to move on with things.
I'm ready.
I was ready.
I'm still ready... to start cutting and notching the tubing on the Main Landing Gear. But... the gods had other ideas. Cutting and notching the tubing for the Main Landing Gear wasn't one of them.
Back up a few months...
From all the notching that I did when building the fuselage, the grinding stone on my hand-held grinder was due for replacement. Not a problem, I had two or three extra ones that I bought just for that purpose. So... last night I spun the locking nut off of the shaft, slipped the old one off and the new one on. Put the nut back on and cinched it up real good... and then some. It was ready to do some work. I went upstairs and placed it in one of my tool bags so I wouldn't forget it tomorrow.
Tomorrow comes, bag in the truck and off we go... time to get started on making that gear. As mentioned earlier... I spent three hours checking things and measuring things just to make sure I have everyting where it's suppose to be. OK... time to cut that first tube and then start notching. Turned the hand-held grinder on... hmmm, sounds like the motor on my lathe (another story) where it spins up and then slows down. Turn it off only to find that the locking nut wasn't holding the grinding wheel against the motor; it was free-wheeling. Nothing that I did would tighten it up. Wasted a half hour trying to tighten something that just wouldn't tighten. Finally gave into it and decided that it would be quicker to just buy a new one from Harbor Freight.
August 27, 2009
Fast forward to Thursday. I'm doing something in the house... oh yeah, putting away some of the fittings that I had sitting up stairs. Thought it would look a little neater if I put them away down in the shop, on a shelf. As I'm walking through the shop I saw what appeared to be a part of the hand-held grinder. A piece that would take up that dead space around the grinding wheel to make it tight. I'm past the point of taking time to figure out why I didn't see that when I was putting it back together. I just don't have the time to ponder such things.
As of right now, I still haven't confirmed that it indeed is the piece I'm looking for. I'll check it out on Friday. I'm 100 percent sure that it is the right piece. That'll save me a trip down to Harbor Freight.


 Went over to Whitey's today to discuss mounting of the Brake Backing Plates and to see how the brakes are suppose to be mounted onto the plates. I'm an idiot as far as that goes... at the moment... learning more each day. Need to figure this out before I go ahead an weld these Brake Backing Plates to the axles.
 In discussing the Brake Backing Plates, and the mounting of the brakes, we talked about the entire set-up. Took a few pictures of the vertical, remote reservoir, brake cylinders that Whitey is using in his Ford powered Bellanca. I should have gotten a pictue of the PVC Cement can he is using for the reservoir. He gave me an old PVC Cement can so that I could do the same. The reservoirs don't cost that much... but hell, Whitey gave me the can... it's just a matter of brazing on a fitting on the bottom and an air inlet at the top. (I'm now wondering how that will work, the opening at the top, when doing acro. - Just took a look at the Aircraft Spruce site and saw a reservoir that can be unsed for inverted flight... it has an 1/8" NPT male outlet at bottom and filling port with unvented plug at top. Sounds like a plan to me.)
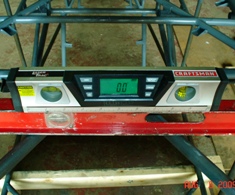 First thing to do is level it again. It was once level...
only to be turned and twisted and up-ended so that I could
get at the weld points. Now that that's finished, like I said,
I can re-level it.
First thing to do is level it again. It was once level...
only to be turned and twisted and up-ended so that I could
get at the weld points. Now that that's finished, like I said,
I can re-level it.