Mantua, New Jersey
Original Site:
September 2004
E-mail: usav8or@yahoo.com
The Radical Radial Fuselage.
August 31, 2009 I've finally notched the first tube on the Landing Gear... so what !
I've been working... and working... and working... towards starting to build the Main Landing Gear. It's always another... something, to be done.
I thought I had patience, when it came to building this biplane... building the Main Landing Gear, or should I say getting to the point of building the Main Landing Gear, took it to another level.
Funny... I never got mad about it... hey, it's all a part of building the biplane. So what if I didn't realize that this part of this, had to be done, until realizing it now. Or, so what if I didn't look closely enough at both the Standard and the R drawings, until now, and didn't realize I needed to order this. A lot of so whats... and it's not a "so what" as to be sarcastic or not caring. It's a "so what"... I'll try to remember next time, and thanks for the learning. ...really.
I've finally said enough "so whats" that I'm at the point of notching the tubing on the Main Landing Gear. Yes, today I notched one tube completely... and boy does it ever feel good.
So what !
September 3, 2009 A jig... for everything.
Today... I spent two point five hours nipping away at the second tube for the Main Landing Gear. Could I have done it quicker ?... probably a lot quicker. Would it have turned out as nice ?... probably not at all. No rush to get the biplane finished... not that I want to drag my feet... but why rush it just to have it turn out bad... only to have to be re-done.
With the second tube finished, it was time to start notching the first of the two back tubes. (head scratching... a lot of it) I didn't just want to barge in there and make an angled cut. I wanted to be as precise as I could. I had my chopsaw with me, but the angle was too great; greater than 45 degrees (the line I was going by was hand drawn, by me, on the tubing... pretty precise, eh ? NOT !) I would have to hold it into position when cutting it. Not a good idea... I could see it easily moving, not to mention the imprecise marking I had made on the tubing.
I spent one and a half hours trying to figure out what I could do with the stuff I had there; getting the correct angle and holding the tubing at that correct angle on the chopsaw... turns out that I could do nothing. I took an angled measurement with the handles of my Leatherman Tool (knife) (58 degrees) so that I could make up a simple wooden jig to hold the tube at 58 degree on the chopsaw. All the stuff to make that jig was at home... 20 miles away. Not a problem...
I'll make the jig with the ability to change the angle that it holds the tube. When I bring it back with me I'll also bring my tool to find the angle and either confirm the 58 degrees or make an adjustment.
If it weren't for the head scratching, I could have gotten a little bit more done today, but... all in all, not a bad day. Another tube behind me... four more to go.
September 9, 2009 Building... It's like a good book.
The other day I saw that the cut on the back tube for the Main Landing Gear was more than the 45 degree angle that my chopsaw would allow me to hold and cut. Instead of "holding" it in position with my hand, and hoping for the best, I decided to stop what I was doing until I could make a jig to hold the tube in place at the right angle. Yesterday I made that jig.
It's a real simple jig, but hey, I'm making a biplane... not jigs. If it does it's job, it's served it's purpose. I squared up a piece of 1/4" plywood, small enough so that it would fit into the chopsaw's vice. One long piece of wood cut to hold the angle and another short piece, similar to what I used for my jig blocks, to hold it tightly into place. Found the angle (53.5 degrees, not the 58 degrees I thought yesterday) and screwed the long piece into place. Cut a test piece to make sure that I had the correct angle. I loaded and locked the 1.25" tube and made the cut. Worked like a champ ! (special note: I needed to remake the gear again in 2010 and this time the cut was figured at 58 degrees... goes to show that you need to make your own measurements for your biplane. Every gear is slightly different.)
After cutting the 53.5 degree angle that was needed, I notched the point to accept the back bushing. From that moment on, I was nipping at the other end, over and over and over again. Checking and re-checking and re-checking... over and over again. A little over four hours and I'm close to having it in place. Give me another two hours and I'll have it finished.
The reason it's taking so long... I left the length of it a little bit more than a little long. I'd rather spend a few extra hours creeping up on the final location than to chop the end off and have it cut at the wrong angle, or a little too short, and wasting an entire length of 1.25" x .083 tubing. Not only wasting it, but having to re-order and wait for the replacement.
Tomorrow I'll finish it up. The second back tube shouldn't take as long. I'll already know how long and at what angle I need to make that first cut. My replacement streamline tubing should be here tomorrow... I should have those notched by sometime next week. This puppy may be on it's wheels by the end of this month !
Whether it takes me an hour or four hours to do something... I'm enjoying the journey. If you can wrap your mind around that... hmmm, to me, building this biplane it's kinda like a good book, I don't want it to end.
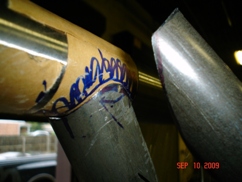
September 10, 2009 Nipping away the hours
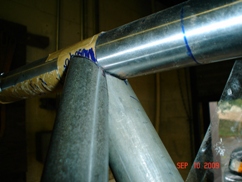
I scratched my head for a few minutes when I looked at how I was going to notch the second tube (the back tube) on the Main Landing Gear. I needed to notch it to fit both the axle and that LARGE 1.5" tube that I notched the other day.
The plan I came up with may have taken longer than it should have but it worked for me. The plan was to notch it to fit the axle, then secure the 1.5" tube into place and notch it to fit around that. Other than the top notch that I had originally made on the second tube, none of the other ones remained. But... the end result of my notching... excellent !
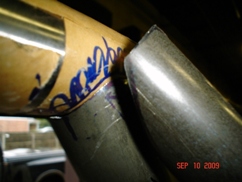
The way that I approach nipping down the tubing is to make little cuts at first, to get the shape that you are looking for. Grant it... I had an extra three inches of tubing to begin with, but like I mentioned yesterday... better too long than too short. Once I get the shape I'm looking for I draw a 1/4" wide line, with a Sharpie (felt tipped marker,) around the end of the tube following the cut. It helps me to keep the same profile while I cut away a lot of metal in a relatively short amount of time. After trimming it, I'll hold it up to the piece I'm notching it into and then I'll make any corrections that I need to make... until it's a tight fit again. I then repeat the process all over again.
As you've read, six hours of cutting, nipping and notching to make this fit isn't fast, but we're not looking for fast are we ?
Here are a few images that I took of it.
View from the outside edge
View from the outside edge
View from the outside edge
View from the inside edge
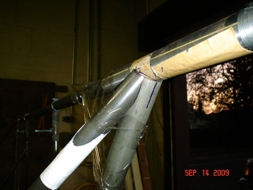
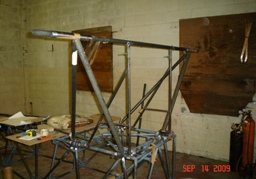
September 14, 2009 More nipping
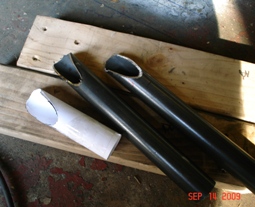
Other than knocking off half the amount of time (3 hours) it took to notch this forth tube, which is the same as the third tube, it was pretty much a repeat (albiet a lot faster repeat) of the other day.
I made a pattern from the tube that I just finished notching, turned it inside-out because it will be the mirror image of this one. Made a test piece by notching the cut-off from the first 1.25" tube, and made a trial fit to see if my thinking was correct. Yes, it was. Still unsure of how it needed to be placed/cut onto the end... I left the tube about 1.5" longer than the tube I was copying.
If I had known where to place that pattern I could have had this side notched in less than an hour. As it was, I wasn't sure, and I didn't want to chance cutting it off to one side or the other. I held the pattern in place towards the end of the tube and traced it onto the tube... still allowing 1.5 inches of excess for me to nip away at.
The outcome was well worth the extra two hours... actually a savings of three hours. Here's the end result.


 I made a pattern from the tube that I just finished notching, turned it inside-out because it will be the mirror image of this one. Made a test piece by notching the cut-off from the first 1.25" tube, and made a trial fit to see if my thinking was correct. Yes, it was. Still unsure of how it needed to be placed/cut onto the end... I left the tube about 1.5" longer than the tube I was copying.