Mantua, New Jersey
Original Site:
September 2004
E-mail: usav8or@yahoo.com
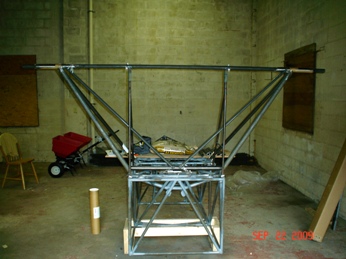
The Radical Radial Fuselage.
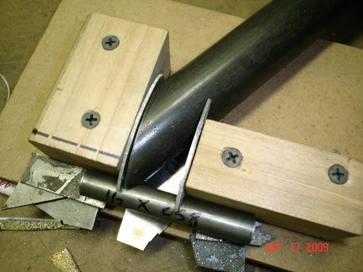
September 17, 2009 Notching the tubes... was the easy part
Two more tubes to notch on the Main Landing Gear. Spent the day home... today; twenty miles away from the Main Landing Gear. What's there to do... Plenty. For one thing, I needed to create the jig to hold all the pieces together for the rear tube; the two caps and the tube.
A little head scratching... why, I don't know. Figured things out... how I wanted to make the "enclosure." Needed to modify the forward cap to fit. When I made that template the other day, over Denise's, I was WAY off. With a little work, it's not fitting as snug as a bug in a rug (whatever that means.)
Here's a picture that I took of the jig, holding the pieces. Not bad. Still need to tack weld the caps on then make and fit the support straps.
September 21, 2009 Forget about the plans !... Just go by memory.
"Got everything, Jer ?" "Yep... got everything."
After a twenty mile drive to Denise's... I unpack everything but the plans. Why ? Because I didn't "Got everything." The plans were twenty miles away... still waiting to be packed. But ya know what ?... I had the striker that I wanted, but didn't have the other day. (and no, I didn't need it today)
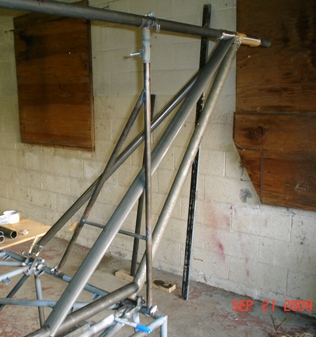
I've looked at enough photos, and at the drawing enough, and it's blatently obvious where this streamline tubing goes... so I went ahead and cut and notched the first of the two streamline tubes. Sure... I gave it a little bit of a fudge factor, knowing that I would probably need to notch it just a little bit more to get it to it's final spot. But hell !... I wasn't going to drive ALL the way back, and then ALL the way back again, for something that was blatently obvious. I put all my trust in my memory (one who couldn't even remember the plans) and started making my cuts.
Oh, by the way... If you're going to use the axle support jig, like I did (and the one I spec'd,) it's VERY close when fitting up the streamline tubing; VERY CLOSE.
Here's a few photos of the tube notched into place. As you can see in the first photo, the axle support jig is VERY CLOSE to the streamline tube.
September 22, 2009 I tend to repeat myself... at the right times.
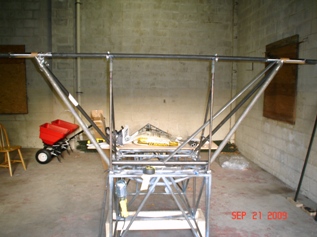
A repeat of yesterday day... only on the other side. Used the first notched streamline tube as a pattern... sorta like I did with the other tubes. This allowed me to cut the time down to two hours.
I remembered the camera and took a few shots. Actually... I took a lot of shots, but the clear tape that I used to hold the tubing in place looked bad on the close-up shots. I'll have to wait until I either get them tacked or finish welded. I want to have a good record of how these tubes look cut and in place.
October 2, 2009 I tend to repeat myself... not 'cause I want to.
I had grand notions of starting to weld the main gear today. Had is the key word.
Let's back up a few months:
It wasn't until after I had leveled the jig support tube for the third time and started my notching... in the first place... that I realized that I wouldn't be able to leave it like that... a tube going all the way through both axles. Weld with it like that and you might as well forget about sliding that tube out.
Fast forward to today:
Well, today was the day that I would need to pull that support tube out... while trying to leave everything the way it was... supported with a ton of tape. (I had rehersed this many times before in my head... not a problem) With the ton of tape in place I began to slide the support tube out with an obvious end result. Yep !...problem ! Total collapse ! I should have cut that tube to begin with and leveled it for the forth time, the first time.
Hind sight is always 20/20. My thinking isn't nearly as clear.
Four point three hours later and I'm ready, or at least I think I'm ready, to begin welding the landing gear.
A lesson learned, that was an obvious lesson to begin with... when I knew that I should have just taken the time to trim that tube and re-level it to begin with.
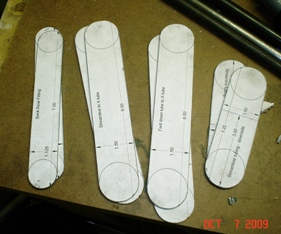
October 6, 2009 A long way... for a little information.
Made it back over to the fuselage today. Mission... to make patterns for the straps. That's it.
Prior to going I made a few different width patterns on DeltaCAD; 1.125", 1.25", 1.5". All I would need to do is cut them to size. Got to the fuselage and discovered that I was happy with the length of all except the ones that would be welded to the streamline tubing to axle joint. Ahhh well... better to know for sure rather that to go at it blindly.
With this information in hand (looks like I'm still working towards getting ready to weld this gear) I can go back to the home workshop and cut these straps. Maybe... just maybe... I'll be ready for welding up the gear at that point. Just maybe...
October 7, 2009 I need to get back into that groove... where's has the routine gone to ?
A little over a week... two Sundays ago... I've been pushing myself to work on the biplane... get out and run... just pushing myself to do things.
Let's just say that one of life's... well, let's not just say. But like anything... I'm dealing with this.
A little over a week has gone by where I was thinking about nothing but it. Still drives it's way into my thoughts on a regular basis, but I'm not fixated on it. So... it's not time to forget it... but it's time to carry on. In my case, one of the things to carry on is to get back to building this biplane.
Tonight I took a little over an hour to glue the strap patterns to some 4130 and cut them out and grind them down. They're ready. I'm ready... to get the Main Landing Gear welded up and finished. I'll make it back over to the fuselage tomorrow and hopefully get things going.
October 8, 2009 Finally... the first weld line
The first weld has been made on the Main Landing Gear ! And it was a lot smoother going than I thought it would be. Take the time to heat up the area around the weld and you get those purty looking weld lines.
Most of today's session dealt with hammering the two upright tubes down to fit the bushing where they meet the lower longeron. Took a lot longer than I thought it would. I applied heat to them and hammered... applied heat and hammered... applied heat and hammered. You get the idea.
Spent the rest of the time aligning the 1" square tube that holds the rebound pads; cut and tacked that into place, and then I tacked the forward upright tubes into place and began welding them. Uh... started getting low on acytelene and the tip was starting to spit. Started ruining my weld line. Called it a night.
October 12, 2009 Making Boxes...
Took the twenty mile drive back to the fuselage so that I could get more of this Main Landing Gear completed.
First line of business was to grind off the nice weld line that I had partially completed on one of the forward tubes. The alignment of the tube was a little off... and ya know I'm all for that strive for excellence mentality. My Dremel just crapped out on me earlier in the week so I had to take the hand-held grinder to it. Would have preferred the Dremel. Looks like I'll be picking up another one of those soon.
OK... twelve minutes later and I'm back to where I was when I had left here the other night. Next on the list of "to dos" was to hook up the acetylene tank that I picked up. Chalk up another two tenths to getting the cylinder cap off of it. It wouldn't budge. I needed to clamp a C-clamp to it and hit the clamp with the dead-blow that I had. (one of the few times I had something I needed that I didn't know I would need)
Finally got to work on the biplane. Changed the tip on the welding handset to a 205 for the heavier tubing on the Main Landing Gear. Still took a lot of heating before I could run a bead. Once it started I had little problem keeping it going... until I was between the two tubes... it decided to be a little stubborn. OK... turn up the heat a little, warm it up a bit more and then continue on with the bead. By the time I reached the start of the weld line it was nice... and... warm.
With both forward tubes welded to the axles I could start working on the "boxes" for the rear tube bushings. Its more of an art than a science. I already kinda had an idea of how I was going to approach it, and like flying... plan your flight, fly your plan. I did.
Welded on the rear tube cover plate then put in the 1/4" spacer, tacked each tube to the bushings, aligned the forward plates, tacked those on and was ready for the finish welding. Had enough time to completely weld the box on the left rear tube. Turned out very nice. I actually like how the wrap turned out on it. Above are a few shots of the finished product. Didn't think I had the camera with me when I was twenty miles away, so I didn't take any shots of the welding I did today. These two shots were taken here, at home.
Not finished with making the main gear yet.
And there is more to read...


 A little over a week has gone by where I was thinking about nothing but it. Still drives it's way into my thoughts on a regular basis, but I'm not fixated on it. So... it's not time to forget it... but it's time to carry on. In my case, one of the things to carry on is to get back to building this biplane.
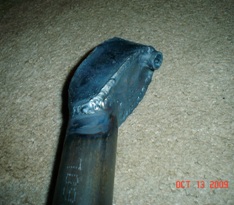 Finally got to work on the biplane. Changed the tip on the welding handset to a 205 for the heavier tubing on the Main Landing Gear. Still took a lot of heating before I could run a bead. Once it started I had little problem keeping it going... until I was between the two tubes... it decided to be a little stubborn. OK... turn up the heat a little, warm it up a bit more and then continue on with the bead. By the time I reached the start of the weld line it was nice... and... warm.
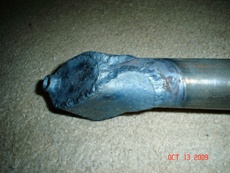 Welded on the rear tube cover plate then put in the 1/4" spacer, tacked each tube to the bushings, aligned the forward plates, tacked those on and was ready for the finish welding. Had enough time to completely weld the box on the left rear tube. Turned out very nice. I actually like how the wrap turned out on it. Above are a few shots of the finished product. Didn't think I had the camera with me when I was twenty miles away, so I didn't take any shots of the welding I did today. These two shots were taken here, at home.