Mantua, New Jersey
Original Site:
September 2004
E-mail: usav8or@yahoo.com
Buying my spars...
If you've been reading about my experiences with these spars, you'll know I've been searching for a nice set of Douglas Fir spars. They just ain't that easy to come by.
I found the name, number and email address for an outfit call R.A.W. Resources. Saw the name on a Pitts Model 12 builder's site and the Tigercub site over in England. Each one a different number to
call up in British Columbia, Canada. Both of the guys I spoke to said that they weren't R.A.W. Resources and have had several calls asking about R.A.W. Nice guys, both of them. Wanted to know where I got their
information from.
I don't quite remember how I eventually fell on this site but it was a Godsend.
Western Aircraft Supplies, LTD, located in Slocan, BC.
Mailing address is:
PO Box 79
Slocan, BC
V0G 2C0
Phone: 250.355.0003
I was excited that I finally found a source for Douglas Fir spars; a place that could pick out the right wood. Not just a source for Douglas Fir leaving me with the task of
deciding what wood was aircaft quality. I picked up the phone and made the call as soon as I made the discovery.
The woman, Laurie, on the other end of the phone was very pleasent and took down all the
information that I gave her. She said that she would have Marc, her husband, work up the quote. I told her that she could email me the information instead of having to make a long distance call.
The next night I get an email from Mark appologizing for taking so long to get back to me. The quote that he gave me was unbelieveable, $260.00 plus packing and shipping. It turns out that I only gave them the information for one top wing and one
bottom wing. STILL... $520.00 for eight Douglas Fir spars ??? And these are finished cut with the correct angles. Sweet !
October 1, 2007 first spar, I cut tonight...
I spoke to Marc at Western Aircraft Supplies last week. I had to call him... The price sounded great and from what I read, they seemed like they knew what they were doing. Still... I had to talk to the man in charge to get a "feel" for what he knew (not the I know that much.)
In just speaking to someone you get a feel about them.
After speaking to Marc for about 15 minutes I was sold on Western Aircraft Supplies. Actually I was sold on him. And, he is Western Aircraft Supplies, both he and his wife own it. He's a down to earth guy that seemed to love what he was doing.
He could talk rings around me about aircraft quality wood. Doesn't do any advertising, it's all word of mouth. He doesn't want to put the word out there and not be able to meet the demand. Sometimes it may take a month or two to get the quality of wood that he is
happy with before he can fill a customer's order. Most people are too impatient for that long of a wait. They want it NOW !
Anyways... tonight I began cutting the spar blanks that I'll be "stringing" my ribs onto for sanding them down to a uniform shape. I'll be sending a section of each of these blanks to Western Aircraft Supplies to dimension my spars from; reversed engineering in a way.
Spent almost two hours tonight cutting just the front and the back spar for the Lower Wing. AND, I still need to plane down the front spar. A lot of double and triple checking of the protractor angles and board measurements. The table saw comes in real handy when cutting these
spars. It'd be ideal if I had a planner to get the thickness down to an exact even dimension. I just may cut a few new ones and use the planner at work to get that "perfect" uniform thickness.
Right now I have about a 1/32 space in front and in back of the spar; the space between the spar and the wood on the ribs. Threw up the question to the biplane forum to see how much wiggle room would be accetable. I'll let you know what I hear.
July 23, 2007 Be careful, what you thought you had previously learned... may have been a fluke in disguise... or maybe just not the right learning.
Looking at the previous post... I haven't been to this page in a loooooooooooooooooooooong time. Could have put this post on the "Fittings" page but figured, what the heck, I need to start on these wings. So what better place to start, than to write something on the "Wings" page.
For the past two or three days I've been working on the Internal Flying Wire plates. They're made out of aluminum. There are three different types; four each of those three for a total of 12 plates. As with any redundant task, I make a jig, or jigs, up for it. And so I did here.
Aluminum is easy to cut, or so I thought, so I'll set up the jig and route these puppies.
I'm routing these free-hand, and I'm doing them two-up, which means I'm cutting .25" of aluminum. I should have trimmed down the excess overhang as close as I could get to the jig. I might have done that, un-knowingly, on the first set, but it was a different story on the following sets. First one cut close to a hot knife in butter... I was being real careful on how I feed the piece into the bit. The next set of plates must have had a larger than normal overhang of aluminum. When I started to carefully feed the piece into the router bit, it bit it and then it spit it out. Again I started to carefully feed the piece into the router bit, it bit again... spit it out just like the first time. I'm not quite sure what I did to finally make it "work," but I was able to finish routing the outside of that set of plates.
I'm not finished with the plates once they have been routed. I still need to file... file... file... sand sand sand, before they are ready for the next step, which is to drill the finish sized hole in them.
Before routing the next set of plates, I took a close look at the router bit to see if it could give me any clues as to why it was biting into my work. Didn't have to look hard to see the chip on the one blade. Before cutting the additional plates I went out and purchased another carbide tipped flush trimming bit from the Home Depot. This morning I got things ready to finish up the routing of the remaining plates.
With the new bit in the router, and the set of plates sandwiched between the jig and a piece of Sintra (plastic) to space it off of the table, I started to carefully feed the piece into the router bit, it bit it again and then spit it out just like it did the other day. What gives ? The only thing that I could think of, upon inspection of the plates I was feeding into the bit, is that I have too much of an overhang of excess metal, as I had explained earlier, before you knew what I was actually referring to.
I'm headed back out to the Home Depot tomorrow to pick up another $17.98 carbide tip flush trimming router bit. BUT... tonight, when I was cutting out the four remaining plates, I made sure that I cut them back as close to the jig as I could; about 1/16 to a 32nd from the wood jig. I'm praying that this will allow me to use the router bit for the remaining plates. I also created a guide fence that I will screw into the top of the table so that it will allow me to "guide" the piece, I'm working on, into the bit with some precision.
Looks like all that learning I had gained from routing the pieces to the Throttle Quadrants, wasn't much learning at all, at least not for what I am experiencing now. Maybe I should have known not to have such a large overhang on the pieces... but I could have sworn I had more overhang on the Throttle Quadrant blanks. Maybe it's the thickness of the pieces... yeah, maybe.
July 24, 2007 Learning more... about routing aluminum... The right learning... for now.
Back out to the Home Depot to pick up another carbide tipped router bit. By the way, these bits are for woodworking. And yes, they do the job, if you know how to use them.
Which brings me to today's discussion; what I learned about routing.
Don't hurry the process. And make sure you take all the steps before starting to route.
If you don't have a table for your router, you can either buy one, or make one yourself. If you're going to make one yourself... copy one of the manufactured tables, and make sure you have a guide on it. Don't "free-hand" the pieces into the bit, you're only asking for trouble. At best... you'll make a few scrap pieces out of your "whatever you're working on." (the idiotic things I do sometimes, amazes me) Worst case... you'll lose a few fingers.
Don't be leaving a big chunk of metal hanging over the edge of the size piece you'll be trimming it down to. Take the time to go over to the bandsaw and trim it as close to the "jig" as you can, without cutting into the jig, of course. The bit can handle small bites of aluminum... it's not in a hurry, so don't you be. Take your time with trimming each piece separately. There's no need to "gang" trim them... two, three, four high. Take it one at a time. It'll go a lot faster, at least when it comes to routing aluminum.
And lastly, feed the piece into the bit sloooooowly. Let it nibble away that aluminum.
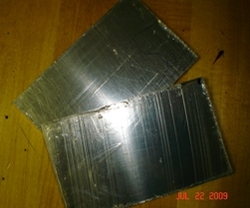
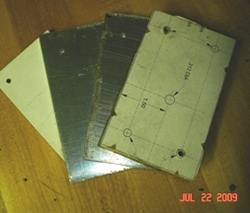
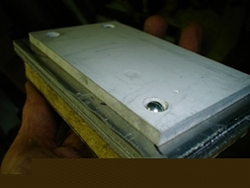
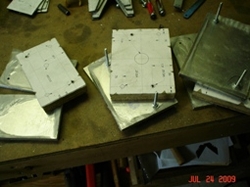
Here are a few shots of the process of taking a sheet of aluminum and making a few fittings from it. I still need to drill the holes. I'll do that tomorrow. Note: The images that show two blanks between the sintra (plastic) and the wood jig were before I learned that you should only do it one piece at a time.
Blank sheet of aluminum
Blanks cut from sheet
Sintra/Blanks/Wood Jig
Same as above, locked together
Routing aluminum
Twelve routed blanks
July 26, 2007 More learning... Match-drilling sets...
Drilling the final size holes in the blanks...
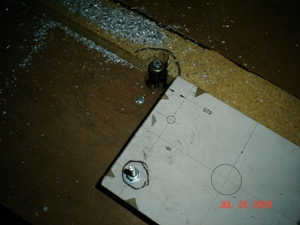
When sandwhiching the aluminum plates between the Sintra and the wood blank, with the pattern on it... make sure you drill all four at one time. Uhhh... I just did two up. Guess what ? Now the two left, with the 5/32" holes in them, have no jig. The jig that had the 5/32" holes now has 1/4" holes.
I'll need to think of some way to align them. Shouldn't be a problem. But... it shouldn't have been a problem in the first place. Now that I've told you... don't make it a problem.
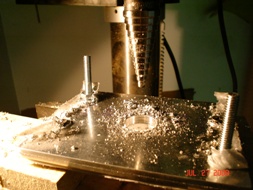
July 27, 2007 Five hours... and seventy-two holes.
Spent quite a few hours on the Internal Flying Wire Plates today. And all that time was spent on drilling holes; holes from 1/4" up to 7/8". Quite a few of them too.
First a gripe with myself. Why I didn't just drill 1/4" holes to begin with is beyond me. Instead I drilled 5/32" holes for the nuts that would keep the plates sandwhiched together. Screws, 1/4", would have done just as well... even better 'cause I wouldn't of had to re-drill the 5/32" holes out to 1/4", thus saving time. You read it here, so don't be drilling 5/32" holes on these pieces.
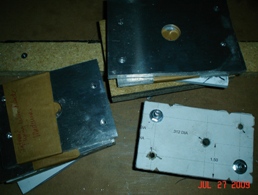
Remember to match drill these in sets so that they'll line up with one another... and remember to mark which ones are which sets. You have enough pieces to get confused about... why throw in another when it can be avoided up front. Here I've already drilled the four 1/4" holes; two of which I have with bolts through them to keep the two pieces aligned. And from the looks of it, I've just finished drilling the 7/8" hole with the Unibit.
Three size holes are needed for these 12 plates. Most of them are 1/4", which I used a nice Milwaukee metal drill bit on. One 5/16" hole needed to be drilled in the smallest plate. Used a Milwaukee metal drill bit on that one too. The third, and largest hole, was a 7/8" hole. Used a Unibit on those. Took a bit of time, quite a bit of time, but I worked through it. Had some classic rock on the radio and the hours just flew by.
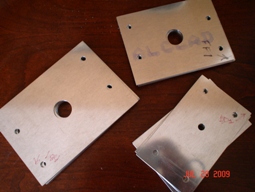
The only thing left to do on them is pull the sets apart so that I can get at the inside edge on each plate... need to file/sand smooth and round them slightly (so that the paint won't easily chip away from the edge... sharp edges have a bad habit of losing their paint.) I'll deburr the edges of the holes too. Other than that, they're ready to be alodined, primed and painted.
Here they are in all their glory. The set of plates at the upper part of the shot clearly shows the four 1/4" and one 7/8" holes. The smallest plates, in the lower right, are still sandwhiched to the jig. And the others are wrapped up... not too good of a photo for showing what I've done. ahhhh well...
July 28, 2007 Edges deburred... and sanded smooth... Next !
More time.
More sanding.
Only thing left to do is seal them up.
Started off the day cutting the bushings for the Main Landing Gear. Let me ammend that statment... Saw that I had the 9/16" x .o58 (so I cut those two) but didn't have the 1/2" x o65 (.o58 if you are looking at the R Supplement, and didn't have that either.) OK... let me do some plans review to make sure that everything has been ordered that needs to be order... and maybe a few other things thrown on there for good measure.
My workshops being what they be (pretty small) I spent a good deal of time looking for tubing to make sure that I either had it, or didn't have it; always referring to my invoices to triple check. After an hour or two of this stuff I placed an order for a few tubes... the rest of the stuff I either knew I had, or found.
Instead of continuing on with working on the bushing stock I had, I decided to finish up the Internal Flying Wire Plates; get those out of the way, and off my plate. Other than deburring with my deburring tool, and filing/sanding smooth the additional edges on all twelve plates, nothing else was needed to be done to them. Here's a better shot of the plates.


 If you don't have a table for your router, you can either buy one, or make one yourself. If you're going to make one yourself... copy one of the manufactured tables, and make sure you have a guide on it. Don't "free-hand" the pieces into the bit, you're only asking for trouble. At best... you'll make a few scrap pieces out of your "whatever you're working on." (the idiotic things I do sometimes, amazes me) Worst case... you'll lose a few fingers.
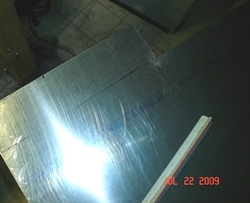

 Remember to match drill these in sets so that they'll line up with one another... and remember to mark which ones are which sets. You have enough pieces to get confused about... why throw in another when it can be avoided up front. Here I've already drilled the four 1/4" holes; two of which I have with bolts through them to keep the two pieces aligned. And from the looks of it, I've just finished drilling the 7/8" hole with the Unibit.