Mantua, New Jersey
Original Site:
September 2004
E-mail: usav8or@yahoo.com
August 13, 2009 Review all of the plans.. before making your parts... or you may be needing to make "more of the same."
I thought I had all my internal Flying Wire plates made. Thought was right... er wrong. Looking at the supplemental drawings for the Clipped-wing version of the Skybolt I now see a slight modification of the Upper Front plate. Not a big difference; a 1/4" narrower and the holes now are only 1/2" from the sides. Everything else... the same.
uh yeah....
Let's see, can I re-use these plates to make the new ones ? Hmmm... if I flip them and turn them side-ways... I'll miss the holes and I'll be able to cut new ones from them.
uh yeah...
That thought passed out of my head as soon as it entered it. I still have plenty of aluminum sitting in my pile of flat stock so I don't need to wait a few days for it to arrive. So... backatit.
Five point five hours later and all four are ready to be alodined and painted; ready for installation. "More of the same" is easier... being the second time 'round.
August 30, 2009 Same schtuff... different pile.
I'm finding that I'm loosing precious time... thinking that I'll keep focused solely on the Main Landing Gear... when the Main landing Gear is 20 miles away. I need schtuff to do... when that part is still 20 miles away. And the schtuff I want to do next is schtuff that needs to be done to the fuselage. I don't want to focus on more than one schtuff at a time... but it looks like I'll need to.
The project for this winter... will be the wings. With that in mind, I figure, what better than... starting the middle section of the upper wing. I already have several of the metal fittings cut, ground and sanded. What's left to do ? And with that thought, I pulled out the plans and started looking at the fittings that I need to make; compare the list to what I have already completed. I was surprised to see that quite a few of the fittings are already made. All I need to do is drill the holes and bend them... if they need bending.
There is quite a bit of wood that needs to be bought and a tank that need to be made. Took a look at the wood components... made that list too. I'll take a look at what needs to be bought for the tank... merge the lists... and place the order with Aircraft Spruce... or Wicks... or...
Wish I didn't need to work on several schtuffs at the same time. But... otherwise... I'd be putting a huge speed bump in the middle of my work-flow. Trying to stay on schedule... not that I have a firm schedule... but the schedule that I'm trying to keep is to just keep working on it, little bites at a time.
October 14, 2009 I've got that feeling again... a bit of hesitation
Ahhhh... I'm use to this schtuff now. Always...always taking those tiny steps when I start something new. Now it's just working slowly into the "new experience" instead of avoiding it altogether.
And so it is with working on the wings. First step is to get this center section on the Upper Wing started and finished. First step to the first step is laying out the lines on the sheet of 1/2" MDF that I bought the other day. Lay it out... square it up... get the material ordered... and have at it.
Although the Skybolt Delta 3-piece wing is relatively new, there are a few guys out there that have paved the way. One of them being JimW; Mr. Woodworking Craftsman. He has his finished; both the center section and the fuel tank... both made from scratch. That's what I'M talking about.
He only found one dimensional mistake one the plans... nice thing to know. OK, 'nuff writing... now it gettin' down to work.
October 16, 2009 Lots going on... both life-wise and build-wise
Lots on the mind... random thoughts filling my head. All trying to occupy the same space at the same time.
Pushing through it all. Actually having to think that I need to do something on the biplane tonight. It wasn't a lot. Got a late start. But !... I did get past that road block of doing nothing.
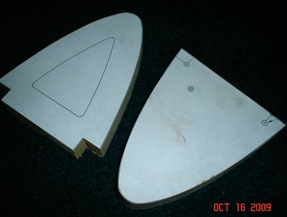
Cut the patterns out for the nose ribs for the Upper Wing Center Section. Glued them on some 3/4" MDF and cut and sanded them to the proper shape. Point six hours... not a lot... but another step closer. Maybe tomorrow, after I've spent time welding up more of the Main Landing Gear, I'll cut the blanks for the nose ribs and route them out.
Felt good to push through that invisible barrier and accomplish something. yeah... felt good
October 20, 2009 Work is really getting in the way... of building.
Since starting the new job on Monday... I'm really pushing myself for time to work on the biplane. A little over an hours drive to work and about an hour and fifteen on the way home. By the time I get home and run with the pup it's close to eight. Grab a bite to eat and head down, or out, to the workshop to start working on the biplane. I'm lucky to get started by eight forty-five.
Tonight time flew by as I was cutting and routing out the seven front nose ribs for the Upper Wing Center Section. A litle over two hours down there. I thought it was closer to one hour until I looked at the time when I stopped. Feeling good though, to get back into it and time flying by.
Tell ya what... that little homemade router table that I made is like gold. I've used it for SO many things... this was another one to add to that list.
Should have done this from the start, when I routed all those nose ribs for the wing's upper and lower ribs. For that I secured the nose rib "jig" to the table top, nailed the wood blank to it then ran the router over the top of it free-hand. Worked, but NOTHING like this little router table. Enough patting myself on the back... just wanted to give ya'll a heads up as to an easier way of doing it.
Above is a photo of the routed nose ribs. Still need to route, or do something, to the inner opening on the five inside nose ribs. Oh yeah... still need to drill two holes in the two outer solid nose ribs.
October 24, 2009 Now... where was I ? ... and what am I building ?
Take it from me... and ya probably already know this... sit down and complete whatever list you're making and then order the stuff !. Putting off ordering... I've come back to this material list, for the Upper Wing Center Section, three or four times now. Each time... having to look at all the drawings again to make sure that I have everything accounted for or that I'm even looking at the right lists.
Actually... on the third look, I saw something that I had missed. So... it's good to at least double check your work... but not a week or two later. Ya forget things !
So, that's what I did again today (a few weeks later)... checked the drawings and my material lists to make sure everything jived. They do (at least I think they do,) and now I'm ready to place that order for the wood and tubing for this part of the project.
November 1, 2009 Still thinkin' 'bout it... still thinkin'.
Get up... long drive to work... long drive back home... eat... sleep... repeat.
Gotta get out of this awful routine. Not quite as bad as I just wrote... but man... I need to get back into that routine of coming home and working on the biplane. Ahhh... it's a combination of several things going on... I just need to keep kicking myself each day, eventually it's going to be a kick hard enough to punt me back into a regular routine of building again !
I've been writing and talking and writing and talking about getting the material for the center section of the upper wing. I'll be ordering that on Tuesday night. At the moment I'm in Minnesota on business. Order on Tuesday and it'll be on my front step on Friday. Get started on it on Saturday, maybe Monday. I'll probably work on the Main Landing Gear on Saturday or Sunday. Try and get that completed in the next few weeks.
Just rambling. The work on the biplane, in the last month, has been spotty at best. This "hiatus" will end ! this week !
I've been keeping busy looking at the drawings, thinking of how I'm going to go about building this Upper Wing Center Section, but who would I be kidding by adding those hours to my build time ? Sure as hell wouldn't be me. Can I chalk it up to hesitation because of starting something new ? Nope ! No excuses to be found.
Time to stop thinking and time to start building... again.
edit: I was just thinking... being out of work (yeah I was one of those people that were affected by this great economy) I was use to looking for a job for about four hours then working on the plane for a few hours during the day... got use to that. Hmmmmm ? Need to get back into that old mind set again... working on it at nights.
October 29, 2014 DAMN !!! Still thinkin' 'bout it? Naaaa... finally moving forward with it !
Damn !, a lot goes on between one decade and the next...
I've been steady working on the biplane, as you know, just not the wings. Talking with Andrea on the way into work today and I was thinking through a few things with the project and I brought up the wings.
Once I start them, I don't want to move them until they're locked into position, with no twist. Which brought up the cutting of the spars (that I've had since 2008). Jeremy, a guy that uses part of their facility for building furniture out of re-claimed wood, is a craftsman when it comes to wood. (idea) I asked Andrea if she could ask Jeremy if he'd be interested in cutting the profiles on the Douglas Fir wood spars I have. Got a text from Jeremy a few hours later... he'd be happy to help me with them.
All I need to do now is cut the sample profiles for Jeremy to follow and to make sure that I let him know which one goes with which spars. I hope to have that over to him in a week or two, along with the spars.
December 4, 2014 Making spar patterns... for the spar patterns ???
I've talked about getting the spar blanks ready. I've thought a lot of times about getting them done...
Tonight I finally got started on them. I had only wished I cut the spars before making the ribs. Soes I could use a thin section of each one to use to make my ribs. NOW... I need to do a little reverse engineering. They're not going to be a perfect fit but they're going to be damn close. Actually... I need to leave a little room for the T-88 glue.
There was a little cutting and a lot more sanding done... to get these to fit close. A lot of back and forth testing of the pieces in the ribs. I have something close to four spar blanks in just an hour and a half of work. I'll let them set for a day or two... check them out again.
One thing's for sure... I'm sure as hell gonna make them as good as I can get them... Maybe make four newer ones using these as patterns... we'll see.
Click on image for a close up of the front spar blanks.
December 9, 2014 Spot on ??? One of a few possible spot ons.
Time... but no time. Maybe better described as rushed time.
Working on the project tonight came after stopping by my Mother's for some holiday business then over to the Hallmark card store to buy a card for Andrea's birthday... THEN over to the house to put some time on the biplane.
I'm re-adjusting the pattern blanks (or should I say I want to adjust them) for the four different size spars for the wings. Ass-backwards as the saying goes. Those openings weren't as "square" as I wanted them to be. With just a little tweaking they're spot on to what they could be but not spot on to how tight I want them to be.
But then... they can't be so tight that you have issues moving them along the spars. and... the upper wing spars need to be filed some so that they have the 6.5 degree angle on them that is needed for the sweepback. But then... I want to make sure that there is a good glue joint. I'm thinking, if I'm not the happiest of happy with the space around the spars I can add small 1/4inch glue blocks for that additional glue joint that I'm looking for.
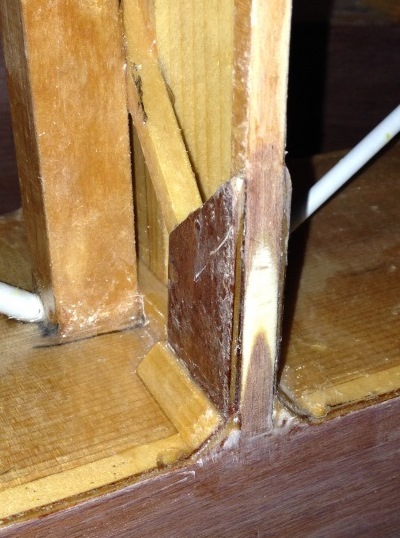
Here's a shot of the triangle support block that was in Taff's wing building thread which is actually a photo that Ward posted. I'm sure they won't mind me posting it. You can go to the biplane forum and take a gander at Taff's thread on building his Skybolt wings. Nice thread... and beautiful work.
Triangle block. Plenty of additional glueing area.
(Ward's photo in Taff's thread.)
December 11, 2014 Perfect... They're not perfect !
Continued work on tweaking of the spars. I should have bought the wood for the spars and profiled them before I went ahead and made the wings. Hindsight 20/20. But, I didn't 'cause I didn't have the money back then (come to think of it... I don't have it now, either).
There is only so much I can do to get these close to the shape that I need them to be. Tonight's work got them to the point of "that's as close as I'm going to get it". I've pushed two ribs on the spar blanks to see how they'd line up and they look good. The front opening in the second lower wing has an opening a little bit larger than the one I was making the spar pattern fit... hmmm ??? Other than two each of the upper and lower wing ribs... I have yet to test any of the other ones on the spar blanks.
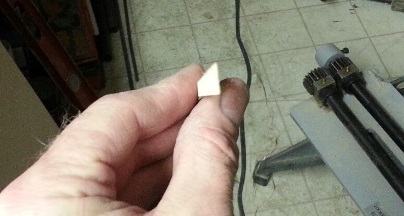
Even with the additional space around the spars... I'm real happy with my work. The ribs will work just fine with the new spars (once they've been profiled). oh... the triangle blocks I have are 5/16inch. I was thinking of what I would do... the triangle blocks Ward used are 1/4inch. I played with the 5/16inch triangle blocks I have and saw that the edges on these (where they taper to nothing) ain't worth a crap for holding anything. So... I figured I'd trim 1/16" off each tip. That'll bring them down to 1/4inch. AND... when I was "playing" with the tri-blocks on the ribs I saw a few areas that will need a little building up (the vertical cap strips between the 1/16inch gussets) I'll use 1/16inch ply to build those areas up as well.
#feelinggood about the ribs/spars...
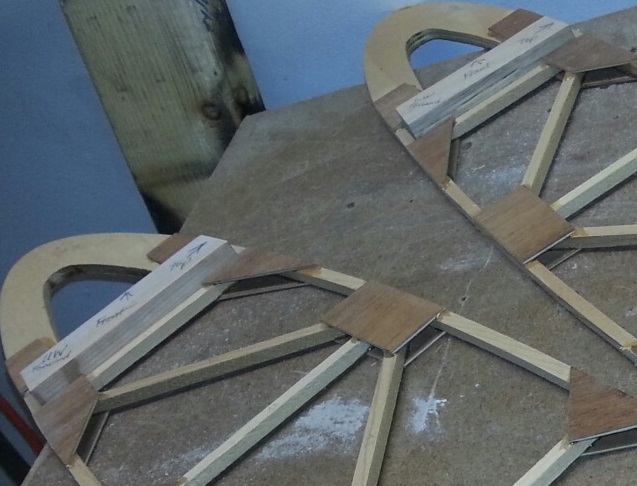
Upper and Lower Ribs... two ribs on each spar blank.
I took a look at how the gussets line up once the ribs are slid on the spars. They line up... but they're not perfect. Some of the gussets were made at a different time and are actually a little bit larger/smaller than the others. Perfect ! Love that look of a hand crafted biplane.
December 13, 2014 What do you call a pile of cap strips ??? I'm calling them finished !
As noted in my last post... the spar blanks are ready for their job of being patterns. and... as noted above, I wanted to put some additional wood/glue support on each of the ribs where they contact the spars.
Pulled out the 5/16inch triangle blocks and start "playing" with them to see how they'd trim down. Tried by hand and not happy with the uneven look of it. Then... took a piece over to the table saw. Rigged up a guide to keep it going straight through. Cut one tip and it looked good. Cut the other tip off and it looked good not so much... With all that work of cutting off the tips it looks like a 1/4inch piece of cap strip. If that's the case, I'll just got out and buy 1/4inch cap strip.
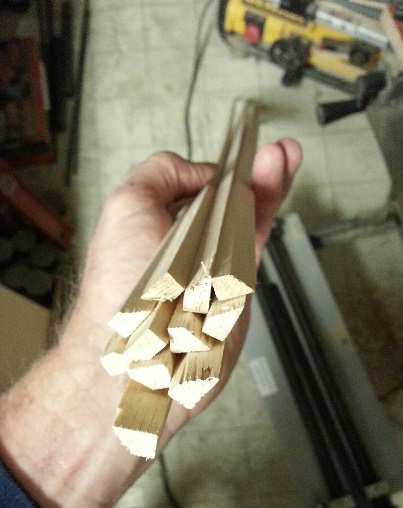
hmmm???... let me try something... Cut the one tip off of another five foot piece and it looked good again. Thought ! That's it ! Keep the 5/16inch edge for additional glue area on the upright but trim down the other side to match the 1/4inch cap strips that it will be mating up to. Figured I'd only glue this additional contact area on the front side of the spars... at least for now that's my thinking.
Enough to support the front side of the spars.
oh... by the way... did you know that a group of rattle snakes is called a rhumba ??? As if they knew how to party...


 Cut the patterns out for the nose ribs for the Upper Wing Center Section. Glued them on some 3/4" MDF and cut and sanded them to the proper shape. Point six hours... not a lot... but another step closer. Maybe tomorrow, after I've spent time welding up more of the Main Landing Gear, I'll cut the blanks for the nose ribs and route them out.
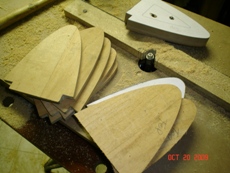 Should have done this from the start, when I routed all those nose ribs for the wing's upper and lower ribs. For that I secured the nose rib "jig" to the table top, nailed the wood blank to it then ran the router over the top of it free-hand. Worked, but NOTHING like this little router table. Enough patting myself on the back... just wanted to give ya'll a heads up as to an easier way of doing it.
 Gotta get out of this awful routine. Not quite as bad as I just wrote... but man... I need to get back into that routine of coming home and working on the biplane. Ahhh... it's a combination of several things going on... I just need to keep kicking myself each day, eventually it's going to be a kick hard enough to punt me back into a regular routine of building again !