Mantua, New Jersey
Original Site:
September 2004
E-mail: usav8or@yahoo.com
YES... more of... The Radical Radial Fuselage.
March 26, 2008 Empty hours... well spent hours though....
I hated cutting the upper longeron off the side of the fuselage. Just hated it ! Yeah there's the learning, but I'd rather learn from someone else's mistakes, not mine.
This puppy is going to take long enough to build, let alone the extra time spent correcting the "learning" that you put yourself through. In another two years I'll look back on this and
say, "Ya know.... if I hadn't made so many mistakes I'd have been flying this gorilla months ago." lol
Time'll pass fast enough and I'll be filling up the tank with some of that expensive crude oil trying to qench it's 10-15 gallon an hour thirst.
Suppose that I'm learning a lot more from my own mistakes than that of someone else's... I suppose.
April 2, 2008 Feelin' crabby... chasin' legs
I spent Monday night, and tonight fighting with the adjustment of the six legs on the table and making sure that the MDF tops were fitting flat on the existing tables.
The first night I ended up spending close to two and a half hours on it and not really seeing any results. Well, at the time I thought I was close... that was, until I went back out there tonight.
I might be making it a little rougher on myself than I need to. I had three types of levels I was using, in addition to my eyes. I had a four foot level, one of those inclometers that tell you in degrees what type of
incline you have, and a straight line lazer (not a level but a helluva tool to make sure that the table top is all on the same "plane."
As you know, a one car garage isn't a lot of space to be building a 168" x 30" x 25" Skybolt fuselage. I found myself constantly walking side-ways along the length of the table going from one leg adjustment to the next.
After fighting with trying to get it leveled on Monday, I started off tonight looking at where I was having the difficulties and possible reasons as to why it was behaving like it was. Part of my problem was with the legs on the tables.
These were made for a 30" wide table. They were out past the 30" marks. It didn't matter if they were a little high. We'll when you're laying a top that is 36" wide on top of it, a little, is a lot... when it comes to leveling the
top from one end of 16' to the other end of 16'. I didn't discover this until about 1/2 way into tonight's session.
Finding the "high" legs, only two such beasts, I'd unscrew the MDF top in that area and either use a small saw or a rasp to do a partial amputation of the offending leg. Having found and solved that issue, the rest of the night was a breeze. Taking care of those two areas pretty much allowed me to finsih up
leveling the table without having to chase the bubble on the level too much longer.
I spent another 2.3 hours on leveling this thing tonight. I'm sure it'll be well worth the hassel of getting it right. If you don't do it right, now, you'll be forever making corrections to it later on.
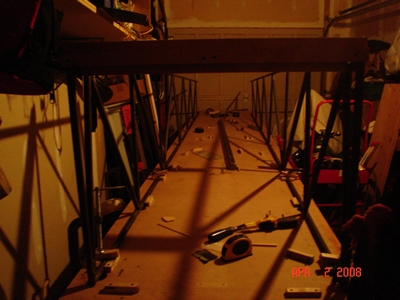
Here's a picture of the sides standing upright on my level MDF tops. May not look purty to you, but tonight it was the most beautiful thing I saw.
Tomorrow I'll take those turnbuckles and wire I've had laying around for the past two weeks and get this puppy squared up and ready for a few cross tubes.
April 3, 2008 Coming up a little short... press on regardless ???
I've metioned it eleswhere on the site that station 77.o isn't really station 77.o, but in actuality it's station 77.25. You can read all about it here.
Fractions of an inch with a good chance of the fuselage shrinking 1 to 2 inches from welding, and I'm building the Skybolt so that part A fits up to part B and part B fits up to part C, etc. I've made the decision that I won't be ripping the two fuselage sides
apart again, but will continue moving forward and start squaring up the forward end of the fuselage.
From reading the Skybolt manual, on the biplane forum, and seeing what a few other builders have done, I'm using turnbuckles and wire to help me in squaring up the fuselage. Not much too it. I'll post a few pictures of it in a day or two.
One thing that I did, so that the wire wouldn't scratch the metal tubing... I took some 1/4" clear tubing (you can get it at a pet store... it's the stuff they use with fish tanks) and cut about two inches and wrapped the wire where it would be touching the tubing.
The boards that I cut, to keep the distance between the lower longerons, which are now on top (the fuselage is flipped up-side down) are cut so that the inside of the tubing is 29" from the other tubing. (The fuselage is 30" wide, the tubing on the lower longerons, in this section is 1" OD, thus you need to have them 29" apart. I'll post of picture of these also.
Other than adjusting the turnbuckles to keep the sides vertical... like I said before... there's not much to it.
April 7, 2008 The difference between 1" and 7/8ths...
trying to understand an engineer's reasoning....
Spent the weekend pretty much studying the fuselage plans; both the Standard version and the Radial version. Other than the two designs looking nothing alike, as far as most of the cross and diagonal tubing goes... I was looking real hard at the tail post area.
Mr Pitts redesiged the fuselage to accomodate a Russian Radial Engine, everything else on the bird is ala Standard Skybolt (unless you're building the new 3-pc wing.) Well, looking at the tailpost area I saw that Mr Pitts put an 18" long 7/8" x .o49 tube where the standard has a 1" x .o58 tube. This didn't quite look right to me since they're both using the tail feathers that were designed for the Standard Version.
And yes, you guessed it... I threw the question out to the group on the biplane forum. JimW, Randy, Eric, Nick and myself threw ideas back and forth trying to understand why it was done. The conversation then turned from why was it designed like that to what I should do with my Skybolt. It came down to sticking with the tried and true, yes... the 1" x .o58 tubing. A set-up just like the Standard Skybolt has. And as Randy said "Make a command decision here - build it like the rest of us and save a bunch of headaches."
That's pretty much what I wanted to do in the first place... just needed some experienced builders to throw that at me. I was almost certain that it should be built like the Standard since the tail feathers are made just like the Standards.
As mentioned earlier, I've started to measure, cut and notch the cross tubes on the top-side, which is the bottom right now. You build the Skybolt fuselage on the table up-side-down since the loooooooooooooooooong straight longeron is the upper one.
Taking it nice and slow to begin with... turning the pages of the Skybolt Manual as I proceed along. I better check that 10 page "manual" I got with the Skybolt plans. Last time I didn't do that and I ended up with a few of my diagonal tubes scooched forward a few fractions of an inch. Been there... and you've read about it. (hope this measuring, cutting and notching starts to get a little faster...)
April 13, 2008 Practicing ???...
measuring, cutting and notching....
Over the past few days I've been working on trying to make a few patterns for the throttle quadrants and fitting in the cross tubes on the fuselage.
The table that I made for the router looked pretty good. Everything fit together without a problem. I attached the router to the underneath side and it sat there for a few days before I got around to starting on the patterns for the throttle quads. Thursday night was just the night for starting on the patterns. Took about an hour and a half and cut the paper prints out and glued them to the 3/4" MDF that I have. Cut, sanded down and drilled the holes on the two patterns that I had. Decided to call it a night and would start the router up tomorrow and quickly make the lower portion of the patterns.
Tomorrow comes and I decided that the MDF was TOO thick. Didn't like it. Cut another pattern out of birch then made a rough cut of another of the same on birch. Attached the two together using machine screws and wingnuts. Fired up the router and slowly fed the wood into the blade. This thing is working great! I'll be cutting pieces of aluminum by the weekend. Made another pass... hmmmm. Are my eyes deceiving me ??? I saw that it was beginning to eat into the original pattern that I made. Is the bearing jammed and spinning withthe bit ? I turn the router off to check and see what the problem is. Nothing seemed to be amiss other than the bit creeping up, which didn't make a bit of sense. If anything you would think that it would have "fallen" and lowered itself.
I checked the turn knob. It was tight. I re-adjusted bit and moved it down, then made sure that it was good and tight. I wanted to make sure that it wouldn't allow that router bit to move again. Went back to that expensive birch ply and cut another "original" pattern (cut pattern from paper, glue to birch, cut with jig saw, sand edges down to pattern lines, drill holes into it, then drill larger holes where I drilled the oringal smaller holes to allow the head of the screw to fall below the surface of the wood.) Rough cut another pattern to the bottom of the first good pattern and feed the wood into the router bit. DAMN ! it did it again.
Tried again.... Repeat the above for a third time....
I just couldn't figure out what was going on. Each time I made sure that it was good and tight and that it wouldn't move up OR down. And each time it moved up.
Still haven't figured out why it was doing it and at this point I don't really care why. I have the entire fuselage to do and this can wait a few days. Thought that I'd get a jump on this and I end up spending a lot of time... basically wasted time.
(April 21, 2008: Update - The moving up and down of the
router bit... The bit wasn't tight enough in the chuck.
It was tight... but not tight enough.)
With the weekend here, and a good chance of rain, I'll be able to get a good start on cutting the cross tubes for the foward section of the fuselage... start making this look like a biplane.
I'm finding that my skills with the Joint Jigger allows me to cut two different cuts at 90degrees but to cut several cuts on one tube that are at various angles... I still need a little practice there. Most of the cuts I'll be making on the forward fuselage, at least the primary ones, are two cuts at 90degrees. Just my style... It was just a matter of course to measure, cut and notch the tubes for lower stations 24.o and 51.o, and upper stations 26.o and 49.o6.
Now both upper and lower tubes for station 0.o is another story. As you well know, the tubes at these stations are cut at a 45degree angle which makes the usual simple cuts on the Joint Jigger a little bit more complicated. A little bit more than a little bit of thought needs to go into thinking this out. (As a side: Remember what tube your cutting and what size hole saw you have in the Jigger. I've caught myself more than once having the wrong size hole saw in for the size tubing I was cutting for. ahhhh... sometimes I didn't catch myself until AFTER the cut was made)
After some practice (read that as one tube cut incorrrectly... actually it was cut right, but it was cut too many times right) I figured out that I needed to cut one side of the tube (half way through) with the 1" hole saw, turn it 90degrees then make a cut into one side of the tube (half way through) with the 7/8" hole saw. Making for use of the "pracitce" piece I spent the next two hours holding it in place, grinding and fitting, holding it in place, grinding and fitting... blah blah blah
Repeat for the second tube for the other station 0.o. Well, a repeat minus the original mistake.
If you find a better way for doing it than nipping a little at at time and fitting it up gradually, let me know for the next one I build.
Since I had the bungee truss already made I put the grinder to that and fit it into station 5.o. Now THAT was a piece of cake.
Next...
I'll tack these pieces to the fuselage and read that Skybolt manual again so I don't screw anything up. I think I continue down and fit all the cross tubes in before I start putting in the diagonals, but I'm not 100 percent as of this writing. I'll let you know...
oh yeah.... gotta go out and find me one of those router bit tables soes I can get started on my throttle quads, or at least making the patterns for them