Mantua, New Jersey
Original Site:
September 2004
E-mail: usav8or@yahoo.com
more work on the...Radial Fuselage.
November 15, 2014
I don't want to play...
I just want to bang on the drum all day...
I'm loving these weekends where I can get a load done on the project... moves things right along.
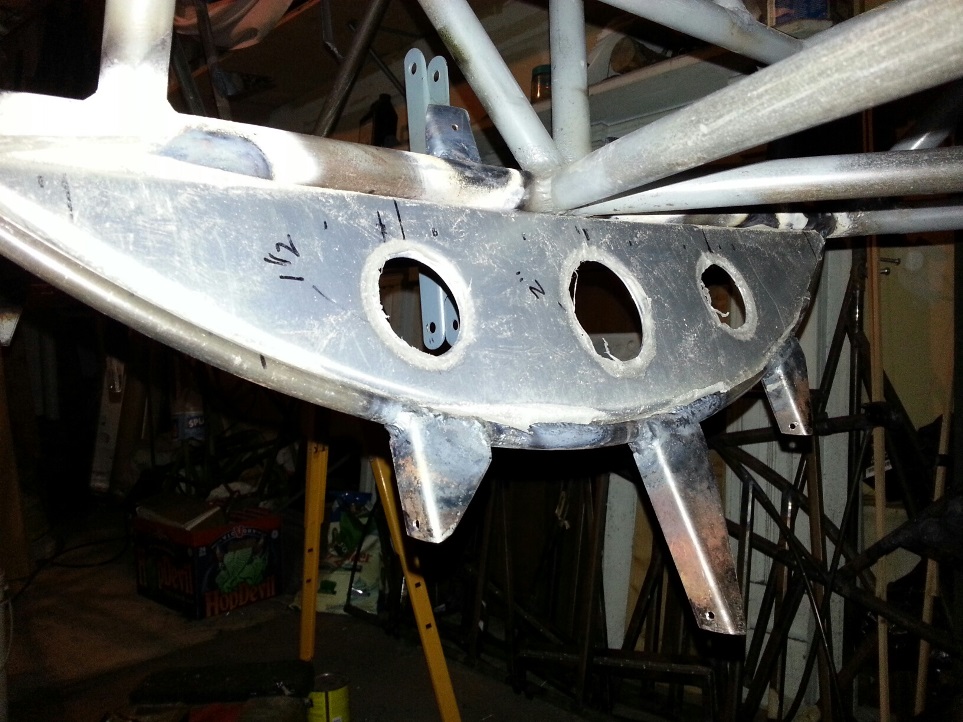
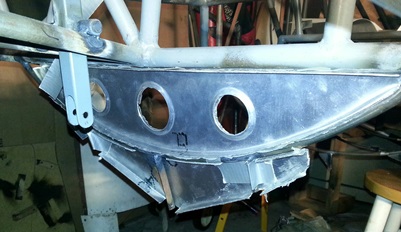
Today I knocked out the complete lower/outer enclosure. Had the blank cut out from the night before and all I had to do was drill a few holes (for the corner cuts), snip the aluminum for the cut-out areas and then bang it out. uhhhh... it was a little bit more involed than that.
so it went like this... Today I actually cut the top piece for the form to hold the aluminum blank tight against the wood, oak form. 1/4inch holes: Drilled (the oak form), matched-drilled (the top ply piece) then match-drilled (the aluminum blank). Banged away (ain't a drum... but it was something to bang on). Banged away some more. Clamped the aluminum "dish" (the piece I'm working on) upside-down with a 1/2inch piece of ply so that I could then cut the sides down to 1/2inch (or real close to it) then file to the 1/2inch mark. Banged some more after re-loading it onto the oak form. Tweaked it here. Tweaked it there. Banged it a little bit more. Looked good to me...
Took it out to the fuselage and mated it up to the lower former and WAA LAA ! Fit beautifully... All I need to do is notch for the stringers and drill the mounting holes.
Ends of the lower encloser will be finished off with a
rubber gasket/filler for a smooth transition.
More daylight to burn so I made the wood, oak form for the outer/side enclosures. Already had the pattern made (one size fits both). Already had the oak blank glued and clamp so that I had a piece large enough for it. All I had to do was trace the pattern and cut out the form.
A little under and hour and it's ready for making a few aluminum enclosures...
November 16, 2014 more than Early morning...
musings...
Getting an early start on the project today. Up at 6AM and figured... what the heck, no sense in just thinking about working on it.
I have a piece of sheet aluminum. I have the side enclosure wood pattern. I have the snips and gloves. I have the time to do it.
Didn't think I had enough aluminum for both sides and drew the one out on the sheet of aluminum I had. Looked at the way I had it placed on the sheet and thought, if I only turned it the other way I just may be able to make it work for both.
I was right... the second time. Drew up the first and had to wade through all the extra lines drawn on the sheet. Scribbled out what wasn't to be cut and took the tin snips to the others. Laid the second side out same as the first and cut it out as well. A little over 1/2hour and I have the two blanks ready for me to bang away on them.
Ready for some pounding.
November 18, 2014
Finished...
but needing more attention.
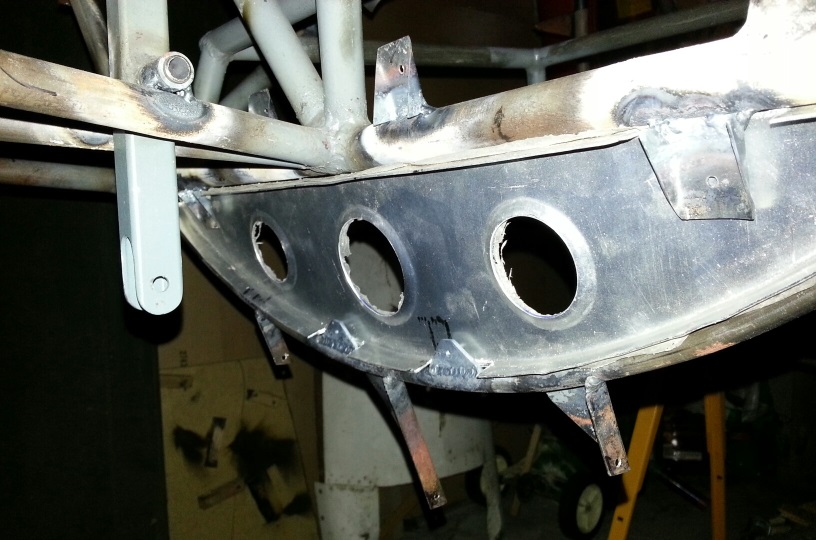
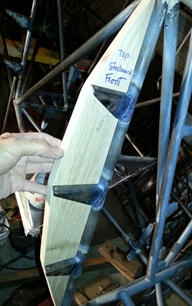
Getting pretty comfortable working with aluminum sheets. Knocked out another piece of the enclosure tonight... the port side, outer piece.
Some of the little-over-two-hours was spent on getting the form/jig ready to bang out the piece. Then... it was just a matter of taking my time to:
- Bang over the sides
- Trim side lengths to just over 1/2inch
- Take off form and file sides to 1/2inch
- Replace on former to bang back to shape
- File open areas where I notched earlier
- Hold piece up to fuselage for a looksee
- Repeat... repeat... until happy with look
- Try finished piece on fuselage
- Happy face
The piece still needs a little attention. Because I've notched both sides of the piece at the same location the enclosure isn't as ridgid as I would like it to be. I'm thinking that putting ligthening holes won't do a thing for it since they'll be either above or below the area needing attention. I'm thinking... putting two beads along the length of it will stiffen it right up. It should do the trick and not complicate anything for attaching it to the stand-offs.
"New" port enclosure next to existing piece.
Still needs a few beads for stiffening it up.
November
20, 2014
Excellence...
or
should I say...
A
really nice job.
Hand forming these enclosures have been a fun task. A lot
of aluminum dust but other than that... it ain't "dirty" like
welding (don't get me wrong... I love to weld).
I've done a real nice job on these piece but they're still
not perfect. Not sure if I can ever reach perfection and have
this flying before I die. I'd rather work towards "excellence"
and fly it for a lot of years.
Pretty much started and finished the starboard-side outer
enclosure. Lookin' good... and I'm wondering even if I'll
need to stiffen these up. They're going to be attached directly
to the stand-offs so they're not going to be able to bend
in any direction. Running a few beads in them is just going
to cause me to put a little bit more work into them. ahhhh...
I may still do it.
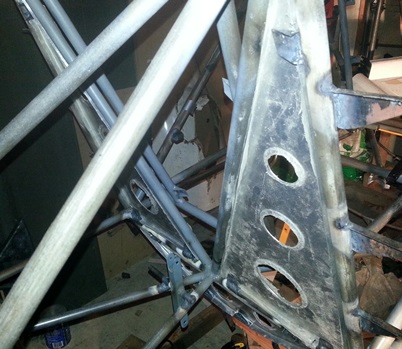
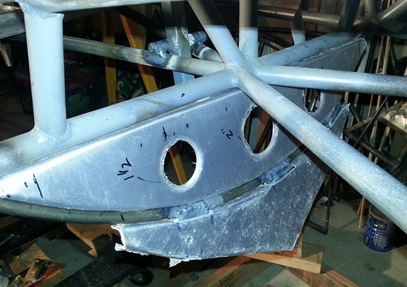
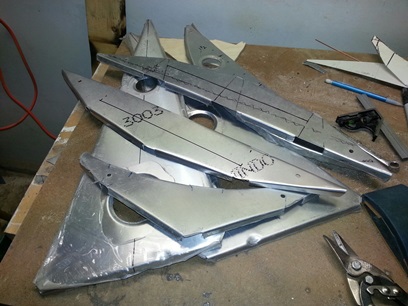
With all the main pieces done on the enclosure I took the
time to stage them all for a photograph. They's lookin' mighty
fine...
November
22, 2014
Looking at...
but not seeing...
attention to detail.
I always thought of myself as a "detail" person... similar to a scientist; concerning myself with all the little things; all the details.
Maybe it's because I'm getting closer to finishing the biplane... I'm finding myself wanting to get the bulk of that project done to where it looks like I want it and then move on without finishing it completely.
I'm real happy with the look of the enclosure parts that I've made. I pretty much finished them up last time I work on the them. It's Saturday and I'm thinking of the next part of the project that I'll be working on; re-do of the re-do of the re-do on the turtledeck stringers (long story???), make the jig for holding the tabs in place (both location and depth) for the enclosure. Then I get to thinking... I need to clean the edges up on all those pieces I just made. Let me take care of that now instead of coming back to it when I'm ready to attach them. And while I'm at it... why don't I just position and weld on those tabs for them too!
I've got my plan for the day... let me just get it done.
Picked up the first piece. I see that there's a lot of aluminum overhang from where I filed them down to 1/2inch. and... It wasn't easy getting it off. Picked up one of my small (tiny) flat, diamond files and started working on it. Got most of it off of the edges. Took some sandpaper to it 'cause the edges are sharp and we all know sharp edges don't hold onto paint that good (that is... if I'm going to paint them) and maybe it'll take that little excess aluminum off the edge that was left from when I just tried filing it off.
Worked like a charm... but sharp edges of aluminum eat up sandpaper like I eat a box of popcorn at the movie theater (it's usually gone before the show starts). I also found, while spinning the piece around to work on it, that every notch I put into the piece needed the same treatment done to it. As of today (and I still need to notch the large center ones) that's 32 notches. It's got to be done, so I worked on cleaning up each an every notch on that piece too.
I worked on the second... third... forth... fifth... and sixth, just like the first. Attention to detail I thought as I filed and sanded each edge, each notch...
I had a lot of time to think while I was doing all this sanding and filing. It occured to me that all of the large pieces I've worked on that needed attention to detail were pretty much spot on to the enclosures; I wanted to move on after I got the bulk of that piece done before finishing off the details of it. I'm trying to figure that out; the why of wanting to move on before completely finishing off the piece.
Today I spent threepointone hours on the project. Compare the photo above to the one below. Doesn't look like I did anything, eh? I wouldn't think so either. What I did today was that "only 10percet left on the project but still 90percent to go". It's that attention to detail that adds hours on to the project. Maybe I should be happy with the number of hours I've put in on the biplane.
oh... I never did get to those tabs
attention to detail...
November
25, 2014
The correlation...
between the amount of time spent...
and the amount of work accomplished.
I look back on tonight's work and I'm not sure where all the time went... compared to what was accomplished.
Now that the edges on the enclosures were cleaned up, I wanted to get them mounted !
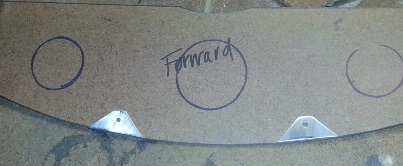
Picked up the piece of masonite that was my first iteration of a pattern for the one set of enclosures. Measured and marked the location of where I wanted to drill the mounting holes and then drilled them. Then, couldn't for the life of me, find a screw small enough to hold the tabs in place. FINALLY found a screw that worked so that I could get on with it.
Next I decided on the depth that I wanted them mounted on the framing tubes. The tubes are 3/4inch diameter. I decided to set them back 1/2 way on the tube. Made the jig (consisting of the masonite panel and a build up of wood pieces to keep it at that depth on the tubes while aligning and tacking the tabs in place. I made more of a big deal at the location of one of the tabs (the hole that I drilled actually had it position very very very slightly off the tube) which in turn added more time to tonight's already long work session.
okay... got everything in place for the first tab and tacked it into place... charring the piece of masonite to no end. Went around to the other two locations for that enclosure and did the same thing (they were spot on as far as the tab-to-tube location, but just like the first location... I burnt the hell out of the masonite).
On to the next enclosure (same as the first one but on the port side). Clamped the holding blocks in place. Held the masonite former up to the blocks and... it ain't lookin' right. The bottom front edge of the piece is towards the front edge of the 3/4inch tube. It ain't lookin' right. Took a look at the masonite panel and it's warped pretty good from its last cooking. Started cutting a new one from another piece of masonite... took a look at this one when I was trimming it to its final size and saw some bowing to it also, which got me scared. Is the other one warply (wurd?) aligned ??? Instead of finishing up the cutting of this one I went back to the other piece. Decided that I would straighten it out by clamping a few lengths of tubes to it.
Got the tubes cut and clamped them on. Went over to the fuselage to hold it into place on the starboard side to see if the tabs I just worked on were warpedly (wurd?) aligned. With the clamps in place it was impossible to insert it into position. thinking... thinking... thinking... tie wraps ! Knew where I had a load of them and went and fetched them. Drilled the holes in the masonite panel and locked the tubes in place. Held the pattern up to the tack welded tabs and it looks like the masonite panel was purty straight when I used it the first time. The masonite panel looked nice and even in the opening when I held it against the tabs.
Time was out today, so I had to get running. I'll align and tack the other tabs in place next time
About that correlation... I'm not happy with the time spent... but I can see, and appreciate, where all that time went. I'd rather spend extra time working towards that excellence than to quickly get it done with "good enough".
Upper tab for one of the enclosure panels.
November 28, 2014
Sometimes ya just need to say...
"It looks good"... "That's why."
It's the day after Thanksgiving... plenty of time to work on the biplane.
I head over to Woodstream Ct... getting there about 11:30AM and get started right away on mounting the port side enclosure tabs. Knew what I needed. Knew how I should do it. Got all three tacked in record time ? (maybe?) Set about welding them down for good. The fuselage isn't on a rotisserie anymore so I had to do all kinds of gymnastics to get at the places to weld. But... I'm finished with it now. Looks good ! On to the next...
The lower/inside enclosure is captured by a larger cross-tube (3/4"?) and the small/tiny former tube (3/8"). Jiggging to keep the wooden form in place for aligning and tacking on the tabs had to be creative. I also needed to decide on where the upper tabs would fall on the tube. So I started playing around with the position of the enclosure... Where the enclosure would land on the 3/8inch tube was a no-brainer (center it of course). Figured I'd center the enclosure on the large tube as well. But... visually, it didn't work. i ended up positioning it 1/8inch from the front edge. Why ??? 'Cause it looked good sitting there.
Now to find the bits-and-pieces to block it up (jig it up) the way I want it to sit. Just a matter of finding, or making, the tiny pieces of metal and/or wood, to hold it into place at that distance and at that angle. If I was just glueing it up it wouldn't be a problem. BUT, I'm putting a 5000degree flame next to whatever I'm using to hold the piece in place and I either need to be okay with burning up that clamp or making sure I use something that won't burn. It turns out I needed to be okay with burning up a clamp or two and making sure everything else was okay to burn. (make any sense ??? if not... expalining would only confuse you more)
oh yeah... had to make a few additional tabs that would work on the 3/8inch tubing. Cut them out of a piece of .o70 strip stock (should have used .o32 ?). Why? 'cause I thought I was going to make them rectangular... as you can see, I didn't.
Two triangle tabs sitting on masonite form.
Figuring out and finding and making those jigging pieces was a practice in creativity. Which makes me think... does it come naturally to an artist or is it something forced upon them; something that needs to be expressed ? (Me thinks it's something that is forced upon them.) Okay... enough of the philosophical stuff. Back to the project.
A few plastic clamps here (the ones I was okay with burning). A few metal clamps there. and... A few thicknesses of metal and a few pieces of wood. Okay, I've got my pile of bits-and-pieces (feeling like a kid with bag of blocks) Now all I had to do was put them together in the right shape and I'm in business. Hanging upsided down and only having a pair of hands instead of three or four... made for a little bit longer "setting" up time, but I did get it accomplished.
All four tabs are now tacked onto the fuselage. I probably could have cut the angle on the existing tabs some... so that they fit up against the large tube better. But it wasn't necessary... but I may go back and do it anyway. I'll take another look at it before welding on for good.
November 29, 2014
Finish this one ?, or, What's the next one ?
They're both a dilemma.
Started off this Saturday by easing into the project... easing into the project if you call, raking the leaves at my place before they freeze to the ground, easing into the project. Then it was on to better things...
After welding on the tabs for the lower/inside enclosure, I had one of those moments again; a moment where I wanted to move on to the next piece of the build before fully completing the one I was working on. Thought to myself... "I'll notch these enclosure panels out AFTER I've painted the fuselage." and tried convincing myself by saying... "Let me get all these tabs on the fuselage so that I can GET it painted THEN notch and permanently mount the enclosures." So, I wasted a bit of time thinking of what that next project will be (amoung the many that need to still be done). I puzzled over my quandary until coming back full circle to what I've realized before; Finish the project I'm working on before moving to the next !
Remembering this bit of wisdom... I picked up the lower/inside enclosure and started the process of notching out for the tabs. Making triple sure that it was centered, I made my marks. Took my snips and files to those openings and, other than a little sanding to the openings (for that smoooooth look), they're ready for drilling out the holes for the screws.
I'll be putting anchor nuts into the tabs so that I can put those screws in without needing to get to the other side (kinda difficult when I'm "enclosing" the back-end of the fuselage).
Click on photos to enlarge !
December 2, 2014
Sometimes the toughest part of the project...
is thinking of how to do it.
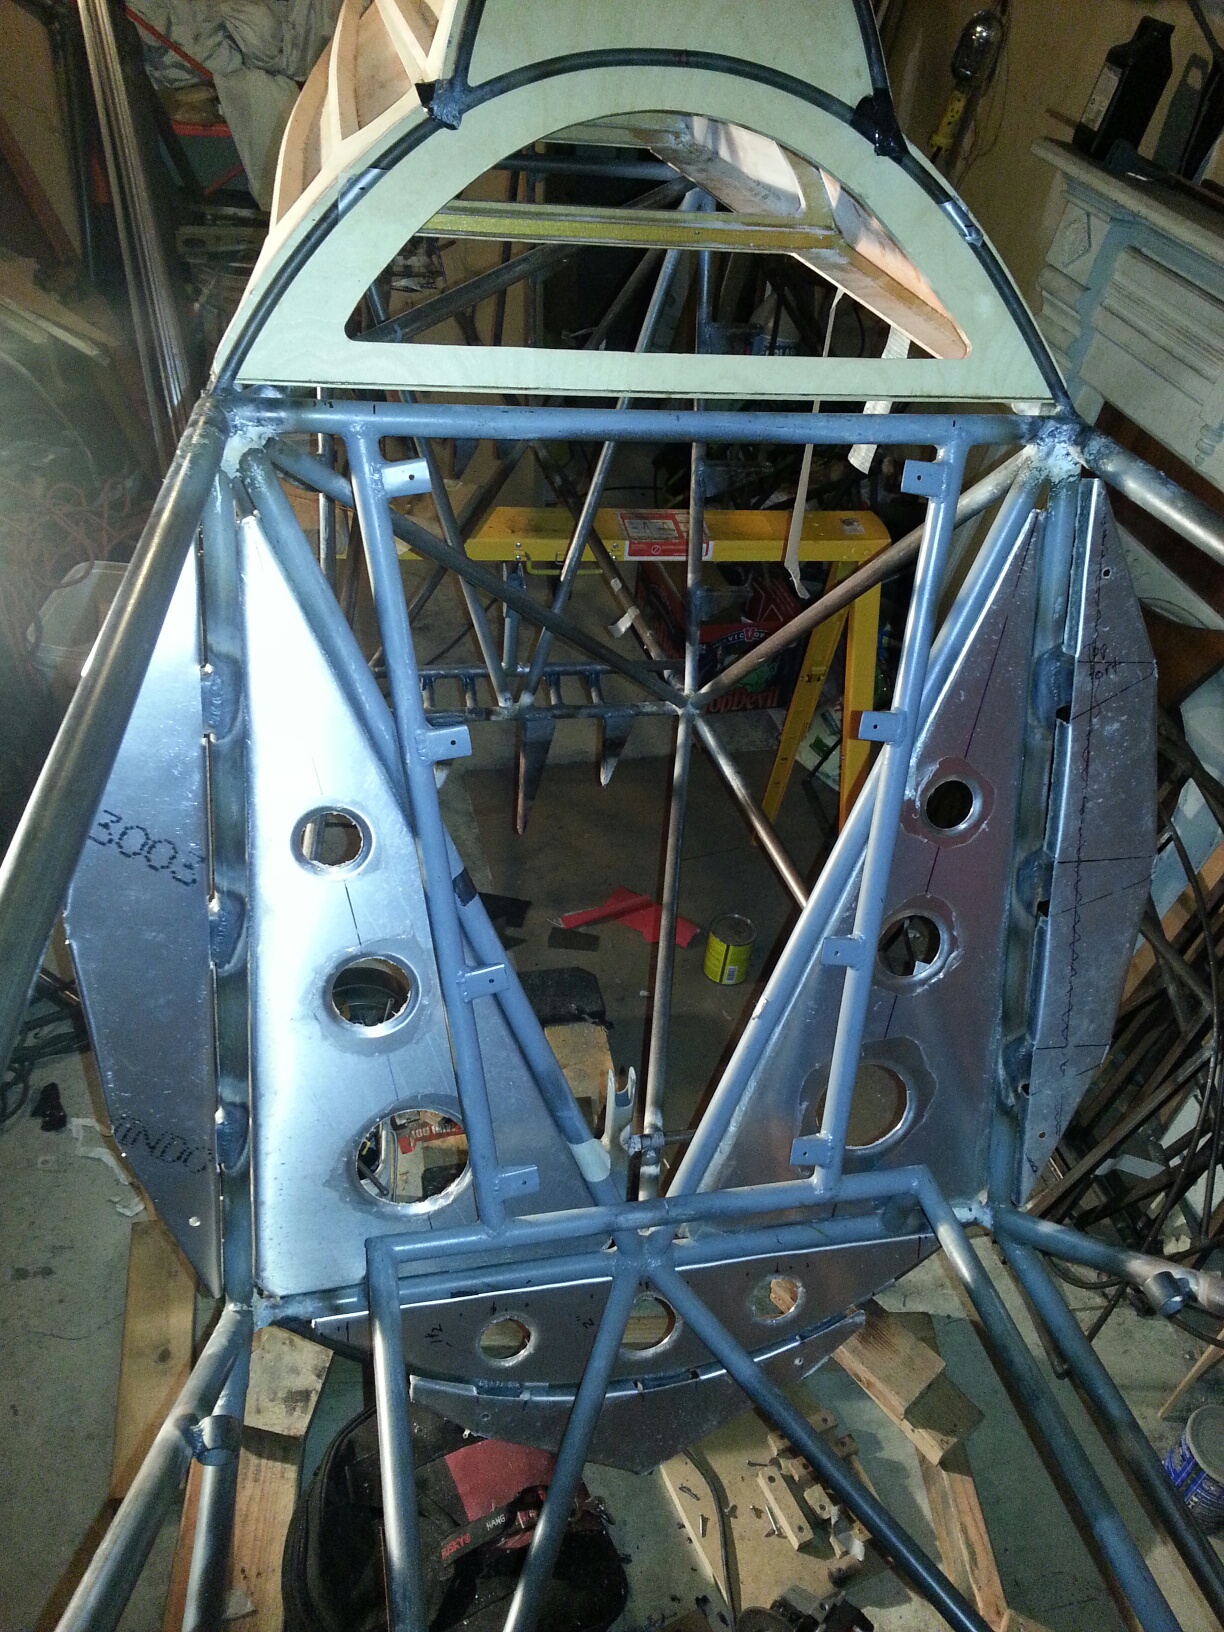
Back on the enclosures tonight... fitting up of the inner/side pieces.
I'd like to say that I had a heck of a time getting the inner/side enclosures to fit, but that would sound like I wasn't enjoying it. Au contraire. It taxed my brain a bit. Thought that I might not be able to make them work, but knew that I could get them to work...
I thought about it and worked through it methodically. And... it worked. Notched the bottom two notches and tried fitting it in place to get an exact on the upper tab notch. The way that it was notched in the bottom didn't allow it to fully seat on the lower tube. Part of that issue was with the indent that I banged into it... it needed a little bit more banging. I revised the inside notch and banged the indent a little bit more. Tried it again and it still didn't want to slip into position. Not sure what the heck happened between me trying it out the first time and this time. It seemed like it was too large for the opening now. Figured I'd try bending the sides over a bit more... maybe 15 degrees (or thereabouts).
Made a quick bending block for the 15degree bend and work it around the perimiter of the piece. Tried slipping it in place again... and it fit like a glove. Marked and made the notch at the top and 2.5hours later I'm finished with the first one.
Second one... same as the first, but I've been here before so it wouldn't/didn't take nearly as much time as the first one did.
The photo below shows tonights work. Just need to bang on that second indent just a little bit more... The sides still need to be worked a little (the small, make-sift bending block did the trick but not as straight as I want it to be.)
February 22, 2020... coming back to this page (of which I FINALLY found) to jump you over to where I am continuing work on the enclosures. Click here to read more.


 More daylight to burn so I made the wood, oak form for the outer/side enclosures. Already had the pattern made (one size fits both). Already had the oak blank glued and clamp so that I had a piece large enough for it. All I had to do was trace the pattern and cut out the form.
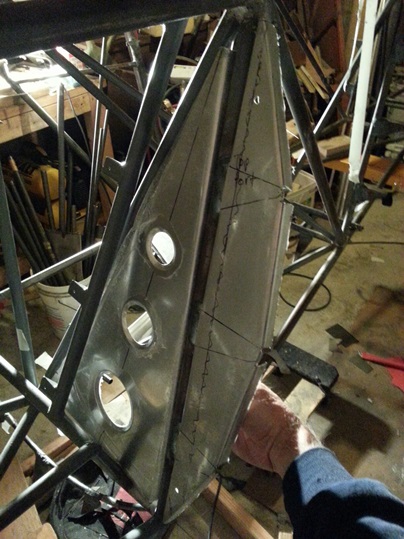

 A few plastic clamps here (the ones I was okay with burning). A few metal clamps there. and... A few thicknesses of metal and a few pieces of wood. Okay, I've got my pile of bits-and-pieces (feeling like a kid with bag of blocks) Now all I had to do was put them together in the right shape and I'm in business. Hanging upsided down and only having a pair of hands instead of three or four... made for a little bit longer "setting" up time, but I did get it accomplished.