Mantua, New Jersey
Original Site:
September 2004
E-mail: usav8or@yahoo.com
More... The Radical Radial Fuselage.
February 17, 2008 Enough is enough ! Now lets get on to other things
Turned up the heat, er..., I took my time making sure that the entire cluster I was working on, on the bungee truss, was good and hot. That was the ticket for welding up those clusters of four 1.125" x .065 tubes.
That was the other day. Not much more to say about that.
Who ever said...
running up and down stairs was good for you... wasn't talking about makin' airplanes.
I've spent the last two days measuring, cutting and notching the tubing for the first fuselage side.
The first day... pretty much a disaster.
My garage "workshop" isn't that big. Enough to fit the 16' fuselage table, a workbench, my Harley and all the rest of the stuff I couldn't find a place for when cleaning it out to build the fusealge table.
I knew it wasn't a good idea to have your project in one place and your tools in another. OK.. what CAN I fit in the garage "workshop" ? and still have room to work ? Hmmmmm.... the chopsaw seemed like a good choice. Actually... it seemed like a good choice 'cause it
was an easy thing to do. Common sense would say... put the Joint Jigger up there so you can "fine tune" your fits without having to run up and down, up and down, up and down, up and down... well, you get the point.
I didn't.
I did the easy thing... which turned out to make EVERYTHING ELSE HARD ! I brought the chopsaw up to the garage and set it up so that it wouldn't be spraying metal chips all over the place then got to work cutting a piece of tubing. Took my adjustable square and got the angle of the cut I needed to
make on the first tube. Great ! moving right along... Ran down the steps to the other workshop to set up the Joint Jigger for the first notch. Put the cutting fluid on the tube and the hole saw and made the first notch. Nice... piece of cake.
Ran up the steps to check the second angle. Duh... same as the first but just reversed. (OK... keep that picture in your head, Jer. You're going to need it after you run down the steps to make the second cut.) Run down the steps to the other workshop and set the tube up for the second cut. Hmmmm.... ??? is that right ? OK...
better go check to make sure. Run up the step to the other workshop and check the angle, visualizing how the longeron will be intersecting the angled tube. OK... got it. Run down the steps to the other workshop (have I confused you yet, as to which workshop I'm in cause I sure as hell don't know), yep, that's the right angle... I think. Hmmm???
OK... enough of this. I make the cut. Nice looking if I do say so myself. Run up the steps to the other workshop. Lay the tube in it's place and hmmm... could be a little tighter. Not a bad cut... but could be nicer. I think to myself. I'll just use this piece for another angled cut that
I'll be making.
I take the measurement again for the length of the tube, for the same location I just finished running up and down the stairs for the last 15 minutes, and make an attempt at cutting a tighter fitting joint (see above for the same mess of running up and down the stairs... over and over again.) The second notch I go to make just doesn't seem right. I thought that
I was holding that piece of tubing, on the other end to make sure it was level, the other way. Hmmm... must be my mistake. OK.. make the cut. Run BACK up the stairs to the other workshop and Arghhhhhhhhhhhhh !
IT WAS MY MISTAKE ! I should have flipped it instead of flopped it.
I ended up with a tube with the notch at both ends angled the same way. Unbelieveable... here it was, close to an hour later and I
have nothing to show for it. Well, the first tube that I notched wasn't bad, but I wanted something better.
Here we go again. A repeat of the repeat. I decided to use the first "good" tube I notch as a go-by for seeing how the notches would go for the third attempt. Still a lot of second guessing, not really sure if I was making the cut for the notches right. Took my time though. Made both cuts, ran back up the stairs to the other workshop, held it in position and... hmmmm... success at last.
You ask... why do I go on like this? Well, it's to make a point. Point being... no matter how tight it may get, keep your tools right next to your project. Take the time to set it up correctly or you'll be spending time wasting your time. I finally moved the Joint Jigger to the garage "workshop," bolted it to the workbench and spent today, the 17th, working on measuring, cutting and
notching tubing for the fuselage. Still a challenge, but not nearly as much as it was the other day.
Didn't get my workout in today, but it was a pleasure measuring, cutting and notching that tubing.


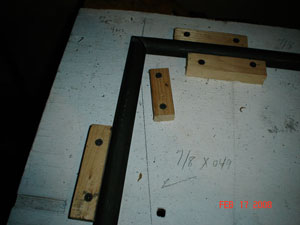 It's all pretty self explanatory... the cutting and fitting and notching of the fuselage. I'll post a few pictures and describe what I'm doing. One question I had was whether I should use the center line that was on the drawings for the tubing going from the lower station 5.o to the
upper station 0.o, or should I reposition the line so that it intersects the top-corner where the vertical tube at station 0.o and the upper longeron meet. As always.. threw the question out to the biplane forum (beej came up with a great idea when he started that.)
It's all pretty self explanatory... the cutting and fitting and notching of the fuselage. I'll post a few pictures and describe what I'm doing. One question I had was whether I should use the center line that was on the drawings for the tubing going from the lower station 5.o to the
upper station 0.o, or should I reposition the line so that it intersects the top-corner where the vertical tube at station 0.o and the upper longeron meet. As always.. threw the question out to the biplane forum (beej came up with a great idea when he started that.) 