Mantua, New Jersey
Original Site:
September 2004
E-mail: usav8or@yahoo.com
still working on the...Radial Fuselage.
March 17, 2012 Cat twine and... CAD programs
I've been itching to work on the shape of the fuselage but didn't have a valid reason for doing it. Well... I just decided that I want to start making the formers for the front part of the fuselage. Turned on the light in the garage work area and "boy does she look good!!!" I love the look of that frame up on its gear.
Unlike the Standard Skybolt... there ain't no stinkin' drawing for the formers for the R version. I started cutting twine to attach to the psuedo firewall so that I could strech it to the tail and start looking at some possible shapes. I played with this for awhile... this could go on forever...
Sitting back thinking, I thought of the DeltaCAD program that I had loaded on the laptop. If I could figure out how to bend the lines to form some nice flowing lines it would work. In a few hours I could do what would take weeks playing with twine.
I kind of want it to look sorta like the Mystery Ship... I like the lines of it... ya know, the roaring twenties look. Taking that as the foundation of the look I started cross referencing the side and top views that Steen Aero has on their site for the R version... cross reference the new briefing stick model photos of my new model (still on its way in the mail to me)... cross reference the formers for the standard to see if there was something there that I could work with.
After two hours of work with DeltaCAD I came up with this preliminary shape (sans tail feathers). I'm getting there. Top image is a side view with the approximate size of the cowling. The bottom view is of the top... the cowling is actually a little too short. anywho... I'm a lot closer to making those formers.
March 18, 2012 Hours... instead of weeks.
I spent this evening working with the CAD program to get the fuselage to the point where I can start making a few cardboard formers. I have to say... I did one helluva job with the look of the fuselage. I'm loving the look of it.
The DeltaCAD program saved weeks of scratching my head and cutting various size formers to see what would look/work best. (Can I be bold enough to say that I've knocked off 40 - 60 hours of time from the build, can I ?). I'm not even sure if I would have arrived at the best look by doing it with the old cut and test method.
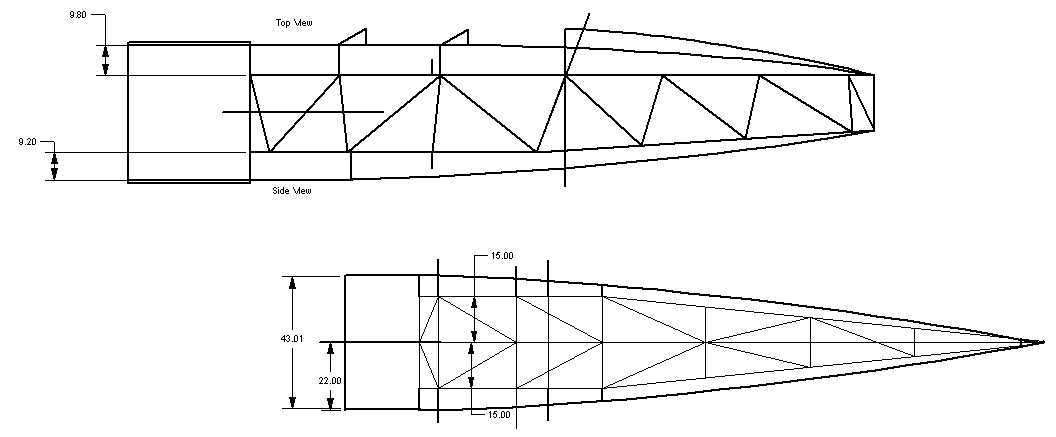
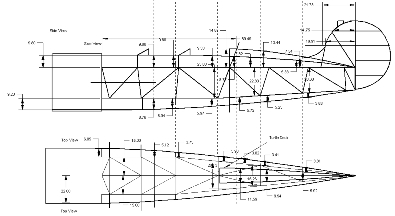
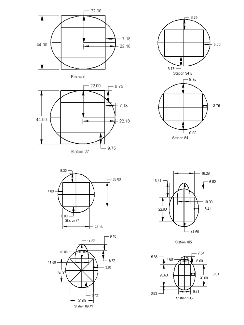
Here is the finished product. I have a side and top view and several cross-section at various stations starting at Station 0.o and ending with Station 133.
March 20, 2012 Making the CAD... come ALIVE !!!
Now that it looks purty on paper... how the hell am I gonna make it come alive ??? It's ALIVE !!!
I'm sure it's not going to be as difficult as I'm blowing it up to be... and in actuality... I ain't really blown it all out of proportion; just sayin'. It's just that the shape I have on paper isn't quite as easy as what the Standard Skybolt would have been to form and shape.
Reading Tony B's chapter about stand offs and looking at quite a few photos in the biplane forum gallery... I didn't find much in the way of formers and stand offs, but I did find one... Skybolt540 has a beautiful looking fuselage that gives great detail about how he has done it.
It's a little after 12 midnight. Tonight flew by and I didn't even leave the chair... some of that productive, non-productive work ya need to do every once in awhile. It gets the wheels a spinnin'; hmmm... late nights, electrodes, Abby Normal brains... it just might work.
March 21, 2012 Putting shapes to numbers... both material and money.
Now that I have the shape of things to come, I needed to figure out how I was going to do it; aka... number and sizes of formers, number and lengths of stand offs.
The DeltaCAD program is great when trying to figure out the length of a curved piece of tubing; click on the piece and it gives you the length of the line, saaaaa...weeet !!!
After a little over three hours I think I have what I need for ordering the material to make it happen. The length and number of formers was the easy part of the equation, figuring out the length and number of stand offs... another story. I ordered extra .o32 4130 for plenty of extra stand offs (they aren't that big). Here's the stand off I'll be using. I took the idea out of the Skybolt Newsletter (Feb. 1977). A while back I did a weight test to see if putting lightening holes in the stand off would make a difference... below is a photo of the three versions. And here is a link to my test.
March 22, 2012 More productive... unproductive time.
And some productive.... productive time.
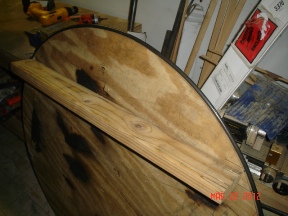
Spent some of that "wasted" time setting up for the next project; the bending table for making the formers. I ordered the material for the formers and stand-offs last night. I should have the material here by Monday. I just so happened to have a length of .375 x .o32 tubing so I decided to make the first former.
All that tube bend learning from years ago hasn't gone to waste. I remembered to keep the bend flat on the table. I did this by having my jig in about 1 foot from the end of the table. This allow me to keep the bend flat as I pulled and bent the remaining part of the former. Click here to see the set-up.
A lot of the going back and forth with the bending... I'm going along fine and then I make a bend that makes the last fifteen minutes of bending look like it was a waste. I need to "step back" and take a look at what I need to do. An un-bend here or there brings me back to where it needs to be, only to take another wrong bend minutes later. I guess I was a little over anxious on this first one; took a little longer than I thought it would.
first former wrapped around the firewall blank
uh... more to come
March 24, 2012 Thinking ahead...
always think ahead.
Let's see... it's just after 10PM and I've been working on figuring out these formers since 5PM, or there abouts. A lot of "what ifs" are being thought about.
Thought of placing an extra former between the firewall and Station 24.o... that ain't gonna work. Got a gas tank that needs to slide into there. Took my jig for making the gas tank and dropped it into the fuselage. There's plenty of room to make it higher; gives me that much more gas to play with; 4 1/2" at the top and 1 1/2" on the side. Let's see... if I figure that out correctly, that gives me an additional... if I raise it up an additional 2 1/2" it will give me a little over 6 gallons more. If I raise it up 4 1/2" it will increase it a total of 15 gallons.
Just looked up at the clock again and it's a little after 11:30PM. One thing leads to another thing which leads to another and another and another... all this time scratching my head and thinking. Thought about building that upper wing center section... have all the material... but where to build it. I think I know where I'll do it. I have a room upstairs that would be perfect for it; take down the bed in there and move a few things around and it's ready for some upper wing building. Just a thought...
March 25, 2012 A little bit of rain
to help move the project along.
7AM Sunday morning and it's raining outside. Not looking forward to running the pup in this weather. Put on a pot of joe and start looking on the internet for some hint of something that looks like I want to do with my forward formers... if I can just get a confirmation on it I'll be good to go.
I checked out a few Pitts Model 12 sites... looking at some build photos and those puppies are way overbuilt compared to the Skybolt (and yes... that's a GOOD thing, those 12's are meant for some serious schtuff !!! kudos to the Kimballs). The 12's look like they start tapering fromt he firewall back and I'm looking to keep the lines of the Jake back to Station 24.o and then begin the taper on the bottom... the top will have less of a taper going back to the pilot's cockpit and from behind my head to the vertical tail lines a taper that match the Mystery Ship. Yeah, I know, one kick-ass look.
A thought then occured to me... a nugget of information that I remembered when discussing something else with JimW from the biplane forum... he had mentioned to me that he would refer to the image gallery on the Steen Aero site for help in figuring out things sometimes. The Standard Skybolt images wouldn't be of any use, but I remember that they had photos up on the site for the build of the Model 14 Pitts/Skybolt, something like that. Anywho... went to the site and hit the JACKPOT !!! A lot of photos of the Model 14 being constructed... and quite a few close-ups of the formers. Although they were making their formers from aluminum sheets, the same basic concept was there that supported what I was doing.
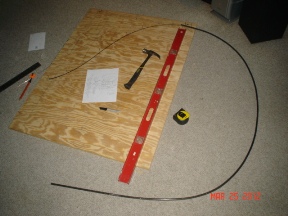
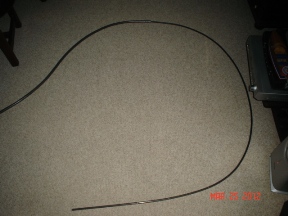
With that finally put to bed, and still waiting on my order of tubing for the formers, I decided that I'd form the forward part of the tail. I had the .675 x .o35 tubing from way-back-when. Found a piece of plywood, laid out my slightly-modified tail and started bending tubing. A little over two hours later (both making the layout and bending the tube) I ended up with this jewel. Both the tail and the rudder still need to be trimmed.
Don't be too critical of this image... I laid the two pieces out on the carpet a little too widely spaced.
March 26, 2012 A little less than an hour tonight...
What can I extropolate from that ???
Just about an hour put on the build tonight... and I feel... hmmmm ??... a little lacking.
The past few days and nights I've been going gang busters on the build; research and actual work. An hour on the build tonight... really ??? That's a good thing; the thought of an hour as lacking.
Can I take this feeling and make it a positive ??? Could this be the start of a hard push forward... an acceleration of the project, yes ? Acknowledging it is a start... It's all in my hands now (when hasn't it been?).
By the way... that hour produced one additional former. And by that statement you can extropolate that I received the .375 x .o35 tubing and .032 sheets of 4130 today. And that's a good thing too.
By the way... the answer is two fold; formers from hours and material from formers.
March 27, 2012 random thoughts...
at work
I just revised the stringer stand-off CAD; from the original 3 inches to 7 inches and every inch in between.
I'm looking at this and it's now 11:18PM... guess those random thoughts turned into a thought. And not really a thought, just a statement... seriously ???
March 27, 2012 Repeat...
yesterday's extropolation.
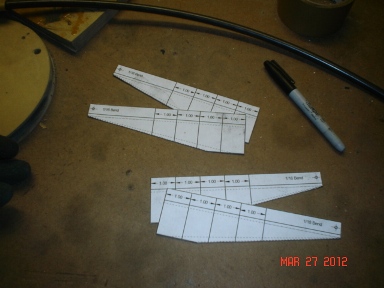
Not sure if it was a kick in the arse from the statement I made last night, or a real push forward... Spent close to three hours today/tonight on the build. As you can see from the above post, from today, I spent time at work redesigning the stringer stand-offs; give or take a half hour of time.
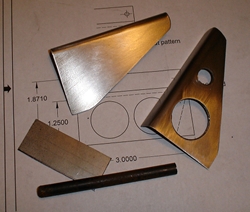
Tonight, after spending a load of time on forming up one former (yeah yeah yeah... a lot of that bending and unbending, rebending and un-rebending, repeat repeat repeat), I took a few of those patterns and rough cut four stringer stand-offs. Tomorrow I'll file and sand the ends smooth then with a couple of easy blows, with the dead blow hammer, I'll have four nice looking stand-offs.
The hours today... felt more like the hours I put in on the weekend. yeah... bay-bee !!!
Tonight's work; one former and four stand-offs:
March 28, 2012 It gets faster !, it gets faster !!...
I'm repeating myself !!!
The momentum looks like it might just carry through until the weekend... weekend to weekend.
More work on the formers and stand-offs.
I was much quicker with shaping the former tonight. Although I've always bent the former slightly the entire length (this allows me to keep the bend in line without putting a twist in it), I think the key to being faster tonight was to make sure that I bent the ends with the curve too. Before I would leave them pretty much straight and bent them after bending the inside of the former. You need a lot more force to bend those ends which in turn over-bent the inside (from me pulling hard on the long end of the tubing), which leads to the "bending and unbending" process.
(As with all parts of the build, when you have a multitude of the same piece to make... you learn from the first one and second one and third one and so on and so forth. The end result, you get faster as you repeat yourself...)
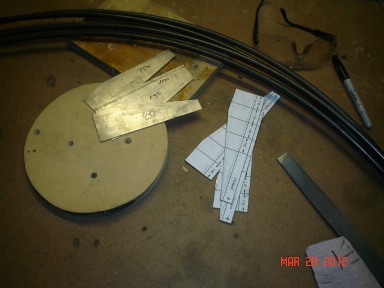
Spent the rest of the night cutting out, filing and sanding four more stand-offs. As with all the parts and pieces, you need to touch them a lot of times; rough cut on the bandsaw, grind close to size, file down to the line and then sand with 150 and then 400 grit sandpaper. A little bit more work than pulling a part out of a bag and attaching it to another part you've pulled out of a bag.
A photo of the formers and stand-offs as of tonight. You'll notice I marked 150 on four of the stand-offs. It means I've sanded them with 150 grit sandpaper... still needing to sand with 400 grit. I try to avoid having to remember things as much as possible.
March 29, 2012 Stop work on the project...
seriously ???
I needed to stand back and take a look at how I wanted to move forward with the formers and stand-offs; forced myself to stop working on the build to figure out some stuff.
The first few formers were no-brainers. They're the size of the fuselage and they needed to go back to at least Station 26.o, further back on the upper deck...
In the hour and a half of sitting, looking and thinking about it, I decided to do the following. I'll come back to Station 26.o with the sheet metal top, bottom and sides. From Station 26.o on back I'll being installing stand-offs on the sides and the bottom. The upper deck will have metal surrounding both cockpits. The turtle deck will be fabricated with stringers (a little complicated with the shape I'll be making.... a wasp turtle deck).
Tonight... another one of those productive un-productive nights.
March 30, 2012 Still not working on the project...
seriously !!!
More work on figuring out what needs to be built.
I'm glad I spent the extra time figuring out the number and lengths of stand-offs I need. It turns out I don't need any that are 7 inch long (of which I made four already... soon to be converted to 5 inch). The majority of the lengths are 4 inch (27), 3 inch (14), and 2 inch (10). I'll need (1) 9 inch and (2) 8 inch and the (4) six inch that I already have made.
If I hadn't stopped to "think" I would have been kicking along thinking I was going gang buster, when in reality I would have been creating a lot of extra work. My wrong thinking was that I thought that the stand-offs fanned out in a radius (duhhhhh !!!) instead they will come straight off of the bottom or side of the flat fuselage which drastically cuts down on the lengths that I need.
My prior thinking wouldn't have made them too short... they would have been too long... I would have had to put in extra time in cutting them down. I don't mind the time I put into the build, but I don't want to tack needless time on to the build.
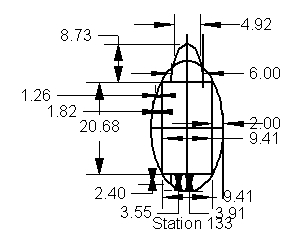
Here is the rearward most Station (133.o) that I will mount the stand-offs.
March 31, 2012 Holding back...
to keep the momentum forward !!!
Worked on knocking out more of these stand-offs.
Way back when... when I originally decided that I was going to make the stand-offs like the ones suggested in the Skybolt Newsletter, I cut out a lot of 3 inch long blanks (knowing little that 3 inch stand-offs would comprise a very small amount of the stand-offs).
With that said, I still could use those blanks and save some extra work and make good use of the material that I have. It was a rainy Saturday and I worked on the 3 inchers toady... a total of 14 have been cut to shape, ground down and filed down and hit with 150 grit sandpaper.
It's about 10:45PM and I just got back from doing some food shopping; woo hoo... (total lack of excitement in that woo hoo). Thought of going down to knock out the ten 2 inchers... then thought again.
I don't want to start thinking that the build is going to consume all of my time. I don't want to think that I need to put a lot of hours on it regardless. I want to enjoy the build; all my time doing it. I find that when I really muscle down and start working on the biplane, now and in the past, I tend to be catious about putting too much time on it. I need to find that happy medium of a lot of time and too much time. Yeah... it's a good place to be. A real good place to be...


 Now that it looks purty on paper... how the hell am I gonna make it come alive ??? It's ALIVE !!!
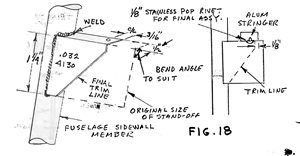
 Thought of placing an extra former between the firewall and Station 24.o... that ain't gonna work. Got a gas tank that needs to slide into there. Took my jig for making the gas tank and dropped it into the fuselage. There's plenty of room to make it higher; gives me that much more gas to play with; 4 1/2" at the top and 1 1/2" on the side. Let's see... if I figure that out correctly, that gives me an additional... if I raise it up an additional 2 1/2" it will give me a little over 6 gallons more. If I raise it up 4 1/2" it will increase it a total of 15 gallons.