Mantua, New Jersey
Original Site:
September 2004
E-mail: usav8or@yahoo.com
working on the...Radial Fuselage.
March 30, 2009 Reflecting... 1250 down...1250 to go
Kinda hard to believe that I've been working pretty steady on the build for the last two and a half years. The first 12 1/2 years saw a total of 126.9 hours, the last 2 1/2 an additional one thousand one hundred twenty-nine point six hours. whew !
May 9, 2009 Reversing direction... finally... something new
Well... it's not new, but it is something to work on other than the Torque Tube Controls, which I finally finished yesterday.
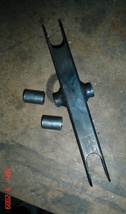
I had the Reverser cut, slotted and drilled for some time now. Didn't have the correct center tube to weld to it so I started on something else while I waited to get an order together that was large enough to justify the $9.oo shipping charge from Aircraft Spruce. Hell... that was quite awhile ago and I just haven't had a chance to get back to it until now.
First though, I did some cleaning of the garage workshop so that I could set one of the large tables back up. I plan on putting the finish welds on the Tail Feathers and I don't want to be crouching down and welding them on the floor. Didn't take any more than a 1/2 hour. Spent the rest of the time finishing up the Reverser.
I grabbed the piece of 1/2" x .o58 tube (I used the tube and design suggested in the Standard Skybolt plans... not the R supplements.) and cut three pieces; (1) 1.5" and (2) .75". After cutting with the tube cutter I chucked them in the lathe and square off the ends. Had the 1.5" piece welded in the Reverser in no time. Finished it off by reaming it out with a 3/8" reamer.
The only thing left to do was to drilling the pilot holes on the ends of the Reverser to .25" and then ream to make sure if was a nice, clean, straight hole. Another piece of the puzzle completed !
August 4, 2009 Starting to get a hold... er, handhold on things
I've got to get back out to the fuselage again.... real soon. I'm running out of things to do, to fill the void, the emptiness in my life... no, really, it's just until I start on the Main Landing Gear. I'm in that mind-set and I don't like stepping out of it until the job is completed.
Started playing with the Handholds yesterday... playing as in, let's see what works. Took a look at what JimW, on the biplane forum, had done. He has a few photos posted in his photo gallery. Real nice looking handholds. The caption said that he used 3/8" x .o49 4130 tubing. Didn't spec the tubing that he wrapped them around to make the shape.
With my discerning eye, it looked to be about 7/8". Drew a jig pattern up on DeltaCAD, printed it out, glue it on, drilled the 7/8" holes to hold the tubing in place, and had at it. Didn't have any 3/8" x .o49 but had quite a bit of .o35. nice... Clamped it down and started pulling on the one end. Got it half-way to where I wanted it and BAM! DAMN ! it inploded on me ! I knew small, thin-walled tubing was hard to bend, but DAMN !
Tried pulling another piece of 3/8 x .o35 through. Got close to the half-way mark and took a look at it. Not a very pretty site. Tell-tale signs of an impending implosion. Hmm... maybe this would be OK. It's just a set of Handholds. Nothing really structural about it. Hmmm... but, OK... isn't OK.
Shot Jim message, through the biplane forum, late that night and waited for his response.
Had a few things to do in the morning, so when I got home I went onto the biplane forum to see if I had a response. Nothing yet, so I forged ahead. Figuring that 7/8" was too small, which is only a 7/16" radius, I looked around for the largest tube I had, that I also had a holesaw for... 1 5/8" was the ticket.
Re-DeltaCADed (new wurd ?) the jig layout, printed it out, glued it up and drilled partial holes for the 1 5/8" tubing, notches in the MDF to keep it in place when I clamped them into position. Tried using the 3/8" x .o35 and it still looked a little sqooshed when making the bend... better than before, but not better than good enough. Searched and found some 1/4" x .o49 tubing. Worked like a charm.
After finishing the bending and trimming and photo sesssion, I logged onto the computer so that I could let Jim know... I figured something out. Kinda figured and Yep... had a response to my questions. Turns out he had some scrap 2" tubing (guess my eye wasn't too discerning, eh ?) laying around and used that for the 1" radius corners and made the Handholds with 3/8" x .o49. Maybe it's the wall thickness that's the ticket... .o49.
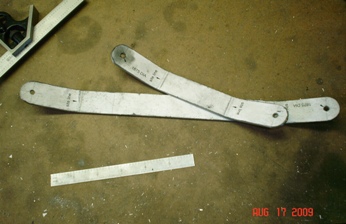
August 17, 2009 Filling time... forming fittings
Nowhere to go today... truck is in the shop getting a new fuel pump. It's been acting up on me... well, at least I thought it was something to do with the fuel pressure. Nothing to discuss here... other than I wasn't able to go check on the fuselage at Denise's to see if it's ready yet for making the Main Landing Gear. Funny how... I'm the one making this thing and I still need to go there to see if it's ready
yet... for me making it. One of the pains of having your project 20 miles from your front door.
Oh yeah... where I was going with this. Needed to fill the time with something constructive so I laid out the Stab Wire Attach Strap on DeltaCAD; both of them. Printed them out, glued them on, cut them out, ground - filed - and sanded them, drilled and bent each arm to 27 degrees.
Here are few photos; about 2.5 hours of work. I'll be heading over to check on the fuselage tomorrow. Hope it's ready for me to make that gear.
August 29, 2009 Feeling strange... strange magic ?
"Playing" with the DeltaCAD program today trying to figure out how long I need to make the stringer stand-offs. I should just wait until I get the fuselage up on it's gear and the engine set into place. But, nooooooo... I'll just waste three hours drawing up the fuselage and trying to do it the hard way... 'cause I can do it NOW !
I'll need to make the belly formers pretty deep. The Standard's are a little over 5". I'll need to make mine approx. 9.5" if I'm going to make it flush with the outer edge of the radial. I'll need to make the formers on the sides about 7.5". Not sure how that will look. Threw the question out to PB, one of the guys I met through the biplane forum (he just recently completed a radial engined Starduster... sweeeet looking flying machine.) He actually made his fuselage per plans... said that the radial idea didn't come up until after that part of it was completed. He forward my question to another guy who is building a Radial Starduster in CO.
Received an email back from Bill, the guy in CO, asking if I want to put a speedring or a cowl on it. I asked him what the difference would be... waiting to hear back from him.
This "building" is all starting to feel a little weird right now. Spending more time figuring out how I want to finish it off; the little details. I know... I know... the old saying "Ninety percent finished ninety percent to go." It's the ninety-ninety rule... It expresses both the rough allocation of time to easy and hard portions of a building project. (Kinda stole that thought from Wikipedia's ninety-ninety rule for programmers and twisted it slightly to make it fit for us scracth builders. I actually think they stole it from us builders.)
In any event... even though I'm still a ways off from completing my Radial Engined Skybolt... I can see a light. Not that I need to see it...
Youre sailing softly through the sun
In a broken stone age dawn.
You fly so high.
I get a strange magic, Oh what a strange magic...
- Electric Light Orchestra
Septemember 6, 2009 In search of excellence... aka... more learning.
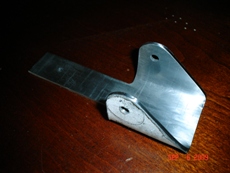
Throwing myself to the dogs again... with spare time at home ('cause I'm working on the Main Landing Gear, which is 20 miles away... at Denise's) I decided to finish the two Lower Rear Wing fittings. I had these already cut out of the .100 4130; did that about 1 1/2 years ago. OK... nothing more to do than bend the "wings" on them and drill the holes.
Hold it there Bubba-Louie !!!... Doing that "take another look at it again the next day with a fresh eye"... a year and a half later... I saw where I had transferred some sizes incorrectly. Uh... trash those first two that I had sitting there all that time and start a new... after I've corrected the DeltaCAD drawing.
OK... drawing corrected, I glue the pattern down, rough cut then grind, file and sand smooth. Made up the first of two jig bending blocks (I only needed one.) The first of the two jig bending blocks had 1/8" radii, later I would find out that I'd prefer a 1/4" radius for the bends. Made the jig bending block square, no allowance for the "spring back" properties of the .100 4130. Whacked the first "wing" on the fitting and saw that it wasn't following the curve of the 1/8" radius. Not a problem before banging the second side down I'll cut the sides in a little... unscrewed the fitting from the block, cut the sides in with a seven degree cut, re-attached the fitting.
Banged the second side over the 1/8" radius and it was looking good. Went back and banged the first side, that was already bent over, and tried to work it around that radius... not looking good. OK... third round of learning completed and I decided to make a forth fitting for the first of two that I'm making.
From the past three learnings... I finally broke down and bought them... no, no, just kidding (the thought did cross my mind, as it has in the past, but where would the learning be ?). I now know that you can't cut the angle of the fitting before bending it (I learned this awhile ago, but these were cut before that learning)... it will tend to twist, like it did on my rudder horn (this is the learning that I was just referring to.) I now know that re-working a part is time wasted... if you're looking for that "strive for excellence." Just re-make the part. You'll save yourself some time and you'll be much happier with the piece. I now know that I'd prefer a 1/4" radius for the bends rather than the orginal 1/8" that I had on the first few. With this knowledge in hand I made the new bending block jig with 1/4" radius corner and seven degree cut-backs to allow for spring back.
Yesterday I cut a new blank out of .100 4130, screwed it to the bending block jig and whacked the sides into shape. They needed a little persuading with the vice; putting both "wings" in the jaw at one time and squeezing them together. Looking nice...
Today I drilled the second of two holes into the fitting and then I cut, ground, filed and sanded it to it's final shape. Still need to put the last bend in the piece before it's ready for attaching. Turned out real nice... I'm happy with it. Tomorrow... I'll work on that second one.
Septemember 7, 2009 Ground Hog Day... aka... the movie.
I'm alluding to the movie with Bill Murray... same thing happening over and over. Well, in this case, the same thing happening again... as with a lot of the things you do on the biplane; you make more than one... so it's happening over and over again. It's a pretty common occurance in building a plane.
So... read yesterday's post and you get a feeling for what I did today... on Labor Day. One complete Lower Rear Wing fitting, from start to finish, in two point six hours.
Here's both of them... oh yeah... still need to make that one last bend on the tail.
April 3, 2010 Back home... safe and sound.
When Denise headed back south... I needed to take the fuselage out of the back building, behind the complex that she was overseeing. The garage at my house was going to be used for finishing the landing gear so I had no place to store the fuselage for the time being. Whitey, being the guy that he is... said I could store it there for awhile. (thank you Whitey)
I'm working on making the bits and parts for the Upper Wing Center Section at the moment so I have additional time to start welding on the multitude of little pieces that go onto the fuselage; stringer stand-offs, handholds, instrument panels, tabs, tabs and more tabs. You get the picture. The nice thing about all these little bits... they don't take a lot of thinking to do. Thinking that I need to put towards getting the Upper Wing Center Section together right.
Long-winded, I know.
Was suppose to go fly one of those rental tin cans this morning... got fogged out. Time was already set aside to do something with flying so what better thing to do then go to Whitey's and hang out with the guys, go out to lunch and then, since I'm there, bring the fuselage back with me. Got to the airport about 10:30 and saw all these trucks parked all over the place. What's going on here today ? Something with Chapter 216 I was thinking. Opened the door to the hangar and saw Tom, a retired nuke plant welder, giving a demo on welding. Nice... I put something like that in the suggestions about two years ago. Glad to see some of the basics being taught. Hung out for awhile talking with a few of the guys I hadn't seen for awhile, Howard, Dan and Tony.
Got to be about 12noon and I asked Tony to give me a hand lifting the frame into the back of my truck. As we're tying it down to keep it from flying out of the back... Tony tells me that he's going to be building a new set of wings for the Experimental Champ that he has sitting across the field. He has a few ways that he'll be testing it for drag and strength. Sounds like a lot of work to me, but that's Tony's schtick; loves doing that sorta thing.
The guys were wrapping it up with the welding seminar and it looked like a few of them were going to go out to lunch. Time for me to hit the road... still needed to clean out that garage so that I can do more than stuff the fuselage into it. "I'll see you guys later."
With the fuselage back home, and the garage finally cleared enough so that I could fit it into it, it's ready for me to start adding all those pieces to it. All told... about seven hours today.
April 4, 2010 Out of a jam... with Naval Jelly.
Side bar:
Funny how parallels form... negelect of my building is reflected in the condition of the tubing on the fuselage. Funny... real funny. As in ha ha funny... not really. I've been working on the fuselage for how long now... no problem with any rust. About the time I put a "hiatus" on the build, in essesence neglecting it... and the fuselage goes to crap. Well, not to crap, but there's a surface rust on it... like why all of a sudden ?
Anyways... not my point here about the parallels... well, maybe kinda. But, how do you, or what do you do, to get rid of it and prevent any such thing from happening to your work again ? Work as in the fuselage you spent all that time on, not your "get off your ass and do something" work.
Did a little research on the biplane forum and saw that Beej had suggested using picklex20 from some manufacture... also something called Gem from Sherwin Williams (a bit cheaper.) Said it converted the rust with the phosphoric acid in it.
Went to the Home Depot to pick up a few quick clamps for doing some additional laid-up pieces for the Upper Wing Center Section and decided to ask one of the guys in there about a rust converter. The elderly gentleman pointed me to something called Naval Jelly... and it's made up of... you guessed it, phosphoric acid. Four dollars later and I'll be coating the entire fuselage with this small bottle. I've heard of Naval Jelly. Just didn't know what it was for. Now I do.
Be sure to take care when applying it, it says not to get it onto your skin. Another $1.99 for some latex gloves and I'm set.
Stop this rusting so that I can start moving on with other things... a lot of other things.
I've always said that you learn more than building a biplane when building a biplane.
April 5, 2010 Learning ??... from the present ??.. looking at the past ??
Wanted to do something on the biplane tonight... didn't want to make a complex jig for some additional pieces for the Upper Wing Center Section so I decided I'd make a quick jig out of a 2x4 to position and hold the angle on the rear lifts.
Not having learned that making something quick, and making something useable for the biplane, doesn't ever work, I once again became that idiot and attempted to do the impossible. I failed... again.
The warp that was in the 2x4 didn't come out with a simple run through my table saw. Duh... I gave up on working with that piece of wood before it got too involved and too late.
Okay... so I failed... did I learn something from it ? Yep... that I'll probably continue to go down this road every once in awhile. Okay... I'm past that. Now on to making a jig that is useable. I had some MDF that I threw away on Saturday knowing that I would probably need these one day, but didn't have the room to keep them just lying in piles. (they'be been in a pile for a little over a year) Another few days and the trash man would have taken them. But I was quick enough to pull those pieces out tonight and set them in another pile... just waiting to be used.
I'm getting a little better... I did use a few of them for this project. Still have a pile though.
Back to the story. Cut the 45 degree angle in the scrap MDF (that I just saved from destruction) and now have my Jerry-rigged jig glued up waiting for the night to pass so that it'll be good and dry. Tomorrow I'll tack, and maybe weld, these bad boys on to the fuselage. Afterward I'll give the fuselage a good rub down with some of that Naval Jelly I mentioned the other day.
Hope to get more completed on the Upper Wing Center Section too.
April 6, 2010 One in a million...pieces
With the fuselage back at the "ranch" I can start making and attaching the multitude of bits and pieces that go onto it. The two fuselage rear lifts... the first of many.
I've had these lifts/hand holds/whateveryouwanttocallthem made since last August. Been fiddling with the landing gear since then too... or damn near it.
I spotted them down in the basement "work shop" the other day and figured I'd better attach these now... while I still know where they're at. (yeah, I know, one helluva way to plan your work schedule...)
That jig, mentioned above, was ready to be used. Set it into place, C-clamped the first lift to the bottom of the fuselage (damn, now that I'm writing this... I hope I did weld it to the bottom) and tacked it into place. Did the same for the other side. Made sure that they were at the same angle by re-checking with my variable angle finder... then welded them up.
Not my prettiest welds... but they're solid. I may go back and re-weld, since they aren't structural, to pretty them up.
Without the fuselage being on that "spit" it wasn't as easy to flip and turn to get the perfect angle for welding. Glad I kept the pile of wood that made up the spit... I can finally use it again after 9 months of collecting dust and soot.
By the way... it doesn't look it, because of the angle the camera was held at, but these are the same shape and size... welded at the same location and angle on both sides too.
April 7, 2010 Pickled... not preserved.
Decided to spend tonight on saving the fuselage from any further surface rusting.
Got out the Scotchbrite, clean rags, Naval Jelly and gloves. Took a closer look at what all needed to be done with the Naval Jelly and to see what it would do. Turns out it'll convert the rust, BUT within 24 hours you either need to put their Naval Jelly Perserve on it or prime and paint it. Hmmm... should've looked at it closer when I bought it. Anyways... I had already taken off the surface rust before reading that panel on the side of the jar and decided that I'd wipe it down and if need be... wipe it down a few more times until I can get it outside to spray the primer/paint on it.
Did all except the lower longerons, which are actually the upper longerons, which I'll do when I flip this tomorrow.
Actually, it's not even pickled, it's just semi-protected.
April 8, 2010 Semi-protected... good for now.
Out to the workshop to take a looksee at the fuselage. Man... does that thing look purty ! No surface rust on those areas I worked on last night.
Lets see... flip this baby and finish up on the bottom. 1/2 hour later and its finished... all protected. Clean the dried Jelly off and spray the primer on it, hopefully, Saturday. Back in bidness. (yeah, bidness)
July 8, 2010
Building Wooden Boats ....
and Biplanes.
What was I thinking ???!
I've been thinking of making a mock-up of the diameter of the Jake. Wanted to at least start "seeing" how I could start shaping the fuselage out... giving it more of a biplane look... instead of the rail car that it is now.
My first thought was to rough cut the circle out with a jig saw. First I'd need to make a circle jig to draw a perfect 44" diameter circle (yeah that Jake is a big sucker) to follow with the free-hand jig saw cut. I'd either leave it rough or I'd file/sand it to look nice while working with it. Most likely I'd file/sand it to look nice.
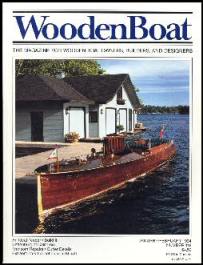
Years ago when I was into building boats (and no... I never
finished one... more on the lines of reading about building
them) a salty old sailor/builder once wrote that he always made
his jig supports and jigging look nice. Reason being... they
were going to be around for awhile, might as well make a nice
looking (noticed I didn't write museum quality) jig. My philosphy
too, carried over from reading that article in "Wooden Boat"
35 years ago. I digress... (quite often)
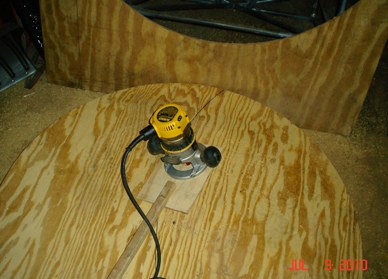
While scavanging through all the used jigs I had, for a large piece of plywood, I was still thinking... Went into the garage workshop and almost fell over the my Brand Spankin' New DeWalt Router (have I told you that it's a beaut?!). Earlier, I kinda-sorta thought of routing the circle (I think) but pushed it out of my mind. I'd need to clear an area in the garage to do it.
Too much wasted time ? actually... thinking, and looking, clearing an area that was already pretty much cleared won't take much time at all. actually... thinking, and looking, I'd need to clear an area just as large in order to cut it too.
I already had the mounting plate for the router from when I routed the jig for the trailing edge for the Upper Wing Center section. Just a matter of drilling a new hole for the 44" diameter cut. Simple enough... quick solution to making a wooden round "engine."
Just a thought... I spend a helluva lot of time making jigs. Instead of making a kit of plane parts... what about making a kit of jigs to make the airplane parts. Purty good idea, eh ?


 I had the Reverser cut, slotted and drilled for some time now. Didn't have the correct center tube to weld to it so I started on something else while I waited to get an order together that was large enough to justify the $9.oo shipping charge from Aircraft Spruce. Hell... that was quite awhile ago and I just haven't had a chance to get back to it until now.
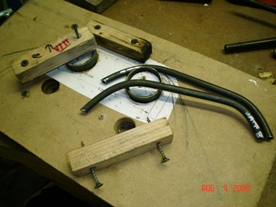 Re-DeltaCADed (new wurd ?) the jig layout, printed it out, glued it up and drilled partial holes for the 1 5/8" tubing, notches in the MDF to keep it in place when I clamped them into position. Tried using the 3/8" x .o35 and it still looked a little sqooshed when making the bend... better than before, but not better than good enough. Searched and found some 1/4" x .o49 tubing. Worked like a charm.
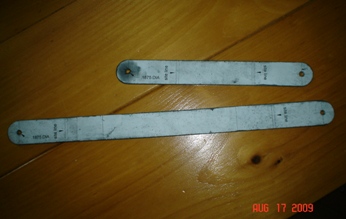
 I'm alluding to the movie with Bill Murray... same thing happening over and over. Well, in this case, the same thing happening again... as with a lot of the things you do on the biplane; you make more than one... so it's happening over and over again. It's a pretty common occurance in building a plane.
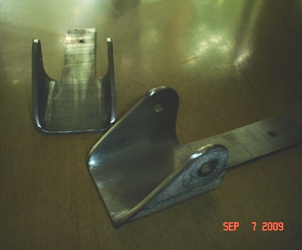
 Anyways... not my point here about the parallels... well, maybe kinda. But, how do you, or what do you do, to get rid of it and prevent any such thing from happening to your work again ? Work as in the fuselage you spent all that time on, not your "get off your ass and do something" work.
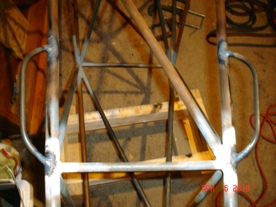
 Years ago when I was into building boats (and no... I never
finished one... more on the lines of reading about building
them) a salty old sailor/builder once wrote that he always made
his jig supports and jigging look nice. Reason being... they
were going to be around for awhile, might as well make a nice
looking (noticed I didn't write museum quality) jig. My philosphy
too, carried over from reading that article in "Wooden Boat"
35 years ago. I digress... (quite often)
Years ago when I was into building boats (and no... I never
finished one... more on the lines of reading about building
them) a salty old sailor/builder once wrote that he always made
his jig supports and jigging look nice. Reason being... they
were going to be around for awhile, might as well make a nice
looking (noticed I didn't write museum quality) jig. My philosphy
too, carried over from reading that article in "Wooden Boat"
35 years ago. I digress... (quite often)