Mantua, New Jersey
Original Site:
September 2004
E-mail: usav8or@yahoo.com
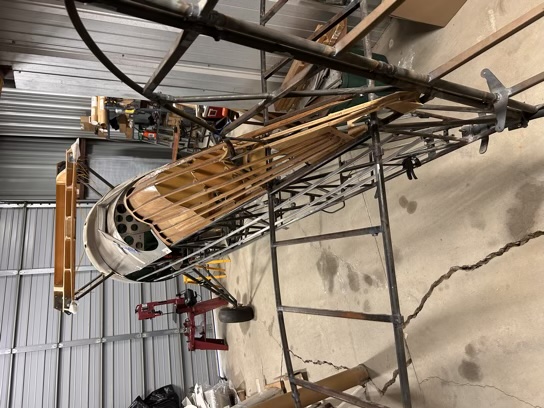
more work on the...Radial Fuselage.
February 28, 2026
4130...
yeah, 4130.
What a beautiful Colorado day... to spend with BIG ASS BIRD. It was beautiful outside too. I'm not use to 65 degree sunny days on the last day of February.
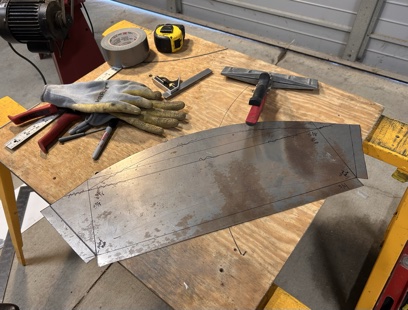
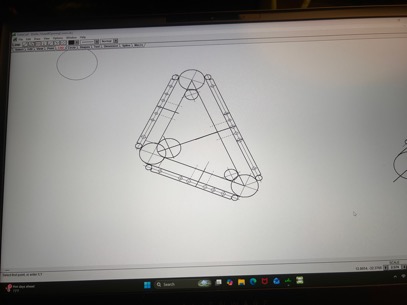
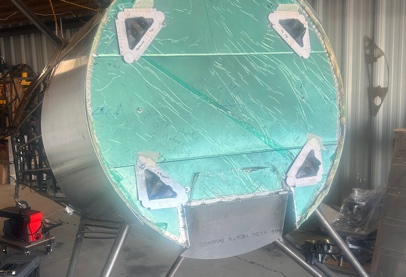
Today I spent time figuring out the air exit in the firewall. Based on the CAD drawings of the Pitts Model 12 firewall I followed (whether right or wrong) there is an air exit at the center bottom of the firewall. To prevent all that air from rushing into the cockpit I need to come up with a air 'duct' to allow it to follow back and down from the engine compartment.
Near six hours later and I think I have the plan and the third revision of a pattern to use for that plan. And thinking this through, I'd like to fashion this piece out of something that is more fire resistant than aluminum. Right now I'm unsure if I'll use a piece of the stainless steel that I have from making the firewall.
Why? It's not that easy to work with... at all. Originally thinking to make it out of aluminum... not suce a good idea. I'm now thinking of creating this out of maybe thin 4130 and running some stiffeners along the long 19inch surface to keep it from bening under the force of the wind. This will allow me to make a 'box' that can be welded up AND fire proof that area. I like that idea.
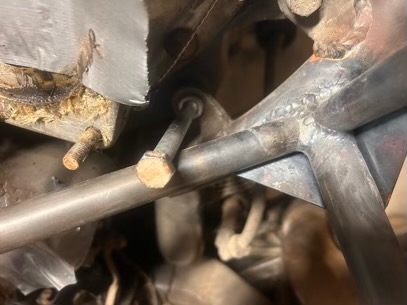
I also located the rod that connects the fuel on/off to the actual fuel valve. Loosely bolted that into place with the incorrect hardware (which WILL be changed to AN.)
Random thought... I need to figure out a way to put more hours in a month on the build. At this pace it's going to take me more than forever to complete it. With it being 45 minutes to an hour away I'm not able to walk out to it each night to put and hour or more on it. (insert a little sad face)
Have a great week...
March 8, 2026
Quality time...
and yeah, a lot of thinking too.
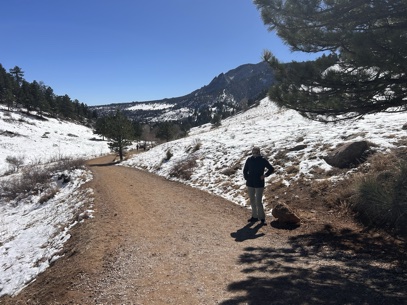
Some quality time spent with Fernanda yesterday, out hiking some of Colorado's great outdoors... time for some quality time with BIG ASS BIRD today.
Almost there... but still a long ways off. A lot, A LOT, of little things, and still some BIG things left to do.
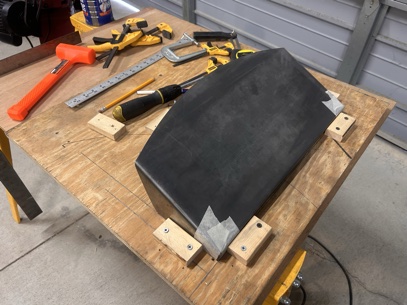
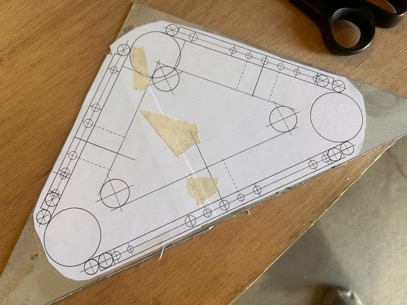
Pattern for the air exhaust whatchamacallit made last weekend. This weekend... testing out that pattern.
Had a scrap piece of .0320 laying around for just this occasion. Rough hand cut, then cut to the line. Did the bends on it by using the small hand-held bender I have... but should have used that Black and Decker clamping table I have. It always made nice bends in thinner metals. BUT... I didn't and it didn't change the results which was to see if this is what I was looking for. And it was.
With a few tweaks to the final pieces... this puppy is a go! All I need to do is order the metal for it and then make more accurate measurements before making the final piece.
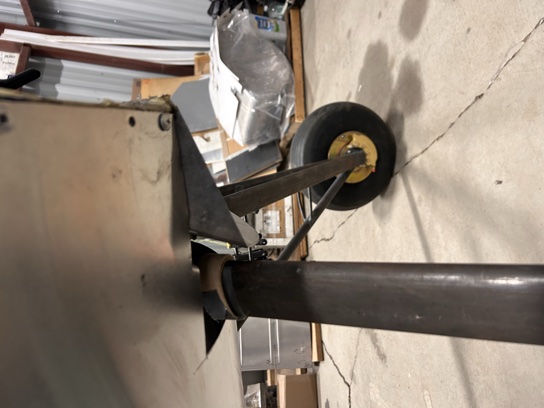
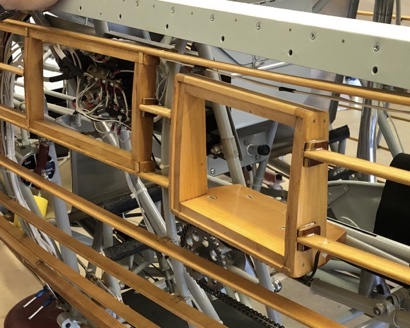
Spent the rest of my time figuring out how I was going to enclose the areas around the main gear legs coming into the fuselage. Right now... from the gear legs forward, I have an open space. Ya know how you play with something even though you don't know which direction it's going to take you? That was me today. I wanted to figure this out but not quite sure how to go about doing it. It was a lot of play today. And still more playing to do. I'll have to see if I can find a few images of that area online... or better yet, ask the biplane form guys.
March 28, 2026
Another test piece...
Final answer.
Messing around with planes...
Continued work on the exhaust opening for the firewall. Another iteration and another tweak and the final pattern is ready to be reproduced into an actual piece.
It's going to be challenging to make this baby out of stainless steel. Anything else and it's not really going to be 'fireproof'. Asked the question to the builders on the biplane forum their thoughts.
April 19, 25 and 26, 2026
Cutting...
and cutting and cutting and cutting and...
Not sure what happened the other week, but it looks like I didn't update the site even though I did put some time in on it.
Still working hard on the air exhaust tunnel for the engine compartment.
Bought some .0320 4130 to make the piece. (Note: The Pitts 12 guys are using aluminum... a lot lighter than the 4130, but what happens if there is a fire in the engine comparment???). Figured the trade off, just this once for safety over weight, was worth the trade off.
Laid the masking tape. Figured out the set-back and bend allowance for the thickness of the piece and the bend I was going to put on it... drew the pattern on the masking tape and started cutting... and cutting and cutting and cutting... The throat on the band saw wasn't deep enough to cut the extra metal off of the piece (unless I wanted to throw away a 10inch wide by 24inch wide piece of metal by cutting it in to manageable thin scrap pieces (of which I wasn't going to do). and... Too thick for tin snips, and I could only cut so much with a regular hacksaw. Luckily I have a small hacksaw blade handle that you can attach a blade on to and cut as looooooooong a piece as you wanted. It just takes so looooooooong to cut, by hand. I must have put a good two and a half hours of cutting on that piece.
Got it rough-cut to size then took it over to the bandsaw to cut to just before the line. THEN over to filing it to the line with a rasp file then finish file then 120, 220, 320 sandpaper. Still had some daylight left so I began to bend that SOB. Ya wouldn't think, but you'd be wrong... hand bending .032 4130 is a bitch. If I was in Mantua I would have had the tools and tables to clamp it, heat it, bend it (easily) and be done with it. But I ain't and I didn't. Left for the day with more bending to do!
Back the next day for more bending... and it didn't get any easier than the day before, no matter how much I prayed the night before.
Finally got that heavy SOB bent and sized it up to its spot on the firewall... sa-weet! Fits like a glove. Good enough? It was Good enough, but... good enough isn't Good Enough. The top flange fell short of the 3/4inch that I was looking for. And since it was, I now had the choice of making it with a thinner piece of metal. Searched for quite a bit and found a nice piece of .025 4130.
Laid the strips of masking tape down on the metal after cleaning it up. Figured out the set-back and bend allowance and got about drawing up the pattern on the metal. Rough-cut (yup! with tin snips) then took it to the bandsaw and cut just before the line... then filed and sanded to size. It's now ready to be bent to shape.
Side note: .032 4130 weighs 1.31 lbs/sq ft. .025 4130 weight 1.022 lbs/sq ft. A saving of .5 pounds. Not a lot... but it is a lot. Once I get it cut we'll see how it fits. If I went with .032 2024 T3 aluminum, which weighs .461/sq ft I would have saved an additional pound compared to the .025 4130.
And just an after thought... by looking at the side view of the tunnel on that last image, I think we can get the weight of the piece down to about 1 pound.
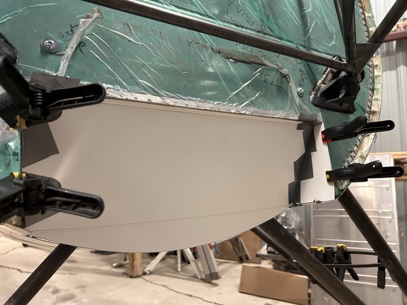
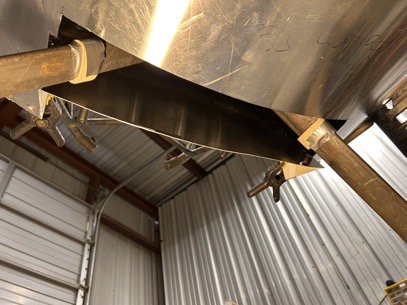
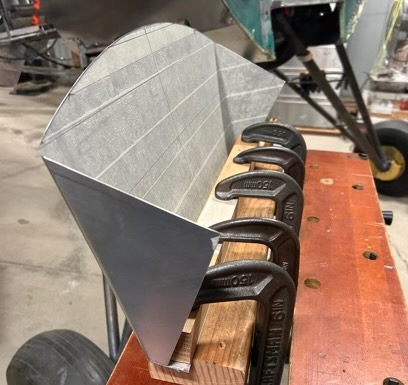
Making the air exhaust tunnel. .032 4130
Looking good... with masking tape still on it. :/
Needs trimming to fit curve of belly.
May 2, 2026
1/2 Pound
accept it...
Ahhhh... back to the airport. Bending this .025 is easy peasy. Apparently, TOO easy peasy. The bends looked beautiful... until I needed to trim them to size. No matter how careful I was with cutting with the tin snips... the edges on those bends were looking like potato chips. And lightly hammering them with the deadblow hammer didn't help smoothing them out. Maybe I could, and now thinking... I could make all the cuts to the line before bending without worrying that I didn't have enough meat on it to bend. The .025 is so bendable that it would have held its shape and I wouldn't have had to trim it to fit.
Maybe, just maybe I'll try that (maybe... if I decide to go and buy another piece of .025). But for now, I have a beautiful looking air exhaust tunnel. All I need to do is weld the corners (and I'm hunkering ro getting back to welding). :)
For now... I'll suck it up and take the little bit of extra weight for the fire protection.
Other than that... I started looking at the fuselage for things I needed to do... found the front stabilizer attachment and bolted that on so that I could slide the stabs onto the fuselage.
Need to go out and buy the wood for the 10' x 4' table to begin making the wings.
As soon as I can weld up that air exhaust tunnel I'll drill the holes for mounting it... And then I can hang that Jake.
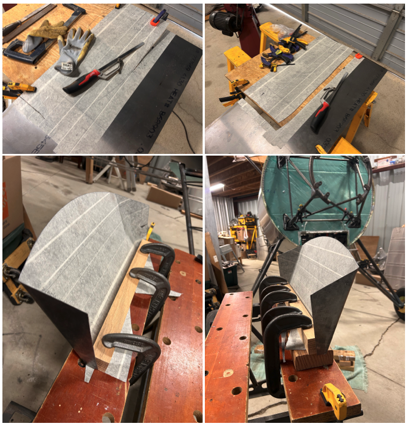
Yeah... .025 is easy to bend AND potato chip...
Ready to be drilled and attached
She is looking good!
May 9 and 16, 2026
1/2 Pound
TOO MUCH!!!
Flip flopping on this air exhaust tunnel...
Got back to the airport and picked up that beautiful air exhaust tunnel and... it weighs a lot. It really does. I thought, if I can find a piece of 2024T3 (cause it's one of the best known of the high strength aluminum alloys. nuff said) laying around and it's big enough, I'll re-make the re-make of the re-make. And if there wasn't a piece, fair enough, I'll keep the anchor-heavy tunnel and be happy with it.
Didn't have to search long when I found a brand new (I'm not sure how old it is.) piece of .040 2024T3 aluminum. Nice. NICE!
Spent the day laying out the pattern and cutting and bending this piece. And it looks NICE and it's light weight and it doesn't form into a potato chip when cutting it.
All of this was done on Saturday the 9th. Back to the airport on Saturday the 16th and trimmed the aluminum tunnel to fit the frame then took my time making a few small brackets. Check! check-check!
Wanted to rivet them on but looking at the placement of the anchor nuts on the frame around the air exhaust opening on the firewall that I will be attaching the tunnel to, if I rivet the brackets onto the air exhaust tunnel the holes I need to drill on the tunnel to attach to the frame on the firewall would destroy one or both rivets. no good
So... I'll bond/glue the brackets to the tunnel. T-33 isn't the glue of choice at all (the only stuff I have in the shop). Wanted to ask Scott, my next door hangar neighbor, or Larry... (2) doors down, but neither of them were at the airport (both are aluminum RV guys). So... I'll need to do a little research.
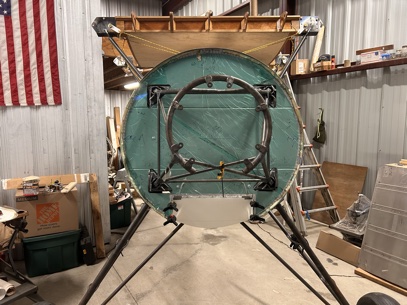
Had time to do some other things so I started attaching more parts on the airframe to get a better feel of where I am (and I am getting close) :)
Took a few minutes to climb up into the cockpit to give a good look-see.
Close to what? We'll see.
Air Exhaust Tunnel, final answer.
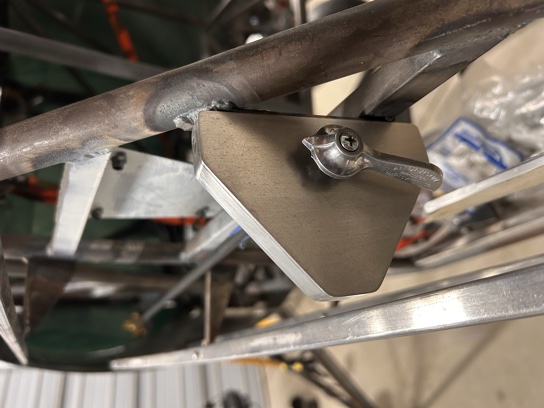
That's a bracket.
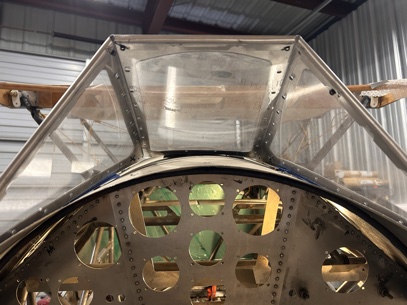
Just need to attach the windshield. Clean the glass. Add a few instruments...
May 23, 2026
I'M TIRED...
of posting the same thing!!!
Before I get started... HAPPY MEMORIAL DAY! Thank you to all those who have served and sacrificed everything to keep our Great country Free.
Thank goodness I persevered...
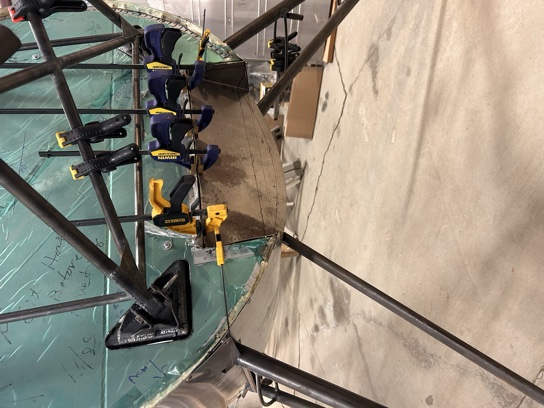
I think I'm close to match-drilling this air exhaust tunnel to the frame on the firewall.
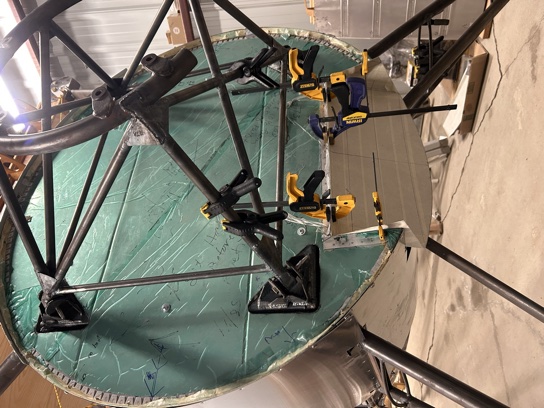
Today I JB Welded the corners on the aluminum air exhaust tunnel. Asked the guys on biplaneforum.com and got quite a few replies. One of the products cost an arm and a leg. I decided on the JB Weld. They use this shit on race cars (I'm thinking...). Anyways. One of the big deal-e-os for me was that it could withstand 550 degree. The more temps it can take, the better.
The stuff sets up real good in 4-6 hours and is like metal in 24-48 hours. Next... I'll un-clamp it, mix some additional JB Weld to fill in any gaps or on the back to make it look purty, wait another week and then sand and match-drill to the firewall. THEN I'm ready to hang that Jake in place!
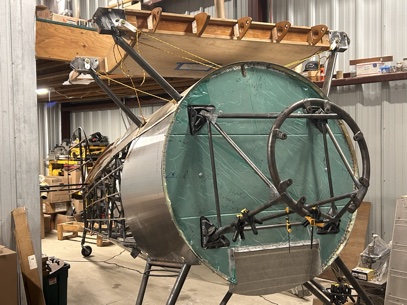
I'm at a weird spot/time with the build... standing back and looking at it, I've got a lot done. Big things to do... hang the engine, make the wings, cover and paint. YIKES!
I started this long-term project back in December of 1993. Thirty-three years ago. Half my life I've been involved or thinking about BIG ASS BIRD every day. That's a long time. Ahhhh... nostalgic. It's nice to think back about that every once in awhile.
Finished? Maybe in two more years... three at the most. (yeah right... I'm thinking if I can put more time on it).
Standing back looking at it there's quite a few things on my too-do list and nows as good a time as any time access what needs to be done. And here is the list I came up with:
- Finish welding hinges for rudder and stabs, and outside edges
of stabs.
- Balance elevators
- Make wings
- Make 4' x 10' table so I can make the wings
- Seat cushions (canvas - old school)
- Finish welding brackets for walking beam
- Buy Sheets of aluminum to make (hopefully) the final skins
Two plus one extra. 4' x 10' x .032
- Hang engine
Need sand bags to weight the back
- Make and attach covers for areas around engine mounts
on firewall
- Above covers... 4130 .040 or .032?
- Start figuring out where the holes need to goin the firewall
- Buy O/A and welding rods
- Work on UWCS
- Attach lower stiffners
- Attach leading edge ply
- Figure out all hardware and make Excel Sheet
- Figure out steps up to the cockpit
Look at Wacos, Stearmans, etc for ideas
- Sliding canopy?
- Buy instruments
- Figure out radio antenna
- Buy starter
- ELT backet
- Electrical
- Plumbing for fuel lines
- Fiberglas cowling?
- Covers for openings in belly
Uh... yeah :/ I still have a list of things to do (and this is the major stuff)
Kinda sorta the area for the built-in step? Waco-style?
Waco step.
And as always. See ya... next week.
May 30, 2026
I'M STILL TIRED...
of posting the same thing!!!
Opened the door of the hangar and ready to get to work... ya know, a little JB Weld 'filler' to smooth out the corners, then next week finish filing and sanding and then match-drill to the frame, right?
NOT!
Un-clamped the air exhaust tunnel... looking mighty fine. Started filing the corners to smooth it out before sanding and POP! (it DIDN'T actually make that sound) and DAMN! (I ACTUALLY made that sound). One side of the corner cover came completely off like nothing was holding it. Same with the other side DAMN!
Thought for a few minutes and made a few marks to see where the holes for attaching to the frame in the firewall would land on those corners and if I could find a few good places to attach rivets in for holding the corners... and... NOPE, ain't, AIN'T gonna work. On the spot made the decision to go back to the beautiful 4130 air exhaust tunnel I had just made and weld the corners for a nice clean finish.
NOW we're 'cooking with gas'!
Made a jig to hold the corners at the correct angles when welding. Now all I need to do is fill up those tanks (getting excited to start welding again!)
Air Exhaust Tunnel weld jig
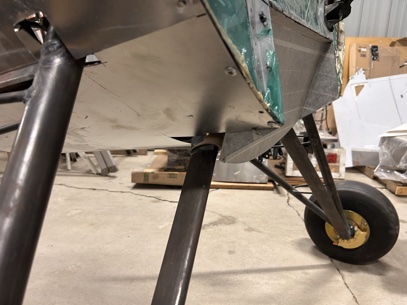
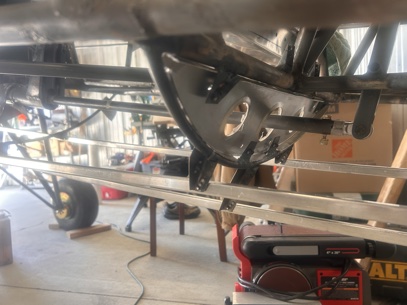
Looked at the firewall and figured I'd trim the top corners off of the air exhaust tunnel frame (alluding to Tony B's theory of excess weight - instead of leaving it square, if serving no purpose, cut the angle and save the weight). Took off the engine mount in order to accomplish that task.
Figured, since I have the engine mount off I can now work out the pattern for the covers around the holes where the engine mount goes through the firewall and attaches to the fuselage. Kinda sorta have that all worked out (roughly) and now just need to finish the pattern at home and decide on what to make them out of; firewall material or thin 4130 (4130 is easier to work with; cutting and drilling).
And in between all of this my hangar neighbor two doors down knocked on the door to see how far I had progressed... Nice talking with you Larry!
Corner clipped.
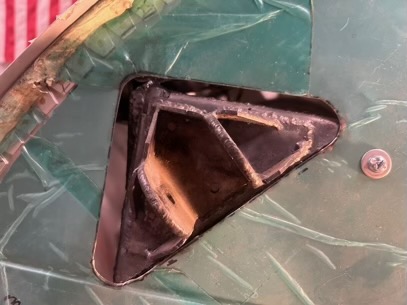
Hole in firewall (obvious)
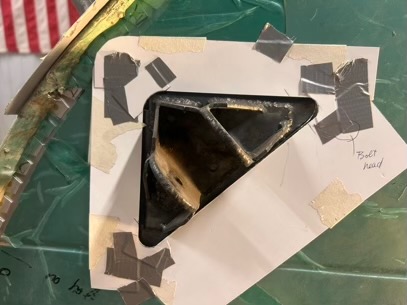
Cover pattern
June 6, 7, 13, 14, 20, 2026
From DAMN!...
To YEA!!!
I'm just going to admit this right up front.
I failed miserably! I haven't updated the BLOG each week that I've put hours on it recently. Recently as since June 6th. I've put 25.7hrs on it since that time and a lot has happened with the build.
Okay... to bring ya up to speed. Spent hours on the design of the firewall opening covers. My big issue with that was, not the designing of it... it was trying to get it to fit on one sheet of paper when printing. Fight as I did... it never did print on one piece, even though it was just small enough to (probably something with the margins was messing things up for me)
Got everything printed out and when testing the paper pattern on the actual openings I was about 3/16inch too wide on all of the three inside sides. Knew it was going to need adjusting but I printed out the patterns as if I wasn't going to need to adjust... wishful thinking? Went home and made the adjustments to the pattern and spent another 2 hours fighting with the printing of the pattern to fit onto one piece of paper AGAIN!
I'll never learn...
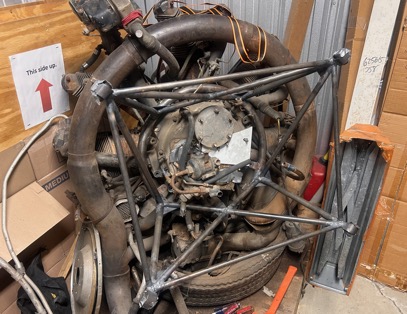
Back out to visit with BIG ASS BIRD the following weekend. Saturday I knocked out two of the patterns. Also had time to see how the engine mount fit up with the engine.
The mount I made followed what UC-78's design. And as such most the accessories had to be taken off of the back in order for me to get the ring up against the engine. With a lot of wrenching I was finally able to start bolting the ring to the back of the engine.
No Joy! Holes on the starboard side, plus the top two holes fit up to the engine. The three lugs on the port side... were off anywhere from 1/8th of a hole to 1/2 of a hole. No Joy! DAMN! Excuse my French, but WTF??? I guess that 1/2inch piece of plywood actually didn't keep things aligned as well as I thought they would! WTF???
I learned from the landing gear, and other re-dos. Don't use the existing part for a re-do. Just start again... 'cause the re-do with the existing part won't do. Or, at least I've never been happy with it. My problem now is... where the heck do I get a new engine right to re-make this engine mount. And if I can't find one... the process of making sure that this ring is heated and moved back into place as per the original ring. Or at least I think to the orignal. I never did try the original ring on the back of the engine before welding. I assumed it was good but I could have been wrong.
Side note: Why would one side or the other be off centered when the other side didn't move. Which has me scratching my head about whether or not it was mountable when I got it. But... I'm not spending much time on thinking about that because it doesn't do anything for my current situation. I can spend hours days weeks months debating over that or just move forward. And, we're moving forward.
When I originally tracked down the first USC-78 Jacob 755 engine ring I did a search on the UC-78 restores website. Got a few names. But before reaching out to anyone I was speaking with Lance Whitey aka Whitey, that owned the small grass strip I was keeping my engine at. One of the guys he knows up in north New Jersey rebuilt a UC-78. He gave my his name and address. Called Bob... and he had a few of them and he'd sell me one. Said $100.00. I said, Great, when can I come by and pick one up. The following week I was up there. With the exchange of $40.00, not $100.00, I walked out of the hangar with a brand new 75 year old 755 engine ring.
Long story made longer... did a search for Bob and saw that he passed in 2019. (Godspeed, Bob). Looked at one of the other names and did a search. That gentleman passed in January of 2025. And then the third an final name I had was actually a LinkedIn contact that I had connected with prior to me even looking for an engine ring for the Jake. Sent him an InMail on Linked. Haven't heard back.
DAMN! Decided to post my need on the Biplane Forum. Crickets... two days and nothing. THEN, this morning I get an email saying that I got a DM on the forum. One of the guys in his past life rebuilt a UC-78 and was active in the community for a long time... among a lot of other aviation related fun stuff. I has one or two spare rings and then suggested instead of using a battle-worn engine ring from the 40's the guy he had zero time his engines might be making them now. I'm thinking... I'd rather have one of those rings with some history with it. I responded with thanks! If you're willing to sell one of them I'd love to buy one.
Long story short... he's packing up three 755 Jacob rings all for the price of one. YES!
That's the bulk of my story from the past three weeks. F'd up engine mount to three 'new' engine rings.
The thing is... even if the ring didn't move from the welding... I would have had to make major modifications to it because of the clearance problem with the one I made and the accessories on the back of the Jake. Oh... and the lower bolts on each side would be impossible to insert into the engine ring itself... the lower cross tubes are much too close. I'll now start from scratch and make sure that what is made will allow me to attach the engine with all accessories attached. I'll be using the design of the Pitts 12 for this engine mount.
And by the way... I confirmed the length, and found the rod end bearings for the final push rod tube. Now all I need to do is find that center jig I packed away...
June 27, 28 thru July 4, 5, 11, 12 2026
I'm all over the place...
these past few weeks.
So the earlier 'yeah' turned out to be that the newest ring that was just sent to me is missing a lug. Not only that, but two of the hole don't line up with the back of the case either. Chalk it up for a DAMN!
Thought I could use it to make a jig with the correct location for the holes but forget about it. Back to the original ring on the original mount I made... So I triple-checked the ring on my existing mount against the geometry of the holes in the back of the case and... DAMN! Re-checked-checked the engine ring against the holes in the case and double-DAMN! Two or three of the holes on the Port side are STILL not lining up. My take is that when welding up the mount the 1/2inch plywood jig did not hold things in position and the lower port-side of the ring got bent out of shape (not pissed-off but the geometry of the piece moved. ha ha)
And to add insult to injury, the bolts for the bottom holes on both the starboard and port side could not even be inserted into the lugs because the bottom horizontal diagonal tubes were in the way. Not only did the ring get 'twisted' but the UC-78 engine mount design does not work with my set-up.
And it's worth mentioning again... the last time something this big of a boo-boo happened it pretty much shut me down for a year. This time... I got pissed off about it for about 10 minutes. Re-grouped. Decided I needed to make a new one.
- Cut the ring off of the existing mount.
- Heat and bring back the ring to its orginal geometry
- Start cutting tubing for new mount and then weld
- Back to moving forward with hanging the engine
Learned my lesson the last time about allowing this to completely stop the build. Allow yourself some time to get a little angry about it. Push that aside and start planning on the new piece you need to make to replace that old piece. And I've also learned that it's much easier and quicker to just start over again instead of trying to salvage the existing 'bad' piece.
Found the hand-held cut-off tool and started cutting off tubing. When I cut the fifth or sixth tube from the ring it made this 'boing!' sound and jumped. Yup... when welding up the tubing it cooled into a stressed state and pulled the ring out of shape. Once I had all the tubes cut off I tried it up against the case again and only the very bottom hole on the port side is slightly off. I'll heat that up and pull it back out into shape.
Cut the remaining tubing off the ground down the welds and sanded smooth...
Spent July 3rd figuring out how to make the new engine mount (aka, where can I find a radial engine mount design that will fit my project) and the length of it. Since I'm making this new mount I'm not relying on what someone else said, I'll put in the effort and figure it out myself.
Long story short... I'll be using the Pitts 12 design for the new mount. There are no horizontal cross tubes in the design. The tubing is also much stouter... instead of a combination of 5/8inch and 3/4inch .035 tubing, it's a combination of 7/8inch and 1.0inch .049. with .050 gussets.
I need to order the tubing but... just as importantly, I need to exchange the tanks for the O/A. Airgas is up in Fort Collins... I actually had a meeting with the airport about flying the closed runway on Monday, July 6th so I headed up to Airgas. No need to drive up to Fort Collins during the week to get a set of full tanks. Not that it would have been a waste because if I was up there to pick up the tanks I would have spent 1/2 a day working on the biplane. ha!
What tubing I did have for the mount... I started cutting and squaring up the tubes. Squaring up because these are the larger tubes that hold the four rubber mounts. I had plenty of the 1 1/8inch tubing left over from the last time I bought one foot of it.
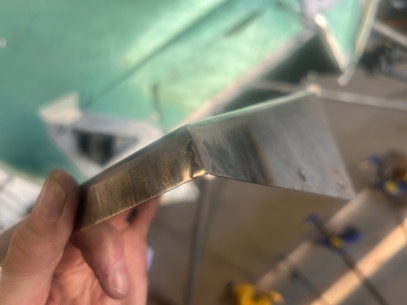
AND, now that I have the filled A/O tanks I can weld up the air exhaust tunnel. Did a practice weld with .025 flat 4130 that was about eight inches long. Looked like a potatoe chip but the weld was good. Over to burning some wood while welding the corners of the exhaust tunnel. Turned out looking nice... the jig held this in place perfectly.
Once cooled I was able to match-drill it to the anchor nuts that are riveted in the frame on the firewall.
I've got to do a better job of making posts every week... Looking back on the past three week, I've pretty much re-written 'War and Peace'.
Closing thoughts: The engine mount is a fairly large project to undertake. I assumed that the guy who told me the length calculated it correctly. Since I am re-making the engine mount I decided to look into this to confirm the length. I was told 16.5inches from center tube at the firewall to the center of the ring tube. He sold the project before doing the weight and balance on it, let alone getting it flying.
So, I took a look at Micky's radial Skybolt's weight and blance, the guy from Hungary, who completed and has flown his many hours. The length of his engine mount is 20.5' with a 481 lb engine (not including his metal prop). For shits and giggle... I did a calculation using his engine weight on one side of the blance point and a 25 lb weight on the other side of the balance point. The 25 lbs would need to be 394.42inches from the balance point to blance 481 lbs that sat at 20.5inches on the other side of the balance point. Taking the same 25 lb weight at the same 394.42inches from the balance point, a 505 lb weight would need to be 19.5inches on the other side of the balance point. That's a pretty big difference from the 16.5inches that I was given.
oh... and somewhere amongst all of this I cut the tubing and match-drilled the holes for the bearings on the final push rod that connects the control stick to the horizontal stabs.
Cleaned up engine ring.
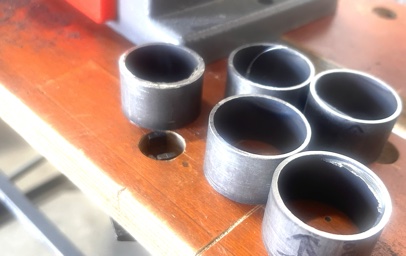
Cups for rubber engine mounts.
Final push rod for the connection for horizontal stabs.
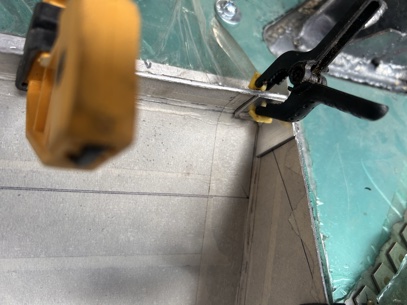
CU of one of the welded air exhaust tunnel corners.