Mantua, New Jersey
Original Site:
September 2004
E-mail: usav8or@yahoo.com
Still a Radical Radial Fuselage.
October 4, 2011 Thoughts and...
feelings.
Out to the garage workshop to get things leveled up to get things going... again.
I went out to the garage with a feel for what I was going to do instead of a plan. Worked for Charlie Manuel tonight with the win against the Cardinals (win two out of the first three played in the NLDSeries... baby !!!) Working for Charlie and working for me... baseball and biplanes aren't alike in this case. My feeling ended up with a plan.
After messing with trying what I was "feeling" at the moment I started thinking... and in thinking realized what I was feeling wasn't the plan that I should have for leveling the tubing that was going to hold my axles in their critical position. (yeah... try following that thought, eh ?)
Ended up with the plan to make a jig for holding both at the same height (yeah... duh!) By the time that my feeling turned into a plan it was past 11PM. I'll pull out the table saw tomorrow to cut the jigs... after drilling it and screwing them together... my plan will start to take shape.
Sometimes you just have to be happy with discovering the obvious...
October 5, 2011 Time spent on anything...
is important.
Spent some time tonight making a few VERY simple jigs to measure the distance between the attach points and the axles for the Main Landing Gear.
More of that... running up and down the stairs from the garage workshop to the basement workshop. (yeah me voicing the fact that I fight more with my work environment sometimes that figuring out how something needs to be done)
These placement holders (jigs) don't look like much, but... they don't need to. The fact that I'm taking time to make these so that the gear will be level/square... speak clearly of the importance of taking your time building anything on/for the biplane. (DID YOU HEAR THAT???) Me taking my time building these simple jigs... speak clearly of the importance of taking your time building anything on/for the biplane.
Not sure if that was me on my soap box, or me reminding myself of some of the basics of buidling. Anywho... the glue will be dried by tomorrow and the location of the axles will be measured, the axles set and locked into place.
October 20, 2011 Everything looks good to go...
except my measurements.
Out to work on the biplane... at least get it all leveled and ready for me to start notching and fitting Main Landing Gear tubing.
Took the time to make sure that wood leveling jigs were made correctly. Fitted them under the "jig" tube that is sitting in the Main Landing Gear jig (the one that holds the tube that holds the axles)... only to find out that I had welded them into place when making the first set of landing gear.
After making the above discovery I made sure that the tube holding the axles was level, and it was. For shits and giggles I took measurements from the front gear attach points to the axle jig tube. Another come to find out... this time not liking what I found. The right gear side is about .250" higher than the left gear side. I've got to get a better read on it... step back for a day and take a better measurement of it. It just doesn't make any sense.
I spanned the two front attach points and they are level. As mentioned above, the tube jig for the axles is level. Can't figure out why they are off ? Gotta be me!
October 24, 2011 Good to Go !!!
Out to look at, figure out, the leveling of the Main Landing Gear axle jig. After measuring and re-measuring and and and and... for close to an hour... I figured out what the issue was. It was me.
It's level now. Was level before. And let's just leave it at that. Let's put it this way... if you were to set a ball on the floor of what I thought was the higher measurement side it would roll toward what I thought was the lower measurement side.
October 27, 2011 Slooooow going...
Centered the tube for Main Landing Gear axle jig. Yeah... that's it tonight. Needed to drop lines to confirm the axles are equidistant from the tailpost. Need to roll the Harley out and move a few large sheets of MDF. A little bit more than raining out tonight. Hope to do it tomorrow. Then... it's on to start the notching and fitting of the tubes.
November 6, 2011 I'm done with it...
Finally... the front axle support jig is ready. Dropped a few plumb bobs from the axle support jig and took measurements from the tailpost to make sure they were squared up. Actually... did it twice. Don't ask me why.
Tomorrow (and I use that word loosely... probably going over Whitey's (not the Whitey from the airport) place for the Monday night game) I'll start notching the gear. Oh wait... still need to cut the two bushings for the front attach points. Anywho... I'm done leveling and squaring the biplane for now.
November 12, 2011 Main Gear... T
minus 49 days
Out to the workshop... after consulting with the blue prints I got started. Needed to cut the front two bushings so that I can get started on the Main Landing Gear.
Tomorrow I'll cut and fit the cross tube and then I'm off and running. It just may be on it's gear by the end of the year. Mission Director reports biplane is go...
November 13, 2011 On a roll... Get it?
Main Landing Gear... ah never mind.
I hate to put this in writing, but it looks like work on the biplane is becoming a habit again. Refreshing to say the least.
Back out there to re-confirm (for the umpteenth time) that the axle jig is centered and level. After taking time to confirm that I measured for the placement of the axles and then locked them into place. Measured and marked 10 1/2 inches on the axles so that I can get to cutting and fitting during the next work session.
Note: I'm making the length of the axles 10 1/2 inches per the Skybolt Builder's Manual. This makes for easier welding and gives you a jack point if ever needed.
November 15, 2011 Hammering away...
and hammering and hammering...
Tonight...
Pulled two pieces of 4130 tubing out of the box (the same box that it was shipped to me sometime back in August). It's the 1.5" x .o95 tubing we're talking about here. It's the forward-inside tubing on both of the Main Landing Gear legs.
Tonight's objective... to notch the tubing and "flatten" them out to streamline them into the front bushings. Notched the first one and started hammering away on it... and hammering... and hammering... and hammering, with one of my dead blow hammers. It appears that five minutes of hammering produces no flattening results. Guess I heated them up the last time and THEN hammered them to a more streamline shape.
Decided to notch the other tube and I'll fire up the welding gear tomorrow. Spent and hours worth of time on thirty minutes of real work.
November 18, 2011 Something more than just hammering...
Dust flies as I pick up the O/A torch to fire it up to make forming the ends of the .o95 tubing, for the Main Landing Gear, a lot easier. No heat ? what was I thinking ?
Not much to write about other than a lot of heating and hammering, heating and hammering, heating and hammering...
November 19, 2011 Hey, it's good to be workin' in the shop again...
Sometimes this biplane feels like a long lost friend...
Looked at the "steamlining" I did yesterday and... none too happy with the look of it. Reflected back on what I did yesterday and made a few changes to my technique.
Yesterday I started off by heating up both sides and about three inches of tubing (coming in from the side I was heating). Looking at the piece I did yesterday, it was flattened out that entire three inches, which... wasn't necessary, and as a matter of fact gave me more room to screw things up.
Today... I heated up one side and only about 1" of the tip. Got it RED HOT ! and started to hammer on it... Got it RED HOT ! and hammered some more on it... etc etc. Flipped the tube to the other side and repeated repeated repeated. Reminded me of the job I did the first go-round on the landing gear; nice.
With so much success in my feathering/streamlining today, I did the other end of the other .o95 4130 tube. I had plenty of length to it so no worries about not having enough to notch it into the axle.
With the front tubes notched and feathered I marked the axles for the brake backing plates and various other needed measurements. Yeah, I'm ready to start notching the front tubes to the axles, baby !
Hey, it's good to be workin' in the shop again, you know it is...
Sometimes this biplane feels like a long lost friend...
Hey, it's good to be workin' in the shop again.
I said, hey, it's good to be workin' in the shop again...
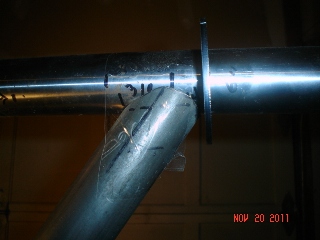
November 20, 2011 Dental caps... aircraft tubing...
it's all about making them fit
4:30PM: Out to the workshop early today (ahhh... well, when you compare it to the last few months...) My plan is to notch and fit the first of two .o95 pieces of 4130 tubing to the front axles.
Made sure that the notch to the front bushing was nice and tight then I placed it in the front fitting and made a few rough marks for the notching at the axle end of the tube. Took the chop saw to get rid of about 6 inches off the end and started the notching, trimming, fitting... notching, triming, fitting... notching, triming, fitting... (you get the idea)
One point seven hours later and I have my first tube fitted. All this notching and fitting reminds me of going to the dentist and getting a cap. Looking for the high spots the dentist would put a piece of purple paper in your mouth and have you grind it between the new cap and the opposing tooth. Where marks were left on the cap, he'd know to grind that area down until there was a nice fit.
Need something like that for easy fine tune fitting of tubes. Can't see that being a big seller... so you're on your own there. Just a thought... maybe it will make this tube fitting a little bit easier for you.
Anywho... I'm on my way to getting the Main Landing Gear completed. I have about seven days between now and the end of the year that I'll be taking off (use it or lose it deal-e-os). That should put me in position to getting them finished and ready for welding by years end. Still on target !
November 26, 2011 Flip... repeat...
The second tube on the landing gear (meaning the reverse side) is always much easier. Make a pattern of the first, take a measurement of how long the tube needs to be, trace and grind. Grind, grind, grind, grind, grind....
After grinding for about an hour I fitted the one end into the bushing and WAA-freakin-LAA... put the other end of the tube up to the axle and it was so close I didn't even need to make any grinding-adjustments. Piece-O-Cake... he says (ain't always the case.)
November 28, 2011 Enjoying the time...
I enjoyed working on the biplane tonight. That's all I got out of tonight's work session... I really enjoy spending time working on building this biplane. Tonight... just a lot of grinding / fitting / grinding / fitting / grinding / fitting...
All that grinding and fitting was work on fitting up the cross tube between the right and left Main Gear. Nibbling a little away at a time to make sure that I don't waste a length of tube. Still a little bit of nibbling to do next session.
December
3, 2011 Taking...
small
bites.
Contined work on the Main Landing Gear. Moving right along.
Started
off the work session by completing the notching of the cross
tube(s) (ya know... the ones that hits the bottom of the fuselage).
Didn't take much time. It was just a matter of some notching
and fitting.
With that completed I moved on to the first of two streamline
tubes to be notched and fitted for the main gear. Got three
quarters of the way through with notching them and then broke
for the evening. Two point six hours flew by today and I hope
to get back out there tomorrow to put in another two hours.
Not much to say about making the Main Landing Gear at this
point... I said it all before the first time I made these.
The one thing that is worth repeating... for the first of
the two idendical tube that you are nothcing and fitting...
cut long and nibble at it... just nibble at it. It takes quite
a bit longer doing it this way but you're sure to have a piece
you can use on the biplane. No sense in rushing into it and
either cutting it too short with the first cut or too short
by grinding TOO much off the end of it. This streamline tube
is EXPENSIVE !
December
4, 2011 Four down... three to go.
Finished notching and fitting the first streamline tube for
the main gear (actually have a little finish trimming to do on it). As before... just nibbling at it a little at
a time. For streamline tube number two I'll make a pattern
from this first one and mark the second one. Should easily
take one hour off the trimming and fitting.
Three tubes remaining on the main landing gear; another streamline and the two that go to the back fittings/bushings.
Getting close to 1900 hours on this puppy. Let's seeeeee...
that'll put me at 77% of the way to achiving my original goal
of having it completed in 2500 hours. hmmmmm... I'm not thinking
it's going to be completed in 2500 hours. I'm thinking...
we'll, I'm not going to think about that any more at the moment.
I'm just enjoying the time being put back on the build.


 Made sure that the notch to the front bushing was nice and tight then I placed it in the front fitting and made a few rough marks for the notching at the axle end of the tube. Took the chop saw to get rid of about 6 inches off the end and started the notching, trimming, fitting... notching, triming, fitting... notching, triming, fitting... (you get the idea)
 Started
off the work session by completing the notching of the cross
tube(s) (ya know... the ones that hits the bottom of the fuselage).
Didn't take much time. It was just a matter of some notching
and fitting.
Started
off the work session by completing the notching of the cross
tube(s) (ya know... the ones that hits the bottom of the fuselage).
Didn't take much time. It was just a matter of some notching
and fitting.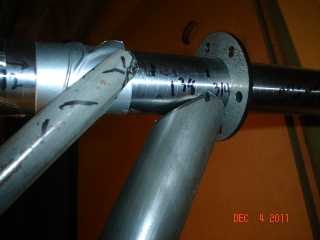 Finished notching and fitting the first streamline tube for
the main gear (actually have a little finish trimming to do on it). As before... just nibbling at it a little at
a time. For streamline tube number two I'll make a pattern
from this first one and mark the second one. Should easily
take one hour off the trimming and fitting.
Finished notching and fitting the first streamline tube for
the main gear (actually have a little finish trimming to do on it). As before... just nibbling at it a little at
a time. For streamline tube number two I'll make a pattern
from this first one and mark the second one. Should easily
take one hour off the trimming and fitting.