Mantua, New Jersey
Original Site:
September 2004
E-mail: usav8or@yahoo.com
The Radical Radial Fuselage.
December 6, 2011 There's always time...
to sleep... or whatever else you do
when you're not working on the plane.
It's the holidays and there is plenty to do... that is, plenty to do above and beyond working on the biplane.
Don't let it sit idle... It's too easy to let a day turn into a week turns into months turn into years...
Set aside 15 minutes... that's all you need to do. That 15 minutes will turn into an hour... hour and a half. You'll be racking up hours on the build while only scheduling minutes. Beautiful !!! Believe me, once you get out there the time will fly.
Enough rah rah rah shish boom bah !!! Out to the garage workshop to work on the biplane for a few minutes (which incidently turned out to be one point four hours). Planned on notching the one end of the second streamline tube and did. Nothing to write home about here. Made a pattern from the first streamline tube that I cut, cut the tube a little extra long, marked the pattern on the one end and started notching away.
A lot of notching and fitting... I'm real close to having a nice fit. Still need to notch the other end and then do a little tweaking of the cuts on both ends. 'nuff said.
December 8, 2011 Kinda like a Seinfeld episode..
a lot about nothing.
It's getting kinda boring... all this writing about nothing.
Don't get me wrong, I'm enjoying the hell out of the build... even if it's the second time round for the landing gear. Other than a lot of notching and fitting, repeat, repeat, repeat... Two more tubes to notch and fit up.
I'm getting close to moving on to a new part of the build... I'm looking forward to something new.
December 11, 2011 Location...
location....
location.
Nope, not moving.
When building the gear, or anything for that matter, a second time, some things come down to locating things again. And, tonight it was one of those nights.
Needed to locate the angle of the cut for the back fitting and the templates for making the boxed in back fittings. Oh yeah, needed to locate an extention cord for all the cutting.
Looked back on my blog and found the degree the cuts needed to be (didn't take much time at all finding it.) Remembered where I had placed those templates from ohhhh so many years ago (way too long ago). The extention cord was another thing... took me some time to figure that one out.
Thought I had an extra extention cord laying around (actually, I know I have another two... somewhere) but couldn't find it. Ended up unplugging the outside lights for a bit so that I could make the cuts. (duhhhhhh)
Made a new jig for holding the tubes at the correct 53.5 degree angle and made the first cut. Held it up to the back bushing for a look see and (drum roll please) it wasn't at the correct angle. It turns out to be the first measure that I had made my first time (if you follow that). For ME it's a 58 degree angle (for this gear.) How I came about at this angle is by sleeving a tube inside another tube, held it up to the correct location on the axle and held it at the correct point on the back bushing. And WAAA LAAA... 58 degrees. thankyouverymuch
Spent about 2 hours running around for about 45 minutes worth of work. Enough for tonight... I hear the coffee pot calling me. I'll start notching those tubes tomorrow.
December 13, 2011 Tonight I was getting ready...
to work on it tomorrow.
Set out to get the metal pieces (front and back) on the back fittings drawn and cut... ready to be used when needed.
It's 10:49PM and I'm just finishing my hide-and-seek game of finding three of the blue prints (which aren't the same size as the other eleven - from the original Standard blue prints). I wanted to see what they had to say about these "boxes" that need to be built. Those three were the full size ribs for the wings so I found nuthin' on those "box" fittings.
Didn't think there was, but needed to "confirm" it. Another reason why donating the money and getting the Skybolt Builder's Manual (from www.biplaneforum.com) is a good idea. They show you step-by-step (with photos even) of what to do and how to do it. These types of things are left off of most older plans. It's a part of the experience. Ya needed to talk those things out with the guys that have been there before you; the EAA experience.
With confirmation of this information not on the plans, after finding the plans, I needed to go and check to see if I had any .o65 (nowadays .o63) 4130 flat stock so that I could trace and cut those four pieces. Located the stock in the place that I have all my 4130 flat stock. Plenty for the four pieces... lacking for when I need to make those straps for all the main gear fittings (on my list to order tomorrow).
All-in-All a bad night for progress, but looks like it needed to be done so that I can make forward progress. Next time I'll be cutting those pieces for the "box" fittings (after putting on the new bandsaw blade) and start notching the first of the last two tubes.
With these minor set-backs I'm still on schedule to have the main gear ready for welding by years end.
December 14, 2011 Today, was tomorrow..
so I must be working on the biplane ? no ?
Back to making pieces again. Seems to be a lot of pieces when making a biplane from scratch.
Even more... when you do things twice.
Down to the basement workshop. First thing I need to do is replace the blade on the bandsaw. A lot of screws to take off to get at the blade. Once I get at the guts of it, it's a pretty easy task to make the change.
Traced the patterns for the four pieces that make up the "boxes" on the rear tubes for the main landing gear; two of each. Rough cut, grind, file and sand... They still need to be sanded a bit more... but for the most part, these puppies are finished. Back to the garage workshop tomorrow to notch the remaining two tubes. YEAH BABY !!!
December 16, 2011 Exotic cars..
and building biplanes...
Fine tuning... tweaking... whatever you want to call it, both exotic cars and biplane need it done to them. I'm not even talking about the finesse needed when starting that radial engine, I'm talkin' 'bout building it still.
Had the day off:
Out to the garage again to work on the biplane. I need to cut the bushing for the back landing gear fitting. Okay... that's a given (but, I actually walked out there thinking I'm going to get right into notching that back tube.)
Bushing cut to size and reamed... now to start notching and fitting the back tube, right ? wrong ! The front tube needed to be notched back a bit more so that there would be plenty of clearance between it and the brake backing plate for welding. I'm giving it 1/2" clearance... so, I needed to notch it back 1/2" (it was right on the six inch mark, where the plate is to be welded.)
Spent the better part of an hour getting that to where I was happy with it; that fine tuning I was speaking about earlier. The rest of the time I spent s-l-o-o-o-l-y notching the back tube; more of that fine tuning I was talking about.
After about an hour of notching... I'm still working at it. Tomorrow I'll finish notching it. With that first one completed, I'll have the pattern for the other side which, as we all know, will go much quicker.
Looking at the hours, I'm three quarters of the way to 2500 hours. And that's absolutly correct !... three quarters of the way to 2500 hours. By my calculations, I'm not 3/4's of the way to having her built. I'd say she'll be flying at 2900 - 3000 hours.
Two more years of fine tuning ? ...hopefully sooner.
December 19, 2011 I shudder at the thought !!!
More nipping away at this same back tube... the first of two for the main landing gear. (yeah i know... get down with it already)
I thought about it a few times... how nice it would be to just take a BIG bite out of this tube and get it done a little bit quicker than what it's taking... Actually, I've thought about it more than a few times. but... Out of my thoughts as soon as it appears. Disaster happens more than not with a situation like that. And... I'm enjoying the build. Why hurry it.
All this talk about getting it done a little quicker also applies to trying to make a piece that has been made... and is unuseable... and then trying to make it useable. I personally haven't had ANY success with this one either. My quote of "Good enough... isn't Good enough" resonates each time I come close to thinking of doing it.
December 23, 2011 Me and my friend...
Rainer Maria Rilke
I'm finished !
Not finished with the build, or even the 2nd set of gear (ya didn't know I was makin' a four wheeler did yas ???). Nope, none of those... but I have finished notching and fitting ALL the tubes for the main landing gear.
I kinda remember being in this very same spot... some years ago. Only this time, I'm a little bit wiser. Yeah, that was my plan all along... yeah, yeah. Make the gear twice. Yeah, right...
What learning would there have been ?, what joy would there have been ?, what ? what ? what ? if I had made this set of legs without any of these challenges ? ohhh... There was plenty the first time. And I got to experience it a second time 'round. And yes, I did learn from the first; ways of doing things that helped with the process the second time 'round.
Ever continue down a path, knowing that it probably isn't a good idea, but you continue on anyway ? Well, this wasn't one of those times (I've had plenty of those "moments" though).
Looking back over the build of the gear... a mirror image of the build of this Big Ol' Radial Biplane... a practice in determination. ahhhh... some times days/weeks/months go by. I didn't give up (and I won't)... there is as much a mental challenge at work here as there is the many skills involved. I might have posted this poem elsewhere, but it applies here too.
"What I Want"
by Rainer Maria Rilke
You see, I want a lot.
Maybe I want it all;
the darkness of each endless fall,
the shimmering light of each ascent.
December 28, 2011 Some things...
never change.
Still making pieces.
I thought I was done with making... pieces...
I can remember the last time I made the landing gear, it seemed like for....ever to get to the point of actually cutting and notching the tubes for the gear. And, so it is with getting on with welding them (must have been like this last time too, hence the comment "Some things never change")
Before welding I needed to make the straps for each of the gear's joints (all the places that one tube meets another tube). Took a few minutes to make the patterns (one 1 1/8" x 7" and one 1 1/2" x 6"), traced six of the 1 1/2" and two of the 1 1/8" on a piece of .o65 4130 sheet and started cutting away. The final step was to grind them down to size. Oh yeah, cleaned up the front and back with some 180 grit sandpaper.
These puppies are now ready for welding !!! At least I think they are.
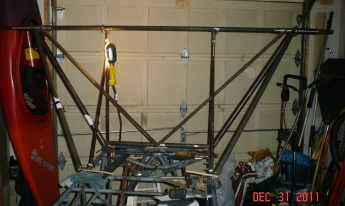
December 31, 2011 Out with the old..
in with the new landing gear.
Spent today working at fitting up the four small pieces that make up the sides of the "box" for the back fittings on the gear. Yeah.. two point three hours of running up and down the steps between the two workshops. As you can see from my previous post, I didn't think I'd be doing this. (that's what happens when you take the pattern for the shorter Standard Skybolt gear and use it for the gear that is again 1/2 as large). Reflecting back on the last time I did the gear... I kind of remember having to modify the parts just as much.
I'll take another look at them tomorrow to see if they are as close fitting as I'd like them to be. If not, I'll use these as templates that I'll modify with paper on the ends. It'll give me a very tight fit and won't take long at all since the "pattern" will be dead on. (at least I'm saying this now)
A lot of stuff runs through my head as I'm building each piece. As a first time builder thoughts run... am I doing this right ? are the joints tight enough ? Having limited space for working thoughts... why the hell can't I have everything in one large workshop ? I hope I don't take too much off of this piece 'cause I'll have to start from scratch if I do. General thoughts... wasabi peas... genius ! Do I have enough beer in the fridge to last the weekend ?
Over the past year I've been a little lacking in putting the "me" in my writings. So... 2012 its back to the "old" me for writing.


 I kinda remember being in this very same spot... some years ago. Only this time, I'm a little bit wiser. Yeah, that was my plan all along... yeah, yeah. Make the gear twice. Yeah, right...
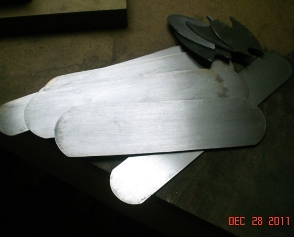 I can remember the last time I made the landing gear, it seemed like for....ever to get to the point of actually cutting and notching the tubes for the gear. And, so it is with getting on with welding them (must have been like this last time too, hence the comment "Some things never change")